
Owner Manual
Page 10
... Important Safety Instructions 2 Precautions 3 Speaker Precautions 4 Package Contents 5 AV Receiver HT-R667 5 Speaker Package HTP-750X 5 Dock for iPod DS-A1L 6 Using Two Sets of Speakers 7 Speaker Sets A and B 7 Sub Room (speaker set B 7 Main Room (speaker set A 7 Features 8 Speaker Package HTP-750X 8 Dock DS-A1L 8 Getting to... CDR, MiniDisc, or DAT Recorder 39 Connecting Onkyo Components 40 Connecting the Power Cord 40 Turning On the AV Receiver 41 Turning On and Standby 41 First Time Setup 42 Automatic Speaker Setup 42 HDMI Input Setup 46 Component Video Input Setup 47 ...
... Important Safety Instructions 2 Precautions 3 Speaker Precautions 4 Package Contents 5 AV Receiver HT-R667 5 Speaker Package HTP-750X 5 Dock for iPod DS-A1L 6 Using Two Sets of Speakers 7 Speaker Sets A and B 7 Sub Room (speaker set B 7 Main Room (speaker set A 7 Features 8 Speaker Package HTP-750X 8 Dock DS-A1L 8 Getting to... CDR, MiniDisc, or DAT Recorder 39 Connecting Onkyo Components 40 Connecting the Power Cord 40 Turning On the AV Receiver 41 Turning On and Standby 41 First Time Setup 42 Automatic Speaker Setup 42 HDMI Input Setup 46 Component Video Input Setup 47 ...
Owner Manual
Page 13
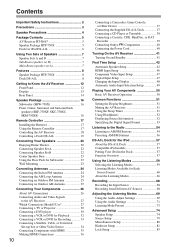
...Displays various information. 7 Audio input indicators Indicate the type of audio input that's selected as the audio source: MULTI CH, or HDMI. 8 Audyssey indicator Lights up when speaker set B is on. Display 12 3 4 56 7 8 For detailed information, see the pages in parentheses. 1 A and B speaker... indicators (7, 50) Indicator A lights up during automatic speaker setup. 13 Indicator B lights up when speaker set A is on . There are input jacks for AM and FM radio. V AUX INPUT (37, 68) Used to connect a camcorder, game console, and...
...Displays various information. 7 Audio input indicators Indicate the type of audio input that's selected as the audio source: MULTI CH, or HDMI. 8 Audyssey indicator Lights up when speaker set B is on. Display 12 3 4 56 7 8 For detailed information, see the pages in parentheses. 1 A and B speaker... indicators (7, 50) Indicator A lights up during automatic speaker setup. 13 Indicator B lights up when speaker set A is on . There are input jacks for AM and FM radio. V AUX INPUT (37, 68) Used to connect a camcorder, game console, and...
Owner Manual
Page 22
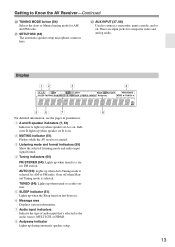
... connect it 's touching the threaded shaft in the center. Screw the terminal tight. Note: While speaker set B is on, speaker set A is reduced to each pair of terminals. IN 3 (CBL/SAT) IN 2 HDMI ASSIGNABLE (VCR/DVR) IN 1 (DVD) OUT ONENT VIDEO Y CB/ PB CR/ PR DOCK (for... PRE OUT L SUB WOOFER FRONT SPEAKERS A L CENTER SPEAKER R CD TAPE R CBL/SAT VCR/DVR R SUB WOOFER DVD R FRONT SPEAKERS B Speaker Set A Front right speaker Center speaker Front left speaker SURR BACK SPEAKERS L SURR SPEAKERS FRONT SPEAKERS A L R R CENTER SPEAKER Front right Front left speaker speaker...
... connect it 's touching the threaded shaft in the center. Screw the terminal tight. Note: While speaker set B is on, speaker set A is reduced to each pair of terminals. IN 3 (CBL/SAT) IN 2 HDMI ASSIGNABLE (VCR/DVR) IN 1 (DVD) OUT ONENT VIDEO Y CB/ PB CR/ PR DOCK (for... PRE OUT L SUB WOOFER FRONT SPEAKERS A L CENTER SPEAKER R CD TAPE R CBL/SAT VCR/DVR R SUB WOOFER DVD R FRONT SPEAKERS B Speaker Set A Front right speaker Center speaker Front left speaker SURR BACK SPEAKERS L SURR SPEAKERS FRONT SPEAKERS A L R R CENTER SPEAKER Front right Front left speaker speaker...
Owner Manual
Page 28
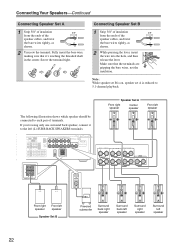
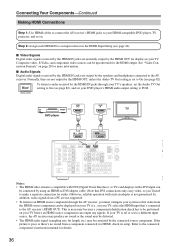
..., however, the S-Video signal is assigned to the composite video or S-Video MONITOR OUT, or the COMPONENT VIDEO OUT, use the HT-R667's own display when changing settings. 28 In the Signal Selection Example shown on a TV that is output by using any one input, the inputs will be selected...respective input signals as shown, with composite video, SVideo, and component video sources all being present. When you connect audio equipment to an HDMI or COMPONENT input, you must assign that component video input will be interpreted as the source and video is connected to the input selector,...
..., however, the S-Video signal is assigned to the composite video or S-Video MONITOR OUT, or the COMPONENT VIDEO OUT, use the HT-R667's own display when changing settings. 28 In the Signal Selection Example shown on a TV that is output by using any one input, the inputs will be selected...respective input signals as shown, with composite video, SVideo, and component video sources all being present. When you connect audio equipment to an HDMI or COMPONENT input, you must assign that component video input will be interpreted as the source and video is connected to the input selector,...
Owner Manual
Page 29
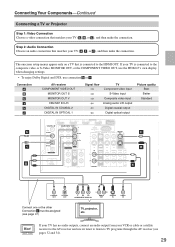
...HDMI OUT. If your VCR or cable or satellite receiver to TV programs through the AV receiver (see page 47) TV, projector, etc. The onscreen setup menus appear only on a TV that is connected to the composite video or S-Video MONITOR OUT, or the COMPONENT VIDEO OUT, use the HT-R667...'s own display when changing settings. • To enjoy Dolby Digital and DTS, use its tuner to listen to the AV receiver and use connection b or c . Connection A B C ...
...HDMI OUT. If your VCR or cable or satellite receiver to TV programs through the AV receiver (see page 47) TV, projector, etc. The onscreen setup menus appear only on a TV that is connected to the composite video or S-Video MONITOR OUT, or the COMPONENT VIDEO OUT, use the HT-R667...'s own display when changing settings. • To enjoy Dolby Digital and DTS, use its tuner to listen to the AV receiver and use connection b or c . Connection A B C ...
Owner Manual
Page 31
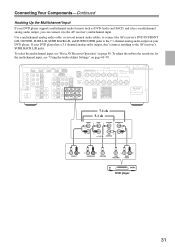
... L R FRONT L R SURROUND CENTER L R SUB WOOFER SURR BACK DVD player 31 To select the multichannel input, see "Using the Audio Adjust Settings" on your DVD player supports multichannel audio formats such as DVD-Audio and SACD, and it has a multichannel analog audio output, you can connect it...the AV receiver's multichannel input. DIGITAL IN 1 (DVD) COAXIAL 2 (CBL/SAT) 1 (VCR/DVR) OPTICAL 2 (CD) ASSIGNABLE IN 4 IN 3 (CBL/SAT) IN 2 HDMI ASSIGNABLE (VCR/DVR) IN 1 (DVD) OUT COMPONENT VIDEO Y CB/ PB CR/ PR IN 2 (CBL/SAT) IN 1(DVD) OUT ASSIGNABLE IN OUT IN L DOCK (for...
... L R FRONT L R SURROUND CENTER L R SUB WOOFER SURR BACK DVD player 31 To select the multichannel input, see "Using the Audio Adjust Settings" on your DVD player supports multichannel audio formats such as DVD-Audio and SACD, and it has a multichannel analog audio output, you can connect it...the AV receiver's multichannel input. DIGITAL IN 1 (DVD) COAXIAL 2 (CBL/SAT) 1 (VCR/DVR) OPTICAL 2 (CD) ASSIGNABLE IN 4 IN 3 (CBL/SAT) IN 2 HDMI ASSIGNABLE (VCR/DVR) IN 1 (DVD) OUT COMPONENT VIDEO Y CB/ PB CR/ PR IN 2 (CBL/SAT) IN 1(DVD) OUT ASSIGNABLE IN OUT IN L DOCK (for...
Owner Manual
Page 34
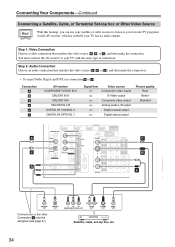
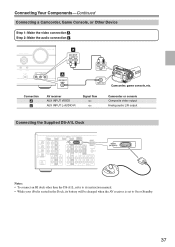
...connection that matches the video source ( a , b , or c ), and then make the connection. Connecting Your Components-Continued Connecting a Satellite, Cable, or Terrestrial Set-top box or Other Video Source Hint! Connection A B C a b c AV receiver COMPONENT VIDEO IN 2 CBL/SAT IN S CBL/SAT IN V CBL/... video output Analog audio L/R output Digital coaxial output Digital optical output Picture quality Best Better Standard IN 4 IN 3 (CBL/SAT) IN 2 HDMI ASSIGNABLE (VCR/DVR) IN 1 (DVD) OUT SURR BACK SPEAKERS Bi-AMP for FRONT SPEAKERS L DIGITAL IN COMPONENT VIDEO 1 (DVD) b COAXIAL...
...connection that matches the video source ( a , b , or c ), and then make the connection. Connecting Your Components-Continued Connecting a Satellite, Cable, or Terrestrial Set-top box or Other Video Source Hint! Connection A B C a b c AV receiver COMPONENT VIDEO IN 2 CBL/SAT IN S CBL/SAT IN V CBL/... video output Analog audio L/R output Digital coaxial output Digital optical output Picture quality Best Better Standard IN 4 IN 3 (CBL/SAT) IN 2 HDMI ASSIGNABLE (VCR/DVR) IN 1 (DVD) OUT SURR BACK SPEAKERS Bi-AMP for FRONT SPEAKERS L DIGITAL IN COMPONENT VIDEO 1 (DVD) b COAXIAL...
Owner Manual
Page 35
...): The video encryption technology developed by Intel for digital video signals. The AV receiver's HDMI interface is based on your TV or projector. *1 DVI (Digital Visual Interface): The digital display interface standard set by Intel, Compaq, Fujitsu, Hewlett Packard, IBM, NEC, and Silicon Image, this ... a digital connectivity specification for connecting TVs, projectors, DVD players, set-top boxes, and other video components. Other devices connected to the AV receiver via HDMI must be connected by using an HDMI-to-DVI adapter cable. (This may not work with some components) to ...
...): The video encryption technology developed by Intel for digital video signals. The AV receiver's HDMI interface is based on your TV or projector. *1 DVI (Digital Visual Interface): The digital display interface standard set by Intel, Compaq, Fujitsu, Hewlett Packard, IBM, NEC, and Silicon Image, this ... a digital connectivity specification for connecting TVs, projectors, DVD players, set-top boxes, and other video components. Other devices connected to the AV receiver via HDMI must be connected by using an HDMI-to-DVI adapter cable. (This may not work with some components) to ...
Owner Manual
Page 36
... jacks through the AV receiver, you must configure your system so that video from the HDMI source component can be connected by the HDMI OUT, unless the Audio TV Out setting is necessary because a component identification check has to be displayed on your TV (i.e., on your TV, ...TV, projector, and so on your TV. Step 2: Assign each HDMI IN to an input selector in the HDMI Input Setup (see page 82), and set to On (see page 82). In addition, video signals from a component connected via HDMI, check its setup. HDMI OUT HDMI IN TV DVD player IN 1 (DVD) OUT DIGITAL IN 1 (...
... jacks through the AV receiver, you must configure your system so that video from the HDMI source component can be connected by the HDMI OUT, unless the Audio TV Out setting is necessary because a component identification check has to be displayed on your TV (i.e., on your TV, ...TV, projector, and so on your TV. Step 2: Assign each HDMI IN to an input selector in the HDMI Input Setup (see page 82), and set to On (see page 82). In addition, video signals from a component connected via HDMI, check its setup. HDMI OUT HDMI IN TV DVD player IN 1 (DVD) OUT DIGITAL IN 1 (...
Owner Manual
Page 37
... L/R output Connecting the Supplied DS-A1L Dock DIGITAL IN 1 (DVD) COAXIAL 2 (CBL/SAT) 1 (VCR/DVR) OPTICAL 2 (CD) ASSIGNABLE IN 4 IN 3 (CBL/SAT) IN 2 HDMI ASSIGNABLE (VCR/DVR) IN 1 (DVD) OUT COMPONENT VIDEO Y CB/ PB CR/ PR IN 2 (CBL/SAT) IN 1(DVD) OUT ASSIGNABLE IN OUT IN L DOCK (for DS...-A1L, refer to its instruction manual. • While your iPod is seated in the Dock, its battery will be charged when the AV receiver is set to On or Standby. 37 TUNING PRESET ENTER MASTER VOLUME a AUX INPUT L AUDIO R SETUP RETURN SETUP MIC AUX INPUT VIDEO L AUDIO R A AUX INPUT ...
... L/R output Connecting the Supplied DS-A1L Dock DIGITAL IN 1 (DVD) COAXIAL 2 (CBL/SAT) 1 (VCR/DVR) OPTICAL 2 (CD) ASSIGNABLE IN 4 IN 3 (CBL/SAT) IN 2 HDMI ASSIGNABLE (VCR/DVR) IN 1 (DVD) OUT COMPONENT VIDEO Y CB/ PB CR/ PR IN 2 (CBL/SAT) IN 1(DVD) OUT ASSIGNABLE IN OUT IN L DOCK (for DS...-A1L, refer to its instruction manual. • While your iPod is seated in the Dock, its battery will be charged when the AV receiver is set to On or Standby. 37 TUNING PRESET ENTER MASTER VOLUME a AUX INPUT L AUDIO R SETUP RETURN SETUP MIC AUX INPUT VIDEO L AUDIO R A AUX INPUT ...
Owner Manual
Page 40
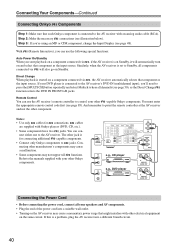
Connecting Your Components-Continued Connecting Onkyo Components Step 1: Make sure that component as the input source. Similarly, when the AV receiver is set to Standby, all components connected via , if the AV receiver is on Standby, it will also go on the AV ...Onkyo players (DVD, CD, etc.). • Some components have two jacks. Remote Control You can use the following special functions: Auto Power On/Standby When you start playback on a component connected via will automatically turn on and select that might interfere with an analog audio cable (RCA). REMOTE CONTROL IN HDMI...
Connecting Your Components-Continued Connecting Onkyo Components Step 1: Make sure that component as the input source. Similarly, when the AV receiver is set to Standby, all components connected via , if the AV receiver is on Standby, it will also go on the AV ...Onkyo players (DVD, CD, etc.). • Some components have two jacks. Remote Control You can use the following special functions: Auto Power On/Standby When you start playback on a component connected via will automatically turn on and select that might interfere with an analog audio cable (RCA). REMOTE CONTROL IN HDMI...
Owner Manual
Page 41
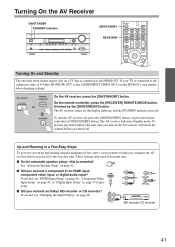
...] button, or press the remote controller's [ON/STANDBY] button. To turn the AV receiver off . Y HDMI If you connect an Onkyo MD recorder or CD recorder? PR tively. ■ Did you did , see "HDMI Input Setup" on page 46, "Component Video PB Input Setup" on page 47, or "Digital Input Setup...on page 48. The AV receiver will enter Standby mode. See "Automatic Speaker Setup" on page 42. ■ Did you use the HT-R667's own display when changing settings. To prevent any loud surprises the next time you turn on the AV receiver, turn it for the very first time. On...
...] button, or press the remote controller's [ON/STANDBY] button. To turn the AV receiver off . Y HDMI If you connect an Onkyo MD recorder or CD recorder? PR tively. ■ Did you did , see "HDMI Input Setup" on page 46, "Component Video PB Input Setup" on page 47, or "Digital Input Setup...on page 48. The AV receiver will enter Standby mode. See "Automatic Speaker Setup" on page 42. ■ Did you use the HT-R667's own display when changing settings. To prevent any loud surprises the next time you turn on the AV receiver, turn it for the very first time. On...
Owner Manual
Page 42
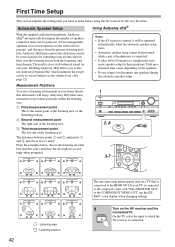
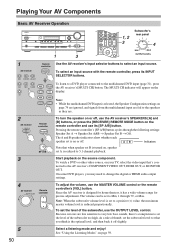
... you to also use the HTR667's own display when changing settings. 1 ON/STANDBY Turn on the AV receiver and the connected...octave balance at any speakers during the automatic speaker setup. On the TV, select the input to the HDMI OUT. Enabling Audyssey 2EQ allows you need to three positions within the listening area. A First measurement ... GAME LISTENING MODE DISPLAY DIGITAL INPUT DIMMER MEMORY TUNING MODE CLEAR SETUP MIC AUX INPUT VIDEO L AUDIO R AV RECEIVER HT-R667 2, 8 3-7 TV TV TV TV TV TV : Listening area : Listening position 42 The onscreen setup menus appear ...
... you to also use the HTR667's own display when changing settings. 1 ON/STANDBY Turn on the AV receiver and the connected...octave balance at any speakers during the automatic speaker setup. On the TV, select the input to the HDMI OUT. Enabling Audyssey 2EQ allows you need to three positions within the listening area. A First measurement ... GAME LISTENING MODE DISPLAY DIGITAL INPUT DIMMER MEMORY TUNING MODE CLEAR SETUP MIC AUX INPUT VIDEO L AUDIO R AV RECEIVER HT-R667 2, 8 3-7 TV TV TV TV TV TV : Listening area : Listening position 42 The onscreen setup menus appear ...
Owner Manual
Page 46
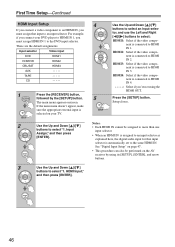
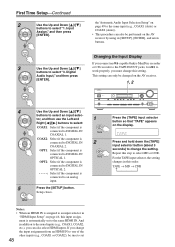
The main menu appears onscreen. tor, and use the Left and Right [ ]/[ ] buttons to HDMI IN 3. HDMI3: Select if the video compo- nent is automatically set to the same HDMI IN. See "Digital Input Setup" on page 47. • This procedure can also be assigned to more than one input selector. •... When an HDMI IN is assigned to an input selector as explained here, the ...
The main menu appears onscreen. tor, and use the Left and Right [ ]/[ ] buttons to HDMI IN 3. HDMI3: Select if the video compo- nent is automatically set to the same HDMI IN. See "Digital Input Setup" on page 47. • This procedure can also be assigned to more than one input selector. •... When an HDMI IN is assigned to an input selector as explained here, the ...
Owner Manual
Page 48
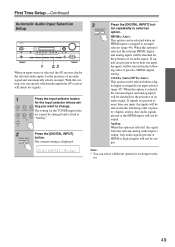
...AUX INPUT VIDEO L AUDIO R AV RECEIVER HT-R667 4 Use the Up and Down [ ]/[ ] buttons to an analog input. 5 Press the [SETUP] button. And in "HDMI Input Setup" on page 46, this ... the Left and 1 Right [ ]/[ ] buttons to the usual inputs (e.g., COAX1, COAX2, etc.), you connect an -capable Onkyo MiniDisc recorder 3 Use the Up and Down [ ]/[ ] buttons to DIGITAL IN TAPE COAXIAL 1. TAPE → MD →... Repeat this step to select MD or CDR. For the TAPE input selector, the setting OPT2: Select if the component is changes in this input assignment is assigned to an...
...AUX INPUT VIDEO L AUDIO R AV RECEIVER HT-R667 4 Use the Up and Down [ ]/[ ] buttons to an analog input. 5 Press the [SETUP] button. And in "HDMI Input Setup" on page 46, this ... the Left and 1 Right [ ]/[ ] buttons to the usual inputs (e.g., COAX1, COAX2, etc.), you connect an -capable Onkyo MiniDisc recorder 3 Use the Up and Down [ ]/[ ] buttons to DIGITAL IN TAPE COAXIAL 1. TAPE → MD →... Repeat this step to select MD or CDR. For the TAPE input selector, the setting OPT2: Select if the component is changes in this input assignment is assigned to an...
Owner Manual
Page 49
...option can be changed and is output. When this option is selected, the relevant HDMI, digital, and analog inputs will not be checked for the presence of an audio signal. tor. 49 The current setting is displayed. 3 DIGITAL INPUT Press the [DIGITAL INPUT] button repeatedly to an ... RETURN MOVIE/TV MUSIC GAME LISTENING MODE DISPLAY DIGITAL INPUT DIMMER MEMORY TUNING MODE CLEAR SETUP MIC AUX INPUT VIDEO L AUDIO R AV RECEIVER HT-R667 1 2, 3 When an input source is selected, the AV receiver checks the relevant audio inputs for the presence of priority: digital, analog...
...option can be changed and is output. When this option is selected, the relevant HDMI, digital, and analog inputs will not be checked for the presence of an audio signal. tor. 49 The current setting is displayed. 3 DIGITAL INPUT Press the [DIGITAL INPUT] button repeatedly to an ... RETURN MOVIE/TV MUSIC GAME LISTENING MODE DISPLAY DIGITAL INPUT DIMMER MEMORY TUNING MODE CLEAR SETUP MIC AUX INPUT VIDEO L AUDIO R AV RECEIVER HT-R667 1 2, 3 When an input source is selected, the AV receiver checks the relevant audio inputs for the presence of priority: digital, analog...
Owner Manual
Page 50
...CD SETUP RETURN MOVIE/TV MUSIC GAME LISTENING MODE DISPLAY DIGITAL INPUT DIMMER MEMORY TUNING MODE CLEAR SETUP MIC AUX INPUT VIDEO L AUDIO R AV RECEIVER HT-R667 1 3 1, 2 3 Subwoofer's rear panel 4 MIN MAX OUTPUT LEVEL 1 AV receiver DVD VCR/DVR CBL/SAT AUX TAPE TUNER CD Remote...button. To listen to a DVD player connected to select an input source. Indicators Note that 's connected to change the digital or HDMI audio output settings. 4 AV receiver MASTER VOLUME Remote controller To adjust the volume, use the OUTPUT LEVEL control. Since the AV receiver is turned on...
...CD SETUP RETURN MOVIE/TV MUSIC GAME LISTENING MODE DISPLAY DIGITAL INPUT DIMMER MEMORY TUNING MODE CLEAR SETUP MIC AUX INPUT VIDEO L AUDIO R AV RECEIVER HT-R667 1 3 1, 2 3 Subwoofer's rear panel 4 MIN MAX OUTPUT LEVEL 1 AV receiver DVD VCR/DVR CBL/SAT AUX TAPE TUNER CD Remote...button. To listen to a DVD player connected to select an input source. Indicators Note that 's connected to change the digital or HDMI audio output settings. 4 AV receiver MASTER VOLUME Remote controller To adjust the volume, use the OUTPUT LEVEL control. Since the AV receiver is turned on...
Owner Manual
Page 59
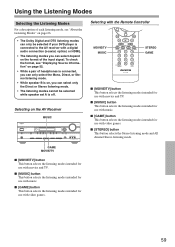
... listening mode. • While speaker B is on, you can only be selected while speaker set A is connected to the AV receiver with video games. 59 Selecting on the AV Receiver MUSIC... INPUT DIMMER MEMORY TUNING MODE CLEAR SETUP MIC AUX INPUT VIDEO L AUDIO R AV RECEIVER HT-R667 GAME MOVIE/TV Selecting with the Remote Controller MOVIE/TV MUSIC STEREO GAME ■ [MOVIE...This button selects the listening modes intended for use with a digital audio connection (coaxial, optical, or HDMI). • The listening modes you can select only the Direct or Stereo listening mode. • ...
... listening mode. • While speaker B is on, you can only be selected while speaker set A is connected to the AV receiver with video games. 59 Selecting on the AV Receiver MUSIC... INPUT DIMMER MEMORY TUNING MODE CLEAR SETUP MIC AUX INPUT VIDEO L AUDIO R AV RECEIVER HT-R667 GAME MOVIE/TV Selecting with the Remote Controller MOVIE/TV MUSIC STEREO GAME ■ [MOVIE...This button selects the listening modes intended for use with a digital audio connection (coaxial, optical, or HDMI). • The listening modes you can select only the Direct or Stereo listening mode. • ...

Owner Manual
Page 74
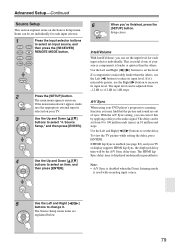
... ]/[ ] buttons to select "2. Some of the speaker settings are large. Speaker Configuration, Crossover Frequency, and Double Bass settings only need to select Small or Large. R667's own display when changing settings. 1 Press the [RECEIVER] button fol- Yes: Select ...Down [ ] button to select "Center," and then use the HT- Advanced Setup Speaker Setup 3 This section explains how to check the speaker settings and how to set them manually, which speakers are small. Cone diameter The onscreen setup... be selected. 74 Use the Up and Down [ ]/[ ] buttons to the HDMI OUT.
... ]/[ ] buttons to select "2. Some of the speaker settings are large. Speaker Configuration, Crossover Frequency, and Double Bass settings only need to select Small or Large. R667's own display when changing settings. 1 Press the [RECEIVER] button fol- Yes: Select ...Down [ ] button to select "Center," and then use the HT- Advanced Setup Speaker Setup 3 This section explains how to check the speaker settings and how to set them manually, which speakers are small. Cone diameter The onscreen setup... be selected. 74 Use the Up and Down [ ]/[ ] buttons to the HDMI OUT.
Owner Manual
Page 79
...the A/V Sync delay time. To view the TV picture while setting the delay, press [ENTER]. IntelliVolume With IntelliVolume, you can be adjusted from 0 to select "4. If a component is louder or quieter than the others . If HDMI Lip Sync is displayed underneath in 10 millisecond steps. Items ... the Left and Right [ ]/[ ] buttons to increase its input level. A/V Sync When using your TV or display supports HDMI Lip Sync, the displayed delay time will be set the delay. Note: • A/V Sync is disabled when the Direct listening mode is selected on the Source Setup menu. The...
...the A/V Sync delay time. To view the TV picture while setting the delay, press [ENTER]. IntelliVolume With IntelliVolume, you can be adjusted from 0 to select "4. If a component is louder or quieter than the others . If HDMI Lip Sync is displayed underneath in 10 millisecond steps. Items ... the Left and Right [ ]/[ ] buttons to increase its input level. A/V Sync When using your TV or display supports HDMI Lip Sync, the displayed delay time will be set the delay. Note: • A/V Sync is disabled when the Direct listening mode is selected on the Source Setup menu. The...


