
Owner Manual
Page 1
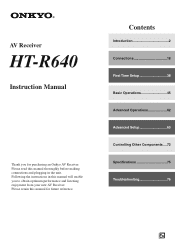
Please retain this manual will enable you for future reference. Contents Introduction 2 Connections 18 First Time Setup 38 Basic Operations 45 Advanced Operations 62 Advanced Setup 63 Controlling Other Components ....72 Specifications 75 Troubleshooting 76 En AV Receiver HT-R640 Instruction Manual Thank you to obtain optimum performance and listening enjoyment from your new AV Receiver. Following the instructions in the unit. Please read this manual thoroughly before making connections and plugging in this manual for purchasing an Onkyo AV Receiver.
Please retain this manual will enable you for future reference. Contents Introduction 2 Connections 18 First Time Setup 38 Basic Operations 45 Advanced Operations 62 Advanced Setup 63 Controlling Other Components ....72 Specifications 75 Troubleshooting 76 En AV Receiver HT-R640 Instruction Manual Thank you to obtain optimum performance and listening enjoyment from your new AV Receiver. Following the instructions in the unit. Please read this manual thoroughly before making connections and plugging in this manual for purchasing an Onkyo AV Receiver.

Owner Manual
Page 8
..., and analog audio. K TUNING MODE button (48) This button is used to adjust the volume of stereo headphones for connecting a standard pair of the AV receiver to MIN, 1 through 99, or MAX. L MEMORY button (49) This button is used to assign the digital inputs and to select the Auto or... Manual tuning mode. N DIGITAL INPUT button (39, 70) This button is used when storing or deleting radio presets. There are used to select the Stereo listening ...
..., and analog audio. K TUNING MODE button (48) This button is used to adjust the volume of stereo headphones for connecting a standard pair of the AV receiver to MIN, 1 through 99, or MAX. L MEMORY button (49) This button is used to assign the digital inputs and to select the Auto or... Manual tuning mode. N DIGITAL INPUT button (39, 70) This button is used when storing or deleting radio presets. There are used to select the Stereo listening ...

Owner Manual
Page 9
... for each item. 1 MUTING indicator (47) RDS (European models only) (50): This indi- This indicator flashes while the AV receiver is selected. XM (North American models only) (52): This indicator lights up when XM radio is cator lights up when the Sleep function has... when tuned to a radio station that muted. MEMORY (49): This indicator lights up when the Auto Tuning mode is selected, and disappears when the Manual Tuning mode is tuned into a radio station. AUTO (48): This indicator lights up when presetting radio stations. Front & Rear Panels-Continued Display 1 ...
... for each item. 1 MUTING indicator (47) RDS (European models only) (50): This indi- This indicator flashes while the AV receiver is selected. XM (North American models only) (52): This indicator lights up when XM radio is cator lights up when the Sleep function has... when tuned to a radio station that muted. MEMORY (49): This indicator lights up when the Auto Tuning mode is selected, and disappears when the Manual Tuning mode is tuned into a radio station. AUTO (48): This indicator lights up when presetting radio stations. Front & Rear Panels-Continued Display 1 ...

Owner Manual
Page 13
... L M N LISTENING MODE STEREO SURROUND AUDIO SUBTITLE RANDOM REPEAT TEST TONE CH SEL LEVEL- I RECEIVER/AMP/TAPE Mode or AMP/TAPE Mode With this manual may be "RECEIVER" or "AMP," depending the model you can control the AV receiver and an Onkyo cassette recorder connected via . By entering the appropriate remote control code, you can control...
... L M N LISTENING MODE STEREO SURROUND AUDIO SUBTITLE RANDOM REPEAT TEST TONE CH SEL LEVEL- I RECEIVER/AMP/TAPE Mode or AMP/TAPE Mode With this manual may be "RECEIVER" or "AMP," depending the model you can control the AV receiver and an Onkyo cassette recorder connected via . By entering the appropriate remote control code, you can control...
Owner Manual
Page 18
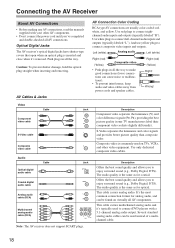
...-channel audio inputs and outputs (typically labeled "L"). This cable carries analog audio. Connecting the AV Receiver About AV Connections • Before making any AV connections, read the manuals supplied with a 5.1-channel analog audio output. And use yellow plugs to enjoy surround sound (e.g., ...cable Coaxial digital audio cable Analog audio cable (RCA) Cable V Jack L R Multichannel analog audio cable (RCA) Note: The AV receiver does not support SCART plugs. It's the most common connection format for optical. Use red plugs to enjoy surround sound (e.g., Dolby Digital,...
...-channel audio inputs and outputs (typically labeled "L"). This cable carries analog audio. Connecting the AV Receiver About AV Connections • Before making any AV connections, read the manuals supplied with a 5.1-channel analog audio output. And use yellow plugs to enjoy surround sound (e.g., ...cable Coaxial digital audio cable Analog audio cable (RCA) Cable V Jack L R Multichannel analog audio cable (RCA) Note: The AV receiver does not support SCART plugs. It's the most common connection format for optical. Use red plugs to enjoy surround sound (e.g., Dolby Digital,...
Owner Manual
Page 28
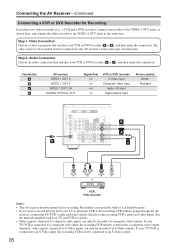
...Step 1: Video Connection Choose a video connection that matches your VCR or DVD recorder ( a or b ), and then make the connection. Connection A B a b AV receiver VIDEO 1 OUT S VIDEO 1 OUT V VIDEO 1 OUT L/R DIGITAL OPTICAL OUT Signal flow VCR or DVD recorder S-Video input Composite video input Audio L/R input ...connection. If your TV/VCR is not possible while it's in the same way. See the manuals supplied with your TV and VCR for recording. Connecting the AV Receiver-Continued Connecting a VCR or DVD Recorder for Recording If you want to record directly from your ...
...Step 1: Video Connection Choose a video connection that matches your VCR or DVD recorder ( a or b ), and then make the connection. Connection A B a b AV receiver VIDEO 1 OUT S VIDEO 1 OUT V VIDEO 1 OUT L/R DIGITAL OPTICAL OUT Signal flow VCR or DVD recorder S-Video input Composite video input Audio L/R input ...connection. If your TV/VCR is not possible while it's in the same way. See the manuals supplied with your TV and VCR for recording. Connecting the AV Receiver-Continued Connecting a VCR or DVD Recorder for Recording If you want to record directly from your ...

Owner Manual
Page 34
...For HDD-compatible components that don't support video Connect your HDD-compatible component's analog audio output jacks to the Remote Interactive Dock's instruction manual. 34 S VIDEO OUT AUDIO OUT L R AUDIO OUT L R Notes: • Connect the Remote Interactive Dock with the DS-A1... or S) jack. (The example shown below is the only HDD-compatible component available. Connecting the AV Receiver-Continued Connecting a HDD-compatible Component As of this printing, the Onkyo Remote Interactive Dock is for connection with an cable (see page 36). • Set the Remote Interactive...
...For HDD-compatible components that don't support video Connect your HDD-compatible component's analog audio output jacks to the Remote Interactive Dock's instruction manual. 34 S VIDEO OUT AUDIO OUT L R AUDIO OUT L R Notes: • Connect the Remote Interactive Dock with the DS-A1... or S) jack. (The example shown below is the only HDD-compatible component available. Connecting the AV Receiver-Continued Connecting a HDD-compatible Component As of this printing, the Onkyo Remote Interactive Dock is for connection with an cable (see page 36). • Set the Remote Interactive...

Owner Manual
Page 36
...receiver's multichannel DVD input, you 're using an MD, CDR, or HDD component, change the input display (see page 46), as the Direct Change function only selects the FRONT DVD IN jacks. Notes: • Use only cables for connecting additional -capable components. • Connect only Onkyo components to jacks. Refer to the manuals... of the component that you purchased the AV receiver. 36 Connecting the AV Receiver-Continued Connecting Onkyo Components Step 1: Make sure that each Onkyo component is connected to the AV receiver with an analog audio cable (connection a in...
...receiver's multichannel DVD input, you 're using an MD, CDR, or HDD component, change the input display (see page 46), as the Direct Change function only selects the FRONT DVD IN jacks. Notes: • Use only cables for connecting additional -capable components. • Connect only Onkyo components to jacks. Refer to the manuals... of the component that you purchased the AV receiver. 36 Connecting the AV Receiver-Continued Connecting Onkyo Components Step 1: Make sure that each Onkyo component is connected to the AV receiver with an analog audio cable (connection a in...

Owner Manual
Page 42
...specified: Full Band, 40 Hz, 50 Hz, 60 Hz, 80 Hz, 100 Hz, 120 Hz, 150 Hz, 200 Hz. Refer to your speakers' manuals to select "b. The Speaker Config menu appears. 1.Speaker Config a.Subwoofer :Yes b.Front : 100Hz c.Center : 100Hz d.Surround : 100Hz e.LPFofLFE : 120Hz f....VOL INPUT GUIDE TOP MENU CH DISC ALBUM VOL PREVIOUS MENU PLAYLIST/CAT ENTER MUTING PLAYLIST/CAT RETURN SETUP 2-10 1, 11 4 5 1 AMP RECEIVER Press the [RECEIVER] or [AMP] button followed by the subwoofer instead of the speaker. Front," and then use the Left and Right [ ]/[ ] buttons to ...
...specified: Full Band, 40 Hz, 50 Hz, 60 Hz, 80 Hz, 100 Hz, 120 Hz, 150 Hz, 200 Hz. Refer to your speakers' manuals to select "b. The Speaker Config menu appears. 1.Speaker Config a.Subwoofer :Yes b.Front : 100Hz c.Center : 100Hz d.Surround : 100Hz e.LPFofLFE : 120Hz f....VOL INPUT GUIDE TOP MENU CH DISC ALBUM VOL PREVIOUS MENU PLAYLIST/CAT ENTER MUTING PLAYLIST/CAT RETURN SETUP 2-10 1, 11 4 5 1 AMP RECEIVER Press the [RECEIVER] or [AMP] button followed by the subwoofer instead of the speaker. Front," and then use the Left and Right [ ]/[ ] buttons to ...

Owner Manual
Page 48
...North American models change the frequency one step at a time. Tuning into AM and FM stations directly by entering the appropriate frequency. 1 AMP RECEIVER Press the [RECEIVER] or [AMP] button, followed by the [D TUN] button. In this example, FM has been selected. When tuned into Radio Stations ...be changed by Frequency You can store your favorite stations as shown. TUNED AUTO I Manual Tuning Mode 1 TUNING MODE Press the [TUNING MODE] button so that the AUTO indicator appears on country.) The [RECEIVER] or [AMP] button flashes. Within 8 seconds, use the number buttons...
...North American models change the frequency one step at a time. Tuning into AM and FM stations directly by entering the appropriate frequency. 1 AMP RECEIVER Press the [RECEIVER] or [AMP] button, followed by the [D TUN] button. In this example, FM has been selected. When tuned into Radio Stations ...be changed by Frequency You can store your favorite stations as shown. TUNED AUTO I Manual Tuning Mode 1 TUNING MODE Press the [TUNING MODE] button so that the AUTO indicator appears on country.) The [RECEIVER] or [AMP] button flashes. Within 8 seconds, use the number buttons...

Owner Manual
Page 61
...output by the VCR. 61 See pages 23 to 36 for more details. • Digital signals received at COAXIAL IN/OPTICAL IN or HDMI IN 1/2 are output by the VCR connected to the manuals supplied with your video recordings. Refer to the VIDEO 1 OUT jacks. TUNER CD trol has .... In the following example, audio from the CD player connected to Pure Audio, no effect on the camcorder and CD player. The AV receiver's VOLUME con- The video from the camcorder and the audio from the camcorder connected to make recordings, select other listening mode. Video sources ...
...output by the VCR. 61 See pages 23 to 36 for more details. • Digital signals received at COAXIAL IN/OPTICAL IN or HDMI IN 1/2 are output by the VCR connected to the manuals supplied with your video recordings. Refer to the VIDEO 1 OUT jacks. TUNER CD trol has .... In the following example, audio from the CD player connected to Pure Audio, no effect on the camcorder and CD player. The AV receiver's VOLUME con- The video from the camcorder and the audio from the camcorder connected to make recordings, select other listening mode. Video sources ...

Owner Manual
Page 70
... format automatically. If no digital input signal is present, the corresponding analog input is detected automatically. Advanced Setup-Continued Lock Setup 1 AMP RECEIVER Press the [RECEIVER] or [AMP] button followed by locking the setup menus. SETUP 2 Use the Up and Down [ ]/[ ] buttons to DTS. However...can protect your settings by the [SETUP] button. DIGITAL INPUT 1 Press and hold the AV receiver's [DIGITAL INPUT] button for the input sources that format are locked, you can manually set , flashes, and only signals in other formats are cut off, try setting the...
... format automatically. If no digital input signal is present, the corresponding analog input is detected automatically. Advanced Setup-Continued Lock Setup 1 AMP RECEIVER Press the [RECEIVER] or [AMP] button followed by locking the setup menus. SETUP 2 Use the Up and Down [ ]/[ ] buttons to DTS. However...can protect your settings by the [SETUP] button. DIGITAL INPUT 1 Press and hold the AV receiver's [DIGITAL INPUT] button for the input sources that format are locked, you can manually set , flashes, and only signals in other formats are cut off, try setting the...


