
Owner Manual
Page 6
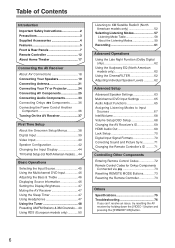
... Headphones 47 Using the Tuner 48 Presetting AM/FM Stations & XM Channels....49 Using RDS (European models only 50 Listening to XM Satellite Radio® (North American models only 52 Selecting Listening Modes 57 Listening Mode Table 58 About the Listening Modes 59 Recording 61 Advanced Operations Using the Late Night Function (Dolby Digital only 62 Using the Audyssey EQ (North American models only 62 Using the CinemaFILTER 62 Adjusting Individual Speaker Levels 62 Advanced Setup Advanced Speaker Settings 63 Multichannel DVD Input Settings 65 Audio Adjust Functions 65 Assigning...
... Headphones 47 Using the Tuner 48 Presetting AM/FM Stations & XM Channels....49 Using RDS (European models only 50 Listening to XM Satellite Radio® (North American models only 52 Selecting Listening Modes 57 Listening Mode Table 58 About the Listening Modes 59 Recording 61 Advanced Operations Using the Late Night Function (Dolby Digital only 62 Using the Audyssey EQ (North American models only 62 Using the CinemaFILTER 62 Adjusting Individual Speaker Levels 62 Advanced Setup Advanced Speaker Settings 63 Multichannel DVD Input Settings 65 Audio Adjust Functions 65 Assigning...

Owner Manual
Page 8
... optical digital audio, S-Video, composite video, and analog audio. O DISPLAY button (46) This button is used to connect a camcorder, game console, and so on. The indicator lights up when this mode is used to select the Stereo listening mode. Front & Rear Panels-Continued G Arrow/TUNING/PRESET & ENTER buttons When the AM or FM input source is selected, the TUNING [ ] [ ] buttons are used to tune the tuner, and the PRESET [ ] [ ] buttons are used to adjust the bass and treble. When the onscreen setup menus are used with the onscreen setup...
... optical digital audio, S-Video, composite video, and analog audio. O DISPLAY button (46) This button is used to connect a camcorder, game console, and so on. The indicator lights up when this mode is used to select the Stereo listening mode. Front & Rear Panels-Continued G Arrow/TUNING/PRESET & ENTER buttons When the AM or FM input source is selected, the TUNING [ ] [ ] buttons are used to tune the tuner, and the PRESET [ ] [ ] buttons are used to adjust the bass and treble. When the onscreen setup menus are used with the onscreen setup...

Owner Manual
Page 13
... TUNER or TAPE input is used to select a mode. DVD M D/CDR C D HDD I DVD and CD/MD/CDR/HDD Modes With these modes, you can also be used to control an Onkyo cassette recorder connected via . ENT DIMMER SLEEP RECEIVER TAPE/AMP J K TV VOL INPUT GUIDE TOP MENU CH DISC ALBUM VOL PREVIOUS MENU PLAYLIST /CAT ENTER MUTING PLAYLIST /CAT RETURN SETUP L M N LISTENING MODE STEREO SURROUND AUDIO SUBTITLE RANDOM REPEAT TEST TONE CH SEL LEVEL- TV VCR CABLE SAT 2 Use the buttons supported by using the six REMOTE MODE buttons...
... TUNER or TAPE input is used to select a mode. DVD M D/CDR C D HDD I DVD and CD/MD/CDR/HDD Modes With these modes, you can also be used to control an Onkyo cassette recorder connected via . ENT DIMMER SLEEP RECEIVER TAPE/AMP J K TV VOL INPUT GUIDE TOP MENU CH DISC ALBUM VOL PREVIOUS MENU PLAYLIST /CAT ENTER MUTING PLAYLIST /CAT RETURN SETUP L M N LISTENING MODE STEREO SURROUND AUDIO SUBTITLE RANDOM REPEAT TEST TONE CH SEL LEVEL- TV VCR CABLE SAT 2 Use the buttons supported by using the six REMOTE MODE buttons...

Owner Manual
Page 14
...CinemaFILTER function. C MULTI CH button (46) Selects the multichannel DVD input. G LISTENING MODE buttons (57) Used to select and adjust settings. L VOL [ ]/[ ] button (45) Adjusts the volume of the AV receiver regardless of each speaker. Rewind and FF [ ]/[ ] buttons The Rewind [ ] button starts rewind. J REMOTE MODE buttons (13) Used to turn the Audyssey equalizer on or off. 14 I DISPLAY button (46) Displays various information about the selected input source. Stop [ ] button Stops playback. I Buttons used to select AM and FM radio stations and XM radio channels directly...
...CinemaFILTER function. C MULTI CH button (46) Selects the multichannel DVD input. G LISTENING MODE buttons (57) Used to select and adjust settings. L VOL [ ]/[ ] button (45) Adjusts the volume of the AV receiver regardless of each speaker. Rewind and FF [ ]/[ ] buttons The Rewind [ ] button starts rewind. J REMOTE MODE buttons (13) Used to turn the Audyssey equalizer on or off. 14 I DISPLAY button (46) Displays various information about the selected input source. Stop [ ] button Stops playback. I Buttons used to select AM and FM radio stations and XM radio channels directly...
Owner Manual
Page 16
... HDD component, you must change the input display (see page 44). 1 2 3 4 E F STANDBY/ON REMOTE MODE RECEIVER DVD TAPE/AMP INPUT SELECTOR M D/CDR 1 2 3 C D HDD V1 V2 V3 4 5 6 TV V4 MULTI CH DVD 7 8 9 VCR TAPE TUNER 10 11 +10 0 C D 12 CABLE CLR SAT D TUN --/--- ENT DIMMER SLEEP TV VOL INPUT GUIDE TOP MENU CH DISC ALBUM VOL PREVIOUS MENU PLAYLIST/CAT ENTER MUTING PLAYLIST/CAT RETURN SETUP M D/CDR C D HDD G 8 9 LISTENING MODE STEREO SURROUND AUDIO SUBTITLE RANDOM REPEAT TEST TONE CH SEL LEVEL- F DISPLAY button Displays information...
... HDD component, you must change the input display (see page 44). 1 2 3 4 E F STANDBY/ON REMOTE MODE RECEIVER DVD TAPE/AMP INPUT SELECTOR M D/CDR 1 2 3 C D HDD V1 V2 V3 4 5 6 TV V4 MULTI CH DVD 7 8 9 VCR TAPE TUNER 10 11 +10 0 C D 12 CABLE CLR SAT D TUN --/--- ENT DIMMER SLEEP TV VOL INPUT GUIDE TOP MENU CH DISC ALBUM VOL PREVIOUS MENU PLAYLIST/CAT ENTER MUTING PLAYLIST/CAT RETURN SETUP M D/CDR C D HDD G 8 9 LISTENING MODE STEREO SURROUND AUDIO SUBTITLE RANDOM REPEAT TEST TONE CH SEL LEVEL- F DISPLAY button Displays information...

Owner Manual
Page 36
... special functions: I Direct Change When playback is set to wall outlets, not the AV receiver's AC OUTLET. • The socket type and capacity will automatically turn on and select that component as the input source. cables are supplied with your other Onkyo components. REMOTE CONTROL IN L R CD FRONT L R DVD e.g., CD player e.g., DVD player R L ANALOG AUDIO OUT R L ANALOG AUDIO OUT Connecting the Power Cord of another AV component. The other component's power switch can con- The other jack is set to Standby, all functions...
... special functions: I Direct Change When playback is set to wall outlets, not the AV receiver's AC OUTLET. • The socket type and capacity will automatically turn on and select that component as the input source. cables are supplied with your other Onkyo components. REMOTE CONTROL IN L R CD FRONT L R DVD e.g., CD player e.g., DVD player R L ANALOG AUDIO OUT R L ANALOG AUDIO OUT Connecting the Power Cord of another AV component. The other component's power switch can con- The other jack is set to Standby, all functions...

Owner Manual
Page 37
... "HDMI Video Setup" on page 40, "Component Video Setup" on page 41, or "Digital Input" on page 44. These settings only need to help you configure the AV receiver before you connected an Onkyo MD recorder, CD recorder, OUT IN or next generation HDD-compatible component? Turning On the AV Receiver STANDBY/ON STANDBY indicator RECEIVER or AMP STANDBY/ON STANDBY/ON REMOTE MODE RECEIVER DVD TAPE/AMP INPUT SELECTOR M D/CDR 1 2 3 C D HDD V1 V2 V3 4 5 6 TV V4 MULTI CH DVD...
... "HDMI Video Setup" on page 40, "Component Video Setup" on page 41, or "Digital Input" on page 44. These settings only need to help you configure the AV receiver before you connected an Onkyo MD recorder, CD recorder, OUT IN or next generation HDD-compatible component? Turning On the AV Receiver STANDBY/ON STANDBY indicator RECEIVER or AMP STANDBY/ON STANDBY/ON REMOTE MODE RECEIVER DVD TAPE/AMP INPUT SELECTOR M D/CDR 1 2 3 C D HDD V1 V2 V3 4 5 6 TV V4 MULTI CH DVD...
Owner Manual
Page 40
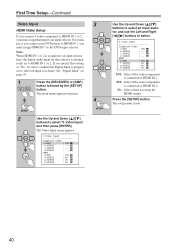
... that Digital Input is properly set to select an input you must assign HDMI IN 1 to the DVD input selector. SETUP 2 Use the Up and Down [ ]/[ ] buttons to HDMI IN 2. d.VIDEO3 : --- No: Select when not using the HDMI output. The setup menu closes. 40 Video Input," and then press [ENTER]. See "Digital Input" on page 39. 1 AMP RECEIVER Press the [RECEIVER] or [AMP] button followed by the [SETUP] button. c.VIDEO2 : --- IN2: Select if the video component is automatically set to HDMI IN 1 or 2. The Video Input menu appears. 0.Video Input Component Video a.DVD...
... that Digital Input is properly set to select an input you must assign HDMI IN 1 to the DVD input selector. SETUP 2 Use the Up and Down [ ]/[ ] buttons to HDMI IN 2. d.VIDEO3 : --- No: Select when not using the HDMI output. The setup menu closes. 40 Video Input," and then press [ENTER]. See "Digital Input" on page 39. 1 AMP RECEIVER Press the [RECEIVER] or [AMP] button followed by the [SETUP] button. c.VIDEO2 : --- IN2: Select if the video component is automatically set to HDMI IN 1 or 2. The Video Input menu appears. 0.Video Input Component Video a.DVD...

Owner Manual
Page 43
... the test tone is set to select "f. Surround," The setup menu closes. If no surround left and right channels to the sub- LPFofLFE," and then use the Left and Right [ ]/[ ] buttons to select a low- The following low-pass filter frequen- ton. LEVEL+ PLAY MODE DISPLAY AUDYSSEY L NIGHT VCR DVD CINE FLTR HDD RC-668M The test tone will appear on (default). cies can boost bass output by a speaker and its [SETUP] button, arrow buttons, and [ENTER] button. Low-Pass Filter for the LFE Channel With this setting...
... the test tone is set to select "f. Surround," The setup menu closes. If no surround left and right channels to the sub- LPFofLFE," and then use the Left and Right [ ]/[ ] buttons to select a low- The following low-pass filter frequen- ton. LEVEL+ PLAY MODE DISPLAY AUDYSSEY L NIGHT VCR DVD CINE FLTR HDD RC-668M The test tone will appear on (default). cies can boost bass output by a speaker and its [SETUP] button, arrow buttons, and [ENTER] button. Low-Pass Filter for the LFE Channel With this setting...

Owner Manual
Page 45
... listen to the AV receiver's COMPONENT VIDEO OUT, HDMI OUT or MONITOR OUT. The AV receiver is designed for home theater enjoyment. MULTI CH 1 3 1 MULTI CH STANDBY/ON REMOTE MODE RECEIVER DVD TAPE/AMP INPUT SELECTOR M D/CDR 1 2 3 C D HDD V1 V2 V3 4 5 6 TV V4 MULTI CH DVD 7 8 9 VCR TAPE TUNER 10 11 +10 0 C D 12 CABLE CLR SAT D TUN --/--- To adjust the volume, use the INPUT SELECTOR buttons. The volume can be set to select the input source. On some DVD players, you 'll need to turn on the source component...
... listen to the AV receiver's COMPONENT VIDEO OUT, HDMI OUT or MONITOR OUT. The AV receiver is designed for home theater enjoyment. MULTI CH 1 3 1 MULTI CH STANDBY/ON REMOTE MODE RECEIVER DVD TAPE/AMP INPUT SELECTOR M D/CDR 1 2 3 C D HDD V1 V2 V3 4 5 6 TV V4 MULTI CH DVD 7 8 9 VCR TAPE TUNER 10 11 +10 0 C D 12 CABLE CLR SAT D TUN --/--- To adjust the volume, use the INPUT SELECTOR buttons. The volume can be set to select the input source. On some DVD players, you 'll need to turn on the source component...

Owner Manual
Page 46
... surround left , front right, and center). Information is displayed for the front speakers, except when the Direct or Pure Audio (not North American models) listening mode is selected. 1 TONE Press the [TONE] button repeatedly to select either Bass or Treble. 2 Use the TONE [-]/[+] buttons to +10 dB in 2 dB steps. Displaying Source Information You can also be used for the DVD input source. AMP RECEIVER Press the [RECEIVER] or [AMP] button, followed by using its [DISPLAY] button. Adjusting the Bass & Treble You can boost or cut low-frequency sounds output...
... surround left , front right, and center). Information is displayed for the front speakers, except when the Direct or Pure Audio (not North American models) listening mode is selected. 1 TONE Press the [TONE] button repeatedly to select either Bass or Treble. 2 Use the TONE [-]/[+] buttons to +10 dB in 2 dB steps. Displaying Source Information You can also be used for the DVD input source. AMP RECEIVER Press the [RECEIVER] or [AMP] button, followed by using its [DISPLAY] button. Adjusting the Bass & Treble You can boost or cut low-frequency sounds output...

Owner Manual
Page 58
..., and 48 kHz respectively. In listening modes other than Pure Audio, Direct, Stereo, and DTS 96/24, DTS 96/24 sources are connected. DVD, CD, etc. Using the Listening Modes-Continued The following table shows which listening modes can be used with each input signal format. DVD, DTV, etc. Source format Analog, PCM*1 3/2.1 2/2.1 Dolby Digital 2/0 1/0, 1+1 Other 3/2.1 2/2.1 DTS/DTS 96/24*2 2/0 Other Multich analog, Multich PCM Listening mode CD, TV, radio, cassette, etc. DVD Pure Audio (not North American models) ✔ ✔ ✔ ✔ ✔...
..., and 48 kHz respectively. In listening modes other than Pure Audio, Direct, Stereo, and DTS 96/24, DTS 96/24 sources are connected. DVD, CD, etc. Using the Listening Modes-Continued The following table shows which listening modes can be used with each input signal format. DVD, DTV, etc. Source format Analog, PCM*1 3/2.1 2/2.1 Dolby Digital 2/0 1/0, 1+1 Other 3/2.1 2/2.1 DTS/DTS 96/24*2 2/0 Other Multich analog, Multich PCM Listening mode CD, TV, radio, cassette, etc. DVD Pure Audio (not North American models) ✔ ✔ ✔ ✔ ✔...

Owner Manual
Page 61
... listening mode is set to Pure Audio, no image is provided because the power is turned off for hookup information. 1 Use the input selector buttons to select the source that when an audio-only input source (i.e., TAPE, TUNER, or CD) is no effect on the VCR and start playback. Camcorder video signal audio signal CD player VCR 1 Prepare the camcorder and CD player for playback. 2 Prepare the VCR for more details. • Digital signals received at COAXIAL...
... listening mode is set to Pure Audio, no image is provided because the power is turned off for hookup information. 1 Use the input selector buttons to select the source that when an audio-only input source (i.e., TAPE, TUNER, or CD) is no effect on the VCR and start playback. Camcorder video signal audio signal CD player VCR 1 Prepare the camcorder and CD player for playback. 2 Prepare the VCR for more details. • Digital signals received at COAXIAL...
Owner Manual
Page 65
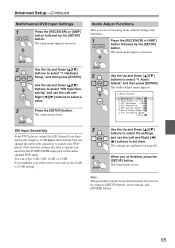
... Down [ ]/[ ] buttons to select the settings, and use the Left and Right [ ]/[ ] buttons to match your subwoofer is too loud, try the 10 dB or 15 dB setting. You can set them. SETUP SW Input Sensitivity Some DVD players output the LFE channel from their subwoofer output at 15 dB higher than normal. Advanced Setup-Continued Multichannel DVD Input Settings 1 AMP RECEIVER Press the [RECEIVER] or [AMP] button followed by the [SETUP] button. The main menu appears onscreen. Audio Adjust Functions Here...
... Down [ ]/[ ] buttons to select the settings, and use the Left and Right [ ]/[ ] buttons to match your subwoofer is too loud, try the 10 dB or 15 dB setting. You can set them. SETUP SW Input Sensitivity Some DVD players output the LFE channel from their subwoofer output at 15 dB higher than normal. Advanced Setup-Continued Multichannel DVD Input Settings 1 AMP RECEIVER Press the [RECEIVER] or [AMP] button followed by the [SETUP] button. The main menu appears onscreen. Audio Adjust Functions Here...
Owner Manual
Page 67
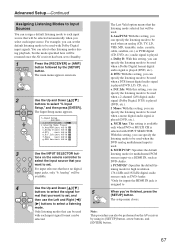
...;es the default listening mode for multichannel PCM sources input via a HDMI IN, such as DVD-Audio. *Only for inputs the HDMI IN jack is used when the DVD analog multichannel input is assigned to When you want to set to Standby. 1 AMP RECEIVER Press the [RECEIVER] or [AMP] button followed by using its [SETUP] button, arrow buttons, and [ENTER] button. 67 Note: This procedure can also be used with Dolby Digital input signals. Only listening modes that can be used when a 2-channel (2/0) digital audio signal (Dolby Digital, DTS) is played. g. The main menu appears...
...;es the default listening mode for multichannel PCM sources input via a HDMI IN, such as DVD-Audio. *Only for inputs the HDMI IN jack is used when the DVD analog multichannel input is assigned to When you want to set to Standby. 1 AMP RECEIVER Press the [RECEIVER] or [AMP] button followed by using its [SETUP] button, arrow buttons, and [ENTER] button. 67 Note: This procedure can also be used with Dolby Digital input signals. Only listening modes that can be used when a 2-channel (2/0) digital audio signal (Dolby Digital, DTS) is played. g. The main menu appears...
Owner Manual
Page 72
... control code to select the remote con- ENT DIMMER SLEEP TV VOL INPUT GUIDE TOP MENU CH DISC ALBUM VOL PREVIOUS MENU MUTING PLAYLIST/CAT ENTER PLAYLIST/CAT RETURN SETUP REMOTE MODE DISPLAY LISTENING MODE STEREO SURROUND AUDIO SUBTITLE RANDOM REPEAT TEST TONE CH SEL LEVEL- HDD TV VCR CABLE SAT DISPLAY RECEIVER or AMP Number buttons STANDBY/ON REMOTE MODE RECEIVER DVD TAPE/AMP INPUT SELECTOR M D/CDR 1 2 3 C D HDD V1 V2 V3 4 5 6 TV V4 MULTI CH DVD 7 8 9 VCR TAPE TUNER 10 11 +10 0 C D 12 CABLE CLR SAT D TUN --/--- If the remote controller...
... control code to select the remote con- ENT DIMMER SLEEP TV VOL INPUT GUIDE TOP MENU CH DISC ALBUM VOL PREVIOUS MENU MUTING PLAYLIST/CAT ENTER PLAYLIST/CAT RETURN SETUP REMOTE MODE DISPLAY LISTENING MODE STEREO SURROUND AUDIO SUBTITLE RANDOM REPEAT TEST TONE CH SEL LEVEL- HDD TV VCR CABLE SAT DISPLAY RECEIVER or AMP Number buttons STANDBY/ON REMOTE MODE RECEIVER DVD TAPE/AMP INPUT SELECTOR M D/CDR 1 2 3 C D HDD V1 V2 V3 4 5 6 TV V4 MULTI CH DVD 7 8 9 VCR TAPE TUNER 10 11 +10 0 C D 12 CABLE CLR SAT D TUN --/--- If the remote controller...

Owner Manual
Page 73
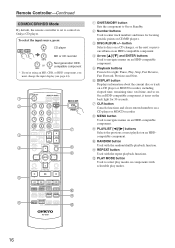
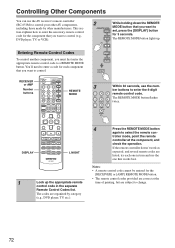
... CABLE SAT L NIGHT 2 REMOTE MODE DVD M D/CDR C D HDD Press the REMOTE MODE button again. The [RECEIVER] or [AMP] button lights up . Controlling Other Components-Continued Remote Control Codes for Onkyo Components Connected via Onkyo components that are connected via are controlled by pointing the remote controller directly at it, or you want to control an Onkyo component that's not connected via , use the following remote control codes: [DVD] REMOTE MODE button 0627: Onkyo DVD player without (default) [CD/MD/CDR/HDD] REMOTE MODE button 1817: Onkyo CD player without (default) 0868: Onkyo...
... CABLE SAT L NIGHT 2 REMOTE MODE DVD M D/CDR C D HDD Press the REMOTE MODE button again. The [RECEIVER] or [AMP] button lights up . Controlling Other Components-Continued Remote Control Codes for Onkyo Components Connected via Onkyo components that are connected via are controlled by pointing the remote controller directly at it, or you want to control an Onkyo component that's not connected via , use the following remote control codes: [DVD] REMOTE MODE button 0627: Onkyo DVD player without (default) [CD/MD/CDR/HDD] REMOTE MODE button 1817: Onkyo CD player without (default) 0868: Onkyo...
Owner Manual
Page 76
... input source is selected, the surround speakers produce no sound from a DVD player connected to an HDMI IN, check the DVD player's output settings, and be set to its factory defaults, turn on the AV receiver • Make sure that the digital input source is off as soon as it 's very quiet • Make sure that the power cord is concentrated in again. If your turntable doesn't have any trouble using the AV receiver, look for home theater enjoyment. VIDEO 1 STANDBY...
... input source is selected, the surround speakers produce no sound from a DVD player connected to an HDMI IN, check the DVD player's output settings, and be set to its factory defaults, turn on the AV receiver • Make sure that the digital input source is off as soon as it 's very quiet • Make sure that the power cord is concentrated in again. If your turntable doesn't have any trouble using the AV receiver, look for home theater enjoyment. VIDEO 1 STANDBY...
Owner Manual
Page 77
... connected is selected. Noise can be heard • Using cable ties to a digital input on your cables. The Late Night function doesn't work • Check the DVD analog multichannel input connec- About DTS signals • When DTS program material ends and the DTS bit- The immediate display does not appear • The immediate display appears on a device connected to the COMPONENT VIDEO OUT, when the Component Video Setup (page 41) is selected. mation in the LFE channel, the subwoofer produces no sound...
... connected is selected. Noise can be heard • Using cable ties to a digital input on your cables. The Late Night function doesn't work • Check the DVD analog multichannel input connec- About DTS signals • When DTS program material ends and the DTS bit- The immediate display does not appear • The immediate display appears on a device connected to the COMPONENT VIDEO OUT, when the Component Video Setup (page 41) is selected. mation in the LFE channel, the subwoofer produces no sound...
Owner Manual
Page 78
... next generation HDD-compatible component to the TAPE IN/OUT jacks, or a DS-A1 Remote Interactive Dock to the VIDEO 3 IN jacks, for home the- Be sure to direct sunshine or inverter-type fluorescent lights. The speaker distance cannot be set to select Main or Sub (page 66). How do I connect my headphones • When a pair of headphones is connected, the listening mode is selected. The functions don't work reliably when the doors...
... next generation HDD-compatible component to the TAPE IN/OUT jacks, or a DS-A1 Remote Interactive Dock to the VIDEO 3 IN jacks, for home the- Be sure to direct sunshine or inverter-type fluorescent lights. The speaker distance cannot be set to select Main or Sub (page 66). How do I connect my headphones • When a pair of headphones is connected, the listening mode is selected. The functions don't work reliably when the doors...


