
Owner Manual
Page 1
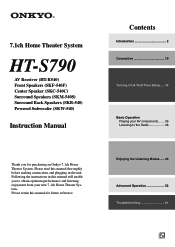
...enable you for future reference. 7.1ch Home Theater System HT-S790 AV Receiver (HT-R540) Front Speakers (SKF-540F) Center Speaker (SKC-540C) Surround Speakers (SKM-540S) Surround Back Speakers (SKB-540) Powered Subwoofer (SKW-540) Instruction Manual Thank you to the Radio 38 Enjoying the Listening Modes... to obtain optimum performance and listening enjoyment from your new 7.1ch Home Theater System. Please read this manual thoroughly before making connections and plugging in this manual for purchasing an Onkyo 7.1ch Home Theater System. Following the instructions in the unit.
...enable you for future reference. 7.1ch Home Theater System HT-S790 AV Receiver (HT-R540) Front Speakers (SKF-540F) Center Speaker (SKC-540C) Surround Speakers (SKM-540S) Surround Back Speakers (SKB-540) Powered Subwoofer (SKW-540) Instruction Manual Thank you to the Radio 38 Enjoying the Listening Modes... to obtain optimum performance and listening enjoyment from your new 7.1ch Home Theater System. Please read this manual thoroughly before making connections and plugging in this manual for purchasing an Onkyo 7.1ch Home Theater System. Following the instructions in the unit.

Owner Manual
Page 11
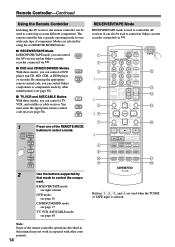
... L LISTENING MODE [ ]/[ ] buttons (46) Select the listening modes. There are jacks for AM and FM radio. Getting to Know the AV Receiver-Continued J TONE, [-], and [+] buttons (44) Used to specify the format of digital audio signals. 4 Radio indicators TUNED (38): Lights up when... Auto Tuning is selected, and disappears when Manual Tuning mode is selected. K STEREO button (46) Selects the Stereo listening mode. M DISPLAY button (37) Displays various information about the selected input...
... L LISTENING MODE [ ]/[ ] buttons (46) Select the listening modes. There are jacks for AM and FM radio. Getting to Know the AV Receiver-Continued J TONE, [-], and [+] buttons (44) Used to specify the format of digital audio signals. 4 Radio indicators TUNED (38): Lights up when... Auto Tuning is selected, and disappears when Manual Tuning mode is selected. K STEREO button (46) Selects the Stereo listening mode. M DISPLAY button (37) Displays various information about the selected input...
Owner Manual
Page 14
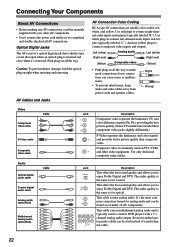
... the remote controller operations described in this manual may not work as expected with each type of the REMOTE MODE buttons to control the compo- By entering the appropriate remote control code, you can control RECEIVER the AV receiver and an Onkyo cassette TAPE recorder connected via . 1 ...2 3 1 4 2 5 36 7 4 8 9 J K ON/STANDBY REMOTE MODE RECEIVER DVD TAPE INPUT SELECTOR 1 2 3 V1 V2 V3 M D/CDR C D HDD...
... the remote controller operations described in this manual may not work as expected with each type of the REMOTE MODE buttons to control the compo- By entering the appropriate remote control code, you can control RECEIVER the AV receiver and an Onkyo cassette TAPE recorder connected via . 1 ...2 3 1 4 2 5 36 7 4 8 9 J K ON/STANDBY REMOTE MODE RECEIVER DVD TAPE INPUT SELECTOR 1 2 3 V1 V2 V3 M D/CDR C D HDD...
Owner Manual
Page 22
... to connect DVD players with your other video equipment. Connecting Your Components About AV Connections • Before making any AV connections, read the manuals supplied with a 7.1channel analog audio output. Use white plugs to make good connections (loose connections can cause noise or malfunctions). • ...is inserted and close when it's removed. Use red plugs to connect composite video inputs and outputs. Optical Digital Jacks The AV receiver's optical digital jacks have shutter-type covers that open when an optical plug is the same as for analog audio and can be ...
... to connect DVD players with your other video equipment. Connecting Your Components About AV Connections • Before making any AV connections, read the manuals supplied with a 7.1channel analog audio output. Use white plugs to make good connections (loose connections can cause noise or malfunctions). • ...is inserted and close when it's removed. Use red plugs to connect composite video inputs and outputs. Optical Digital Jacks The AV receiver's optical digital jacks have shutter-type covers that open when an optical plug is the same as for analog audio and can be ...
Owner Manual
Page 31
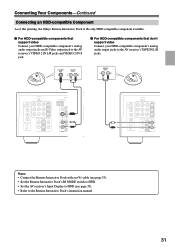
...switch to HDD. • Set the AV receiver's Input Display to HDD (see page 35). • Refer to the AV receiver's TAPE IN L/R jacks. Connecting Your Components-Continued Connecting an HDD-compatible Component As of this printing, the Onkyo Remote Interactive Dock is the only HDD-compatible ... analog audio output jacks and S-Video output jack to the AV receiver's VIDEO 2 IN L/R jacks and VIDEO 2 IN S jack. ■ For HDD-compatible components that don't support video Connect your HDD-compatible component's analog audio output jacks to the Remote Interactive Dock's instruction manual. 31
...switch to HDD. • Set the AV receiver's Input Display to HDD (see page 35). • Refer to the AV receiver's TAPE IN L/R jacks. Connecting Your Components-Continued Connecting an HDD-compatible Component As of this printing, the Onkyo Remote Interactive Dock is the only HDD-compatible ... analog audio output jacks and S-Video output jack to the AV receiver's VIDEO 2 IN L/R jacks and VIDEO 2 IN S jack. ■ For HDD-compatible components that don't support video Connect your HDD-compatible component's analog audio output jacks to the Remote Interactive Dock's instruction manual. 31
Owner Manual
Page 33
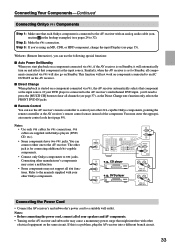
... (see page 37), as the input source. Notes: • Use only cables for connecting additional -capable components. • Connect only Onkyo components to the manuals supplied with other -capable Onkyo components, pointing the remote controller at the AV receiver's remote control sensor instead of your speakers and AV components. • Turning on the AV...
... (see page 37), as the input source. Notes: • Use only cables for connecting additional -capable components. • Connect only Onkyo components to the manuals supplied with other -capable Onkyo components, pointing the remote controller at the AV receiver's remote control sensor instead of your speakers and AV components. • Turning on the AV...
Owner Manual
Page 35
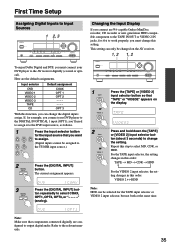
...HDD → For the VIDEO 2 input selector, the setting changes in this setting. Changing the Input Display If you connect an -capable Onkyo MiniDisc recorder, CD recorder or next generation HDD-compatible component to the TAPE IN/OUT or VIDEO 2 IN jacks, for to work properly,...2 TAPE or VIDEO 2 Press and hold down the [TAPE] or [VIDEO 2] input selector button (about 3 seconds) to the relevant manuals. 35 This setting can only be changed on the AV receiver. 1, 2 1, 2 STANDBY/ON STANDBY PHONES TUNING PRESET MULTI CH DVD VIDEO 1 VIDEO 2 VIDEO 3 TAPE TUNER C D ENTER RETURN ...
...HDD → For the VIDEO 2 input selector, the setting changes in this setting. Changing the Input Display If you connect an -capable Onkyo MiniDisc recorder, CD recorder or next generation HDD-compatible component to the TAPE IN/OUT or VIDEO 2 IN jacks, for to work properly,...2 TAPE or VIDEO 2 Press and hold down the [TAPE] or [VIDEO 2] input selector button (about 3 seconds) to the relevant manuals. 35 This setting can only be changed on the AV receiver. 1, 2 1, 2 STANDBY/ON STANDBY PHONES TUNING PRESET MULTI CH DVD VIDEO 1 VIDEO 2 VIDEO 3 TAPE TUNER C D ENTER RETURN ...


