
E-620 Instruction Manual (English)
Page 1
z We recommend that you start to use your camera before taking important photographs. z The screen and camera illustrations shown in this camera. DIGITAL CAMERA INSTRUCTION MANUAL Basic guide P. 2 Review the camera part names, the basic steps for future reference. Keep this manual in this manual are ... operations. For the latest information, please visit the Olympus website. Before you take test shots to get accustomed to your new camera, please read these instructions carefully to firmware update for the camera, the contents will differ. Table of functions due to...
z We recommend that you start to use your camera before taking important photographs. z The screen and camera illustrations shown in this camera. DIGITAL CAMERA INSTRUCTION MANUAL Basic guide P. 2 Review the camera part names, the basic steps for future reference. Keep this manual in this manual are ... operations. For the latest information, please visit the Olympus website. Before you take test shots to get accustomed to your new camera, please read these instructions carefully to firmware update for the camera, the contents will differ. Table of functions due to...
E-620 Instruction Manual (English)
Page 2
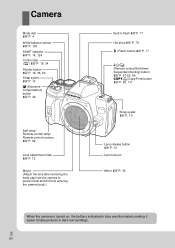
Camera Mode dial gP. 4 White balance sensor gP. 106 SSWF indicator gP. 14, 124 Control dial (j) gP. 19, 34 Shutter button gP. 16, 36, 60 Strap eyelet gP. 10 F (Exposure compensation) button gP. 49 Self-timer/ Remote control lamp/ Remote control receiver gP. 62 Lens attachment mark gP. 12 Mount (Attach the lens after removing the body cap from the camera to prevent dust and dirt from entering the camera body.) Built-in flash gP. 77 Hot shoe gP. 79 # (Flash) button gP. 77
Camera Mode dial gP. 4 White balance sensor gP. 106 SSWF indicator gP. 14, 124 Control dial (j) gP. 19, 34 Shutter button gP. 16, 36, 60 Strap eyelet gP. 10 F (Exposure compensation) button gP. 49 Self-timer/ Remote control lamp/ Remote control receiver gP. 62 Lens attachment mark gP. 12 Mount (Attach the lens after removing the body cap from the camera to prevent dust and dirt from entering the camera body.) Built-in flash gP. 77 Hot shoe gP. 79 # (Flash) button gP. 77
E-620 Instruction Manual (English)
Page 4
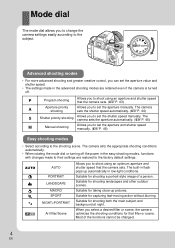
... for shooting a portrait-style image of the functions cannot be changed. 4 EN Most of a person. P Program shooting Allows you to change the camera settings easily according to the subject. Suitable for shooting both the main subject and background at night. AUTO i l & j / g AUTO PORTRAIT ...that filter or scene. Mode dial The mode dial allows you to shoot using an optimum aperture and shutter speed that the camera sets. The camera sets the appropriate shooting conditions automatically. • When rotating the mode dial or turning off . The built-in low-light...
... for shooting a portrait-style image of the functions cannot be changed. 4 EN Most of a person. P Program shooting Allows you to change the camera settings easily according to the subject. Suitable for shooting both the main subject and background at night. AUTO i l & j / g AUTO PORTRAIT ...that filter or scene. Mode dial The mode dial allows you to shoot using an optimum aperture and shutter speed that the camera sets. The camera sets the appropriate shooting conditions automatically. • When rotating the mode dial or turning off . The built-in low-light...
E-620 Instruction Manual (English)
Page 10
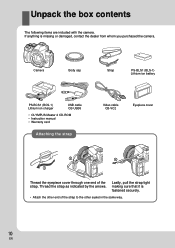
... If anything is fastened securely. • Attach the other end of the strap. Unpack the box contents The following items are included with the camera. Lastly, pull the strap tight making sure that it is missing or damaged, contact the dealer from whom you purchased the... camera. Camera Body cap Strap PS-BLS1 (BLS-1) Lithium ion battery PS-BCS1 (BCS-1) Lithium ion charger USB cable CB-USB6 • OLYMPUS Master 2 CD-ROM • Instruction manual • Warranty card Attaching the strap Video ...
... If anything is fastened securely. • Attach the other end of the strap. Unpack the box contents The following items are included with the camera. Lastly, pull the strap tight making sure that it is missing or damaged, contact the dealer from whom you purchased the... camera. Camera Body cap Strap PS-BLS1 (BLS-1) Lithium ion battery PS-BCS1 (BCS-1) Lithium ion charger USB cable CB-USB6 • OLYMPUS Master 2 CD-ROM • Instruction manual • Warranty card Attaching the strap Video ...

E-620 Instruction Manual (English)
Page 11
... for prolonged shooting in case the battery in the direction of E • Be sure to turn off the camera when you open or close the battery compartment cover. • When using the camera, be sure to unlock the battery. Unloading the battery Press the battery lock to close the battery compartment cover...
... for prolonged shooting in case the battery in the direction of E • Be sure to turn off the camera when you open or close the battery compartment cover. • When using the camera, be sure to unlock the battery. Unloading the battery Press the battery lock to close the battery compartment cover...
E-620 Instruction Manual (English)
Page 12
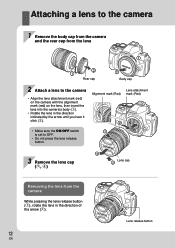
...cap 2 Body cap 2 Attach a lens to OFF. • Do not press the lens release button. Attaching a lens to the camera 1 Remove the body cap from the camera and the rear cap from the camera While pressing the lens release button (1), rotate the lens in the direction indicated by the arrow until you hear... it click (2). • Make sure the ON/OFF switch is set to the camera • Align the lens attachment mark (red) on the camera with the alignment mark (red) on the lens, then insert the lens into the camera's body (1). • Rotate the lens in the direction of the arrow (2). 12 EN...
...cap 2 Body cap 2 Attach a lens to OFF. • Do not press the lens release button. Attaching a lens to the camera 1 Remove the body cap from the camera and the rear cap from the camera While pressing the lens release button (1), rotate the lens in the direction indicated by the arrow until you hear... it click (2). • Make sure the ON/OFF switch is set to the camera • Align the lens attachment mark (red) on the camera with the alignment mark (red) on the lens, then insert the lens into the camera's body (1). • Rotate the lens in the direction of the arrow (2). 12 EN...

E-620 Instruction Manual (English)
Page 14
If the super control panel screen does not appear, press the INFO button. Power on 1 Set the camera's ON/OFF switch to ON • To turn off the power, set the ON/OFF switch to remove dust and dirt from the image pickup ... accordance with your vision. Viewfinder AF target Diopter adjustment dial 14 EN Dust reduction function operation The dust reduction function is automatically activated when the camera is displayed on . When you can see the AF target clearly, adjustment is working. The SSWF (Super Sonic Wave Filter) indicator blinks while dust reduction...
If the super control panel screen does not appear, press the INFO button. Power on 1 Set the camera's ON/OFF switch to ON • To turn off the power, set the ON/OFF switch to remove dust and dirt from the image pickup ... accordance with your vision. Viewfinder AF target Diopter adjustment dial 14 EN Dust reduction function operation The dust reduction function is automatically activated when the camera is displayed on . When you can see the AF target clearly, adjustment is working. The SSWF (Super Sonic Wave Filter) indicator blinks while dust reduction...

E-620 Instruction Manual (English)
Page 15
... pad fghi 5 Repeat this procedure until the date and time are completely set 2 Use fg to set the correct date and time before using the camera. MENU button 1 Press the MENU button • The menu screen is also included with the images. s j±0 k±0 REC VIEW 5SEC cMENU DISPLAY OFF FIRMWARE...
... pad fghi 5 Repeat this procedure until the date and time are completely set 2 Use fg to set the correct date and time before using the camera. MENU button 1 Press the MENU button • The menu screen is also included with the images. s j±0 k±0 REC VIEW 5SEC cMENU DISPLAY OFF FIRMWARE...

E-620 Instruction Manual (English)
Page 16
Doing so could destroy stored pictures and prevent storage of pictures you have been set automatically by the camera are displayed. • The super control panel is not displayed while the shutter button is pressed. 3 Release the shutter Press the shutter button all the ...way (fully). • The shutter sounds and the picture is taken. • The card access lamp blinks and the camera starts recording the picture. AF target Viewfinder Card access lamp Super control panel 250 AUTO 2009. 03.16 F5.6 AF Aperture value OFF arge Normal...
Doing so could destroy stored pictures and prevent storage of pictures you have been set automatically by the camera are displayed. • The super control panel is not displayed while the shutter button is pressed. 3 Release the shutter Press the shutter button all the ...way (fully). • The shutter sounds and the picture is taken. • The card access lamp blinks and the camera starts recording the picture. AF target Viewfinder Card access lamp Super control panel 250 AUTO 2009. 03.16 F5.6 AF Aperture value OFF arge Normal...

E-620 Instruction Manual (English)
Page 17
... EN g"Using live view" (P. 35) 1 Press the u (live view • The subject is displayed on the LCD monitor. When the camera stops operating If no operations are performed for shooting Holding the camera Keep your fingers and the strap away from the lens, flash, and the white balance sensor. The...is possible to take the picture • The picture is taken with the focus adjusted. Basic guide Preparations for approximately 8 seconds while the camera is on, the monitor backlight turns off to live view) button to switch to save battery power (when the super control panel is lit...
... EN g"Using live view" (P. 35) 1 Press the u (live view • The subject is displayed on the LCD monitor. When the camera stops operating If no operations are performed for shooting Holding the camera Keep your fingers and the strap away from the lens, flash, and the white balance sensor. The...is possible to take the picture • The picture is taken with the focus adjusted. Basic guide Preparations for approximately 8 seconds while the camera is on, the monitor backlight turns off to live view) button to switch to save battery power (when the super control panel is lit...
E-620 Instruction Manual (English)
Page 19
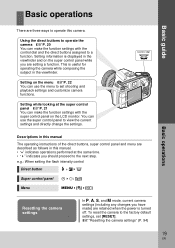
...control panel while you have made) are retained when the power is useful for operating the camera while composing the subject in this camera. g"Resetting the camera settings" (P. 94) 19 EN You can make the function settings with the control dial and...e.g.: When setting the flash intensity control Direct button #+F j Super control panel i p: [w] Menu MENU [X] [w] Resetting the camera settings In P, A, S, and M mode, current camera settings (including any changes you are setting a function. Basic operations Basic guide There are three ways to operate this manual. ...
...control panel while you have made) are retained when the power is useful for operating the camera while composing the subject in this camera. g"Resetting the camera settings" (P. 94) 19 EN You can make the function settings with the control dial and...e.g.: When setting the flash intensity control Direct button #+F j Super control panel i p: [w] Menu MENU [X] [w] Resetting the camera settings In P, A, S, and M mode, current camera settings (including any changes you are setting a function. Basic operations Basic guide There are three ways to operate this manual. ...
E-620 Instruction Manual (English)
Page 20
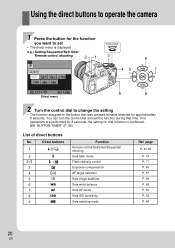
... assigned to set the function during that time. Direct buttons 1 g"BUTTON TIMER" (P. 98) List of direct buttons No. Using the direct buttons to operate the camera 1 Press the button for approximately 8 seconds. You can turn the control dial and set • The direct menu is confirmed.
... assigned to set the function during that time. Direct buttons 1 g"BUTTON TIMER" (P. 98) List of direct buttons No. Using the direct buttons to operate the camera 1 Press the button for approximately 8 seconds. You can turn the control dial and set • The direct menu is confirmed.
E-620 Instruction Manual (English)
Page 22
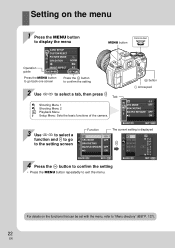
... confirm the setting 2 Use fg to select a tab, then press i Tab W Shooting Menu 1 X Shooting Menu 2 q Playback Menu d Setup Menu: Sets the basic functions of the camera. Setting on the functions that can be set with the menu, refer to exit the menu.
... confirm the setting 2 Use fg to select a tab, then press i Tab W Shooting Menu 1 X Shooting Menu 2 q Playback Menu d Setup Menu: Sets the basic functions of the camera. Setting on the functions that can be set with the menu, refer to exit the menu.

E-620 Instruction Manual (English)
Page 23
... simple and advanced shooting functions. s j±0 k±0 REC VIEW 5SEC cMENU DISPLAY ON FIRMWARE BACK SET The [c] tab is more than adequate for customizing the camera to suit your personal preferences or needs. Normally, there is set to select the [d] tab, then press i W '09.03.01 14:01 ENG. The... Custom Menu is added when [c MENU DISPLAY] in the Setup Menu is no need to suit your camera" (gP. 95) 1 Press the MENU button to display the menu 2 Use fg to [ON]. The initial menu is displayed. c Custom Menu: Customizes shooting functions...
... simple and advanced shooting functions. s j±0 k±0 REC VIEW 5SEC cMENU DISPLAY ON FIRMWARE BACK SET The [c] tab is more than adequate for customizing the camera to suit your personal preferences or needs. Normally, there is set to select the [d] tab, then press i W '09.03.01 14:01 ENG. The... Custom Menu is added when [c MENU DISPLAY] in the Setup Menu is no need to suit your camera" (gP. 95) 1 Press the MENU button to display the menu 2 Use fg to [ON]. The initial menu is displayed. c Custom Menu: Customizes shooting functions...
E-620 Instruction Manual (English)
Page 24
...the date/time 15 Shooting ...16 Playback/Erasing 18 Basic operations ...19 Basic operations 19 Using the direct buttons to operate the camera 20 Setting while looking at the super control panel 21 Setting on the menu 22 1 Using live view 35 Functions and operations... available only during live view will be explained. Table of parts and functions 2 Camera ...2 Mode dial...4 Viewfinder ...6 Super control panel 7 LCD monitor (Live view 8 LCD monitor (Playback 9 Preparations for shooting and playback. Activating live...
...the date/time 15 Shooting ...16 Playback/Erasing 18 Basic operations ...19 Basic operations 19 Using the direct buttons to operate the camera 20 Setting while looking at the super control panel 21 Setting on the menu 22 1 Using live view 35 Functions and operations... available only during live view will be explained. Table of parts and functions 2 Camera ...2 Mode dial...4 Viewfinder ...6 Super control panel 7 LCD monitor (Live view 8 LCD monitor (Playback 9 Preparations for shooting and playback. Activating live...
E-620 Instruction Manual (English)
Page 25
... AE bracketing ...50 ISO sensitivity setting 52 ISO bracketing ...53 Multiple exposure ...53 3 Focusing and shooting functions 55 Describes the optimal focusing methods according to digital cameras. AF mode selection ...55 S-AF (single AF 55 C-AF (continuous AF 56 MF (manual focus 56 Simultaneous use of S-AF mode and MF mode (S-AF...
... AE bracketing ...50 ISO sensitivity setting 52 ISO bracketing ...53 Multiple exposure ...53 3 Focusing and shooting functions 55 Describes the optimal focusing methods according to digital cameras. AF mode selection ...55 S-AF (single AF 55 C-AF (continuous AF 56 MF (manual focus 56 Simultaneous use of S-AF mode and MF mode (S-AF...

E-620 Instruction Manual (English)
Page 26
... shooting 77 Flash intensity control 77 Flash bracketing ...78 External flash shooting 79 Shooting with the Olympus wireless RC flash system 80 Using commercially available flashes 81 6 Playback functions 82 Describes the functions for using the camera. Setup Menu ...93 X (Date/time setting 93 W (Changing the display language 93 s (Monitor brightness adjustment...
... shooting 77 Flash intensity control 77 Flash bracketing ...78 External flash shooting 79 Shooting with the Olympus wireless RC flash system 80 Using commercially available flashes 81 6 Playback functions 82 Describes the functions for using the camera. Setup Menu ...93 X (Date/time setting 93 W (Changing the display language 93 s (Monitor brightness adjustment...

E-620 Instruction Manual (English)
Page 27
... 101 AELMetering 101 ISO ...101 ISO STEP 101 ISO-AUTO SET 102 ISO-AUTO 102 BULB TIMER 102 ANTI-SHOCK 102 27 EN 8 Customizing your camera 95 Describes how to customize the...
... 101 AELMetering 101 ISO ...101 ISO STEP 101 ISO-AUTO SET 102 ISO-AUTO 102 BULB TIMER 102 ANTI-SHOCK 102 27 EN 8 Customizing your camera 95 Describes how to customize the...

E-620 Instruction Manual (English)
Page 28
... (DPOF 109 Print reservation 109 Single-frame reservation 109 All-frame reservation 110 Resetting the print reservation data 111 Direct printing (PictBridge 111 Connecting the camera to a printer 112 Easy printing 112 Custom printing 113 28 EN W # CUSTOM...102 #X-SYNC 102 #SLOW LIMIT 102 w+F ...102 AUTO POP UP 102 X K/a/COLOR/WB...
... (DPOF 109 Print reservation 109 Single-frame reservation 109 All-frame reservation 110 Resetting the print reservation data 111 Direct printing (PictBridge 111 Connecting the camera to a printer 112 Easy printing 112 Custom printing 113 28 EN W # CUSTOM...102 #X-SYNC 102 #SLOW LIMIT 102 w+F ...102 AUTO POP UP 102 X K/a/COLOR/WB...
E-620 Instruction Manual (English)
Page 29
... software Describes how to transfer and store your camera images to a computer. 115 Flowchart ...115 Using the provided OLYMPUS Master software 115 What is OLYMPUS Master 115 Connecting the camera to your charger abroad 127 Interchangeable lenses 128 ZUIKO DIGITAL interchangeable lenses 128 ZUIKO DIGITAL lens specifications 129 Program line diagram (P mode 131 Flash synchronization and...
... software Describes how to transfer and store your camera images to a computer. 115 Flowchart ...115 Using the provided OLYMPUS Master software 115 What is OLYMPUS Master 115 Connecting the camera to your charger abroad 127 Interchangeable lenses 128 ZUIKO DIGITAL interchangeable lenses 128 ZUIKO DIGITAL lens specifications 129 Program line diagram (P mode 131 Flash synchronization and...


