
D-370 Quick Start Guide (238KB)
Page 1
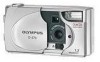
... batteries or the AC adapter when the green lamp is taken. DIGITAL CAMERA C-100 D-370 QUICK START GUIDE Thank you are using a SmartMedia card, do not open the card cover as shown, making sure that they are correctly oriented. 3 Pull down the battery compartment cover in the direction of the arrow C and close -up in the direction of B. 2 Insert the batteries as this will return to Auto mode (default setting) when the lens...
... batteries or the AC adapter when the green lamp is taken. DIGITAL CAMERA C-100 D-370 QUICK START GUIDE Thank you are using a SmartMedia card, do not open the card cover as shown, making sure that they are correctly oriented. 3 Pull down the battery compartment cover in the direction of the arrow C and close -up in the direction of B. 2 Insert the batteries as this will return to Auto mode (default setting) when the lens...

D-370 Quick Start Guide (238KB)
Page 2
...White balance settings Auto (no display) Automatically adjusts the white balance to ensure natural colors Daylight ( ) Ensures natural colors outdoors in full daylight (sunny weather) Cloudy ( ) Ensures natural colors outdoors in the internal memory, do not insert a SmartMedia card. • When erasing images on . Press the button to exit the menu. 6 Take the picture. I RECORDING/PLAYING BACK MOVING IMAGES ( ) Taking moving images 1 Press the button with the lens barrier open to display the Camera menu screen. 2 Select [PICTURE] using the / buttons and press the button...
...White balance settings Auto (no display) Automatically adjusts the white balance to ensure natural colors Daylight ( ) Ensures natural colors outdoors in full daylight (sunny weather) Cloudy ( ) Ensures natural colors outdoors in the internal memory, do not insert a SmartMedia card. • When erasing images on . Press the button to exit the menu. 6 Take the picture. I RECORDING/PLAYING BACK MOVING IMAGES ( ) Taking moving images 1 Press the button with the lens barrier open to display the Camera menu screen. 2 Select [PICTURE] using the / buttons and press the button...
D-370 Basic Manual (4.8 MB)
Page 2
... by copyright laws to duplicate in part or in whole the information contained in this manual may be subject to which can radiate radio frequency energy and, if not installed and used to connect the camera to provide reasonable protection against harmful interference in a residential installation. Only the included USB cable should be determined by taking all possible measures to improper...
... by copyright laws to duplicate in part or in whole the information contained in this manual may be subject to which can radiate radio frequency energy and, if not installed and used to connect the camera to provide reasonable protection against harmful interference in a residential installation. Only the included USB cable should be determined by taking all possible measures to improper...
D-370 Basic Manual (4.8 MB)
Page 4
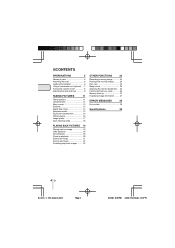
... Digital Tele mode 14 Sequence mode 14 Exposure compensation 15 White balance 16 Image quality 17 Spot metering mode 18 PLAYING BACK PICTURES 19 Playing back an image 19 Index playback 19 Auto playback 20 Close-up playback 20 Erasing an image 21 Erasing all images 22 Protecting important images .......... 22 OTHER FUNCTIONS 24 Recording a moving image 24 Playing back moving images .......... 24 Rec view 25 Beep sound 25 Adjusting the monitor brightness .... 25 Card format/memory setup 26 Memory back-up 27 Displaying image information ......... 27 ERROR MESSAGES 29 Error...
... Digital Tele mode 14 Sequence mode 14 Exposure compensation 15 White balance 16 Image quality 17 Spot metering mode 18 PLAYING BACK PICTURES 19 Playing back an image 19 Index playback 19 Auto playback 20 Close-up playback 20 Erasing an image 21 Erasing all images 22 Protecting important images .......... 22 OTHER FUNCTIONS 24 Recording a moving image 24 Playing back moving images .......... 24 Rec view 25 Beep sound 25 Adjusting the monitor brightness .... 25 Card format/memory setup 26 Memory back-up 27 Displaying image information ......... 27 ERROR MESSAGES 29 Error...

D-370 Basic Manual (4.8 MB)
Page 10
... time settings are exhausted. Note The date and time can be erased or become incorrect if the camera is completed. 9 Press the button again. Move to turn the monitor off. Make sure that the date and time settings are correct before taking an important picture. The date and time adjustment menu will be adjusted both in Record mode and Play mode using the / buttons and press the button. Setting of the date and time is left without batteries or the batteries are adjusted...
... time settings are exhausted. Note The date and time can be erased or become incorrect if the camera is completed. 9 Press the button again. Move to turn the monitor off. Make sure that the date and time settings are correct before taking an important picture. The date and time adjustment menu will be adjusted both in Record mode and Play mode using the / buttons and press the button. Setting of the date and time is left without batteries or the batteries are adjusted...
D-370 Basic Manual (4.8 MB)
Page 12
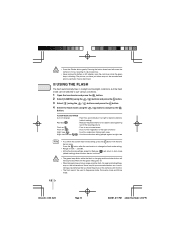
I USING THE FLASH The flash automatically fires in a blurred picture. • Never remove the battery or AC adapter, open . Pressing the button down hard will return to Auto mode (default setting) when the lens barrier is closed. Caution • Press the Shutter button gently. FLASH MODE SETTINGS Auto (no display) : Flash fires automatically in low light or backlit conditions (default setting) Red-eye ( ) : Reduces the phenomenon of a subject's eyes appearing red in the resulting picture Flash on the camera's LCD monitor. • The flash cannot...
I USING THE FLASH The flash automatically fires in a blurred picture. • Never remove the battery or AC adapter, open . Pressing the button down hard will return to Auto mode (default setting) when the lens barrier is closed. Caution • Press the Shutter button gently. FLASH MODE SETTINGS Auto (no display) : Flash fires automatically in low light or backlit conditions (default setting) Red-eye ( ) : Reduces the phenomenon of a subject's eyes appearing red in the resulting picture Flash on the camera's LCD monitor. • The flash cannot...
D-370 Basic Manual (4.8 MB)
Page 14
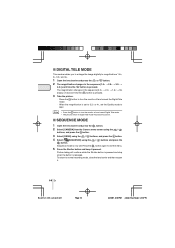
...;] each time the button is pressed. 3 Take the picture. · Press the button to 3.2× or 4×, set . I SEQUENCE MODE 1 Open the lens barrier and press the button. 2 Select [CAMERA] from the Camera menu screen using the / buttons, and press the button. 3 Select [DRIVE] using the / buttons, and press the button. 4 Select [ SEQUENCE] using the / buttons and press the button. Picture-taking will continue while the Shutter button is pressed and stop when the button is set to turn the monitor...
...;] each time the button is pressed. 3 Take the picture. · Press the button to 3.2× or 4×, set . I SEQUENCE MODE 1 Open the lens barrier and press the button. 2 Select [CAMERA] from the Camera menu screen using the / buttons, and press the button. 3 Select [DRIVE] using the / buttons, and press the button. 4 Select [ SEQUENCE] using the / buttons and press the button. Picture-taking will continue while the Shutter button is pressed and stop when the button is set to turn the monitor...
D-370 Basic Manual (4.8 MB)
Page 16
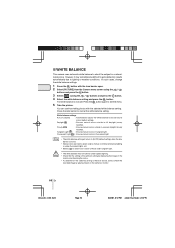
... recorded image by playing it may not function under tungsten light. Cloudy ( ) : Ensures natural colors outside in full daylight (sunny weather). Caution • The white balance may sometimes be difficult to get satisfactory results automatically due to lighting or weather conditions. In such cases, change the white balance settings. 1 Press the button with the selected white balance setting. Close the lens barrier to exit the menu. 5 Take the picture. You can continue taking photos...
... recorded image by playing it may not function under tungsten light. Cloudy ( ) : Ensures natural colors outside in full daylight (sunny weather). Caution • The white balance may sometimes be difficult to get satisfactory results automatically due to lighting or weather conditions. In such cases, change the white balance settings. 1 Press the button with the selected white balance setting. Close the lens barrier to exit the menu. 5 Take the picture. You can continue taking photos...
D-370 Basic Manual (4.8 MB)
Page 17
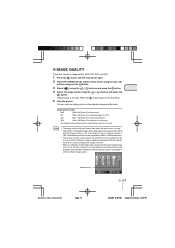
... more time to record and play back images than HQ. • When you change to exit the menu. Image quality is now set. I IMAGE QUALITY There are currently available in 8MB to 128 MB capacities.) • The number of image quality: SHQ, HQ, SQ1 and SQ2. 1 Press the button with the lens barrier open. 2 Select [PICTURE] from the Camera menu screen using the / buttons and press the button. 3 Select [ ] using the / buttons and...
... more time to record and play back images than HQ. • When you change to exit the menu. Image quality is now set. I IMAGE QUALITY There are currently available in 8MB to 128 MB capacities.) • The number of image quality: SHQ, HQ, SQ1 and SQ2. 1 Press the button with the lens barrier open. 2 Select [PICTURE] from the Camera menu screen using the / buttons and press the button. 3 Select [ ] using the / buttons and...

D-370 Basic Manual (4.8 MB)
Page 19
... not a malfunction. Changing the number of images in the index playback Select the number of images in the index playback from single-image playback mode. 1 Press the button with the lens barrier closed. 2 Press the button. 3 Press the button to move the green frame to the next image and the button to move the frame to the previous image. 4 Press the button. The last recorded image will be displayed on , the monitor...
... not a malfunction. Changing the number of images in the index playback Select the number of images in the index playback from single-image playback mode. 1 Press the button with the lens barrier closed. 2 Press the button. 3 Press the button to move the green frame to the next image and the button to move the frame to the previous image. 4 Press the button. The last recorded image will be displayed on , the monitor...

D-370 Basic Manual (4.8 MB)
Page 25
... the button. 3 Select [REC VIEW] using the / buttons and press the button. 4 Select [ON] using the / buttons and press the button. I ADJUSTING THE MONITOR BRIGHTNESS 1 Open the lens barrier and press the button. 2 Select [SETUP] using the / buttons and press the button. Note The Rec View mode is saved when the camera is turned off. • You can also set the beep sound from the Play menu. I BEEP SOUND This function enables you to check an image by displaying...
... the button. 3 Select [REC VIEW] using the / buttons and press the button. 4 Select [ON] using the / buttons and press the button. I ADJUSTING THE MONITOR BRIGHTNESS 1 Open the lens barrier and press the button. 2 Select [SETUP] using the / buttons and press the button. Note The Rec View mode is saved when the camera is turned off. • You can also set the beep sound from the Play menu. I BEEP SOUND This function enables you to check an image by displaying...

D-370 Basic Manual (4.8 MB)
Page 30
... light) Lens: Olympus lens 4.5mm, F4, 5 elements, 5 groups (equivalent to 35mm lens on 35mm camera) Photometric system: Digital ESP metering system with imager, Spot Metering Exposure control system: Programmed auto exposure Aperture: f4, f8 Shutter*: 1 ~ 1/2000 sec. (used with JPEG (based on DCF) and DPOF Recording media: Internal memory 1MB, SmartMedia card (4MB, 8MB, 16MB, 32MB, 64MB, 128MB) No. of pixels: Approx. 114,000 pixels On-screen display: Date/Time, frame number, protect, image quality, battery level, file number, print service, menu...
... light) Lens: Olympus lens 4.5mm, F4, 5 elements, 5 groups (equivalent to 35mm lens on 35mm camera) Photometric system: Digital ESP metering system with imager, Spot Metering Exposure control system: Programmed auto exposure Aperture: f4, f8 Shutter*: 1 ~ 1/2000 sec. (used with JPEG (based on DCF) and DPOF Recording media: Internal memory 1MB, SmartMedia card (4MB, 8MB, 16MB, 32MB, 64MB, 128MB) No. of pixels: Approx. 114,000 pixels On-screen display: Date/Time, frame number, protect, image quality, battery level, file number, print service, menu...
D-370 PC Reference Manual (644KB)
Page 1
G Follow the procedures in incorrect installation. Following other procedures may result in this manual to install the USB driver. DIGITAL CAMERA C-100 D-370 OPERATION MANUAL CONNECTING THE CAMERA TO A PC G Thank you for purchasing an Olympus digital camera.
G Follow the procedures in incorrect installation. Following other procedures may result in this manual to install the USB driver. DIGITAL CAMERA C-100 D-370 OPERATION MANUAL CONNECTING THE CAMERA TO A PC G Thank you for purchasing an Olympus digital camera.

D-370 PC Reference Manual (644KB)
Page 5
... download images from the internal memory, remove the SmartMedia card. • Turn the PC on and check that Windows is running. • Quit all applications that may be lost. • If you are not using batteries and the power runs out while you are accessing the SmartMedia card in the camera, connecting and disconnecting the AC adapter may be running. • Olympus recommends the use of the image data...
... download images from the internal memory, remove the SmartMedia card. • Turn the PC on and check that Windows is running. • Quit all applications that may be lost. • If you are not using batteries and the power runs out while you are accessing the SmartMedia card in the camera, connecting and disconnecting the AC adapter may be running. • Olympus recommends the use of the image data...

D-370 PC Reference Manual (644KB)
Page 10
... window. 2 Double-click on the [Dcim] icon and open the folder. 10 The My Documents folder is used in the camera, the internal memory will be indicated by a [Removable Disk] icons. 3 Double-click on the [Removable Disk] icon. Note • If the [Removable Disk] icon is not displayed, or if an error message is displayed when you to save images on the PC. Windows SAVING IMAGES FROM YOUR CAMERA ON THE PC This function enables you double-click on the [Removable Disk] icon...
... window. 2 Double-click on the [Dcim] icon and open the folder. 10 The My Documents folder is used in the camera, the internal memory will be indicated by a [Removable Disk] icons. 3 Double-click on the [Removable Disk] icon. Note • If the [Removable Disk] icon is not displayed, or if an error message is displayed when you to save images on the PC. Windows SAVING IMAGES FROM YOUR CAMERA ON THE PC This function enables you double-click on the [Removable Disk] icon...
D-370 Reference Manual (2.28MB)
Page 27
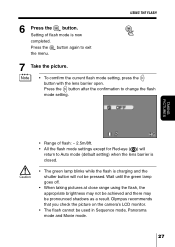
Press the button again to change the flash mode setting. TAKING PICTURES • Range of flash mode is now completed. Caution • The green lamp blinks while the flash is closed. Setting of flash: ~ 2.5m/8ft. • All the flash mode settings except for Red-eye ( ) will return to Auto mode (default setting) when the lens barrier is charging and the shutter button will not be pressed. USING THE FLASH 6 Press the button. Olympus recommends that you check the picture on the camera's LCD monitor...
Press the button again to change the flash mode setting. TAKING PICTURES • Range of flash mode is now completed. Caution • The green lamp blinks while the flash is closed. Setting of flash: ~ 2.5m/8ft. • All the flash mode settings except for Red-eye ( ) will return to Auto mode (default setting) when the lens barrier is charging and the shutter button will not be pressed. USING THE FLASH 6 Press the button. Olympus recommends that you check the picture on the camera's LCD monitor...

D-370 Reference Manual (2.28MB)
Page 42
... you change to exit the menu. 6 Take the picture. Warning mark 42 Press the button again to a high image quality and the remaining recordable image count is insufficient memory space. This indicates that there is low, the internal memory or SmartMedia card warning mark may be displayed. Note • The image quality setting will remain even when the lens barrier is closed. • The number of recordable images varies depending...
... you change to exit the menu. 6 Take the picture. Warning mark 42 Press the button again to a high image quality and the remaining recordable image count is insufficient memory space. This indicates that there is low, the internal memory or SmartMedia card warning mark may be displayed. Note • The image quality setting will remain even when the lens barrier is closed. • The number of recordable images varies depending...
D-370 Reference Manual (2.28MB)
Page 45
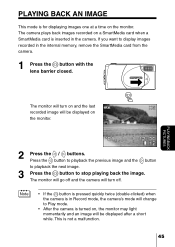
... Record mode, the camera's mode will be displayed on the monitor. The monitor will go off . The camera plays back images recorded on a SmartMedia card when a SmartMedia card is for displaying images one at a time on the monitor. PLAYINGBACK PICTURES 2 Press the / buttons. Press the button to playback the previous image and the button to playback the next image. 3 Press the button to display images recorded in the internal memory, remove the SmartMedia card from the camera. 1 Press the button with the lens...
... Record mode, the camera's mode will be displayed on the monitor. The monitor will go off . The camera plays back images recorded on a SmartMedia card when a SmartMedia card is for displaying images one at a time on the monitor. PLAYINGBACK PICTURES 2 Press the / buttons. Press the button to playback the previous image and the button to playback the next image. 3 Press the button to display images recorded in the internal memory, remove the SmartMedia card from the camera. 1 Press the button with the lens...

D-370 Reference Manual (2.28MB)
Page 72
... mode, Movie mode, or Panorama mode. Page P.64 In sunlight Block the sunlight with your hand. - 72 Battery performance is connected to a The camera will not function PC while connected to forcibly fire the flash, set Remedy Adjust the brightness. Page P.18 P.12 P.12 P.12 P.18 - - Ref. TROUBLE- SHOOTING The monitor is hard to see Cause Brightness is incorrectly set to cold temperatures temperature before use. Power has...
... mode, Movie mode, or Panorama mode. Page P.64 In sunlight Block the sunlight with your hand. - 72 Battery performance is connected to a The camera will not function PC while connected to forcibly fire the flash, set Remedy Adjust the brightness. Page P.18 P.12 P.12 P.12 P.18 - - Ref. TROUBLE- SHOOTING The monitor is hard to see Cause Brightness is incorrectly set to cold temperatures temperature before use. Power has...

D-370 Reference Manual (2.28MB)
Page 76
..., 16MB, 32MB, 64MB, 128MB) No. SPECIFICATIONS Product type: Digital camera (for recording and displaying) Recording system: Digital recording, compatible with mechanical shutter) *Manual setting not available Shooting range: 0.6m ~ ∞ (Standard mode) 0.25m ~ ∞ (Macro mode) Viewfinder: Optical real image viewfinder (Target mark), LCD monitor LCD monitor: 1.5 inch TFT color LCD display No. SHOOTING 76 of pixels: Approx. 114,000 pixels On-screen display: Date/Time, frame number, protect, image quality, battery level, file number, print service, menu, etc.
..., 16MB, 32MB, 64MB, 128MB) No. SPECIFICATIONS Product type: Digital camera (for recording and displaying) Recording system: Digital recording, compatible with mechanical shutter) *Manual setting not available Shooting range: 0.6m ~ ∞ (Standard mode) 0.25m ~ ∞ (Macro mode) Viewfinder: Optical real image viewfinder (Target mark), LCD monitor LCD monitor: 1.5 inch TFT color LCD display No. SHOOTING 76 of pixels: Approx. 114,000 pixels On-screen display: Date/Time, frame number, protect, image quality, battery level, file number, print service, menu, etc.


