C-2000 Zoom Instruction manual (5.5 MB)
Page 10
... sources such as the original part. E e) When the product exhibits a distinct change in proper operating condition. 19. this product, ask the service technician to perform safety checks to Part 15 of any service or repairs to this indicates a need for Class B digital device, pursuant to determine that produce heat. Replacement Parts - Safety Check - Radio and Television Interference Change or modifications not expressly approved...
... sources such as the original part. E e) When the product exhibits a distinct change in proper operating condition. 19. this product, ask the service technician to perform safety checks to Part 15 of any service or repairs to this indicates a need for Class B digital device, pursuant to determine that produce heat. Replacement Parts - Safety Check - Radio and Television Interference Change or modifications not expressly approved...
C-2000 Zoom Instruction manual (5.5 MB)
Page 26
... the camera's internal parts. Ⅲ Do not use the flash for a long period of mold in a shock or injury. 26 a beach in places exposed to check operation. Ⅲ Do not turn the camera when it is hot. Ⅲ Do not improperly open or modify the camera, as this can lead to become excessively hot. Before using, press the Shutter release button to direct sunlight (e.g. Turn...
... the camera's internal parts. Ⅲ Do not use the flash for a long period of mold in a shock or injury. 26 a beach in places exposed to check operation. Ⅲ Do not turn the camera when it is hot. Ⅲ Do not improperly open or modify the camera, as this can lead to become excessively hot. Before using, press the Shutter release button to direct sunlight (e.g. Turn...
C-2000 Zoom Instruction manual (5.5 MB)
Page 34
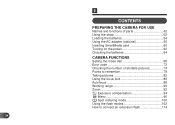
E CONTENTS PREPARING THE CAMERA FOR USE Names and functions of parts 42 Using the strap 52 Loading the batteries 54 Using the AC adapter (optional 56 Inserting SmartMedia card 60 Turning on the power 62 Checking the batteries 64 CAMERA FUNCTIONS Setting the mode dial 68 Error code 72 Checking the number of storable pictures 74 Points to remember 78 Taking pictures 82 Using the focus lock 86 Autofocus 88 Working range 90 Zoom 92 Exposure compensation 94 Menu 96 Spot metering mode 100 Using the flash modes 102 How to connect an extension flash 114 34
E CONTENTS PREPARING THE CAMERA FOR USE Names and functions of parts 42 Using the strap 52 Loading the batteries 54 Using the AC adapter (optional 56 Inserting SmartMedia card 60 Turning on the power 62 Checking the batteries 64 CAMERA FUNCTIONS Setting the mode dial 68 Error code 72 Checking the number of storable pictures 74 Points to remember 78 Taking pictures 82 Using the focus lock 86 Autofocus 88 Working range 90 Zoom 92 Exposure compensation 94 Menu 96 Spot metering mode 100 Using the flash modes 102 How to connect an extension flash 114 34
C-2000 Zoom Instruction manual (5.5 MB)
Page 36
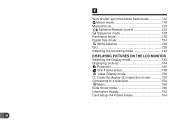
E Slow shutter synchronization flash mode 116 Macro mode 118 Manual focus 120 Selftimer/Remote control 124 Sequence mode 128 Panorama mode 130 Digital Tele mode 134 White balance 136 ISO 138 Selecting the recording mode 140 DISPLAYING PICTURES ON THE LCD MONITOR Selecting the Display mode 142 Displaying pictures 144 Protection 146 One-Frame erase 148 Index-Display mode 150 Close-Up display (3x inspection mode 152 Connecting to a television 154 Menu 156 Slide-Show mode 160 Information display 162 Card setup (All-Frame erase 164 36
E Slow shutter synchronization flash mode 116 Macro mode 118 Manual focus 120 Selftimer/Remote control 124 Sequence mode 128 Panorama mode 130 Digital Tele mode 134 White balance 136 ISO 138 Selecting the recording mode 140 DISPLAYING PICTURES ON THE LCD MONITOR Selecting the Display mode 142 Displaying pictures 144 Protection 146 One-Frame erase 148 Index-Display mode 150 Close-Up display (3x inspection mode 152 Connecting to a television 154 Menu 156 Slide-Show mode 160 Information display 162 Card setup (All-Frame erase 164 36
C-2000 Zoom Instruction manual (5.5 MB)
Page 43
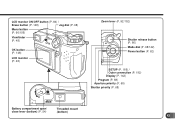
LCD monitor ON/OFF button (P. 84) / Erase button (P. 148) Jog dial (P. 68) Menu button (P. 96/156) Viewfinder (P. 48) OK button (P. 148) LCD monitor (P. 48) Zoom lever (P. 92/152) Shutter release button (P. 80) Mode dial (P. 68/142) Power button (P. 62) SETUP (P. 166) / Outer connection (P. 192) Display (P. 142) Program (P. 68) Aperture priority (P. 68) Shutter priority (P. 68) Battery compartment open/ Threaded mount close lever (bottom) (P. 54) (bottom) 43
LCD monitor ON/OFF button (P. 84) / Erase button (P. 148) Jog dial (P. 68) Menu button (P. 96/156) Viewfinder (P. 48) OK button (P. 148) LCD monitor (P. 48) Zoom lever (P. 92/152) Shutter release button (P. 80) Mode dial (P. 68/142) Power button (P. 62) SETUP (P. 166) / Outer connection (P. 192) Display (P. 142) Program (P. 68) Aperture priority (P. 68) Shutter priority (P. 68) Battery compartment open/ Threaded mount close lever (bottom) (P. 54) (bottom) 43
C-2000 Zoom Instruction manual (5.5 MB)
Page 50
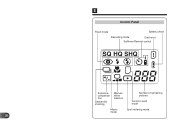
E Control Panel Flash mode Battery check Recording mode Card error Selftimer/Remote control Exposure compensation Sequential shooting Manual white balance Number of remaining pictures Function card mode Macro mode Spot metering mode 50
E Control Panel Flash mode Battery check Recording mode Card error Selftimer/Remote control Exposure compensation Sequential shooting Manual white balance Number of remaining pictures Function card mode Macro mode Spot metering mode 50
C-2000 Zoom Instruction manual (5.5 MB)
Page 76
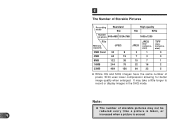
Note: x The number of pixels, SHQ uses lower compression allowing for better image quality when enlarged. It may not be reduced every time a picture is taken, or 76 increased when a picture is erased. E The Number of Storable Pictures Recording mode Standard SQ Number of pixels 640x480 1024x768 High quality HQ SHQ 1600x1200 File Memory capacity 2MB Card 4MB 8MB 16MB 32MB JPEG 30 9 60 19 122...
Note: x The number of pixels, SHQ uses lower compression allowing for better image quality when enlarged. It may not be reduced every time a picture is taken, or 76 increased when a picture is erased. E The Number of Storable Pictures Recording mode Standard SQ Number of pixels 640x480 1024x768 High quality HQ SHQ 1600x1200 File Memory capacity 2MB Card 4MB 8MB 16MB 32MB JPEG 30 9 60 19 122...
C-2000 Zoom Instruction manual (5.5 MB)
Page 80
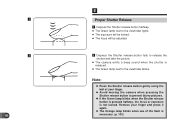
... use of your finger and press it again. x Avoid moving the camera when pressing the Shutter release button to the viewfinder blinks. 1 2 80 E Proper Shutter Release 1 Depress the Shutter release button halfway. ● The Green lamp next to the viewfinder lights. ● The exposure will be locked. ● The focus will be adjusted. 2 Depress the Shutter release button fully to release the shutter and take the picture. ● The camera...
... use of your finger and press it again. x Avoid moving the camera when pressing the Shutter release button to the viewfinder blinks. 1 2 80 E Proper Shutter Release 1 Depress the Shutter release button halfway. ● The Green lamp next to the viewfinder lights. ● The exposure will be locked. ● The focus will be adjusted. 2 Depress the Shutter release button fully to release the shutter and take the picture. ● The camera...
C-2000 Zoom Instruction manual (5.5 MB)
Page 82
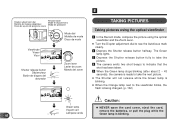
... Visor Shutter release button Déclencheur Botón de disparo del obturador Zoom lever Levier de zoom Mando del zoom E TAKING PICTURES Taking pictures using the optical viewfinder 1 In the Record mode, compose the picture using the optical viewfinder and the Zoom lever. ● Turn the Diopter adjustment dial to the viewfinder blinks, the flash is being charged. (p. 102) Caution: Green lamp x NEVER open the card cover, eject the card, Voyant vert remove the batteries, or...
... Visor Shutter release button Déclencheur Botón de disparo del obturador Zoom lever Levier de zoom Mando del zoom E TAKING PICTURES Taking pictures using the optical viewfinder 1 In the Record mode, compose the picture using the optical viewfinder and the Zoom lever. ● Turn the Diopter adjustment dial to the viewfinder blinks, the flash is being charged. (p. 102) Caution: Green lamp x NEVER open the card cover, eject the card, Voyant vert remove the batteries, or...

C-2000 Zoom Instruction manual (5.5 MB)
Page 102
...ón del visor Orange lamp Voyant orange Lámpara naranja E USING THE FLASH MODES Press the Shutter release button halfway. Confirm the result using the LCD monitor. 102 x See page 114 for selecting the flash mode. Flash working range: Wide-angle Approx. 31" ~ 18.4 ft Telephoto Approx. 8" ~ 12.5 ft Note: x The flash is being charged while the Orange lamp is ready to take the picture.
...ón del visor Orange lamp Voyant orange Lámpara naranja E USING THE FLASH MODES Press the Shutter release button halfway. Confirm the result using the LCD monitor. 102 x See page 114 for selecting the flash mode. Flash working range: Wide-angle Approx. 31" ~ 18.4 ft Telephoto Approx. 8" ~ 12.5 ft Note: x The flash is being charged while the Orange lamp is ready to take the picture.

C-2000 Zoom Instruction manual (5.5 MB)
Page 124
... the Jog dial to select ON. ● The Selftimer/Remote control indicator appears on the control panel. 3 Press the Shutter release button to take a picture. ● The Selftimer/Remote control signal lights for approx. 10 seconds then blinks for approx. 2 seconds before the picture is taken. ● To stop the activated selftimer, set the Mode dial to hold the camera securely. 1 In the Record mode, turn on page 98.
... the Jog dial to select ON. ● The Selftimer/Remote control indicator appears on the control panel. 3 Press the Shutter release button to take a picture. ● The Selftimer/Remote control signal lights for approx. 10 seconds then blinks for approx. 2 seconds before the picture is taken. ● To stop the activated selftimer, set the Mode dial to hold the camera securely. 1 In the Record mode, turn on page 98.
C-2000 Zoom Instruction manual (5.5 MB)
Page 126
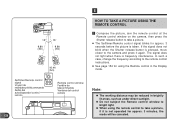
...;commande Ventana del control remoto 126 E HOW TO TAKE A PICTURE USING THE REMOTE CONTROL 1 Compose the picture, aim the remote control at the Remote control window on the camera, then press the Shutter release button to take a picture, if it again. x Do not subject the Remote control window to the camera and press it is not operated for approx. 3 minutes, the mode will be reduced in the Display mode. The signal does not light when there...
...;commande Ventana del control remoto 126 E HOW TO TAKE A PICTURE USING THE REMOTE CONTROL 1 Compose the picture, aim the remote control at the Remote control window on the camera, then press the Shutter release button to take a picture, if it again. x Do not subject the Remote control window to the camera and press it is not operated for approx. 3 minutes, the mode will be reduced in the Display mode. The signal does not light when there...
C-2000 Zoom Instruction manual (5.5 MB)
Page 146
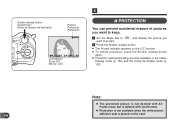
Frame erase, but is not deleted with Card format. Display mode (p. 150) and the Close-Up display mode (p. 152). Note: x The protected picture is deleted with All- x Protection is not available when the write-protect 146 adhesive seal is placed on the LCD monitor. ● To cancel protection, press the Shutter release button again. ● Protection setting/canceling are also available in the Index- Shutter release button Déclencheur Botón de disparo...
Frame erase, but is not deleted with Card format. Display mode (p. 150) and the Close-Up display mode (p. 152). Note: x The protected picture is deleted with All- x Protection is not available when the write-protect 146 adhesive seal is placed on the LCD monitor. ● To cancel protection, press the Shutter release button again. ● Protection setting/canceling are also available in the Index- Shutter release button Déclencheur Botón de disparo...
C-2000 Zoom Instruction manual (5.5 MB)
Page 154
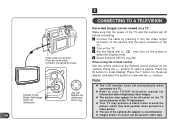
... a video printer. Press the +/- x Refer to video tape. x The use of the TV. 2 Turn on the TV. 3 Set the Mode dial to " " then turn on screen can be viewed on the camera. x Images shown on the power to a TV. When using the remote control Aim the remote control at the Remote control window on a TV. Make sure that the power of the TV and the camera are off automatically when connected to select the Display mode. 4 Select a picture...
... a video printer. Press the +/- x Refer to video tape. x The use of the TV. 2 Turn on the TV. 3 Set the Mode dial to " " then turn on screen can be viewed on the camera. x Images shown on the power to a TV. When using the remote control Aim the remote control at the Remote control window on a TV. Make sure that the power of the TV and the camera are off automatically when connected to select the Display mode. 4 Select a picture...

C-2000 Zoom Instruction manual (5.5 MB)
Page 168
E Mode ªAll reset Sharpness SHQ setup SQ setup Beep sound Rec view Card format Index-Display adjustment Brightness Date set Use For returning to the default settings. (p. 170) For selecting image sharpness. (p. 172) For selecting TIFF (non-compression). (p. 174) For selecting the file size. (p. 174) For setting on/off. (p. 176) For not displaying images while recording. (p. 176) For formatting the card. (p. 178) For selecting the number of frames. (p. 180) For adjusting the brightness of the LCD. (p. 180) For setting the date. (p. 182) 168
E Mode ªAll reset Sharpness SHQ setup SQ setup Beep sound Rec view Card format Index-Display adjustment Brightness Date set Use For returning to the default settings. (p. 170) For selecting image sharpness. (p. 172) For selecting TIFF (non-compression). (p. 174) For selecting the file size. (p. 174) For setting on/off. (p. 176) For not displaying images while recording. (p. 176) For formatting the card. (p. 178) For selecting the number of frames. (p. 180) For adjusting the brightness of the LCD. (p. 180) For setting the date. (p. 182) 168
C-2000 Zoom Instruction manual (5.5 MB)
Page 192
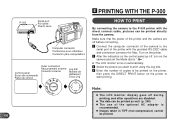
... copies to be printed. Turn on the printer. 2 After the indicators on the control panel go off, turn on the camera and set the Mode dial to " ". ● The LCD monitor turns on the printer to print using the Jog dial. 4 Enter the number of the printer with the direct connect cable, pictures can be printed directly from the camera. Make sure that the power of the printer and the camera are off during printing, and other operations are disabled. x The date...
... copies to be printed. Turn on the printer. 2 After the indicators on the control panel go off, turn on the camera and set the Mode dial to " ". ● The LCD monitor turns on the printer to print using the Jog dial. 4 Enter the number of the printer with the direct connect cable, pictures can be printed directly from the camera. Make sure that the power of the printer and the camera are off during printing, and other operations are disabled. x The date...
C-2000 Zoom Instruction manual (5.5 MB)
Page 226
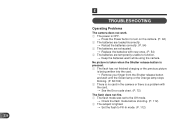
... the flash mode before shooting. (P. 112) 2 The subject is OFF. [ Press the Power button to turn on the camera. (P. 62) 2 The batteries are loaded incorrectly. [ Reload the batteries correctly. (P. 54) 3 The batteries are exhausted. [ Replace the batteries with new ones. (P. 54) 4 The batteries are temporarily unable to Fill-In mode. (P. 112) 226 E TROUBLESHOOTING Operating Problems The camera does not work. 1 The power is lighted. [ Set the flash to function. [ Keep the batteries warm while using the camera.
... the flash mode before shooting. (P. 112) 2 The subject is OFF. [ Press the Power button to turn on the camera. (P. 62) 2 The batteries are loaded incorrectly. [ Reload the batteries correctly. (P. 54) 3 The batteries are exhausted. [ Replace the batteries with new ones. (P. 54) 4 The batteries are temporarily unable to Fill-In mode. (P. 112) 226 E TROUBLESHOOTING Operating Problems The camera does not work. 1 The power is lighted. [ Set the flash to function. [ Keep the batteries warm while using the camera.
C-2000 Zoom Instruction manual (5.5 MB)
Page 230
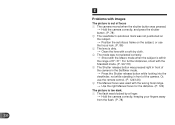
... flash. (P. 78) 230 E Problems with Images The picture is out of focus 1 The camera moved when the shutter button was pressed. [ Hold the camera correctly, and press the shutter button. (P. 78) 2 The viewfinder's autofocus mark was not positioned on the subject. [ Position the autofocus frame on the subject, or use the remote control. (P. 124/126) 6 The Manual focus was used with the wrong focal range. [ Use the right Manual focus...
... flash. (P. 78) 230 E Problems with Images The picture is out of focus 1 The camera moved when the shutter button was pressed. [ Hold the camera correctly, and press the shutter button. (P. 78) 2 The viewfinder's autofocus mark was not positioned on the subject. [ Position the autofocus frame on the subject, or use the remote control. (P. 124/126) 6 The Manual focus was used with the wrong focal range. [ Use the right Manual focus...
C-2000 Zoom Instruction manual (5.5 MB)
Page 238
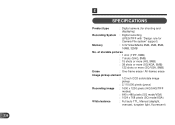
E SPECIFICATIONS Product type : Digital camera (for shooting and displaying) Recording System : Digital recording (JPEG/TIFF with "Design rule for Camera File system" support) Memory : 3.3V SmartMedia 2MB, 4MB, 8MB, 16MB, 32MB No. of storable pictures : 1 shot (TIFF, 8MB) : 7 shots (SHQ, 8MB) : 15 shots or more (HQ, 8MB) : 38 shots or more (SQ/XGA, 8MB) 122 shots or more (SQ/VGA, 8MB) Erase : One-frame erase / All-frames erase Image pickup element : 1/2 inch CCD...
E SPECIFICATIONS Product type : Digital camera (for shooting and displaying) Recording System : Digital recording (JPEG/TIFF with "Design rule for Camera File system" support) Memory : 3.3V SmartMedia 2MB, 4MB, 8MB, 16MB, 32MB No. of storable pictures : 1 shot (TIFF, 8MB) : 7 shots (SHQ, 8MB) : 15 shots or more (HQ, 8MB) : 38 shots or more (SQ/XGA, 8MB) 122 shots or more (SQ/VGA, 8MB) Erase : One-frame erase / All-frames erase Image pickup element : 1/2 inch CCD...
C-2000 Zoom Instruction manual (5.5 MB)
Page 240
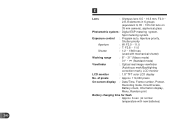
... On-screen display : Date/Time, Frame number, Protect, Recording mode, One/All erase, Battery check, Information display, Menu, Random print Battery charging time for flash : Approx. 6 sec. (at normal temperature with mechanical shutter) Working range : 8" ~ 31" (Macro mode) 31" ~ ∞ (Standard mode) Viewfinder : Optical real image viewfinder (Autofocus mark/Backlighting correction mark), LCD monitor LCD monitor : 1.8" TFT color LCD display No. E Lens : Olympus lens 6.5 ~ 19.5 mm, F2.0 ~ 2.8, 8 elements in 6 groups (equivalent to 35 ~ 105 mm lens on 35 mm camera), aspherical...
... On-screen display : Date/Time, Frame number, Protect, Recording mode, One/All erase, Battery check, Information display, Menu, Random print Battery charging time for flash : Approx. 6 sec. (at normal temperature with mechanical shutter) Working range : 8" ~ 31" (Macro mode) 31" ~ ∞ (Standard mode) Viewfinder : Optical real image viewfinder (Autofocus mark/Backlighting correction mark), LCD monitor LCD monitor : 1.8" TFT color LCD display No. E Lens : Olympus lens 6.5 ~ 19.5 mm, F2.0 ~ 2.8, 8 elements in 6 groups (equivalent to 35 ~ 105 mm lens on 35 mm camera), aspherical...


