ML6300FB User Manual
Page 3
... 6 Retaining packing materials 6 Identifying component parts 6 Front view 6 Rear view 8 Locating your printer 9 Powering on your printer 9 Producing a test print 10 Connecting to a computer 12 Connecting the printer to a computer 12 Interfaces 12 Making the connection 13 Installing the printer driver 13 Printing a test page 13 Special Features: Cut Sheet Paper 14 Automatic... Confirming current settings 32 Menu setting 33 Menu items and settings 34 Initializing menu settings 39 Adjusting TOF (Top of Form) position 40 Quick printer settings 41 Printer impact mode 41 > 3
... 6 Retaining packing materials 6 Identifying component parts 6 Front view 6 Rear view 8 Locating your printer 9 Powering on your printer 9 Producing a test print 10 Connecting to a computer 12 Connecting the printer to a computer 12 Interfaces 12 Making the connection 13 Installing the printer driver 13 Printing a test page 13 Special Features: Cut Sheet Paper 14 Automatic... Confirming current settings 32 Menu setting 33 Menu items and settings 34 Initializing menu settings 39 Adjusting TOF (Top of Form) position 40 Quick printer settings 41 Printer impact mode 41 > 3
ML6300FB User Manual
Page 4
Troubleshooting 43 Clearing paper jams 43 Cut sheet paper jammed in printer 43 Continuous forms jammed in printer 45 Responding to alarm conditions 46 Responding to general problems 47 Cleaning your printer 56 Printer exterior 56 Printer interior 56 Consumables and accessories 58 Consumables 58 Changing a ribbon cartridge 58 Ribbon cartridge order information 63 Accessories 63 Accessory order information 63 Specifications 64 Appendix A: Removing the Rear Cover 67 Removing the rear cover 67 Replacing the rear cover 68 > 4
Troubleshooting 43 Clearing paper jams 43 Cut sheet paper jammed in printer 43 Continuous forms jammed in printer 45 Responding to alarm conditions 46 Responding to general problems 47 Cleaning your printer 56 Printer exterior 56 Printer interior 56 Consumables and accessories 58 Consumables 58 Changing a ribbon cartridge 58 Ribbon cartridge order information 63 Accessories 63 Accessory order information 63 Specifications 64 Appendix A: Removing the Rear Cover 67 Removing the rear cover 67 Replacing the rear cover 68 > 4

ML6300FB User Manual
Page 6
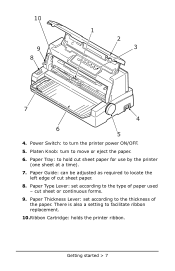
Top Cover: open and close for access, for noise reduction. 3. Keep closed for example when changing a ribbon cartridge. Control Panel: contains button switches and indicators that allow you ever need to operate the printer. Getting started Retaining packing materials Please retain your packing materials and container in case you to ship or transport your printer. See "Control panel" on the paper. 2. Identifying component parts Front view 10 1 2 9 3 8 7 4 6 5 1. Getting started > 6 Print Head: prints the characters on page 27.
Top Cover: open and close for access, for noise reduction. 3. Keep closed for example when changing a ribbon cartridge. Control Panel: contains button switches and indicators that allow you ever need to operate the printer. Getting started Retaining packing materials Please retain your packing materials and container in case you to ship or transport your printer. See "Control panel" on the paper. 2. Identifying component parts Front view 10 1 2 9 3 8 7 4 6 5 1. Getting started > 6 Print Head: prints the characters on page 27.
ML6300FB User Manual
Page 7
... required to the type of cut sheet paper. 8. There is also a setting to move or eject the paper. 6. cut sheet paper for use by the printer (one sheet at a time). 7. Paper Thickness Lever: set according to locate the left edge of paper used - 10 9 8 1 2 3 7 4 6 5 4. Platen Knob: turn the...
... required to the type of cut sheet paper. 8. There is also a setting to move or eject the paper. 6. cut sheet paper for use by the printer (one sheet at a time). 7. Paper Thickness Lever: set according to locate the left edge of paper used - 10 9 8 1 2 3 7 4 6 5 4. Platen Knob: turn the...

ML6300FB User Manual
Page 8
Parallel connector: connect to USB interface cable. 3. USB connector: connect to parallel interface connector. 4. Rear Cover: open and close for access, for example when loading continuous forms. (To remove completely, see "Appendix A: Removing the Rear Cover" on page 67.) Getting started > 8 Pin Tractor: to printer power cable. 6. Power connector: connect to load and feed continuous forms. 5. Rear view 6 1 2 3 5 4 1. Optional connector position: connect to optional accessory serial interface card or 100BASE-TX/10BASE-T network card. 2.
Parallel connector: connect to USB interface cable. 3. USB connector: connect to parallel interface connector. 4. Rear Cover: open and close for access, for example when loading continuous forms. (To remove completely, see "Appendix A: Removing the Rear Cover" on page 67.) Getting started > 8 Pin Tractor: to printer power cable. 6. Power connector: connect to load and feed continuous forms. 5. Rear view 6 1 2 3 5 4 1. Optional connector position: connect to optional accessory serial interface card or 100BASE-TX/10BASE-T network card. 2.

ML6300FB User Manual
Page 9
Ensure that your printer Power Switch is available nearby. Locating your printer • Select a firm, solid surface on your printer 1. Powering on which to OFF. at least 60 cm from any wall) for easy access to the Platen Knob and the various paper feed paths. >=60 cm 75 cm • Make sure a grounded power outlet is set to site your printer. • Allow enough space around your printer (e.g. Getting started > 9
Ensure that your printer Power Switch is available nearby. Locating your printer • Select a firm, solid surface on your printer 1. Powering on which to OFF. at least 60 cm from any wall) for easy access to the Platen Knob and the various paper feed paths. >=60 cm 75 cm • Make sure a grounded power outlet is set to site your printer. • Allow enough space around your printer (e.g. Getting started > 9

ML6300FB User Manual
Page 10
Check that your printer is printing as follows: CAUTION! Producing a test print To check that the POWER indicator on a sheet of letter-size paper (for example) as this may cause printer power failure. A shorter time interval between turning the printer ON after turning it is operational,... produce a test print on the control panel illuminates. Turn the printer Power Switch to ON. 5. Turn the printer Power Switch to OFF. Do not turn the printer OFF while it OFF. Getting started > 10 Connect the power cable connector (1) to the power ...
Check that your printer is printing as follows: CAUTION! Producing a test print To check that the POWER indicator on a sheet of letter-size paper (for example) as this may cause printer power failure. A shorter time interval between turning the printer ON after turning it is operational,... produce a test print on the control panel illuminates. Turn the printer Power Switch to ON. 5. Turn the printer Power Switch to OFF. Do not turn the printer OFF while it OFF. Getting started > 10 Connect the power cable connector (1) to the power ...

ML6300FB User Manual
Page 11
... button to eject the paper and then turn the Power Switch to OFF. When the test print has completed, the paper is automatically ejected. 2. The printer will automatically grip the paper and start the test print. Press and hold the LF button and turn the... printer Power Switch to ON. 4. With the long side of the paper against the paper guide, insert the paper carefully into the printer. Set the Paper Type Lever to cut sheet and set the Paper Thickness Lever...
... button to eject the paper and then turn the Power Switch to OFF. When the test print has completed, the paper is automatically ejected. 2. The printer will automatically grip the paper and start the test print. Press and hold the LF button and turn the... printer Power Switch to ON. 4. With the long side of the paper against the paper guide, insert the paper carefully into the printer. Set the Paper Type Lever to cut sheet and set the Paper Thickness Lever...

ML6300FB User Manual
Page 12
...accompanying installation documentation: • RS232 Serial interface • 100BASE-TX/10BASE-T network connection Note It is not recommended that you will connect your printer to a computer > 12 Connecting to a computer ____ In this product. This port requires a shielded cable less than 5m long conforming to... a PC running Windows 98 or above. Connecting the printer to a computer Interfaces Your printer is installed in your printer. Do not use either the parallel or USB port when the RS-232C or OL7120e option is equipped with...
...accompanying installation documentation: • RS232 Serial interface • 100BASE-TX/10BASE-T network connection Note It is not recommended that you will connect your printer to a computer > 12 Connecting to a computer ____ In this product. This port requires a shielded cable less than 5m long conforming to... a PC running Windows 98 or above. Connecting the printer to a computer Interfaces Your printer is installed in your printer. Do not use either the parallel or USB port when the RS-232C or OL7120e option is equipped with...
ML6300FB User Manual
Page 13
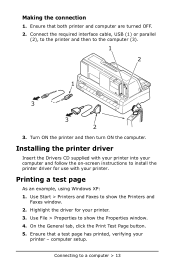
On the General tab, click the Print Test Page button. 5. Ensure that a test page has printed, verifying your printer - Use Start > Printers and Faxes to show the Properties window. 4. Installing the printer driver Insert the Drivers CD supplied with your printer. 3. Connecting to the computer (3). 1 2 1 3 3 2 3. Connect the required interface cable, USB (1) or parallel (2), to the...
On the General tab, click the Print Test Page button. 5. Ensure that a test page has printed, verifying your printer - Use Start > Printers and Faxes to show the Properties window. 4. Installing the printer driver Insert the Drivers CD supplied with your printer. 3. Connecting to the computer (3). 1 2 1 3 3 2 3. Connect the required interface cable, USB (1) or parallel (2), to the...
ML6300FB User Manual
Page 14
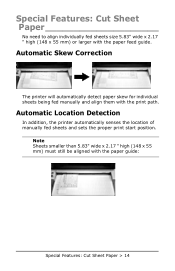
Note Sheets smaller than 5.83" wide x 2.17 " high (148 x 55 mm) must still be aligned with the print path. Automatic Skew Correction The printer will automatically detect paper skew for individual sheets being fed manually and align them with the paper guide: Special Features: Cut Sheet Paper > 14 Special ... align individually fed sheets size 5.83" wide x 2.17 " high (148 x 55 mm) or larger with the paper feed guide. Automatic Location Detection In addition, the printer automatically senses the location of manually fed sheets and sets the proper print start position.
Note Sheets smaller than 5.83" wide x 2.17 " high (148 x 55 mm) must still be aligned with the print path. Automatic Skew Correction The printer will automatically detect paper skew for individual sheets being fed manually and align them with the paper guide: Special Features: Cut Sheet Paper > 14 Special ... align individually fed sheets size 5.83" wide x 2.17 " high (148 x 55 mm) or larger with the paper feed guide. Automatic Location Detection In addition, the printer automatically senses the location of manually fed sheets and sets the proper print start position.

ML6300FB User Manual
Page 15
Ensure that the printer is turned ON. Ensure that the Pin Tractor covers (1) are any continuous forms in the printer, eject them as described in your printer. Loading cut sheet paper Note For information on automatic skew correction for cut sheet paper and continuous forms in "Removing continuous forms" on page 23. 2. Paper handling This section describes how to avoid the possibility of paper jams. 1 1 Paper handling > 15 Note If there are closed to use cut sheets, see "Special Features: Cut Sheet Paper" on page 14. 1.
Ensure that the printer is turned ON. Ensure that the Pin Tractor covers (1) are any continuous forms in the printer, eject them as described in your printer. Loading cut sheet paper Note For information on automatic skew correction for cut sheet paper and continuous forms in "Removing continuous forms" on page 23. 2. Paper handling This section describes how to avoid the possibility of paper jams. 1 1 Paper handling > 15 Note If there are closed to use cut sheets, see "Special Features: Cut Sheet Paper" on page 14. 1.

ML6300FB User Manual
Page 17
... it is ejected to the Paper Tray. If required, add another sheet for the printer to put the printer off the Paper Tray. To eject a cut sheet page it left in the printer, carry out the following: 1. Press the SEL button to continue printing from where it automatically ejects the page. ...Note Paper longer than 5.83 x 2.17" (148 x 55 mm) must be aligned with the paper guide (1). 1 2 Ejecting cut sheet paper When the printer reaches the end of the cut sheet left off. Note Sheets smaller than A4 length (297 mm) may overlap and possibly fall off -line. 2. Press...
... it is ejected to the Paper Tray. If required, add another sheet for the printer to put the printer off the Paper Tray. To eject a cut sheet page it left in the printer, carry out the following: 1. Press the SEL button to continue printing from where it automatically ejects the page. ...Note Paper longer than 5.83 x 2.17" (148 x 55 mm) must be aligned with the paper guide (1). 1 2 Ejecting cut sheet paper When the printer reaches the end of the cut sheet left off. Note Sheets smaller than A4 length (297 mm) may overlap and possibly fall off -line. 2. Press...

ML6300FB User Manual
Page 18
Loading continuous forms Setting up continuous forms To avoid paper feeding problems, carry out the following: >=60 cm 75 cm 18
Loading continuous forms Setting up continuous forms To avoid paper feeding problems, carry out the following: >=60 cm 75 cm 18

ML6300FB User Manual
Page 22
Close the Rear Cover by gently swinging it downwards to the horizontal and then pushing it inwards until it locks into the printer and positioned at a position other than the tear-off perforations. 3. With the SEL indicator illuminated, press the TEAR button to the paper cutter on ...button or LF button to the first line print position. Paper handling > 22 The continuous forms will illuminate. Using excessive force may result in the printer back to reposition the continuous forms in tearing at the first line print position and the SEL indicator will be taken into position. 10.Press...
Close the Rear Cover by gently swinging it downwards to the horizontal and then pushing it inwards until it locks into the printer and positioned at a position other than the tear-off perforations. 3. With the SEL indicator illuminated, press the TEAR button to the paper cutter on ...button or LF button to the first line print position. Paper handling > 22 The continuous forms will illuminate. Using excessive force may result in the printer back to reposition the continuous forms in tearing at the first line print position and the SEL indicator will be taken into position. 10.Press...

ML6300FB User Manual
Page 23
... the continuous forms in is specified, the QUIET indicator blinks and the above adjustment cannot be made. 3. Note If a movement greater than +- 7/90 in the printer. 3. Removing continuous forms 1. Press the SEL button to the paper cutter (2). (Paper Tray (3) is no paper present. 2. If sprocket holes of the last page of...
... the continuous forms in is specified, the QUIET indicator blinks and the above adjustment cannot be made. 3. Note If a movement greater than +- 7/90 in the printer. 3. Removing continuous forms 1. Press the SEL button to the paper cutter (2). (Paper Tray (3) is no paper present. 2. If sprocket holes of the last page of...

ML6300FB User Manual
Page 27
Operating instructions _______ Control panel The status/alarm indicators and button switches on the control panel allow you to check printer status and control the printer. Operating instructions > 27
Operating instructions _______ Control panel The status/alarm indicators and button switches on the control panel allow you to check printer status and control the printer. Operating instructions > 27

ML6300FB User Manual
Page 28
...power ON again. Paper end status i.e. High temperature alarm status Operating instructions > 28 Indicators Indicator SEL Status ON OFF Flashing ALARM ON OFF Flashing Meaning Printer is off-line i.e. Turn the power OFF, verify that the carriage moves properly, then turn the power ON again. If the problem is still there... alarm status When flashing together with the ALARM indicator, printing cannot be resumed at this stage. If the problem is not available to print Printer is on-line i.e. is still there after you turn the power ON again, contact your dealer.
...power ON again. Paper end status i.e. High temperature alarm status Operating instructions > 28 Indicators Indicator SEL Status ON OFF Flashing ALARM ON OFF Flashing Meaning Printer is off-line i.e. Turn the power OFF, verify that the carriage moves properly, then turn the power ON again. If the problem is still there... alarm status When flashing together with the ALARM indicator, printing cannot be resumed at this stage. If the problem is not available to print Printer is on-line i.e. is still there after you turn the power ON again, contact your dealer.

ML6300FB User Manual
Page 29
... ON OFF Flashing Meaning Menu printing mode Normal printing mode High temperature indication Quiet print mode Normal speed printing mode High multipart printing mode Printer power is ON Printer power is OFF Low power consumption mode Button switches Switch SEL SHIFT Status On-line Off-line LF On-line Off-line Function...
... ON OFF Flashing Meaning Menu printing mode Normal printing mode High temperature indication Quiet print mode Normal speed printing mode High multipart printing mode Printer power is ON Printer power is OFF Low power consumption mode Button switches Switch SEL SHIFT Status On-line Off-line LF On-line Off-line Function...

ML6300FB User Manual
Page 31
Ineffective Saves the set paper start position (first line print position). Microfeed (0.14 mm step) up Hold this button combination down for continuous feeding or ejecting of paper. Switch SHIFT+LF Status SHIFT+FF/ LOAD SHIFT+PARK On-line Off-line SHIFT+TEAR On-line Off-line Function Microfeed (0.14 mm step) down Hold this button combination down for continuous feeding or ejecting of paper. Quieter print mode Each press of the button pair progresses the printer through Quieter print mode > High multipart print mode > Normal print mode Ineffective Operating instructions > 31
Ineffective Saves the set paper start position (first line print position). Microfeed (0.14 mm step) up Hold this button combination down for continuous feeding or ejecting of paper. Switch SHIFT+LF Status SHIFT+FF/ LOAD SHIFT+PARK On-line Off-line SHIFT+TEAR On-line Off-line Function Microfeed (0.14 mm step) down Hold this button combination down for continuous feeding or ejecting of paper. Quieter print mode Each press of the button pair progresses the printer through Quieter print mode > High multipart print mode > Normal print mode Ineffective Operating instructions > 31


