ML6300FB User Manual
Page 3
... 15 Loading cut sheet paper 15 Ejecting cut sheet paper 17 Loading continuous forms 18 Setting up continuous forms 18 Feeding continuous forms 18 Tearing off continuous forms 22 Aligning the tear-off perforations 22 Removing continuous forms 23 Setting the Paper Thickness lever 25 Operating instructions 27 Control panel 27 Indicators 28 Button switches 29 Setting menu values 32 Confirming current settings 32 Menu setting 33 Menu items and settings 34 Initializing menu settings 39 Adjusting TOF (Top of Form) position 40 Quick printer settings 41 Printer impact mode 41...
... 15 Loading cut sheet paper 15 Ejecting cut sheet paper 17 Loading continuous forms 18 Setting up continuous forms 18 Feeding continuous forms 18 Tearing off continuous forms 22 Aligning the tear-off perforations 22 Removing continuous forms 23 Setting the Paper Thickness lever 25 Operating instructions 27 Control panel 27 Indicators 28 Button switches 29 Setting menu values 32 Confirming current settings 32 Menu setting 33 Menu items and settings 34 Initializing menu settings 39 Adjusting TOF (Top of Form) position 40 Quick printer settings 41 Printer impact mode 41...
ML6300FB User Manual
Page 13
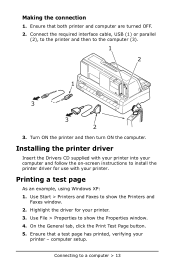
... your printer. 3. computer setup. Making the connection 1. Connect the required interface cable, USB (1) or parallel (2), to the printer and then to show the Printers and Faxes window. 2. Ensure that both printer and computer are turned OFF. 2. Installing the printer driver Insert the Drivers CD supplied with your printer - Connecting to install the printer driver for your computer and follow the on-screen instructions to a computer > 13 On the General tab, click the Print Test Page button. 5. Use Start > Printers...
... your printer. 3. computer setup. Making the connection 1. Connect the required interface cable, USB (1) or parallel (2), to the printer and then to show the Printers and Faxes window. 2. Ensure that both printer and computer are turned OFF. 2. Installing the printer driver Insert the Drivers CD supplied with your printer - Connecting to install the printer driver for your computer and follow the on-screen instructions to a computer > 13 On the General tab, click the Print Test Page button. 5. Use Start > Printers...
ML6300FB User Manual
Page 14
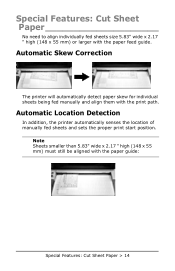
... aligned with the paper feed guide. Special Features: Cut Sheet Paper No need to align individually fed sheets size 5.83" wide x 2.17 " high (148 x 55 mm) or larger with the paper guide: Special Features: Cut Sheet Paper > 14 Automatic Location Detection In addition, the printer automatically senses the location of manually fed sheets and sets the proper print start position. Automatic Skew Correction The printer will automatically detect paper skew for individual sheets being fed manually...
... aligned with the paper feed guide. Special Features: Cut Sheet Paper No need to align individually fed sheets size 5.83" wide x 2.17 " high (148 x 55 mm) or larger with the paper guide: Special Features: Cut Sheet Paper > 14 Automatic Location Detection In addition, the printer automatically senses the location of manually fed sheets and sets the proper print start position. Automatic Skew Correction The printer will automatically detect paper skew for individual sheets being fed manually...

ML6300FB User Manual
Page 16
3. Adjust the Paper Thickness Lever (4) to Cut Sheet. 1 4. See "Setting the Paper Thickness lever" on page 25. Note If the Paper Thickness Lever setting does not match the paper being used, paper feeding and printing may not work properly. Paper handling > 16 Ensure the Paper Type Lever (1) is set to suit the paper. Sheets smaller than 5.83 x 2.17" (148 x 55 mm) only: Set the left margin of the paper by adjusting the Paper Guide (1) along the scale (2) relative to the start of printed line marker arrow (3). 4 2 1 3 5.
3. Adjust the Paper Thickness Lever (4) to Cut Sheet. 1 4. See "Setting the Paper Thickness lever" on page 25. Note If the Paper Thickness Lever setting does not match the paper being used, paper feeding and printing may not work properly. Paper handling > 16 Ensure the Paper Type Lever (1) is set to suit the paper. Sheets smaller than 5.83 x 2.17" (148 x 55 mm) only: Set the left margin of the paper by adjusting the Paper Guide (1) along the scale (2) relative to the start of printed line marker arrow (3). 4 2 1 3 5.

ML6300FB User Manual
Page 18
Loading continuous forms Setting up continuous forms To avoid paper feeding problems, carry out the following: >=60 cm 75 cm 18
Loading continuous forms Setting up continuous forms To avoid paper feeding problems, carry out the following: >=60 cm 75 cm 18

ML6300FB User Manual
Page 19
Ensure the Paper Type Lever (1) is set to suit the paper. Adjust the Paper Thickness Lever to Continuous Forms. 1 3. Paper handling > 19 See "Setting the Paper Thickness lever" on page 25. Note If the Paper Thickness Lever setting does not match the paper being used, paper feeding and printing may not work properly. 4. Open the Rear Cover by gently pulling it out horizontally to the end of its travel then swinging it upwards until it locks into position. 2.
Ensure the Paper Type Lever (1) is set to suit the paper. Adjust the Paper Thickness Lever to Continuous Forms. 1 3. Paper handling > 19 See "Setting the Paper Thickness lever" on page 25. Note If the Paper Thickness Lever setting does not match the paper being used, paper feeding and printing may not work properly. 4. Open the Rear Cover by gently pulling it out horizontally to the end of its travel then swinging it upwards until it locks into position. 2.

ML6300FB User Manual
Page 30
... position, press to retract the form to the Pin Tractors. (If the sprocket holes of the last page of next page Ejects the cut sheet Delivers the continuous form to eject the paper as a paper jam may result.) Enters menu mode Operating instructions > 30 Ineffective Ineffective If the continuous form is restored. Switch FF/LOAD TEAR PARK SHIFT+SEL Status On-line and offline Continuous Forms mode On-line and offline Cut sheet manual mode On-line Continuous Forms mode On-line Cut sheet manual mode Off-line Continuous Forms mode...
... position, press to retract the form to the Pin Tractors. (If the sprocket holes of the last page of next page Ejects the cut sheet Delivers the continuous form to eject the paper as a paper jam may result.) Enters menu mode Operating instructions > 30 Ineffective Ineffective If the continuous form is restored. Switch FF/LOAD TEAR PARK SHIFT+SEL Status On-line and offline Continuous Forms mode On-line and offline Cut sheet manual mode On-line Continuous Forms mode On-line Cut sheet manual mode Off-line Continuous Forms mode...

ML6300FB User Manual
Page 31
... line print position). Quieter print mode Each press of paper. Switch SHIFT+LF Status SHIFT+FF/ LOAD SHIFT+PARK On-line Off-line SHIFT+TEAR On-line Off-line Function Microfeed (0.14 mm step) down Hold this button combination down for continuous feeding or ejecting of paper. Microfeed (0.14 mm step) up Hold this button combination down for continuous feeding or ejecting of the button pair progresses the printer through Quieter print mode > High...
... line print position). Quieter print mode Each press of paper. Switch SHIFT+LF Status SHIFT+FF/ LOAD SHIFT+PARK On-line Off-line SHIFT+TEAR On-line Off-line Function Microfeed (0.14 mm step) down Hold this button combination down for continuous feeding or ejecting of paper. Microfeed (0.14 mm step) up Hold this button combination down for continuous feeding or ejecting of the button pair progresses the printer through Quieter print mode > High...

ML6300FB User Manual
Page 34
... settings In the menu settings tables below, factory default settings are shown in bold face. Item Setting Choices Emulation Mode Print Mode Pitch Proportional Spacing Style Size Character Set Language Set IBM PPR IBM AGM EPSON LQ LQ Courier LQ Roman LQ Swiss LQ Swiss Bold LQ Orator LQ Gothic LQ Prestige LQ OCR-A LQ OCR-B Utility HSD 10 CPI, 12 CPI, 15 CPI, 17.1 CPI, 20 CPI Yes No Normal, Italics Single, Double Set I Set...
... settings In the menu settings tables below, factory default settings are shown in bold face. Item Setting Choices Emulation Mode Print Mode Pitch Proportional Spacing Style Size Character Set Language Set IBM PPR IBM AGM EPSON LQ LQ Courier LQ Roman LQ Swiss LQ Swiss Bold LQ Orator LQ Gothic LQ Prestige LQ OCR-A LQ OCR-B Utility HSD 10 CPI, 12 CPI, 15 CPI, 17.1 CPI, 20 CPI Yes No Normal, Italics Single, Double Set I Set...

ML6300FB User Manual
Page 37
Set Pos. Item Power Save Time PE Detection Table Print Line Spacing Page Width Form Tear-Off Skip Over Perforation Page Length (Continuous) TOF (Continuous) Initial Position Auto Eject Position Setting Choices 5 min, 10 min, 15 min, 30 min, 60 min OFF ON Standard Special 6 LPI 8 LPI 10.6 in 8 in Off 500 ms 1 sec 2 sec Yes ...) 19.05 mm (3/4 in) 21.17 mm (5/6 in) 23.28 mm (11/12 in) 25.4 mm (1 in) 27.52 mm (13/12 in ) 14.8 mm Operating instructions > 37 Print Tear OFF 6.35 mm (1/4 in ) 1Chr.
Set Pos. Item Power Save Time PE Detection Table Print Line Spacing Page Width Form Tear-Off Skip Over Perforation Page Length (Continuous) TOF (Continuous) Initial Position Auto Eject Position Setting Choices 5 min, 10 min, 15 min, 30 min, 60 min OFF ON Standard Special 6 LPI 8 LPI 10.6 in 8 in Off 500 ms 1 sec 2 sec Yes ...) 19.05 mm (3/4 in) 21.17 mm (5/6 in) 23.28 mm (11/12 in) 25.4 mm (1 in) 27.52 mm (13/12 in ) 14.8 mm Operating instructions > 37 Print Tear OFF 6.35 mm (1/4 in ) 1Chr.

ML6300FB User Manual
Page 38
Wait Time 500 ms 1 sec 2 sec I-Prime Invalid Buffer Clear Buffer Print Auto Feed XT EPSON only Valid Invalid I/F Bi-Direction TOF Adjustment (Cut Sheet) Enable Disable -7 - -1 0 +7 - +1 Rear Load Adjustment -7 - -1 0 +7 - +1 Cut Position Adjust -7 - -1 0 +7 - +1 Operating instructions > 38 Set Pos. Item Setting Choices Page Length (Cut Sheet) 3.5 in, 4 in, 5.5 in, 6 in, 7 in, 8 in, 8.5 in, 11 in, 11 2/3 in, 12 in, 14 in, 16.57 in, 5 in, 3 in, 3.25 in TOF (Cut Sheet) 2.12 mm (1/12 in) 4.23 mm (1/6 in) 6.35 mm...
Wait Time 500 ms 1 sec 2 sec I-Prime Invalid Buffer Clear Buffer Print Auto Feed XT EPSON only Valid Invalid I/F Bi-Direction TOF Adjustment (Cut Sheet) Enable Disable -7 - -1 0 +7 - +1 Rear Load Adjustment -7 - -1 0 +7 - +1 Cut Position Adjust -7 - -1 0 +7 - +1 Operating instructions > 38 Set Pos. Item Setting Choices Page Length (Cut Sheet) 3.5 in, 4 in, 5.5 in, 6 in, 7 in, 8 in, 8.5 in, 11 in, 11 2/3 in, 12 in, 14 in, 16.57 in, 5 in, 3 in, 3.25 in TOF (Cut Sheet) 2.12 mm (1/12 in) 4.23 mm (1/6 in) 6.35 mm...

ML6300FB User Manual
Page 46
Set the Power Switch to indicated alarm conditions. Add paper and press the SEL button. Responding to alarm conditions Use the following table for the g type of paper in use. OFF Flashin The Paper Type lever is being fed. Remove the g cut sheet feeding. Insert paper. Flashin g Flashin g Printing cannot be resumed at this stage. Indicator SEL ALARM Alarm meanings and actions OFF ON Paper has run out. Turn the power OFF, verify that the carriage...
Set the Power Switch to indicated alarm conditions. Add paper and press the SEL button. Responding to alarm conditions Use the following table for the g type of paper in use. OFF Flashin The Paper Type lever is being fed. Remove the g cut sheet feeding. Insert paper. Flashin g Flashin g Printing cannot be resumed at this stage. Indicator SEL ALARM Alarm meanings and actions OFF ON Paper has run out. Turn the power OFF, verify that the carriage...
ML6300FB User Manual
Page 47
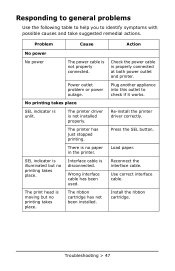
... is properly connected at both power outlet and printer. Load paper. Troubleshooting > 47 Check the power cable is disconnected. Press the SEL button. Reconnect the interface cable. No printing takes place SEL indicator is not installed properly. There is illuminated but no printing takes place. The printer has just stopped printing. SEL indicator is no printing takes place. Re-install the printer driver correctly. Wrong interface cable has been used. Install the ribbon cartridge. Responding to general problems Use the following table to...
... is properly connected at both power outlet and printer. Load paper. Troubleshooting > 47 Check the power cable is disconnected. Press the SEL button. Reconnect the interface cable. No printing takes place SEL indicator is not installed properly. There is illuminated but no printing takes place. The printer has just stopped printing. SEL indicator is no printing takes place. Re-install the printer driver correctly. Wrong interface cable has been used. Install the ribbon cartridge. Responding to general problems Use the following table to...

ML6300FB User Manual
Page 48
... original operation. Troubleshooting > 48 The start position. When the print head temperature drops sufficiently, the printer will return to unidirectional . When the print head overheats, the printer automatically starts unidirectional split printing. You must set the Power Switch to on the carriage shaft. PE warning The print carriage does not operate. There is offset. Problem Cause Action Print position offset The horizontal printing position is contamination on -line mode by pressing the SEL button...
... original operation. Troubleshooting > 48 The start position. When the print head temperature drops sufficiently, the printer will return to unidirectional . When the print head overheats, the printer automatically starts unidirectional split printing. You must set the Power Switch to on the carriage shaft. PE warning The print carriage does not operate. There is offset. Problem Cause Action Print position offset The horizontal printing position is contamination on -line mode by pressing the SEL button...
ML6300FB User Manual
Page 50
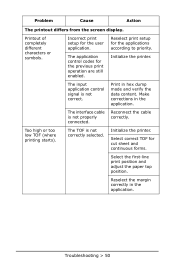
... print setup for cut sheet and continuous forms. Select the first-line print position and adjust the paper top position. Printout of completely different characters or symbols. The interface cable is not correct. Too high or too low TOF (where printing starts). The TOF is not correctly selected. Select correct TOF for the applications according to priority. Print in the application. The application control codes for the user application. Initialize the printer. Troubleshooting > 50 Incorrect print setup for the previous print operation...
... print setup for cut sheet and continuous forms. Select the first-line print position and adjust the paper top position. Printout of completely different characters or symbols. The interface cable is not correct. Too high or too low TOF (where printing starts). The TOF is not correctly selected. Select correct TOF for the applications according to priority. Print in the application. The application control codes for the user application. Initialize the printer. Troubleshooting > 50 Incorrect print setup for the previous print operation...

ML6300FB User Manual
Page 52
... the paper guide. Load sheets to the end. Reselect line spacing correctly in the continuous forms mode. Use the printer's builtin fonts when you print important documents or bills. Load sheets with their left edges against the paper guide. The printer is especially notable in bidirectional printing. end. Eject the continuous forms and select cut sheet feed No paper feed. Troubleshooting > 52 This is not selected correctly. Sheets are not loaded to adjust. Sheets are fed. Split print Blanks appear in printing a single character. Blanks...
... the paper guide. Load sheets to the end. Reselect line spacing correctly in the continuous forms mode. Use the printer's builtin fonts when you print important documents or bills. Load sheets with their left edges against the paper guide. The printer is especially notable in bidirectional printing. end. Eject the continuous forms and select cut sheet feed No paper feed. Troubleshooting > 52 This is not selected correctly. Sheets are not loaded to adjust. Sheets are fed. Split print Blanks appear in printing a single character. Blanks...

ML6300FB User Manual
Page 53
... PARK button. Reload paper correctly. Problem Cause Action Improper cut sheet feed (cont.) Paper distortion. The FF/LOAD button is off the Pin Tractors. Set the adjust lever to eject. Sheets are not loaded to the end. The adjust lever position does not match the paper type. Use paper types specified for the printer. Paper not specified for the printer. Change paper. Paper with wrinkles, folds or other defects. Improper continuous forms feed No line feed, and no paper feed. Paper is pressed. Load sheets...
... PARK button. Reload paper correctly. Problem Cause Action Improper cut sheet feed (cont.) Paper distortion. The FF/LOAD button is off the Pin Tractors. Set the adjust lever to eject. Sheets are not loaded to the end. The adjust lever position does not match the paper type. Use paper types specified for the printer. Paper not specified for the printer. Change paper. Paper with wrinkles, folds or other defects. Improper continuous forms feed No line feed, and no paper feed. Paper is pressed. Load sheets...

ML6300FB User Manual
Page 64
... cannot be guaranteed.) Specifications > 64 Specifications Item Print method Print head Print direction Print speed High Speed Draft (HSD) Letter Quality (LQ) Utility Line Feed (LF) time Form Feed (FF) speed Paper feed control Duplication capability Feeding direction Feeding mode Continuous forms tape tail detection method Specification Impact dot matrix 24 pins, 0.2 mm (0.0079 in /s) Paper feed: yes Vertical tab: yes Direct line feed: yes Continuous forms: the original page +5 more pages (total maximum paper thickness less than 0.36 mm) Cut sheet: the original...
... cannot be guaranteed.) Specifications > 64 Specifications Item Print method Print head Print direction Print speed High Speed Draft (HSD) Letter Quality (LQ) Utility Line Feed (LF) time Form Feed (FF) speed Paper feed control Duplication capability Feeding direction Feeding mode Continuous forms tape tail detection method Specification Impact dot matrix 24 pins, 0.2 mm (0.0079 in /s) Paper feed: yes Vertical tab: yes Direct line feed: yes Continuous forms: the original page +5 more pages (total maximum paper thickness less than 0.36 mm) Cut sheet: the original...
ML6300FB Safety & Warranty Manual
Page 1
...Removing the cover may cause damage that your power source matches the rating listed on the back of the product. If anything happens that indicates that the total of enclosure, make sure the enclosure is less than those outlined in any kind of the amperes required by qualified Oki Data... the provided setup and operating instructions. • Save all equipment plugged into the product, or the product has been exposed to have the outlet replaced. If you are a few basic precautions you place it has been printing for a length of the things to look for. • The power cord or ...
...Removing the cover may cause damage that your power source matches the rating listed on the back of the product. If anything happens that indicates that the total of enclosure, make sure the enclosure is less than those outlined in any kind of the amperes required by qualified Oki Data... the provided setup and operating instructions. • Save all equipment plugged into the product, or the product has been exposed to have the outlet replaced. If you are a few basic precautions you place it has been printing for a length of the things to look for. • The power cord or ...
ML6300FB Safety & Warranty Manual
Page 3
...customer documentation cannot solve, contact the listed sources for service or support. A written receipt for the product, showing the date of purchase, dealer's name, and serial number of the Product, must return the Product, shipping prepaid, in the original shipping container or equivalent to Oki Data or an authorized Oki Data service... you specific legal rights, and you . Limited Warranty, United States Oki Data Americas, Inc. (Oki Data) warrants this ML6300F-SC (hereinafter "the Product") to be free from defect in material and workmanship and will repair (or at its option, replace) at...
...customer documentation cannot solve, contact the listed sources for service or support. A written receipt for the product, showing the date of purchase, dealer's name, and serial number of the Product, must return the Product, shipping prepaid, in the original shipping container or equivalent to Oki Data or an authorized Oki Data service... you specific legal rights, and you . Limited Warranty, United States Oki Data Americas, Inc. (Oki Data) warrants this ML6300F-SC (hereinafter "the Product") to be free from defect in material and workmanship and will repair (or at its option, replace) at...


