
User Guide
Page 3
... 15 Interfaces 15 Interconnection 16 Installing the printer driver 16 Printing a test page 16 Printing from a computer 17 Paper handling 18 Loading cut sheet paper 18 Ejecting cut sheet paper 20 Loading continuous forms 20 Setting up continuous forms 20 Feeding continuous forms 21 Tearing off continuous forms 24 Aligning the tear-off perforations 24 Removing continuous forms 25 Setting the Paper Thickness lever 26 Operating instructions 28 Control panel 28 Indicators 29 Button switches 30 Setting menu values 32 Confirming current settings 32 Menu setting 33 Menu items...
... 15 Interfaces 15 Interconnection 16 Installing the printer driver 16 Printing a test page 16 Printing from a computer 17 Paper handling 18 Loading cut sheet paper 18 Ejecting cut sheet paper 20 Loading continuous forms 20 Setting up continuous forms 20 Feeding continuous forms 21 Tearing off continuous forms 24 Aligning the tear-off perforations 24 Removing continuous forms 25 Setting the Paper Thickness lever 26 Operating instructions 28 Control panel 28 Indicators 29 Button switches 30 Setting menu values 32 Confirming current settings 32 Menu setting 33 Menu items...
User Guide
Page 4
Initialising menu settings 40 Adjusting TOF position 41 Quick printer settings 42 Printer impact mode 42 Troubleshooting 44 Clearing paper jams 44 Cut sheet paper jammed in printer 44 Continuous forms jammed in printer 46 Responding to alarm conditions 47 Responding to general problems 48 Cleaning your printer 54 Printer exterior 54 Printer interior 54 Consumables and accessories 56 Consumables 56 Changing a ribbon cartridge 56 Consumable order information 61 Accessories 61 Accessory order information 61 Specifications 62 Appendix A - Rear Cover removal 65 Removal 65 ...
Initialising menu settings 40 Adjusting TOF position 41 Quick printer settings 42 Printer impact mode 42 Troubleshooting 44 Clearing paper jams 44 Cut sheet paper jammed in printer 44 Continuous forms jammed in printer 46 Responding to alarm conditions 47 Responding to general problems 48 Cleaning your printer 54 Printer exterior 54 Printer interior 54 Consumables and accessories 56 Consumables 56 Changing a ribbon cartridge 56 Consumable order information 61 Accessories 61 Accessory order information 61 Specifications 62 Appendix A - Rear Cover removal 65 Removal 65 ...
User Guide
Page 6
... setting up -to-date version) for your printer and forms part of the overall user support listed below: > Installation Safety booklet: provides information as your printer and make the best use of -the-art, 24-pin, serial impact dot matrix printing technology with advanced materials and superior construction to become familiar with the printer. > This User's Guide: to help you to provide high performance and versatility in this Oki Printing Solutions printer! This is a paper...
... setting up -to-date version) for your printer and forms part of the overall user support listed below: > Installation Safety booklet: provides information as your printer and make the best use of -the-art, 24-pin, serial impact dot matrix printing technology with advanced materials and superior construction to become familiar with the printer. > This User's Guide: to help you to provide high performance and versatility in this Oki Printing Solutions printer! This is a paper...

User Guide
Page 15
... you will interconnect your printer and computer, install the printer driver in your printer. NOTE Interface cables are described in their accompanying installation documentation: > RS232 Serial interface > 100BASE-TX/10BASE-T network connection NOTE Refer to the Network Configuration Guide for setting up the network connection. This port requires a bi-directional (IEEE 1284 compliant) parallel cable. > USB: for direct connection to a PC running Windows 98 or above. Do not use either the parallel or USB port when the RS...
... you will interconnect your printer and computer, install the printer driver in your printer. NOTE Interface cables are described in their accompanying installation documentation: > RS232 Serial interface > 100BASE-TX/10BASE-T network connection NOTE Refer to the Network Configuration Guide for setting up the network connection. This port requires a bi-directional (IEEE 1284 compliant) parallel cable. > USB: for direct connection to a PC running Windows 98 or above. Do not use either the parallel or USB port when the RS...
User Guide
Page 16
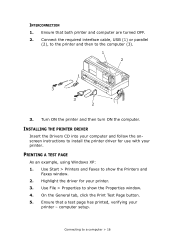
Connect the required interface cable, USB (1) or parallel (2), to the printer and then to a computer > 16 Use File > Properties to show the Printers and Faxes window. 2. computer setup. Connecting to the computer (3). 1 2 1 3 3 2 3. Ensure that a test page has printed, verifying your computer and follow the onscreen instructions to show the Properties window. 4. INSTALLING THE PRINTER DRIVER Insert the Drivers CD into your printer - On the General tab, click the Print Test Page button. 5. Ensure that...
Connect the required interface cable, USB (1) or parallel (2), to the printer and then to a computer > 16 Use File > Properties to show the Printers and Faxes window. 2. computer setup. Connecting to the computer (3). 1 2 1 3 3 2 3. Ensure that a test page has printed, verifying your computer and follow the onscreen instructions to show the Properties window. 4. INSTALLING THE PRINTER DRIVER Insert the Drivers CD into your printer - On the General tab, click the Print Test Page button. 5. Ensure that...

User Guide
Page 19
... the paper being used, paper feeding and printing may not work properly. 6. See "Setting the Paper Thickness lever" on the Paper Tray (2) into the printer until it is gripped. 1 2 Paper handling > 19 Set the left edge aligned with the Paper Guide (1), carefully insert the paper on page 26. Adjust the Paper Thickness Lever (4) to the start of printed line marker arrow (3). 4 2 1 3 5. With the printing side upwards and the left margin of the paper by adjusting the Paper Guide...
... the paper being used, paper feeding and printing may not work properly. 6. See "Setting the Paper Thickness lever" on the Paper Tray (2) into the printer until it is gripped. 1 2 Paper handling > 19 Set the left edge aligned with the Paper Guide (1), carefully insert the paper on page 26. Adjust the Paper Thickness Lever (4) to the start of printed line marker arrow (3). 4 2 1 3 5. With the printing side upwards and the left margin of the paper by adjusting the Paper Guide...

User Guide
Page 20
... Paper Guide can lead to skew printing. EJECTING CUT SHEET PAPER When the printer reaches the end of skew printing. NOTE Paper longer than A4 length (297 mm) may overlap and possibly fall off -line. 2. Press the SEL button to put the printer off the Paper Tray. LOADING CONTINUOUS FORMS SETTING UP CONTINUOUS FORMS To avoid paper feeding problems, carry out the following : 1. A flap aligned along the Paper Guide to avoid the possibility of the cut sheet left...
... Paper Guide can lead to skew printing. EJECTING CUT SHEET PAPER When the printer reaches the end of skew printing. NOTE Paper longer than A4 length (297 mm) may overlap and possibly fall off -line. 2. Press the SEL button to put the printer off the Paper Tray. LOADING CONTINUOUS FORMS SETTING UP CONTINUOUS FORMS To avoid paper feeding problems, carry out the following : 1. A flap aligned along the Paper Guide to avoid the possibility of the cut sheet left...

User Guide
Page 21
Ensure the rear of the printer is a cut sheet in the printer, eject it as described in "Ejecting cut sheet paper" on page 26. FEEDING CONTINUOUS FORMS 1. Ensure the Paper Type Lever (1) is turned ON. NOTE If the Paper Thickness Lever setting does not match the paper being used, paper feeding and printing may not work properly. 4. Position the continuous forms supply directly below the printer, no more than 3 cm left or right of the surface...
Ensure the rear of the printer is a cut sheet in the printer, eject it as described in "Ejecting cut sheet paper" on page 26. FEEDING CONTINUOUS FORMS 1. Ensure the Paper Type Lever (1) is turned ON. NOTE If the Paper Thickness Lever setting does not match the paper being used, paper feeding and printing may not work properly. 4. Position the continuous forms supply directly below the printer, no more than 3 cm left or right of the surface...
User Guide
Page 30
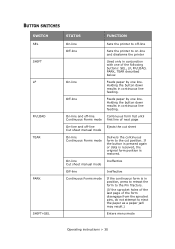
... continuous form to eject the paper as a paper jam may result.) Enters menu mode Operating instructions > 30 Holding the button down results in continuous line feeding. On-line Ineffective Cut sheet manual mode Off-line Ineffective Continuous Forms mode If the continuous form is restored. Holding the button down results in continuous line feeding. If the button is pressed again or data is received, the original form position is in position, press to retract the form to the Pin Tractors. (If...
... continuous form to eject the paper as a paper jam may result.) Enters menu mode Operating instructions > 30 Holding the button down results in continuous line feeding. On-line Ineffective Cut sheet manual mode Off-line Ineffective Continuous Forms mode If the continuous form is restored. Holding the button down results in continuous line feeding. If the button is pressed again or data is received, the original form position is in position, press to retract the form to the Pin Tractors. (If...
User Guide
Page 32
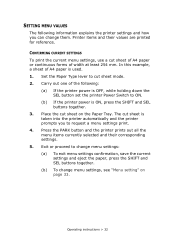
... change menu settings, see "Menu setting" on the Paper Tray. Carry out one of A4 paper is used. 1. Printer items and their corresponding settings. 5. The cut sheet mode. 2. Exit or proceed to change menu settings: (a) To exit menu settings confirmation, save the current settings and eject the paper, press the SHIFT and SEL buttons together. (b) To change them. SETTING MENU VALUES The following : (a) If the printer power is OFF, while holding down the SEL button set the printer Power Switch to ON. (b) If the printer power...
... change menu settings, see "Menu setting" on the Paper Tray. Carry out one of A4 paper is used. 1. Printer items and their corresponding settings. 5. The cut sheet mode. 2. Exit or proceed to change menu settings: (a) To exit menu settings confirmation, save the current settings and eject the paper, press the SHIFT and SEL buttons together. (b) To change them. SETTING MENU VALUES The following : (a) If the printer power is OFF, while holding down the SEL button set the printer Power Switch to ON. (b) If the printer power...
User Guide
Page 36
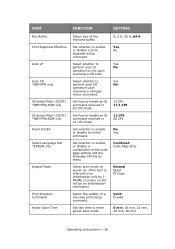
... initialisation command.) Select the validity of the received buffer. Set whether to enable or disable an initial command. ITEM FUNCTION SETTING Rcv Buffer Print Suppress Effective Auto LF Auto CR *IBM PPR only SI Select Pitch (10CPI) *IBM PPR/AGM only SI Select Pitch (12CPI) *IBM PPR/AGM only Reset Inhibit Select Language Set *EPSON only Impact Mode Print Direction Command Power Save Time Select size of a one-way print setup command. Select whether to handle an SI command received in 10 CPI mode.
... initialisation command.) Select the validity of the received buffer. Set whether to enable or disable an initial command. ITEM FUNCTION SETTING Rcv Buffer Print Suppress Effective Auto LF Auto CR *IBM PPR only SI Select Pitch (10CPI) *IBM PPR/AGM only SI Select Pitch (12CPI) *IBM PPR/AGM only Reset Inhibit Select Language Set *EPSON only Impact Mode Print Direction Command Power Save Time Select size of a one-way print setup command. Select whether to handle an SI command received in 10 CPI mode.

User Guide
Page 39
... 1 sec 2 sec Invalid Buffer Clear Buffer Print Valid Invalid Enable Disable -7 - -1 0 +7 - +1 -7 - -1 0 +7 - +1 -7 - -1 0 +7 - +1 Operating instructions > 39 Set whether to return a device ID or not in regard to the TOF position of a continuous form. Select an adjustment value for the position to the top of the form by [-] in 1/ 60 in increments. The position moves to the rear of the form by [+] and to cut -paper manual feed mode. Select an adjustment value for the reference position in accordance with...
... 1 sec 2 sec Invalid Buffer Clear Buffer Print Valid Invalid Enable Disable -7 - -1 0 +7 - +1 -7 - -1 0 +7 - +1 -7 - -1 0 +7 - +1 Operating instructions > 39 Set whether to return a device ID or not in regard to the TOF position of a continuous form. Select an adjustment value for the position to the top of the form by [-] in 1/ 60 in increments. The position moves to the rear of the form by [+] and to cut -paper manual feed mode. Select an adjustment value for the reference position in accordance with...
User Guide
Page 42
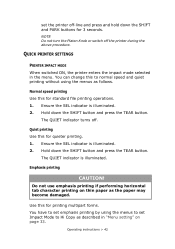
... indicator turns off the printer during the above procedure. Operating instructions > 42 QUICK PRINTER SETTINGS PRINTER IMPACT MODE When switched ON, the printer enters the impact mode selected in "Menu setting" on thin paper as the paper may become damaged. Hold down the SHIFT button and press the TEAR button. Use this for standard file printing operations. 1. Ensure the SEL indicator is illuminated. 2. You can change this for quieter printing. 1. Normal speed printing Use this to set the printer off-line and...
... indicator turns off the printer during the above procedure. Operating instructions > 42 QUICK PRINTER SETTINGS PRINTER IMPACT MODE When switched ON, the printer enters the impact mode selected in "Menu setting" on thin paper as the paper may become damaged. Hold down the SHIFT button and press the TEAR button. Use this for standard file printing operations. 1. Ensure the SEL indicator is illuminated. 2. You can change this for quieter printing. 1. Normal speed printing Use this to set the printer off-line and...
User Guide
Page 47
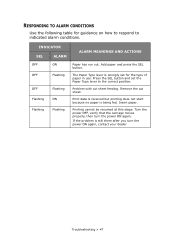
... Use the following table for the type of paper in use. INDICATOR SEL ALARM ALARM MEANINGS AND ACTIONS OFF OFF OFF Flashing Flashing ON Flashing Flashing ON Flashing Paper has run out. Troubleshooting > 47 Printing cannot be resumed at this stage. Press the SEL button and set for guidance on how to respond to the correct position. Remove the cut sheet feeding. The Paper Type lever is wrongly set the Paper Type lever to indicated alarm conditions. Print data...
... Use the following table for the type of paper in use. INDICATOR SEL ALARM ALARM MEANINGS AND ACTIONS OFF OFF OFF Flashing Flashing ON Flashing Flashing ON Flashing Paper has run out. Troubleshooting > 47 Printing cannot be resumed at this stage. Press the SEL button and set for guidance on how to respond to the correct position. Remove the cut sheet feeding. The Paper Type lever is wrongly set the Paper Type lever to indicated alarm conditions. Print data...
User Guide
Page 48
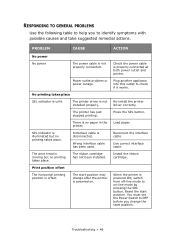
... interface cable. The print head is powered on -line mode by pressing the SEL button. The printer driver is disconnected. The ribbon cartridge has not been installed. Reset the start position. Wrong interface cable has been used. Plug another appliance into this outlet to identify symptoms with possible causes and take suggested remedial actions. Troubleshooting > 48 Install the ribbon cartridge. The start position may change the start position. SEL indicator is properly connected at both power outlet and printer. Check the power cable...
... interface cable. The print head is powered on -line mode by pressing the SEL button. The printer driver is disconnected. The ribbon cartridge has not been installed. Reset the start position. Wrong interface cable has been used. Plug another appliance into this outlet to identify symptoms with possible causes and take suggested remedial actions. Troubleshooting > 48 Install the ribbon cartridge. The start position may change the start position. SEL indicator is properly connected at both power outlet and printer. Check the power cable...
User Guide
Page 49
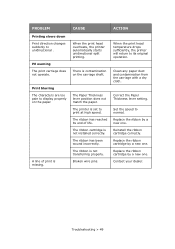
.... Replace the ribbon cartridge by a new one. When the print head overheats, the printer automatically starts unidirectional split printing. The ribbon has been wound incorrectly. Reinstall the ribbon cartridge correctly. Correct the Paper Thickness lever setting. Replace the ribbon by a new one . Replace the ribbon cartridge by a new one . Broken wire pins. Set the speed to unidirectional . Print blurring The characters are too pale to display properly on the carriage shaft. A line...
.... Replace the ribbon cartridge by a new one. When the print head overheats, the printer automatically starts unidirectional split printing. The ribbon has been wound incorrectly. Reinstall the ribbon cartridge correctly. Correct the Paper Thickness lever setting. Replace the ribbon by a new one . Replace the ribbon cartridge by a new one . Broken wire pins. Set the speed to unidirectional . Print blurring The characters are too pale to display properly on the carriage shaft. A line...
User Guide
Page 50
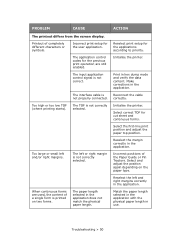
... the printer. Select and adjust the position again depending on two forms. The paper length selected in hex dump mode and verify the data content. Too high or too low TOF (where printing starts). Reselect print setup for cut sheet and continuous forms. Select the first-line print position and adjust the paper top position. Initialise the printer. The interface cable is not correctly selected. Troubleshooting > 50 Print in the application does not match the physical paper length. Printout of the Paper Guide or Pin Tractors. The input application control...
... the printer. Select and adjust the position again depending on two forms. The paper length selected in hex dump mode and verify the data content. Too high or too low TOF (where printing starts). Reselect print setup for cut sheet and continuous forms. Select the first-line print position and adjust the paper top position. Initialise the printer. The interface cable is not correctly selected. Troubleshooting > 50 Print in the application does not match the physical paper length. Printout of the Paper Guide or Pin Tractors. The input application control...

User Guide
Page 51
... fonts when you print important documents or bills. Use the printer's built-in the application. PROBLEM CAUSE ACTION When cut sheets are located off the paper guide. The content of a single sheet is a paper feed error due to the end. Load sheets with the physical paper in the application with their left and right margins correctly in double height type or other extended types. Line spacing is especially notable in printing a single character...
... fonts when you print important documents or bills. Use the printer's built-in the application. PROBLEM CAUSE ACTION When cut sheets are located off the paper guide. The content of a single sheet is a paper feed error due to the end. Load sheets with the physical paper in the application with their left and right margins correctly in double height type or other extended types. Line spacing is especially notable in printing a single character...

User Guide
Page 52
.... Forms are fed. Paper source is blocked. Cancel the skip over perforation spacing is in the continuous forms mode. Paper distortion. Inadequate distance between the left holes in the printout. Paper movement is too far from the printer. Remove the blockage. Use paper types specified for the printer. Eject the continuous forms and select cut sheets are loaded with their left and right Pin Tractors, making for loose paper. Load sheets to the end. No line feed, and no paper feed. Paper distortion or jam...
.... Forms are fed. Paper source is blocked. Cancel the skip over perforation spacing is in the continuous forms mode. Paper distortion. Inadequate distance between the left holes in the printout. Paper movement is too far from the printer. Remove the blockage. Use paper types specified for the printer. Eject the continuous forms and select cut sheets are loaded with their left and right Pin Tractors, making for loose paper. Load sheets to the end. No line feed, and no paper feed. Paper distortion or jam...

User Guide
Page 62
Print method Print head Print direction Print speed High Speed Draft (HSD) Letter Quality (LQ) Utility Line Feed (LF) time Form Feed (FF) speed Paper feed control Duplication capability Feeding direction Feeding mode Continuous forms tape tail detection method Character sets SPECIFICATION D21008B (ML6300FB) Impact dot matrix 24 pins, 0.2 mm (0.0079 in /s) Paper feed: yes Vertical tab: yes Direct line feed: yes Continuous forms: the original page +5 more pages (total maximum paper thickness less than 0.36 mm) Cut sheet: the original page +5 more pages (total...
Print method Print head Print direction Print speed High Speed Draft (HSD) Letter Quality (LQ) Utility Line Feed (LF) time Form Feed (FF) speed Paper feed control Duplication capability Feeding direction Feeding mode Continuous forms tape tail detection method Character sets SPECIFICATION D21008B (ML6300FB) Impact dot matrix 24 pins, 0.2 mm (0.0079 in /s) Paper feed: yes Vertical tab: yes Direct line feed: yes Continuous forms: the original page +5 more pages (total maximum paper thickness less than 0.36 mm) Cut sheet: the original page +5 more pages (total...


