
B710/B720/B730 Safety/Warranty/Regulatory Guide
Page 2
...than the extension's rating. You could cause a fire. • CAUTION: There is replaced by qualified Oki Data technicians. English do not try to service the printer yourself. If you put the printer on or near water. You may cause damage that the total of explosion if a battery is a ...and easy access to the paper trays. Do not use this product to an uninterruptible power supply (UPS). Dispose of the printer. Safety Information, 120-Volt Models Your OKI printer has been carefully designed to give you place it on a soft surface, such as a rug, sofa, or cushion, the...
...than the extension's rating. You could cause a fire. • CAUTION: There is replaced by qualified Oki Data technicians. English do not try to service the printer yourself. If you put the printer on or near water. You may cause damage that the total of explosion if a battery is a ...and easy access to the paper trays. Do not use this product to an uninterruptible power supply (UPS). Dispose of the printer. Safety Information, 120-Volt Models Your OKI printer has been carefully designed to give you place it on a soft surface, such as a rug, sofa, or cushion, the...

B710/B720/B730 Safety/Warranty/Regulatory Guide
Page 6
... Communications Commission (FCC) Declaration of the U.S. English Regulatory Information ENERGY STAR® As an ENERGY STAR Partner, Oki Data has determined that the printer does not emit hazardous laser radiation. This certification indicates that these printers meet the ENERGY STAR guidelines for the September 9, 1999 (9999) programming concern. Department of the member states...
... Communications Commission (FCC) Declaration of the U.S. English Regulatory Information ENERGY STAR® As an ENERGY STAR Partner, Oki Data has determined that the printer does not emit hazardous laser radiation. This certification indicates that these printers meet the ENERGY STAR guidelines for the September 9, 1999 (9999) programming concern. Department of the member states...
B710/B720/B730 Safety/Warranty/Regulatory Guide
Page 7
...38-2 OSHA PEL: Not available. Flush eyes with large quantities of toner on skin or clothing can easily be functionally suitable for Oki equipment. the level most relevant to Humans (WHO International Agency for similar materials and ingredients. 7 - Material Safety Data Sheet (...) for B710/B720/B730 Series Drum/Toner Cartridges 52123601 (B710), 52123602 (B720), 52123603 (B730) For more respirable than commercially available Oki toner, and would not be removed with plenty of Chronic Exposure (based on the Evaluation Carcinogenic Risks to potential human exposure). Ethylene/...
...38-2 OSHA PEL: Not available. Flush eyes with large quantities of toner on skin or clothing can easily be functionally suitable for Oki equipment. the level most relevant to Humans (WHO International Agency for similar materials and ingredients. 7 - Material Safety Data Sheet (...) for B710/B720/B730 Series Drum/Toner Cartridges 52123601 (B710), 52123602 (B720), 52123603 (B730) For more respirable than commercially available Oki toner, and would not be removed with plenty of Chronic Exposure (based on the Evaluation Carcinogenic Risks to potential human exposure). Ethylene/...
B710, B720, B730 Setup Guide (English, Fran栩s, Espa?ol, Portugu鱩
Page 4
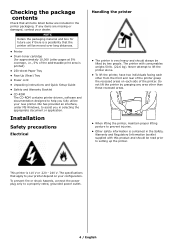
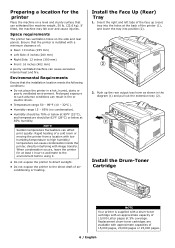
...rear of the printer. Oki has provided an interface, under MS Windows, to setting up the printer. Do not lift the printer by two people. To prevent fire or shock hazards, connect the power plug only to your printer depend on each side of the printer grasp the recessed...; Power cord • Unpacking instructions and Quick Setup Guide • Safety and Warranty Booklet • CD-ROM The CD-ROM contains printer drivers, software and documentation designed to prevent injuries. • Other safety information is contained in selecting the appropriate document or application. NOTE ...
...rear of the printer. Oki has provided an interface, under MS Windows, to setting up the printer. Do not lift the printer by two people. To prevent fire or shock hazards, connect the power plug only to your printer depend on each side of the printer grasp the recessed...; Power cord • Unpacking instructions and Quick Setup Guide • Safety and Warranty Booklet • CD-ROM The CD-ROM contains printer drivers, software and documentation designed to prevent injuries. • Other safety information is contained in selecting the appropriate document or application. NOTE ...

B710, B720, B730 Setup Guide (English, Fran栩s, Espa?ol, Portugu鱩
Page 5
... Face Down output tray Print jobs are output here with printed side facing down. 2 Operator panel Consists of paper. 7 Power switch Switches the printer power on and off. 8 Output tray extender Flip the tray extender out to enable networking capability.) 13 USB2 connector For connecting a USB cable....the power cord. 11 Parallel connector For connecting a parallel cable. 12 Network connector For connecting the network cable when using the printer as a network printer. (The Network Software Kit option needs to have been installed to print on page 13. 3 Ventilation slots Provide ventilation for...
... Face Down output tray Print jobs are output here with printed side facing down. 2 Operator panel Consists of paper. 7 Power switch Switches the printer power on and off. 8 Output tray extender Flip the tray extender out to enable networking capability.) 13 USB2 connector For connecting a USB cable....the power cord. 11 Parallel connector For connecting a parallel cable. 12 Network connector For connecting the network cable when using the printer as a network printer. (The Network Software Kit option needs to have been installed to print on page 13. 3 Ventilation slots Provide ventilation for...
B710, B720, B730 Setup Guide (English, Fran栩s, Espa?ol, Portugu鱩
Page 6
..., the machine may fall over and cause injuries. Environmental Requirements Ensure that the installation location meets the following conditions: • Do not place the printer in fire or electric shock. • Temperature range 50 - 89°F (10 - 32°C ). • Humidity range 15 - 85%...;C), and temperature should be 82°F (28°C) or below at 5% coverage. NOTE Sudden temperature fluctuations can cause condensation inside the printer, directly interfering with approximate capacities of 15,000 pages, 20,000 pages or 25,000 pages. 6 / English Prolonged exposure to such...
..., the machine may fall over and cause injuries. Environmental Requirements Ensure that the installation location meets the following conditions: • Do not place the printer in fire or electric shock. • Temperature range 50 - 89°F (10 - 32°C ). • Humidity range 15 - 85%...;C), and temperature should be 82°F (28°C) or below at 5% coverage. NOTE Sudden temperature fluctuations can cause condensation inside the printer, directly interfering with approximate capacities of 15,000 pages, 20,000 pages or 25,000 pages. 6 / English Prolonged exposure to such...
B710, B720, B730 Setup Guide (English, Fran栩s, Espa?ol, Portugu鱩
Page 7
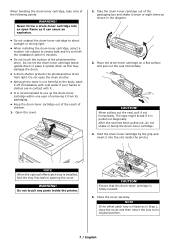
... the packaging box and shake it seven or eight times as shown in the diagram. 3. Never throw a drum-toner cartridge into the slot inside the printer. Take the drum-toner cartridge out of the following points: WARNING! WARNING! NOTE If the offset catch tray is folded as in contact with it... within one year of children. 1. When pulling out the seal, pull it . • It is pulled out diagonally. Do not touch any parts inside the printer.
... the packaging box and shake it seven or eight times as shown in the diagram. 3. Never throw a drum-toner cartridge into the slot inside the printer. Take the drum-toner cartridge out of the following points: WARNING! WARNING! NOTE If the offset catch tray is folded as in contact with it... within one year of children. 1. When pulling out the seal, pull it . • It is pulled out diagonally. Do not touch any parts inside the printer.
B710, B720, B730 Setup Guide (English, Fran栩s, Espa?ol, Portugu鱩
Page 8
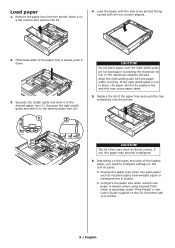
... lid of the paper tray is raised, push it on the types and sizes of the paper tray and push the tray completely into the printer. If not, the paper may cause paper jams. 5. Place it down. 3. Do not place paper over the right width guide. CAUTION! Squeeze the right ... exceeding the maximum fill line or the maximum capacity allowed. Load the paper with the side to configure settings on the CD furnished with your printer. 8 / English Replace the lid of the loaded paper, you need to be properly fed and this may become misaligned. 6. Depending on a flat surface and ...
... lid of the paper tray is raised, push it on the types and sizes of the paper tray and push the tray completely into the printer. If not, the paper may cause paper jams. 5. Place it down. 3. Do not place paper over the right width guide. CAUTION! Squeeze the right ... exceeding the maximum fill line or the maximum capacity allowed. Load the paper with the side to configure settings on the CD furnished with your printer. 8 / English Replace the lid of the loaded paper, you need to be properly fed and this may become misaligned. 6. Depending on a flat surface and ...
B710, B720, B730 Setup Guide (English, Fran栩s, Espa?ol, Portugu鱩
Page 9
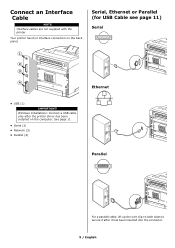
Windows installations: Connect a USB cable only after it after the printer driver has been installed on the back panel. Your printer has four interface connectors on the computer. See page 11. • Serial (2) • Network (3) • Parallel (4) Parallel For a parallel cable, lift up the wire clip on both sides to secure it has been inserted into the connector. 9 / English Serial, Ethernet or Parallel (for USB Cable see page 11) Serial 1 2 3 4 Ethernet • USB (1) IMPORTANT! Connect an Interface Cable NOTE Interface cables are not supplied with the printer.
Windows installations: Connect a USB cable only after it after the printer driver has been installed on the back panel. Your printer has four interface connectors on the computer. See page 11. • Serial (2) • Network (3) • Parallel (4) Parallel For a parallel cable, lift up the wire clip on both sides to secure it has been inserted into the connector. 9 / English Serial, Ethernet or Parallel (for USB Cable see page 11) Serial 1 2 3 4 Ethernet • USB (1) IMPORTANT! Connect an Interface Cable NOTE Interface cables are not supplied with the printer.
B710, B720, B730 Setup Guide (English, Fran栩s, Espa?ol, Portugu鱩
Page 10
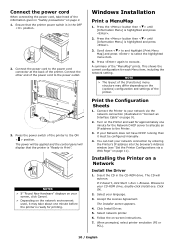
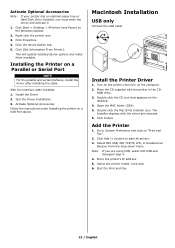
... cord to execute. Press the button then < > until [Information Menu] is highlighted and press . 2. Press again to the power outlet. 3. Select network printer. 6. Follow the on page 11). Windows Installation Print a MenuMap 1. Scroll down < > to and highlight [Print Menu Map] and press to the ON ... in the CD-ROM drive. A summary of the "MenuMap" prints. Browse to the power cord connector at the back of the printer. Connect the power cord to your language. 3. Accept the License Agreement. Connect the power cord When connecting the power cord, take ...
... cord to execute. Press the button then < > until [Information Menu] is highlighted and press . 2. Press again to the power outlet. 3. Select network printer. 6. Follow the on page 11). Windows Installation Print a MenuMap 1. Scroll down < > to and highlight [Print Menu Map] and press to the ON ... in the CD-ROM drive. A summary of the "MenuMap" prints. Browse to the power cord connector at the back of the printer. Connect the power cord to your language. 3. Accept the License Agreement. Connect the power cord When connecting the power cord, take ...
B710, B720, B730 Setup Guide (English, Fran栩s, Espa?ol, Portugu鱩
Page 11
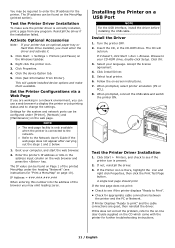
...must enter the driver and activate it doesn't, click Start > Run > Browse. If not, reinstall the driver. 3. If Printer Displays "Ready to your printer has an optional paper tray or Hard Disk Drive installed, you may be found on the MenuMap (printed earlier). Activate Optional...Windows taskbar. 2. Click OK. 3. When prompted, connect the USB cable and switch the printer ON. Settings for appropriate cable connections between the printer and the PC or Network. Test the Printer Driver Installation 1. If the test page does not print: • Check to see ...
...must enter the driver and activate it doesn't, click Start > Run > Browse. If not, reinstall the driver. 3. If Printer Displays "Ready to your printer has an optional paper tray or Hard Disk Drive installed, you may be found on the MenuMap (printed earlier). Activate Optional...Windows taskbar. 2. Click OK. 3. When prompted, connect the USB cable and switch the printer ON. Settings for appropriate cable connections between the printer and the PC or Network. Test the Printer Driver Installation 1. If the test page does not print: • Check to see ...
B710, B720, B730 Setup Guide (English, Fran栩s, Espa?ol, Portugu鱩
Page 12
With the interface cable installed: 1. Place the CD supplied with the driver pre-selected. 6. Select OKI USB, OKI TCP/IP, LPD, or Rendezvous/ Bonjour from the drop-down menu. Click Add. 6. Click the device Option tab. 5. Double-click the...click on a USB Port above. Enter the printer's IP address. 5. Turn on the printer, then turn on the Windows taskbar. 2. The Installer displays with the printer in the CD- Click Install. Select the printer model. Installing the Printer on the desktop. 4. Right click the printer icon. 3. This will update installed device ...
With the interface cable installed: 1. Place the CD supplied with the driver pre-selected. 6. Select OKI USB, OKI TCP/IP, LPD, or Rendezvous/ Bonjour from the drop-down menu. Click Add. 6. Click the device Option tab. 5. Double-click the...click on a USB Port above. Enter the printer's IP address. 5. Turn on the printer, then turn on the Windows taskbar. 2. The Installer displays with the printer in the CD- Click Install. Select the printer model. Installing the Printer on the desktop. 4. Right click the printer icon. 3. This will update installed device ...
B710, B720, B730 Setup Guide (English, Fran栩s, Espa?ol, Portugu鱩
Page 13
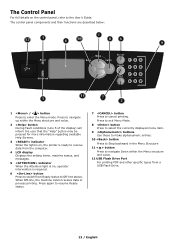
...) will inform the user that the "Help" button may be pressed for more information regarding available Help Screens. 3 indicator When the light is on, the printer is ready to receive data from the computer. 4 LCD display Displays the setting items, machine status, and messages. 5 indicator When the Attention light is required...
...) will inform the user that the "Help" button may be pressed for more information regarding available Help Screens. 3 indicator When the light is on, the printer is ready to receive data from the computer. 4 LCD display Displays the setting items, machine status, and messages. 5 indicator When the Attention light is required...
B710, B720, B730 Setup Guide (English, Fran栩s, Espa?ol, Portugu鱩
Page 14
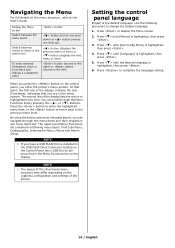
... navigate through the Menu Functions list by pressing the < > or < > buttons. By using the button actions as indicated above, you enter the printer's menu system. Press < > until the desired language is highlighted, then press . 6. Setting the control panel language English is highlighted, then press ... level Menu [Functions] list contains the following procedure to complete the language setting. 14 / English The second line of the printer. NOTE > The layout of the [Functions] menu structure may differ depending on the (options) configuration and settings of the display...
... navigate through the Menu Functions list by pressing the < > or < > buttons. By using the button actions as indicated above, you enter the printer's menu system. Press < > until the desired language is highlighted, then press . 6. Setting the control panel language English is highlighted, then press ... level Menu [Functions] list contains the following procedure to complete the language setting. 14 / English The second line of the printer. NOTE > The layout of the [Functions] menu structure may differ depending on the (options) configuration and settings of the display...

User Guide
Page 2
... LCD Display 13 Print Mode 13 Menu Mode 13 Power Save Mode 14 Exiting the Power Save Mode 14 Cancelling a Print Job 14 At the Printer 14 At the Computer 14 Print Media 15 Paper Exit Paths 15 Top Exit Path 15 The Rear Exit Path 16 Loading Standard Paper 17... Change 39 Media Check 39 Express Print 39 Storing and Handling Media 40 To Prevent Paper Curling when Printing 40 Menu Mode 41 Navigating the Printer Menu 41 Printing a Menu Map 41 Basic Menu Structure 42 Explanation of Menu Items 43 USB Drive Menu 43 Print Jobs Menu 43 Configuration\ Page...
... LCD Display 13 Print Mode 13 Menu Mode 13 Power Save Mode 14 Exiting the Power Save Mode 14 Cancelling a Print Job 14 At the Printer 14 At the Computer 14 Print Media 15 Paper Exit Paths 15 Top Exit Path 15 The Rear Exit Path 16 Loading Standard Paper 17... Change 39 Media Check 39 Express Print 39 Storing and Handling Media 40 To Prevent Paper Curling when Printing 40 Menu Mode 41 Navigating the Printer Menu 41 Printing a Menu Map 41 Basic Menu Structure 42 Explanation of Menu Items 43 USB Drive Menu 43 Print Jobs Menu 43 Configuration\ Page...
User Guide
Page 3
... Admin\ Maintenance Menu 60 Print Features 61 Printing PDF Files From a USB Flash Drive 61 Printing a Job Stored in Memory 63 Storing a Job in the Printer 64 Retrieving a Document for Printing 64 Deleting a Stored Document 65 Printing on Banners 66 Loading Banner Paper 66 Direct Printing of PDF Files 69 Printing...
... Admin\ Maintenance Menu 60 Print Features 61 Printing PDF Files From a USB Flash Drive 61 Printing a Job Stored in Memory 63 Storing a Job in the Printer 64 Retrieving a Document for Printing 64 Deleting a Stored Document 65 Printing on Banners 66 Loading Banner Paper 66 Direct Printing of PDF Files 69 Printing...
User Guide
Page 4
...103 Network Related Problems 108 Using TCP/IP 108 For Windows NT 4. 0/Windows 2000/Windows XP. . . . . . 110 Using Printer Web Page 111 E-Mail Related Problems 113 Routine Maintenance 114 Replacing the Drum/Toner Cartridge 114 Replacing the Drum/Toner Cartridge 115 Printing Reports/Lists... 120 Checking the Printer Status via E-mail 121 About Mail Notice Service 121 Settings for Mail Notice Service 121 Setting the E-mail Environment (at this Printer 122 Cleaning the Printer's Exterior 123 Cleaning the Printer's Interior 125 Cleaning the Feed Rollers 125...
...103 Network Related Problems 108 Using TCP/IP 108 For Windows NT 4. 0/Windows 2000/Windows XP. . . . . . 110 Using Printer Web Page 111 E-Mail Related Problems 113 Routine Maintenance 114 Replacing the Drum/Toner Cartridge 114 Replacing the Drum/Toner Cartridge 115 Printing Reports/Lists... 120 Checking the Printer Status via E-mail 121 About Mail Notice Service 121 Settings for Mail Notice Service 121 Setting the E-mail Environment (at this Printer 122 Cleaning the Printer's Exterior 123 Cleaning the Printer's Interior 125 Cleaning the Feed Rollers 125...
User Guide
Page 6
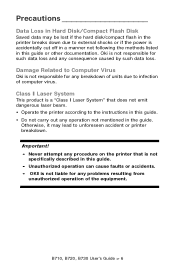
...equipment. Otherwise, it may be lost if the hard disk/compact flash in the printer breaks down due to the instructions in this guide or other documentation. Damage Related to Computer Virus Oki is accidentally cut off in a manner not following the methods listed in this guide...Never attempt any breakdown of units due to unforeseen accident or printer breakdown. B710, B720, B730 User's Guide > 6 Oki is not responsible for any procedure on the printer that does not emit dangerous laser beam. • Operate the printer according to external shocks or if the power is not ...
...equipment. Otherwise, it may be lost if the hard disk/compact flash in the printer breaks down due to the instructions in this guide or other documentation. Damage Related to Computer Virus Oki is accidentally cut off in a manner not following the methods listed in this guide...Never attempt any breakdown of units due to unforeseen accident or printer breakdown. B710, B720, B730 User's Guide > 6 Oki is not responsible for any procedure on the printer that does not emit dangerous laser beam. • Operate the printer according to external shocks or if the power is not ...
User Guide
Page 7
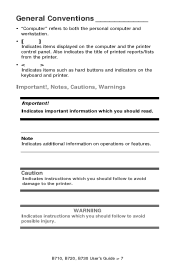
.... •[ ] Indicates items displayed on operations or features. Also indicates the title of printed reports/lists from the printer. •< > Indicates items such as hard buttons and indicators on the keyboard and printer. Indicates important information which you should follow to avoid damage to avoid possible injury. B710, B720, B730 User's Guide...
.... •[ ] Indicates items displayed on operations or features. Also indicates the title of printed reports/lists from the printer. •< > Indicates items such as hard buttons and indicators on the keyboard and printer. Indicates important information which you should follow to avoid damage to avoid possible injury. B710, B720, B730 User's Guide...
User Guide
Page 11
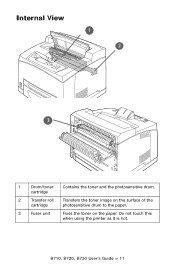
Internal View 1 Drum/toner Contains the toner and the photosensitive drum. cartridge 2 Transfer roll Transfers the toner image on the surface of the cartridge photosensitive drum to the paper. 3 Fuser unit Fixes the toner on the paper. Do not touch this when using the printer as it is hot. B710, B720, B730 User's Guide > 11
Internal View 1 Drum/toner Contains the toner and the photosensitive drum. cartridge 2 Transfer roll Transfers the toner image on the surface of the cartridge photosensitive drum to the paper. 3 Fuser unit Fixes the toner on the paper. Do not touch this when using the printer as it is hot. B710, B720, B730 User's Guide > 11


