B4400 4500 4550 4600 User Guide (English)
Page 3
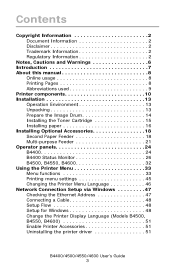
... Paper Feeder 18 Multi-purpose Feeder 21 Operator panels 24 B4400 24 B4400 Status Monitor 26 B4500, B4550, B4600 32 Using the Printer Menu 33 Menu functions 33 Printing menu settings 45 Changing the Printer Menu Language 46 Network Connection Setup via Windows 47 Checking the Ethernet Address 47 Connecting a Cable 48 Setup...
... Paper Feeder 18 Multi-purpose Feeder 21 Operator panels 24 B4400 24 B4400 Status Monitor 26 B4500, B4550, B4600 32 Using the Printer Menu 33 Menu functions 33 Printing menu settings 45 Changing the Printer Menu Language 46 Network Connection Setup via Windows 47 Checking the Ethernet Address 47 Connecting a Cable 48 Setup...
B4400 4500 4550 4600 User Guide (English)
Page 4
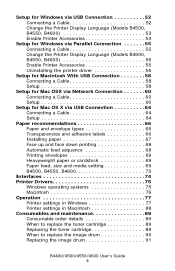
... envelopes 69 Heavyweight paper or cardstock 69 Paper feed, size and media setting 69 B4500, B4550, B4600 70 Interfaces 74 Printer Drivers 75 Windows operating systems 75 Macintosh 76 Operation 77 Printer settings in Windows 77 Printer settings in Macintosh 88 Consumables and maintenance 89 Consumable order details 89 When to replace the toner...
... envelopes 69 Heavyweight paper or cardstock 69 Paper feed, size and media setting 69 B4500, B4550, B4600 70 Interfaces 74 Printer Drivers 75 Windows operating systems 75 Macintosh 76 Operation 77 Printer settings in Windows 77 Printer settings in Macintosh 88 Consumables and maintenance 89 Consumable order details 89 When to replace the toner...
B4400 4500 4550 4600 User Guide (English)
Page 10
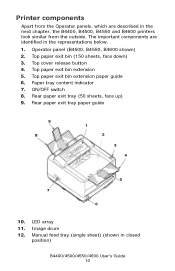
Top cover release button 4. LED array 11. Manual feed tray (single sheet) (shown in the next chapter, the B4400, B4500, B4550 and B4600 printers look similar from the outside. Printer components Apart from the Operator panels, which are identified in the representations below. 1. The important components are described in closed position) B4400/4500/4550... bin extension 5. Top paper exit bin extension paper guide 6. Image drum 12. Rear paper exit tray paper guide Fig1_05.jpg 9 8 1 2 3 4 5 7 6 10. Operator panel (B4500, B4550, B4600 shown) 2.
Top cover release button 4. LED array 11. Manual feed tray (single sheet) (shown in the next chapter, the B4400, B4500, B4550 and B4600 printers look similar from the outside. Printer components Apart from the Operator panels, which are identified in the representations below. 1. The important components are described in closed position) B4400/4500/4550... bin extension 5. Top paper exit bin extension paper guide 6. Image drum 12. Rear paper exit tray paper guide Fig1_05.jpg 9 8 1 2 3 4 5 7 6 10. Operator panel (B4500, B4550, B4600 shown) 2.
B4400 4500 4550 4600 User Guide (English)
Page 24
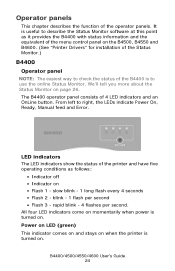
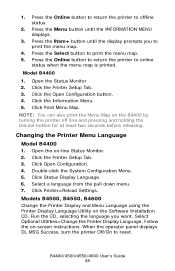
... and an OnLine button. B4400/4500/4550/4600 User's Guide 24 Power on LED (green) This indicator comes on and stays on when the printer is turned on • Flash 1 - Operator panels This chapter describes the function of the B4400 is to use the online Status Monitor. It...five operating conditions as it provides the B4400 with status information and the equivalent of the menu control panel on the B4500, B4550 and B4600. (See "Printer Drivers" for installation of the Status Monitor.) B4400 Operator panel NOTE: The easiest way to describe the Status Monitor software at this point...
... and an OnLine button. B4400/4500/4550/4600 User's Guide 24 Power on LED (green) This indicator comes on and stays on when the printer is turned on • Flash 1 - Operator panels This chapter describes the function of the B4400 is to use the online Status Monitor. It...five operating conditions as it provides the B4400 with status information and the equivalent of the menu control panel on the B4500, B4550 and B4600. (See "Printer Drivers" for installation of the Status Monitor.) B4400 Operator panel NOTE: The easiest way to describe the Status Monitor software at this point...
B4400 4500 4550 4600 User Guide (English)
Page 31
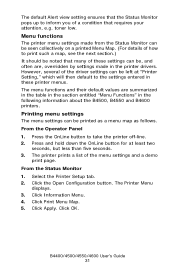
...but less than five seconds. 3. Click the Open Configuration button. Click Apply. Menu functions The printer menu settings made in the following information about the B4500, B4550 and B4600 printers. However, several of the driver settings can be printed as a menu map as follows. From... the Status Monitor 1. The Printer Menu displays. 3. Click Information Menu. 4. The default Alert view ...
...but less than five seconds. 3. Click the Open Configuration button. Click Apply. Menu functions The printer menu settings made in the following information about the B4500, B4550 and B4600 printers. However, several of the driver settings can be printed as a menu map as follows. From... the Status Monitor 1. The Printer Menu displays. 3. Click Information Menu. 4. The default Alert view ...
B4400 4500 4550 4600 User Guide (English)
Page 32
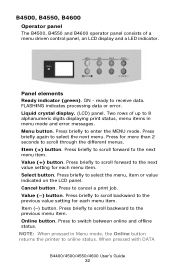
...panel. Menu button. Press briefly to scroll forward to the next value setting for each menu item. B4500, B4550, B4600 Operator panel The B4500, B4550 and B4600 operator panel consists of up to 8 alphanumeric digits displaying print status, menu items in Menu mode, the Online button returns... the printer to the next menu item. Press briefly to scroll forward to online status. ON - B4350_panel_1.jpg Panel elements...
...panel. Menu button. Press briefly to scroll forward to the next value setting for each menu item. B4500, B4550, B4600 Operator panel The B4500, B4550 and B4600 operator panel consists of up to 8 alphanumeric digits displaying print status, menu items in Menu mode, the Online button returns... the printer to the next menu item. Press briefly to scroll forward to online status. ON - B4350_panel_1.jpg Panel elements...
B4400 4500 4550 4600 User Guide (English)
Page 45
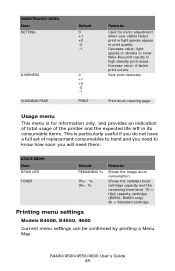
...to know how soon you will need them. Shows the installed toner cartridge capacity and the remaining toner level. 7K = High capacity cartridge (B4550, B4600 only) 3k = Standard cartridge Printing menu settings Models B4500, B4550, 4600 Current menu settings can be confirmed by printing a Menu Map. MAINTENANCE ...MENU Item SETTING DARKNESS CLEANING PAGE Default 0 +1 +2 -2 -1 0 +1 +2 -2 -1 PRINT Remarks Used for information only, and provides an indication of total usage of the printer and the expected life left in high-density print areas. B4400/4500/4550/4600 User's Guide 45
...to know how soon you will need them. Shows the installed toner cartridge capacity and the remaining toner level. 7K = High capacity cartridge (B4550, B4600 only) 3k = Standard cartridge Printing menu settings Models B4500, B4550, 4600 Current menu settings can be confirmed by printing a Menu Map. MAINTENANCE ...MENU Item SETTING DARKNESS CLEANING PAGE Default 0 +1 +2 -2 -1 0 +1 +2 -2 -1 PRINT Remarks Used for information only, and provides an indication of total usage of the printer and the expected life left in high-density print areas. B4400/4500/4550/4600 User's Guide 45
B4400 4500 4550 4600 User Guide (English)
Page 46
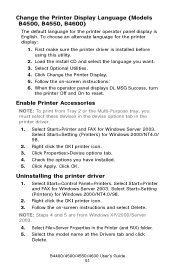
... least two seconds before releasing. Follow the on the Software Installation CD. Click Print Menu Map. Double-click the System Configuration Menu. 5. Models B4500, B4550, B4600 Change the Printer Display and Menu Language using the Printer Display Language Utility on -screen instructions. When the operator panel displays DL MSG Success, turn the...
... least two seconds before releasing. Follow the on the Software Installation CD. Click Print Menu Map. Double-click the System Configuration Menu. 5. Models B4500, B4550, B4600 Change the Printer Display and Menu Language using the Printer Display Language Utility on -screen instructions. When the operator panel displays DL MSG Success, turn the...
B4400 4500 4550 4600 User Guide (English)
Page 51
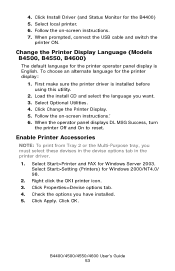
... devises in the devise options tab in the Printer (and FAX) folder. 5. When the operator panel displays DL MSG Success, turn the printer Off and On to reset. Select Start>Setting (Printers) for the printer display: 1. Right click the OKI printer icon. 3. Click Properties>Devise options tab.... 98. 2. Select Start>Printer and FAX for the printer operator panel display is installed before using this utility. 2. Change the Printer Display Language (Models B4500, B4550, B4600) The default language for Windows Server 2003. First make sure the printer driver is English. Follow the...
... devises in the devise options tab in the Printer (and FAX) folder. 5. When the operator panel displays DL MSG Success, turn the printer Off and On to reset. Select Start>Setting (Printers) for the printer display: 1. Right click the OKI printer icon. 3. Click Properties>Devise options tab.... 98. 2. Select Start>Printer and FAX for the printer operator panel display is installed before using this utility. 2. Change the Printer Display Language (Models B4500, B4550, B4600) The default language for Windows Server 2003. First make sure the printer driver is English. Follow the...
B4400 4500 4550 4600 User Guide (English)
Page 53
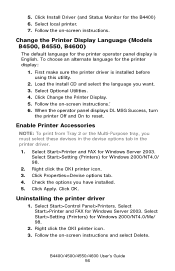
...printer ON. Change the Printer Display Language (Models B4500, B4550, B4600) The default language for the printer operator panel display is installed before using this utility. 2. To choose an alternate language for Windows Server 2003. First make sure the printer driver is English. Select Start>Printer and FAX for the printer...operator panel displays DL MSG Success, turn the printer Off and On to reset. Right click the OKI printer icon. 3. Click Install Driver (and Status Monitor for Windows 2000/NT4.0/ 98. 2. Select local printer. 6. Select Optional Utilities. 4. Click Properties>...
...printer ON. Change the Printer Display Language (Models B4500, B4550, B4600) The default language for the printer operator panel display is installed before using this utility. 2. To choose an alternate language for Windows Server 2003. First make sure the printer driver is English. Select Start>Printer and FAX for the printer...operator panel displays DL MSG Success, turn the printer Off and On to reset. Right click the OKI printer icon. 3. Click Install Driver (and Status Monitor for Windows 2000/NT4.0/ 98. 2. Select local printer. 6. Select Optional Utilities. 4. Click Properties>...
B4400 4500 4550 4600 User Guide (English)
Page 56
... for Windows 2000/NT4.0/Me/ 98. 2. Select Start>Setting (Printers) for Windows Server 2003. Click Change the Printer Display. 5. Check the options you have installed. 5. Select Start>Control Panel>Printers. Right click the OKI printer icon. 3. Click Install Driver (and Status Monitor for the printer display: 1. 5. Select local printer. 7. To choose an alternate language for the B4400) 6.
... for Windows 2000/NT4.0/Me/ 98. 2. Select Start>Setting (Printers) for Windows Server 2003. Click Change the Printer Display. 5. Check the options you have installed. 5. Select Start>Control Panel>Printers. Right click the OKI printer icon. 3. Click Install Driver (and Status Monitor for the printer display: 1. 5. Select local printer. 7. To choose an alternate language for the B4400) 6.
B4400 4500 4550 4600 User Guide (English)
Page 57
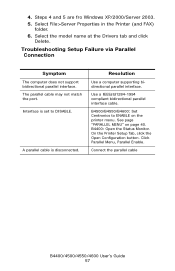
...bidirectional parallel interface. Steps 4 and 5 are fro Windows XP/2000/Server 2003. 5. Click Parallel Menu, Parallel Enable. On the Printer Setup Tab, click the Open Configuration button. Interface is disconnected. Resolution Use a computer supporting bidirectional parallel interface. Connect the parallel ...cable B4400/4500/4550/4600 User's Guide 57 B4500/B4550/B4600: Set Centronics to DISABLE. A parallel cable is set to ENABLE on page 40. Select File>Server Properties in the Printer (and FAX) folder. 6.
...bidirectional parallel interface. Steps 4 and 5 are fro Windows XP/2000/Server 2003. 5. Click Parallel Menu, Parallel Enable. On the Printer Setup Tab, click the Open Configuration button. Interface is disconnected. Resolution Use a computer supporting bidirectional parallel interface. Connect the parallel ...cable B4400/4500/4550/4600 User's Guide 57 B4500/B4550/B4600: Set Centronics to DISABLE. A parallel cable is set to ENABLE on page 40. Select File>Server Properties in the Printer (and FAX) folder. 6.
B4400 4500 4550 4600 User Guide (English)
Page 70
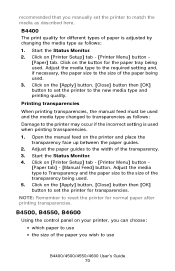
...transparency. 3. Start the Status Monitor. 4. Open the manual feed on the [Apply] button, [Close] button then [OK] button to set the printer for the paper tray being used. 5. B4500, B4550, B4600 Using the control panel on the [Apply] button, [Close] button then [OK] button to set the... printer to the new media type and printing quality. B4400 The print quality for normal paper after printing transparencies. Click on the printer and place the transparency face ...
...transparency. 3. Start the Status Monitor. 4. Open the manual feed on the [Apply] button, [Close] button then [OK] button to set the printer for the paper tray being used. 5. B4500, B4550, B4600 Using the control panel on the [Apply] button, [Close] button then [OK] button to set the... printer to the new media type and printing quality. B4400 The print quality for normal paper after printing transparencies. Click on the printer and place the transparency face ...
B4400 4500 4550 4600 User Guide (English)
Page 72
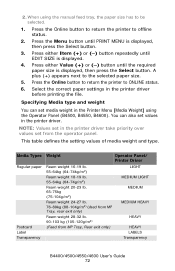
...type and weight You can also set values in the printer driver. NOTE: Values set in the printer driver take priority over values set media weight in the printer driver before printing the file. When using the Operator Panel (B4500, B4550, B4600). Media Types Regular paper Postcard Label Transparency Weight Operator Panel.../ Printer Driver Ream weight 16-19 lb. 55-64kg (64-74kg/m2) Ream weight 18-19 lb. 55-64kg (64-74g/m2)...
...type and weight You can also set values in the printer driver. NOTE: Values set in the printer driver take priority over values set media weight in the printer driver before printing the file. When using the Operator Panel (B4500, B4550, B4600). Media Types Regular paper Postcard Label Transparency Weight Operator Panel.../ Printer Driver Ream weight 16-19 lb. 55-64kg (64-74kg/m2) Ream weight 18-19 lb. 55-64kg (64-74g/m2)...
B4400 4500 4550 4600 User Guide (English)
Page 74
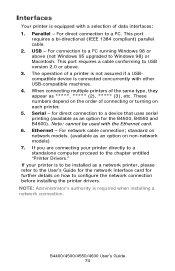
for direct connection to a device that uses serial printing (available as a network printer, please refer to the User's Guide for the network interface card for the B4500, B4550 and B4600). Ethernet - B4400/4500/4550/4600 User's Guide 74 These numbers depend on the order of the same ...type, they appear as an option on each printer. 5. If you are connecting your printer is to configure the network connection before ...
for direct connection to a device that uses serial printing (available as a network printer, please refer to the User's Guide for the network interface card for the B4500, B4550 and B4600). Ethernet - B4400/4500/4550/4600 User's Guide 74 These numbers depend on the order of the same ...type, they appear as an option on each printer. 5. If you are connecting your printer is to configure the network connection before ...
B4400 4500 4550 4600 User Guide (English)
Page 77
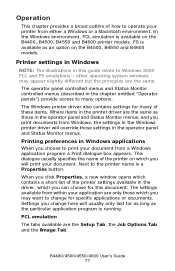
... document. PCL emulation The tabs available are only those settings in Windows applications When you change for many options. The Windows printer driver also contains settings for specific applications or documents. Printing preferences in the operator panel and Status Monitor menus. When you ... as the particular application program is available on the B4400, B4500, B4550 and B4600 printer models. This dialogue usually specifies the name of the printer on the B4500, B4550 and B4600 models. other operating system windows may want to change here will print your application...
... document. PCL emulation The tabs available are only those settings in Windows applications When you change for many options. The Windows printer driver also contains settings for specific applications or documents. Printing preferences in the operator panel and Status Monitor menus. When you ... as the particular application program is available on the B4400, B4500, B4550 and B4600 printer models. This dialogue usually specifies the name of the printer on the B4500, B4550 and B4600 models. other operating system windows may want to change here will print your application...

B4400 4500 4550 4600 User Guide (English)
Page 81
Printed page order can be set to be printed on a single sheet. B4400/4500/4550/4600 User's Guide 81 The tabs available are the Layout Tab, the Paper/Quality Tab and the Job Options Tab. Page orientation can be set as front to back or back to front of pages to portrait (tall), landscape (wide) or landscape rotated by 180 degrees. 2. Set the number of the document. 3. PS emulation For B4500, B4550 and B4600 printers with the PostScript 3 option installed. Layout tab pslayout1.jpg 1.
Printed page order can be set to be printed on a single sheet. B4400/4500/4550/4600 User's Guide 81 The tabs available are the Layout Tab, the Paper/Quality Tab and the Job Options Tab. Page orientation can be set as front to back or back to front of pages to portrait (tall), landscape (wide) or landscape rotated by 180 degrees. 2. Set the number of the document. 3. PS emulation For B4500, B4550 and B4600 printers with the PostScript 3 option installed. Layout tab pslayout1.jpg 1.
B4400 4500 4550 4600 User Guide (English)
Page 87
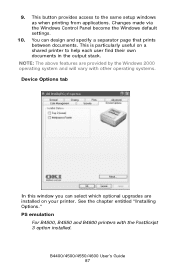
...are provided by the Windows 2000 operating system and will vary with the PostScript 3 option installed. PS emulation For B4500, B4550 and B4600 printers with other operating systems. Device Options tab deviceoption1.jpg In this window you can design and specify a separator page that prints between ...provides access to help each user find their own documents in the output stack. NOTE: The above features are installed on a shared printer to the same setup windows as when printing from applications. Changes made via the Windows Control Panel become the Windows default settings. 10...
...are provided by the Windows 2000 operating system and will vary with the PostScript 3 option installed. PS emulation For B4500, B4550 and B4600 printers with other operating systems. Device Options tab deviceoption1.jpg In this window you can design and specify a separator page that prints between ...provides access to help each user find their own documents in the output stack. NOTE: The above features are installed on a shared printer to the same setup windows as when printing from applications. Changes made via the Windows Control Panel become the Windows default settings. 10...
B4400 4500 4550 4600 User Guide (English)
Page 89
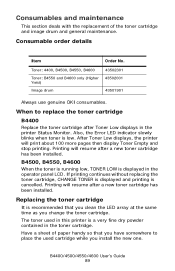
...Toner Low displays in the toner cartridge. Have a sheet of the toner cartridge and image drum and general maintenance. B4500, B4550, B4600 When the toner is running low, TONER LOW is low. If printing continues without replacing the toner cartridge, CHANGE TONER is displayed... the used in this printer is a very fine dry powder contained in the printer Status Monitor. Replacing the toner cartridge It is cancelled. Toner: 4400, B4500, B4550, B4600 Toner: B4550 and B4600 only (Higher Yield) Image drum 43502301 43502001 43501901 Always use genuine OKI consumables. B4400/4500/4550...
...Toner Low displays in the toner cartridge. Have a sheet of the toner cartridge and image drum and general maintenance. B4500, B4550, B4600 When the toner is running low, TONER LOW is low. If printing continues without replacing the toner cartridge, CHANGE TONER is displayed... the used in this printer is a very fine dry powder contained in the printer Status Monitor. Replacing the toner cartridge It is cancelled. Toner: 4400, B4500, B4550, B4600 Toner: B4550 and B4600 only (Higher Yield) Image drum 43502301 43502001 43501901 Always use genuine OKI consumables. B4400/4500/4550...

B4400 4500 4550 4600 User Guide (English)
Page 90
...the LED array surface with the LED lens cleaner that the new one came with the new toner cartridge or soft tissue. 5. B4500, B4550, B4600 When the drum reaches 90% of its life, a CHANGE DRUM message is not enough, use solvents of any residue. Do not use hot ... regulations, recommendations, etc., which may be in . Seek medical attention immediately. Do not touch. 2. Switch off . This area is displayed in the printer Status Monitor. When to cool for about 10 minutes before opening the top cover. 1. They will make stains permanent. Press the top cover release button...
...the LED array surface with the LED lens cleaner that the new one came with the new toner cartridge or soft tissue. 5. B4500, B4550, B4600 When the drum reaches 90% of its life, a CHANGE DRUM message is not enough, use solvents of any residue. Do not use hot ... regulations, recommendations, etc., which may be in . Seek medical attention immediately. Do not touch. 2. Switch off . This area is displayed in the printer Status Monitor. When to cool for about 10 minutes before opening the top cover. 1. They will make stains permanent. Press the top cover release button...


