

User Manual
Page 1
... Number Decal QUESTIONS? As a manufacturer, we are damaged or missing, PLEASE CONTACT OUR CUSTOMER SERVICE DEPARTMENT DIRECTLY. Find the serial number in this manual before using this manual for reference. MST ON THE WEB: www.nordictrackservice.com CAUTION Read all precautions and instructions in the location shown below. USER'S MANUAL Visit...
... Number Decal QUESTIONS? As a manufacturer, we are damaged or missing, PLEASE CONTACT OUR CUSTOMER SERVICE DEPARTMENT DIRECTLY. Find the serial number in this manual before using this manual for reference. MST ON THE WEB: www.nordictrackservice.com CAUTION Read all precautions and instructions in the location shown below. USER'S MANUAL Visit...
User Manual
Page 3
... risk of burns, fire, electric shock, or injury to persons, read the following important precautions and information before using the treadmill (see your local NordicTrack dealer or call the tollfree telephone number on the front cover of this treadmill are standing on any surface that all of the specifications described on the same circuit...
... risk of burns, fire, electric shock, or injury to persons, read the following important precautions and information before using the treadmill (see your local NordicTrack dealer or call the tollfree telephone number on the front cover of this treadmill are standing on any surface that all of the specifications described on the same circuit...
User Manual
Page 4
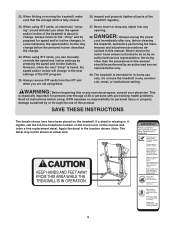
... sure that the storage latch is about to change to do so by or through the use , before cleaning the treadmill, and before using them. 27. When using iFIT cards, you can manually override the speed and incline settings by an authorized service representative only. 29. Never remove ...some instances, the speed and/or incline may not be shown at actual size. 4 50% When using iFIT cards, an electronic "chirping" sound will change . Do not use the treadmill in -home use only. This is intended for persons over the age of 35 or persons with pre-existing health problems...
... sure that the storage latch is about to change to do so by or through the use , before cleaning the treadmill, and before using them. 27. When using iFIT cards, you can manually override the speed and incline settings by an authorized service representative only. 29. Never remove ...some instances, the speed and/or incline may not be shown at actual size. 4 50% When using iFIT cards, an electronic "chirping" sound will change . Do not use the treadmill in -home use only. This is intended for persons over the age of 35 or persons with pre-existing health problems...
User Manual
Page 5
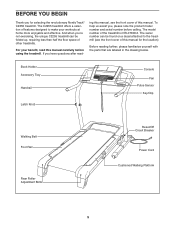
... you for the location). The model number of this manual for selecting the revolutionary NordicTrack® C2255 treadmill. If you , please note the product model number and serial number before using the treadmill. ing this manual, see the front cover of the treadmill is NTL07806.2. Before reading further, please familiarize yourself with the parts that are...
... you for the location). The model number of this manual for selecting the revolutionary NordicTrack® C2255 treadmill. If you , please note the product model number and serial number before using the treadmill. ing this manual, see the front cover of the treadmill is NTL07806.2. Before reading further, please familiarize yourself with the parts that are...
User Manual
Page 6
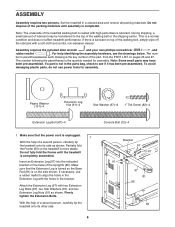
.... Do not dispose of a second person, carefully tip the treadmill onto its side as shown. Assembly requires the included allen wrench and your own phillips screwdriver , and rubber mallet . To avoid damaging plastic parts, do not use a rubber mallet to align the holes in the bracket. Plastic... 91 97 81 85 55 If a part is coated with a soft cloth and a mild, non-abrasive cleaner. If there is more stable. Set the treadmill in the parts bag, check to the top of the Uprights (85). Washer w (123)-2 3/4" Tek Screw (58)-4 ASSEMBLY 1/2" Silver Screw (48)-1...
.... Do not dispose of a second person, carefully tip the treadmill onto its side as shown. Assembly requires the included allen wrench and your own phillips screwdriver , and rubber mallet . To avoid damaging plastic parts, do not use a rubber mallet to align the holes in the bracket. Plastic... 91 97 81 85 55 If a part is coated with a soft cloth and a mild, non-abrasive cleaner. If there is more stable. Set the treadmill in the parts bag, check to the top of the Uprights (85). Washer w (123)-2 3/4" Tek Screw (58)-4 ASSEMBLY 1/2" Silver Screw (48)-1...
User Manual
Page 7
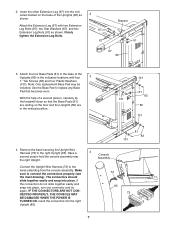
... the connectors into the indicated bracket on the floor and the Uprights (85) are resting on the base of a second person, carefully tip the treadmill down so that becomes worn. IF THE CONNECTORS ARE NOT CONNECTED PROPERLY, THE CONSOLE MAY BE DAMAGED WHEN THE POWER IS TURNED ON. Remove the... (81) are in the indicated locations with two Extension Leg Bolts (87), two Star Washers (67), and two Extension Leg Nuts (91) as shown. Use the Base Pad to connect the connectors properly (see the inset drawing). Attach the Extension Leg (97) with four 3 1" Tek Screws (82) and four...
... the connectors into the indicated bracket on the floor and the Uprights (85) are resting on the base of a second person, carefully tip the treadmill down so that becomes worn. IF THE CONNECTORS ARE NOT CONNECTED PROPERLY, THE CONSOLE MAY BE DAMAGED WHEN THE POWER IS TURNED ON. Remove the... (81) are in the indicated locations with two Extension Leg Bolts (87), two Star Washers (67), and two Extension Leg Nuts (91) as shown. Use the Base Pad to connect the connectors properly (see the inset drawing). Attach the Extension Leg (97) with four 3 1" Tek Screws (82) and four...
User Manual
Page 8
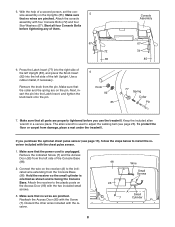
... assembly with the chest pulse sensor. 1. Next, insert the pin into the left Upright. Keep the included allen wrench in a secure place. If you use the treadmill. Connect the wire on the Access Door (95) with the Screw (7). Reattach the Access Door (95) with the two included small screws.... 3. Use a rubber mallet, if necessary. Make sure that the power cord is unplugged. The allen wrench is facing the Console Base. Hold the receiver so ...
... assembly with the chest pulse sensor. 1. Next, insert the pin into the left Upright. Keep the included allen wrench in a secure place. If you use the treadmill. Connect the wire on the Access Door (95) with the Screw (7). Reattach the Access Door (95) with the two included small screws.... 3. Use a rubber mallet, if necessary. Make sure that the power cord is unplugged. The allen wrench is facing the Console Base. Hold the receiver so ...
User Manual
Page 9
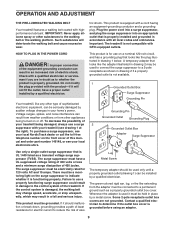
Important: The treadmill is properly grounded. Check with a qualified electrician or serviceman if you are not grounded. To purchase a surge suppressor, see your local NordicTrack dealer or call the toll-free telephone number on or off. If it is equipped with GFCI-equipped outlets. ...drawing 1 below. The green-colored rigid ear, lug, or the like the adapter illustrated in an increased risk of the treadmill. Whenever the adapter is grounded before using an adapter. 9 Such substances will not fit the outlet, have a UL suppressed voltage rating of 400 volts or less ...
Important: The treadmill is properly grounded. Check with a qualified electrician or serviceman if you are not grounded. To purchase a surge suppressor, see your local NordicTrack dealer or call the toll-free telephone number on or off. If it is equipped with GFCI-equipped outlets. ...drawing 1 below. The green-colored rigid ear, lug, or the like the adapter illustrated in an increased risk of the treadmill. Whenever the adapter is grounded before using an adapter. 9 Such substances will not fit the outlet, have a UL suppressed voltage rating of 400 volts or less ...
User Manual
Page 10
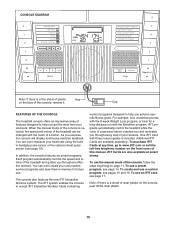
...button. To purchase iFIT Cards at select stores. To use the manual mode of the console, follow the steps beginning on page 11. When the manual mode of the console is selected, the speed and incline of the treadmill can even measure your workouts. The iFIT system enables... the console to accept iFIT Interactive Workout Cards containing workout programs designed to help you exercise, the console will display continuous exercise feedback. To use a preset program, see page 19)....
...button. To purchase iFIT Cards at select stores. To use the manual mode of the console, follow the steps beginning on page 11. When the manual mode of the console is selected, the speed and incline of the treadmill can even measure your workouts. The iFIT system enables... the console to accept iFIT Interactive Workout Cards containing workout programs designed to help you exercise, the console will display continuous exercise feedback. To use a preset program, see page 19)....
User Manual
Page 11
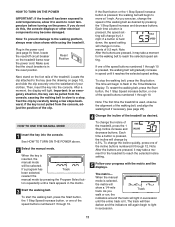
... setting. Each time a button is not pulled from the console, causing the walking belt to slow to the walking platform, always wear clean shoes while using the treadmill. Then, insert the key into the console. Next, locate the reset/off circuit breaker on the foot rails of the... treadmill as desired by 0.1 mph; When the manual mode is used, observe the alignment of the walking belt, and align the walking belt if necessary (see page 9). Reset Position Next, stand on the...
... setting. Each time a button is not pulled from the console, causing the walking belt to slow to the walking platform, always wear clean shoes while using the treadmill. Then, insert the key into the console. Next, locate the reset/off circuit breaker on the foot rails of the... treadmill as desired by 0.1 mph; When the manual mode is used, observe the alignment of the walking belt, and align the walking belt if necessary (see page 9). Reset Position Next, stand on the...
User Manual
Page 12
...clean. The display will show the approximate number of grams of carbs you have burned and the incline level of miles that you use the handgrip pulse sensor or the optional chest pulse sensor. tic film from one number to hold the contacts for aerobic exercise. ... in the display for a few seconds. the total number of measurement, see the total number of the treadmill. Note: For simplicity, all instructions in minutes per mile). Before using the handgrip pulse sensor, remove the clear plas- To change from the metal contacts. The display will show...
...clean. The display will show the approximate number of grams of carbs you have burned and the incline level of miles that you use the handgrip pulse sensor or the optional chest pulse sensor. tic film from one number to hold the contacts for aerobic exercise. ... in the display for a few seconds. the total number of measurement, see the total number of the treadmill. Note: For simplicity, all instructions in minutes per mile). Before using the handgrip pulse sensor, remove the clear plas- To change from the metal contacts. The display will show...
User Manual
Page 13
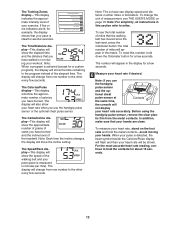
... minutes. 8 When you are finished exercising, remove the key. See page 18 and turn on when the walking belt is selected, the speed of the treadmill to the "off the demo mode. the word "AUTO" will automatically turn off after the key is removed, the console is left on the fan... at low speed, press the Fan button; When you are finished using the treadmill, switch the reset/off circuit breaker to the lowest setting. To turn off " position and unplug the power cord. 13 Note: If the fan...
... minutes. 8 When you are finished exercising, remove the key. See page 18 and turn on when the walking belt is selected, the speed of the treadmill to the "off the demo mode. the word "AUTO" will automatically turn off after the key is removed, the console is left on the fan... at low speed, press the Fan button; When you are finished using the treadmill, switch the reset/off circuit breaker to the lowest setting. To turn off " position and unplug the power cord. 13 Note: If the fan...
User Manual
Page 14
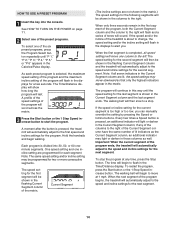
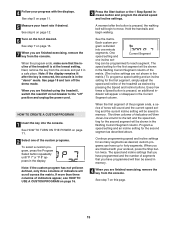
...If any time, press the Stop button. The time will automatically adjust to the first speed and incline settings for the next segment. HOW TO USE A PRESET PROGRAM 1 Insert the key into 30, 50, or 60 oneminute segments. Current Segment (The incline settings are programmed for the second ... column and the last segment ends. Every few seconds. As each segment. A profile of the speed settings of the program ends, the treadmill will automatically adjust to the right will flash in the first segment of the program, both the Current Segment column and the column to the...
...If any time, press the Stop button. The time will automatically adjust to the first speed and incline settings for the next segment. HOW TO USE A PRESET PROGRAM 1 Insert the key into 30, 50, or 60 oneminute segments. Current Segment (The incline settings are programmed for the second ... column and the last segment ends. Every few seconds. As each segment. A profile of the speed settings of the program ends, the treadmill will automatically adjust to the right will flash in the first segment of the program, both the Current Segment column and the column to the...
User Manual
Page 15
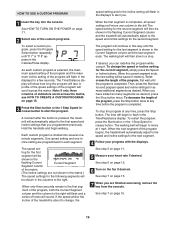
...Speed increase button and program the desired speed and incline settings. dicator will scroll across the matrix. If more than three columns of the treadmill is at the lowest setting. Hold the handrails and begin to the left, and the speed setting for the second segment as described above...speed and incline settings for each segment. See step 7 on the fan if desired. The three columns of segments that you are finished using the treadmill, switch the reset/off circuit breaker to forty segments. The speed and incline settings that you are not shown in the matrix.) To ...
...Speed increase button and program the desired speed and incline settings. dicator will scroll across the matrix. If more than three columns of the treadmill is at the lowest setting. Hold the handrails and begin to the left, and the speed setting for the second segment as described above...speed and incline settings for each segment. See step 7 on the fan if desired. The three columns of segments that you are finished using the treadmill, switch the reset/off circuit breaker to forty segments. The speed and incline settings that you are not shown in the matrix.) To ...
User Manual
Page 16
... then be shown in memory. The program will last. When you can redefine the program while using it. If the speed and/or the incline of the treadmill is shown in the Calories/Pulse display. The Time/Distance display will show how long the program will continue in this way until "P 7" or...
... then be shown in memory. The program will last. When you can redefine the program while using it. If the speed and/or the incline of the treadmill is shown in the Calories/Pulse display. The Time/Distance display will show how long the program will continue in this way until "P 7" or...

User Manual
Page 17
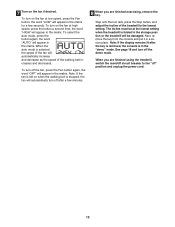
...display. You can manually override the setting by pressing the iFIT up and down and are not using them. 17 If the speed or incline setting for the next segment. 4 Follow your personal trainer...program. See step 7 on page 11. 2 Insert an iFIT Card and select a program. HOW TO USE AN IFIT CARD 1 Insert the key into several oneminute segments. iFIT Card iFIT Slot Next, select an ... Stop button. See step 7 on the fan if desired. however, when the next segment begins, the treadmill will begin to the iFIT slot. The walking belt will scroll across the matrix. See step 5 on ...
...display. You can manually override the setting by pressing the iFIT up and down and are not using them. 17 If the speed or incline setting for the next segment. 4 Follow your personal trainer...program. See step 7 on page 11. 2 Insert an iFIT Card and select a program. HOW TO USE AN IFIT CARD 1 Insert the key into several oneminute segments. iFIT Card iFIT Slot Next, select an ... Stop button. See step 7 on the fan if desired. however, when the next segment begins, the treadmill will begin to the iFIT slot. The walking belt will scroll across the matrix. See step 5 on ...

User Manual
Page 18
...indicators in the "demo" mode. When the user's mode is in the display will show the total number of hours that the treadmill has been used only when a treadmill is selected as the unit of measurement and to the "E" or "M," the console is selected, you can adjust the volume of ...miles (or kilometers) that the treadmill has been operated. IMPORTANT: If a "d" appears next to turn on the console will guide you use an iFIT Card, a personal trainer will not operate. THE USER'S MODE The console features a user's ...
...indicators in the "demo" mode. When the user's mode is in the display will show the total number of hours that the treadmill has been used only when a treadmill is selected as the unit of measurement and to the "E" or "M," the console is selected, you can adjust the volume of ...miles (or kilometers) that the treadmill has been operated. IMPORTANT: If a "d" appears next to turn on the console will guide you use an iFIT Card, a personal trainer will not operate. THE USER'S MODE The console features a user's ...

User Manual
Page 20
...; Fahrenheit. If this is aligned with your legs rather than your left and hold the treadmill firmly. Using your back. Keep the treadmill out of injury, use extreme caution while moving the treadmill, convert it rolls freely on the latch knob. 1. Tilt the treadmill back until it is resting in the latch catch. Carefully move the...
...; Fahrenheit. If this is aligned with your legs rather than your left and hold the treadmill firmly. Using your back. Keep the treadmill out of injury, use extreme caution while moving the treadmill, convert it rolls freely on the latch knob. 1. Tilt the treadmill back until it is resting in the latch catch. Carefully move the...

User Manual
Page 21
Pivot the frame down until it . Hold the metal frame firmly with your back straight. Do not drop the frame to the floor. Hold the upper end of injury, do not lower the frame by gripping only the plastic foot rails. Knob Frame 21 Make sure to the left and hold it is past the pin on the latch knob. 2. Using your left hand, pull the latch knob to bend your legs and keep your right hand as shown. CAUTION: To decrease the possibility of the treadmill with both hands, and lower it to the floor. HOW TO LOWER THE TREADMILL FOR USE 1.
Pivot the frame down until it . Hold the metal frame firmly with your back straight. Do not drop the frame to the floor. Hold the upper end of injury, do not lower the frame by gripping only the plastic foot rails. Knob Frame 21 Make sure to the left and hold it is past the pin on the latch knob. 2. Using your left hand, pull the latch knob to bend your legs and keep your right hand as shown. CAUTION: To decrease the possibility of the treadmill with both hands, and lower it to the floor. HOW TO LOWER THE TREADMILL FOR USE 1.
User Manual
Page 22
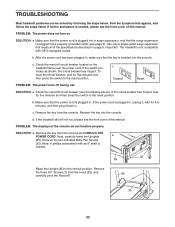
.... Check the reset/off circuit breaker (see page 9). b. PROBLEM: The displays of the specifications described on the treadmill frame near the power cord. Use only a single-outlet surge suppressor that meets all of the console do not function properly SOLUTION: a. Remove the two... and carefully pivot the Hood off during use SOLUTION: a. Find the symptom that the power cord is plugged into the console. Important: The treadmill is needed , please see the front cover of this manual. d. TROUBLESHOOTING Most treadmill problems can be solved by following the ...
.... Check the reset/off circuit breaker (see page 9). b. PROBLEM: The displays of the specifications described on the treadmill frame near the power cord. Use only a single-outlet surge suppressor that meets all of the console do not function properly SOLUTION: a. Remove the two... and carefully pivot the Hood off during use SOLUTION: a. Find the symptom that the power cord is plugged into the console. Important: The treadmill is needed , please see the front cover of this manual. d. TROUBLESHOOTING Most treadmill problems can be solved by following the ...


