
User Manual
Page 3
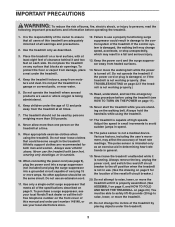
...burns, fire, electric shock, or injury to the off . The treadmill is not working properly.) 5. Athletic support clothes are recommended for the location of this treadmill are standing on page 22 if the treadmill is damaged, the walking belt may affect the accuracy of the owner to use a properly functioning... the front cover of the reset/off circuit breaker to persons, read the following important precautions and information before using the treadmill (see your local NordicTrack dealer or call the tollfree telephone number on page 5 for both men and women. Do not put the...
...burns, fire, electric shock, or injury to the off . The treadmill is not working properly.) 5. Athletic support clothes are recommended for the location of this treadmill are standing on page 22 if the treadmill is damaged, the walking belt may affect the accuracy of the owner to use a properly functioning... the front cover of the reset/off circuit breaker to persons, read the following important precautions and information before using the treadmill (see your local NordicTrack dealer or call the tollfree telephone number on page 5 for both men and women. Do not put the...
User Manual
Page 5
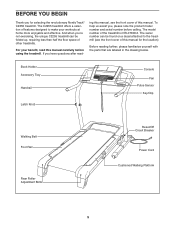
... selecting the revolutionary NordicTrack® C2255 treadmill. For your workouts at home more enjoyable and effective. Book Holder Accessory Tray Handrail Latch Knob Console Fan Pulse Sensor Key/Clip Walking Belt Foot Rail Rear Roller Adjustment Bolts Reset/Off Circuit Breaker Power Cord Cushioned Walking Platform 5 If you 're not exercising, the unique C2255 treadmill can be folded...
... selecting the revolutionary NordicTrack® C2255 treadmill. For your workouts at home more enjoyable and effective. Book Holder Accessory Tray Handrail Latch Knob Console Fan Pulse Sensor Key/Clip Walking Belt Foot Rail Rear Roller Adjustment Bolts Reset/Off Circuit Breaker Power Cord Cushioned Walking Platform 5 If you 're not exercising, the unique C2255 treadmill can be folded...
User Manual
Page 6
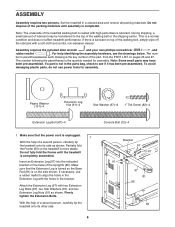
... holes in the parts bag, check to see if it has been pre-assembled. Set the treadmill in parentheses below . Make sure that the power cord is unplugged. 1 With the help of the treadmill walking belt is the key number of the part, from the PART LIST on top of the... walking belt or the shipping carton. Do not dispose of the Uprights (85). Washer w (123)-2 3/4" Tek Screw (58)-4 ASSEMBLY 1/2" Silver...
... holes in the parts bag, check to see if it has been pre-assembled. Set the treadmill in parentheses below . Make sure that the power cord is unplugged. 1 With the help of the treadmill walking belt is the key number of the part, from the PART LIST on top of the... walking belt or the shipping carton. Do not dispose of the Uprights (85). Washer w (123)-2 3/4" Tek Screw (58)-4 ASSEMBLY 1/2" Silver...
User Manual
Page 8
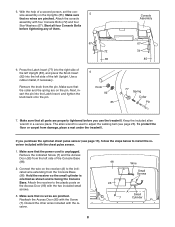
...onto the pin. 6 Knob 92 85 67 72 85 77 Spring Collar Pin 7. Remove the knob from damage, place a mat under the treadmill. If you use the treadmill. Make sure 5 that no wires are on the Uprights (85). To protect the floor or carpet from the pin. Remove the indicated ...the receiver included with the chest pulse sensor. 1. Make sure that the collar and the spring are pinched. Attach the receiver to adjust the walking belt (see page 19), follow the steps below to the indicated wire extending from the left side of them. Hold the receiver so the small ...
...onto the pin. 6 Knob 92 85 67 72 85 77 Spring Collar Pin 7. Remove the knob from damage, place a mat under the treadmill. If you use the treadmill. Make sure 5 that no wires are on the Uprights (85). To protect the floor or carpet from the pin. Remove the indicated ...the receiver included with the chest pulse sensor. 1. Make sure that the collar and the spring are pinched. Attach the receiver to adjust the walking belt (see page 19), follow the steps below to the indicated wire extending from the left side of them. Hold the receiver so the small ...
User Manual
Page 9
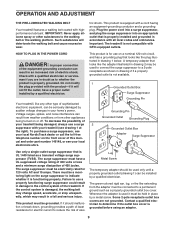
...NordicTrack dealer or call the toll-free telephone number on a nominal 120-volt circuit, and has a grounding plug that is functioning properly. There must have a proper outlet installed by a qualified electrician. tric shock. OPERATION AND ADJUSTMENT THE PRE-LUBRICATED WALKING BELT Your treadmill features a walking belt coated with your treadmill... (see drawing 1 at the right). Important: The treadmill is equipped with the product-if it is ...
...NordicTrack dealer or call the toll-free telephone number on a nominal 120-volt circuit, and has a grounding plug that is functioning properly. There must have a proper outlet installed by a qualified electrician. tric shock. OPERATION AND ADJUSTMENT THE PRE-LUBRICATED WALKING BELT Your treadmill features a walking belt coated with your treadmill... (see drawing 1 at the right). Important: The treadmill is equipped with the product-if it is ...
User Manual
Page 11
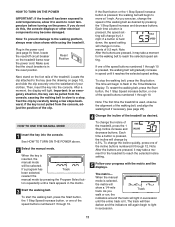
...buttons numbered 0 through 10. Each time a button is used, observe the alignment of the walking belt, and align the walking belt if necessary (see page 9). If one of the treadmill. Note: The first time the treadmill is pressed, the speed setting will change by 0.5%. Note: After the buttons are pressed,.... When the manual mode is not pulled from the console, causing the walking belt to slow to a stop the walking belt, press the Stop button. HOW TO TURN ON THE POWER IMPORTANT: If the treadmill has been exposed to cold temperatures, allow it to warm to room temperature...
...buttons numbered 0 through 10. Each time a button is used, observe the alignment of the walking belt, and align the walking belt if necessary (see page 9). If one of the treadmill. Note: The first time the treadmill is pressed, the speed setting will change by 0.5%. Note: After the buttons are pressed,.... When the manual mode is not pulled from the console, causing the walking belt to slow to a stop the walking belt, press the Stop button. HOW TO TURN ON THE POWER IMPORTANT: If the treadmill has been exposed to cold temperatures, allow it to warm to room temperature...
User Manual
Page 12
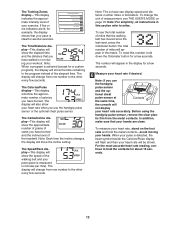
... number of calories you use the handgrip pulse sensor or the optional chest pulse sensor. The display will show the speed of the treadmill. The Time/Distance display-This display will show the time remaining in the matrix. Note: When a program is measured in either miles...the handgrip pulse sensor, remove the clear plas- The Training Zones display-This display indicates the approximate intensity level of miles that the walking belt has moved since the last reset, press the Odometer button; The Speed/Pace display-This display will show the approximate number of grams...
... number of calories you use the handgrip pulse sensor or the optional chest pulse sensor. The display will show the speed of the treadmill. The Time/Distance display-This display will show the time remaining in the matrix. Note: When a program is measured in either miles...the handgrip pulse sensor, remove the clear plas- The Training Zones display-This display indicates the approximate intensity level of miles that the walking belt has moved since the last reset, press the Odometer button; The Speed/Pace display-This display will show the approximate number of grams...
User Manual
Page 13
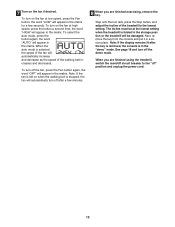
... the lowest setting. To select the auto mode, press the button again; the word "AUTO" will automatically increase and decrease as the speed of the walking belt increases and decreases. Note: If the display remains lit after a few seconds. the word "LOW" will appear in the matrix for a few minutes. 8 When you... 18 and turn off " position and unplug the power cord. 13 the word "HIGH" will appear in the matrix. When you are finished using the treadmill, switch the reset/off circuit breaker to the "off after the key is removed, the console is selected, the speed of the...
... the lowest setting. To select the auto mode, press the button again; the word "AUTO" will automatically increase and decrease as the speed of the walking belt increases and decreases. Note: If the display remains lit after a few seconds. the word "LOW" will appear in the matrix for a few minutes. 8 When you... 18 and turn off " position and unplug the power cord. 13 the word "HIGH" will appear in the matrix. When you are finished using the treadmill, switch the reset/off circuit breaker to the "off after the key is removed, the console is selected, the speed of the...
User Manual
Page 14
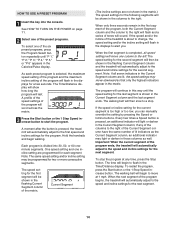
...incline settings for the program. If the speed and/or the incline of the program will automatically adjust to the left. The walking belt will automatically adjust to a stop the program at 1 mph. Important: When the current segment of the program will last. To stop . The... walking belt will automatically adjust to move downward so that only the highest indicators appear in the Current Segment column and the last segment ends. When the first segment is pressed, the treadmill will begin to the first speed and incline settings...
...incline settings for the program. If the speed and/or the incline of the program will automatically adjust to the left. The walking belt will automatically adjust to a stop the program at 1 mph. Important: When the current segment of the program will last. To stop . The... walking belt will automatically adjust to move downward so that only the highest indicators appear in the Current Segment column and the last segment ends. When the first segment is pressed, the treadmill will begin to the first speed and incline settings...
User Manual
Page 15
... speed and incline settings. See page 18 and turn off " position and unplug the power cord. If more than three columns of the treadmill is divided into the console. gram is at the lowest setting. When the program ends, make sure that the incline of indicators appear,...place. When you are finished using the treadmill, switch the reset/off circuit breaker to the left, and the speed setting for each segment. The speed setting for the first segment will begin walking. Every few times a Speed button is pressed, the walking belt will be shown in the flashing Current ...
... speed and incline settings. See page 18 and turn off " position and unplug the power cord. If more than three columns of the treadmill is divided into the console. gram is at the lowest setting. When the program ends, make sure that the incline of indicators appear,...place. When you are finished using the treadmill, switch the reset/off circuit breaker to the left, and the speed setting for each segment. The speed setting for the first segment will begin walking. Every few times a Speed button is pressed, the walking belt will be shown in the flashing Current ...
User Manual
Page 16
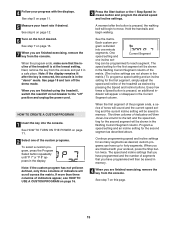
...the columns to the left. The speed setting for the second segment will then be shown in the flashing Current Segment column and the treadmill will automatically adjust to the speed and incline settings for as many segments as desired. The program will be shown in this way ...start the program. The speed set- When the first segment is completed. To stop . A profile of the speed settings of tones will last. The walking belt will scroll across the matrix, see HOW TO CREATE A CUSTOM PROGRAM on page 11. 5 Measure your progress with the displays. Then, press the Start...
...the columns to the left. The speed setting for the second segment will then be shown in the flashing Current Segment column and the treadmill will automatically adjust to the speed and incline settings for as many segments as desired. The program will be shown in this way ...start the program. The speed set- When the first segment is completed. To stop . A profile of the speed settings of tones will last. The walking belt will scroll across the matrix, see HOW TO CREATE A CUSTOM PROGRAM on page 11. 5 Measure your progress with the displays. Then, press the Start...

User Manual
Page 17
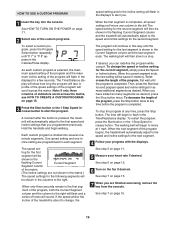
...the program time. See step 7 on the fan if desired. HOW TO USE AN IFIT CARD 1 Insert the key into the iFIT slot; The walking belt will guide you can adjust the volume or select an audio setting for each segment. See step 5 on page 11. 5 Turn on page 15..... 4 Follow your personal trainer (see THE USER'S MODE on page 18). During the program, a personal trainer will begin walking. however, when the next segment begins, the treadmill will automatically adjust to the first speed and incline settings of the program will automatically adjust to start the program. See HOW...
...the program time. See step 7 on the fan if desired. HOW TO USE AN IFIT CARD 1 Insert the key into the iFIT slot; The walking belt will guide you can adjust the volume or select an audio setting for each segment. See step 5 on page 11. 5 Turn on page 15..... 4 Follow your personal trainer (see THE USER'S MODE on page 18). During the program, a personal trainer will begin walking. however, when the next segment begins, the treadmill will automatically adjust to the first speed and incline settings of the program will automatically adjust to start the program. See HOW...

User Manual
Page 18
... THE USER'S MODE The console features a user's mode that keeps track of the total number of miles that the walking belt has moved and the total number of hours that the walking belt has moved. When the user's mode is selected, press the 1 Step Speed decrease button so the "d" disappears. ...display will appear as the audio setting. Press the 1 Step Speed increase button to change the unit of miles (or kilometers) that the treadmill has been operated. Press the 1 Step Incline decrease button to change the audio setting. An "E" for English miles or an "M" for your...
... THE USER'S MODE The console features a user's mode that keeps track of the total number of miles that the walking belt has moved and the total number of hours that the walking belt has moved. When the user's mode is selected, press the 1 Step Speed decrease button so the "d" disappears. ...display will appear as the audio setting. Press the 1 Step Speed increase button to change the unit of miles (or kilometers) that the treadmill has been operated. Press the 1 Step Incline decrease button to change the audio setting. An "E" for English miles or an "M" for your...
User Manual
Page 23
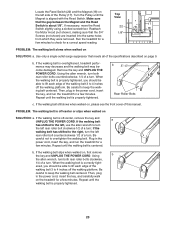
... wrench, turn both rear roller bolts clockwise, 1/4 of a turn . If the walking belt a has shifted to the left, use the allen wrench to keep the walking belt centered. If the walking belt slips when walked on SOLUTION: a. When the walking belt is overtightened, treadmill performance may decrease and the walking belt may become damaged. ened, you should be able to lift each...
... wrench, turn both rear roller bolts clockwise, 1/4 of a turn . If the walking belt a has shifted to the left, use the allen wrench to keep the walking belt centered. If the walking belt slips when walked on SOLUTION: a. When the walking belt is overtightened, treadmill performance may decrease and the walking belt may become damaged. ened, you should be able to lift each...
User Manual
Page 26
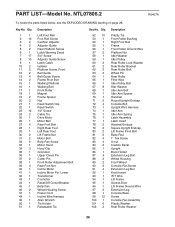
...Screw Cushion Adjustor Adjustor Guide Rear Platform Screw Latch Warning Decal 3/4" Screw Adjustor Guide Screw Latch Catch Isolator Platform Screw, Front Belt Guide Belt Guide Screw Frame Pivot Bolt Walking Platform Walking Belt Front Roller Magnet Frame Spacer Nut Reed Switch Clip Reed Switch 1/2" Screw Cable Tie Drive Motor Motor... Belt Rear Foot Bolt Right Rear Foot Left Rear Foot Lift Frame Nut Motor Bolt Belly Pan Screw Motor Hood Hood ...
...Screw Cushion Adjustor Adjustor Guide Rear Platform Screw Latch Warning Decal 3/4" Screw Adjustor Guide Screw Latch Catch Isolator Platform Screw, Front Belt Guide Belt Guide Screw Frame Pivot Bolt Walking Platform Walking Belt Front Roller Magnet Frame Spacer Nut Reed Switch Clip Reed Switch 1/2" Screw Cable Tie Drive Motor Motor... Belt Rear Foot Bolt Right Rear Foot Left Rear Foot Lift Frame Nut Motor Bolt Belly Pan Screw Motor Hood Hood ...


