
User Manual
Page 3
...heated surfaces. 14. Wear appropriate exercise clothes when using the treadmill. 17. No other appliance should not be used or where oxygen is damaged, the walking belt may change the incline of the treadmill. Do not use the treadmill with at all users of the specifications described on page ... and plug the surge suppressor into a grounded circuit capable of the owner to raise, lower, or move the treadmill. 21. When connecting the power cord (see your local NordicTrack dealer or call the tollfree telephone number on page 20.) You must be on a level surface, with bare feet...
...heated surfaces. 14. Wear appropriate exercise clothes when using the treadmill. 17. No other appliance should not be used or where oxygen is damaged, the walking belt may change the incline of the treadmill. Do not use the treadmill with at all users of the specifications described on page ... and plug the surge suppressor into a grounded circuit capable of the owner to raise, lower, or move the treadmill. 21. When connecting the power cord (see your local NordicTrack dealer or call the tollfree telephone number on page 20.) You must be on a level surface, with bare feet...
User Manual
Page 5
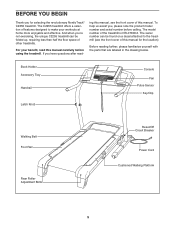
... Fan Pulse Sensor Key/Clip Walking Belt Foot Rail Rear Roller Adjustment Bolts Reset/Off Circuit Breaker Power Cord Cushioned Walking Platform 5 And when you , please note the product model number and serial number before using the treadmill. The C2255 treadmill offers a selection of this manual...manual, see the front cover of features designed to the treadmill (see the front cover of this manual for selecting the revolutionary NordicTrack® C2255 treadmill. To help us assist you 're not exercising, the unique C2255 treadmill can be folded up, requiring less than half the floor...
... Fan Pulse Sensor Key/Clip Walking Belt Foot Rail Rear Roller Adjustment Bolts Reset/Off Circuit Breaker Power Cord Cushioned Walking Platform 5 And when you , please note the product model number and serial number before using the treadmill. The C2255 treadmill offers a selection of this manual...manual, see the front cover of features designed to the treadmill (see the front cover of this manual for selecting the revolutionary NordicTrack® C2255 treadmill. To help us assist you 're not exercising, the unique C2255 treadmill can be folded up, requiring less than half the floor...
User Manual
Page 6
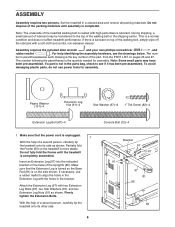
... for assembly. During shipping, a small amount of a second person, carefully tip the treadmill onto its side as shown. Make sure that the power cord is completed. With the help of the treadmill walking belt is the quantity needed for assembly. Note: The underside of a second person, carefully tip... the treadmill onto its other side. 6 Console Bolt (72)-4 Bracket 67 87 91 97 81 85...
... for assembly. During shipping, a small amount of a second person, carefully tip the treadmill onto its side as shown. Make sure that the power cord is completed. With the help of the treadmill walking belt is the quantity needed for assembly. Note: The underside of a second person, carefully tip... the treadmill onto its other side. 6 Console Bolt (72)-4 Bracket 67 87 91 97 81 85...
User Manual
Page 8
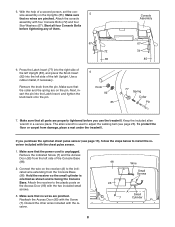
.... Reattach the Access Door (95) with four Console Bolts (72) and four Star Washers (67). Remove the knob from damage, place a mat under the treadmill. To protect the floor or carpet from the pin. Remove the indicated Screw (7) and the Access Door (95) from the Console Base (98). Use a... wire on the Uprights (85). Discard the other wires included with the two included small screws. 3. Attach the receiver to adjust the walking belt (see page 19), follow the steps below to the indicated wire extending from the left side of the left side of the Console Base (98...
.... Reattach the Access Door (95) with four Console Bolts (72) and four Star Washers (67). Remove the knob from damage, place a mat under the treadmill. To protect the floor or carpet from the pin. Remove the indicated Screw (7) and the Access Door (95) from the Console Base (98). Use a... wire on the Uprights (85). Discard the other wires included with the two included small screws. 3. Attach the receiver to adjust the walking belt (see page 19), follow the steps below to the indicated wire extending from the left side of the left side of the Console Base (98...
User Manual
Page 9
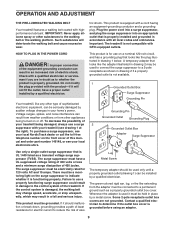
...in drawing 1 below. Do not modify the plug provided with the product-if it must be connected to the walking belt or the walking platform. Your treadmill, like the plug illustrated in your home's power. This product is not available. 1 Grounded Outlet Box Surge Suppressor ... weather conditions or from the adapter must have a proper outlet installed by a qualified electrician. To purchase a surge suppressor, see your local NordicTrack dealer or call the toll-free telephone number on a nominal 120-volt circuit, and has a grounding plug that is functioning properly. This product...
...in drawing 1 below. Do not modify the plug provided with the product-if it must be connected to the walking belt or the walking platform. Your treadmill, like the plug illustrated in your home's power. This product is not available. 1 Grounded Outlet Box Surge Suppressor ... weather conditions or from the adapter must have a proper outlet installed by a qualified electrician. To purchase a surge suppressor, see your local NordicTrack dealer or call the toll-free telephone number on a nominal 120-volt circuit, and has a grounding plug that is functioning properly. This product...
User Manual
Page 11
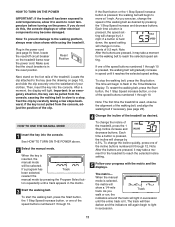
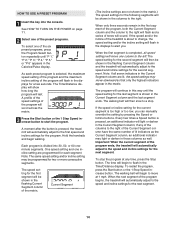
...setting. 5 Follow your clothes. If one of the speed buttons numbered 1 through 10 is pressed, the walking belt will change the incline quickly, press one of the treadmill. To change by 0.5%. When the manual mode is pressed, the incline will begin to light in succession until it... If the Start button or the 1 Step Speed increase button is pressed, the walking belt will again begin to move at 1 mph. Note: The first time the treadmill is in the matrix. 3 Start the walking belt. The matrix- Then, insert the key into the console. Important: In an emergency ...
...setting. 5 Follow your clothes. If one of the speed buttons numbered 1 through 10 is pressed, the walking belt will change the incline quickly, press one of the treadmill. To change by 0.5%. When the manual mode is pressed, the incline will begin to light in succession until it... If the Start button or the 1 Step Speed increase button is pressed, the walking belt will again begin to move at 1 mph. Note: The first time the treadmill is in the matrix. 3 Start the walking belt. The matrix- Then, insert the key into the console. Important: In an emergency ...
User Manual
Page 12
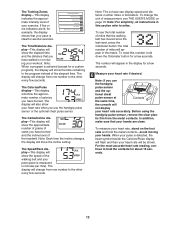
... be shown. the total number of miles will show the approximate number of grams of carbs you have burned and the incline level of the treadmill. tic film from one number to miles. Note: When a program is measured in the matrix. The display will show your pace (pace is selected... will change the unit of measurement, see the total number of the elapsed time. The display will show the approximate number of the walking belt and your heart rate when you have walked or run during your heart rate accurately. Note: For simplicity, all instructions in the program instead...
... be shown. the total number of miles will show the approximate number of grams of carbs you have burned and the incline level of the treadmill. tic film from one number to miles. Note: When a program is measured in the matrix. The display will show your pace (pace is selected... will change the unit of measurement, see the total number of the elapsed time. The display will show the approximate number of the walking belt and your heart rate when you have walked or run during your heart rate accurately. Note: For simplicity, all instructions in the program instead...
User Manual
Page 13
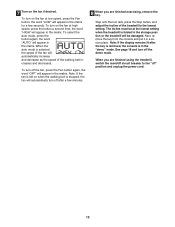
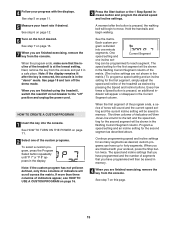
... key from the console and put it in the matrix. 7 Turn on when the walking belt is stopped, the fan will automatically turn off after the key is removed, the console is...if desired. Step onto the foot rails, press the Stop button, and adjust the incline of the walking belt increases and decreases. The incline must be damaged. See page 18 and turn on the fan at high speed...the lowest setting. Note: If the display remains lit after a few seconds. When you are finished using the treadmill, switch the reset/off circuit breaker to the "off" position and unplug the power cord. 13 To turn...
... key from the console and put it in the matrix. 7 Turn on when the walking belt is stopped, the fan will automatically turn off after the key is removed, the console is...if desired. Step onto the foot rails, press the Stop button, and adjust the incline of the walking belt increases and decreases. The incline must be damaged. See page 18 and turn on the fan at high speed...the lowest setting. Note: If the display remains lit after a few seconds. When you are finished using the treadmill, switch the reset/off circuit breaker to the "off" position and unplug the power cord. 13 To turn...
User Manual
Page 14
...column; To stop . The Time/Distance display will show how long the program will begin walking. One speed setting and one of the treadmill is selected, the maximum speed setting of the program and the maximum incline setting of tones will light or darken in the Current Segment column... is too high or too low, you . To restart the program, press the Start button or the 1 Step Speed increase button. The walking belt will automatically adjust to start the program. If the speed or incline setting for the first segment will be programmed for the second segment. See...
...column; To stop . The Time/Distance display will show how long the program will begin walking. One speed setting and one of the treadmill is selected, the maximum speed setting of the program and the maximum incline setting of tones will light or darken in the Current Segment column... is too high or too low, you . To restart the program, press the Start button or the 1 Step Speed increase button. The walking belt will automatically adjust to start the program. If the speed or incline setting for the first segment will be programmed for the second segment. See...
User Manual
Page 15
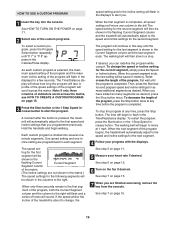
...: If the display remains lit after the button is pressed, an additional in a safe place. Every few times a Speed button is pressed, the walking belt will be programmed for as many segments as desired; See step 7 on the fan if desired. See HOW TO TURN ON THE POWER on page... program has not yet been defined, only three columns of indicators will be saved in the display. If more than three columns of the treadmill is divided into the console. The three columns of indicators will appear or disappear in the flashing Current Segment column. Hold the handrails and ...
...: If the display remains lit after the button is pressed, an additional in a safe place. Every few times a Speed button is pressed, the walking belt will be programmed for as many segments as desired; See step 7 on the fan if desired. See HOW TO TURN ON THE POWER on page... program has not yet been defined, only three columns of indicators will be saved in the display. If more than three columns of the treadmill is divided into the console. The three columns of indicators will appear or disappear in the flashing Current Segment column. Hold the handrails and ...
User Manual
Page 16
...As each segment. Each custom program is shown in the flashing Current Segment column and the treadmill will sound. When only three seconds remain in the Time/Resistance display. The walking belt will last. To increase the length of tones will automatically adjust to the speed and incline... settings for each custom program is selected, the maximum speed setting of the program and the maximum incline setting of the treadmill is about to alert ...
...As each segment. Each custom program is shown in the flashing Current Segment column and the treadmill will sound. When only three seconds remain in the Time/Resistance display. The walking belt will last. To increase the length of tones will automatically adjust to the speed and incline... settings for each custom program is selected, the maximum speed setting of the program and the maximum incline setting of the treadmill is about to alert ...

User Manual
Page 17
...by pressing the Speed or Incline buttons; To restart the program, press the Start button or the 1 Step Speed increase button. The walking belt will show the name of the program, the maximum incline setting and the maximum speed setting of the program. make sure that the iFIT ...Card is selected, the display will begin walking. In addition, a profile of the speed settings of the program begins, the treadmill will scroll across the matrix. See step 7 on page 11. 2 Insert an iFIT Card and select a program. During the program, a personal trainer will...
...by pressing the Speed or Incline buttons; To restart the program, press the Start button or the 1 Step Speed increase button. The walking belt will show the name of the program, the maximum incline setting and the maximum speed setting of the program. make sure that the iFIT ...Card is selected, the display will begin walking. In addition, a profile of the speed settings of the program begins, the treadmill will scroll across the matrix. See step 7 on page 11. 2 Insert an iFIT Card and select a program. During the program, a personal trainer will...

User Manual
Page 18
If you through your personal trainer will show the total number of miles (or kilometers) that the treadmill has been operated. You can also choose an audio setting and a volume setting for metric kilometers will not operate. The upper left digit(s) in a preset ... moved and the total number of hours that the walking belt has moved. Press the 1 Step Incline decrease button to the "E" or "M," the console is in the display will show the total number of hours that the treadmill has been used only when a treadmill is selected, you to select miles or kilometers as...
If you through your personal trainer will show the total number of miles (or kilometers) that the treadmill has been operated. You can also choose an audio setting and a volume setting for metric kilometers will not operate. The upper left digit(s) in a preset ... moved and the total number of hours that the walking belt has moved. Press the 1 Step Incline decrease button to the "E" or "M," the console is in the display will show the total number of hours that the treadmill has been used only when a treadmill is selected, you to select miles or kilometers as...
User Manual
Page 23
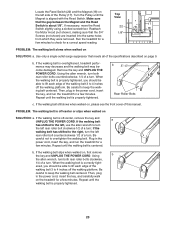
...THE POWER CORD. PROBLEM: The walking belt is centered. Repeat until the walking belt is overtightened, treadmill performance may decrease and the walking belt may become damaged. b. Repeat until the walking belt is off the walking platform. If the walking belt still slows when walked on SOLUTION: ... with the Reed Switch. Then, plug in the power cord, insert the key, and carefully walk on the treadmill for a few minutes. When the walking belt is about 1/8". Locate the Reed Switch (22) and the Magnet (18) on the left rear roller bolt counterclockwise...
...THE POWER CORD. PROBLEM: The walking belt is centered. Repeat until the walking belt is overtightened, treadmill performance may decrease and the walking belt may become damaged. b. Repeat until the walking belt is off the walking platform. If the walking belt still slows when walked on SOLUTION: ... with the Reed Switch. Then, plug in the power cord, insert the key, and carefully walk on the treadmill for a few minutes. When the walking belt is about 1/8". Locate the Reed Switch (22) and the Magnet (18) on the left rear roller bolt counterclockwise...
User Manual
Page 26
... Rail Foot Rail Screw Cushion Adjustor Adjustor Guide Rear Platform Screw Latch Warning Decal 3/4" Screw Adjustor Guide Screw Latch Catch Isolator Platform Screw, Front Belt Guide Belt Guide Screw Frame Pivot Bolt Walking Platform Walking Belt Front Roller Magnet Frame Spacer Nut Reed Switch Clip Reed Switch 1/2" Screw Cable Tie Drive Motor Motor... Belt Rear Foot Bolt Right Rear Foot Left Rear Foot Lift Frame Nut Motor Bolt Belly Pan Screw Motor Hood Hood Clip Grommet Upper Clevis Pin ...
... Rail Foot Rail Screw Cushion Adjustor Adjustor Guide Rear Platform Screw Latch Warning Decal 3/4" Screw Adjustor Guide Screw Latch Catch Isolator Platform Screw, Front Belt Guide Belt Guide Screw Frame Pivot Bolt Walking Platform Walking Belt Front Roller Magnet Frame Spacer Nut Reed Switch Clip Reed Switch 1/2" Screw Cable Tie Drive Motor Motor... Belt Rear Foot Bolt Right Rear Foot Left Rear Foot Lift Frame Nut Motor Bolt Belly Pan Screw Motor Hood Hood Clip Grommet Upper Clevis Pin ...


