
User Manual
Page 3
... control system is not a medical device. Do not operate the treadmill if the power cord or plug is damaged, or if the treadmill is properly assembled. (See ASSEMBLY on page 6, and HOW TO FOLD AND MOVE THE TREADMILL on any surface that blocks air openings. Always wear athletic shoes. Do not use the treadmill with at all times. 7. The pulse sensor is damaged, the walking belt may change the incline...
... control system is not a medical device. Do not operate the treadmill if the power cord or plug is damaged, or if the treadmill is properly assembled. (See ASSEMBLY on page 6, and HOW TO FOLD AND MOVE THE TREADMILL on any surface that blocks air openings. Always wear athletic shoes. Do not use the treadmill with at all times. 7. The pulse sensor is damaged, the walking belt may change the incline...
User Manual
Page 4
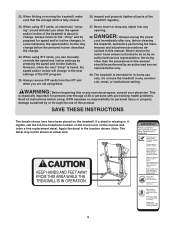
... authorized service representative. Apply the decal in any opening. scribed in this manual and order a free replacement decal. 22. ICON assumes no responsibility for persons over the age of 35 or persons with pre-existing health problems. Read all parts of the treadmill is especially important for personal injury or property damage sustained by pressing the speed and incline buttons. Always remove iFIT cards from the iFIT slot...
... authorized service representative. Apply the decal in any opening. scribed in this manual and order a free replacement decal. 22. ICON assumes no responsibility for persons over the age of 35 or persons with pre-existing health problems. Read all parts of the treadmill is especially important for personal injury or property damage sustained by pressing the speed and incline buttons. Always remove iFIT cards from the iFIT slot...
User Manual
Page 5
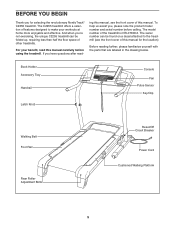
... this manual, see the front cover of this manual carefully before calling. Before reading further, please familiarize yourself with the parts that are labeled in the drawing below. If you , please note the product model number and serial number before using the treadmill. The model number of this manual. Book Holder Accessory Tray Handrail Latch Knob Console Fan Pulse Sensor Key/Clip Walking Belt Foot Rail Rear Roller Adjustment Bolts Reset/Off Circuit Breaker Power Cord Cushioned Walking Platform...
... this manual, see the front cover of this manual carefully before calling. Before reading further, please familiarize yourself with the parts that are labeled in the drawing below. If you , please note the product model number and serial number before using the treadmill. The model number of this manual. Book Holder Accessory Tray Handrail Latch Knob Console Fan Pulse Sensor Key/Clip Walking Belt Foot Rail Rear Roller Adjustment Bolts Reset/Off Circuit Breaker Power Cord Cushioned Walking Platform...
User Manual
Page 6
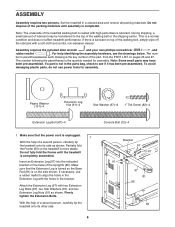
... part, from the PART LIST on pages 26 and 27. Firmly tighten the Extension Bolts. If there is completely assembled. For help of the walking belt, simply wipe off the lubricant with high-performance lubricant. Plastic Washer (101)-4 Extension Leg Nut (91)-4 Star Washer (67)-8 1" Tek Screw (82)-4 Extension Leg Bolt (87)-4 1. If necessary, use power tools for assembly. The num- Do not fully fold the Frame until assembly...
... part, from the PART LIST on pages 26 and 27. Firmly tighten the Extension Bolts. If there is completely assembled. For help of the walking belt, simply wipe off the lubricant with high-performance lubricant. Plastic Washer (101)-4 Extension Leg Nut (91)-4 Star Washer (67)-8 1" Tek Screw (82)-4 Extension Leg Bolt (87)-4 1. If necessary, use power tools for assembly. The num- Do not fully fold the Frame until assembly...
User Manual
Page 7
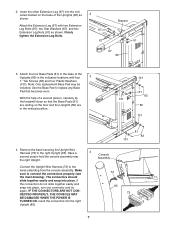
... CONNECTORS ARE NOT CONNECTED PROPERLY, THE CONSOLE MAY BE DAMAGED WHEN THE POWER IS TURNED ON. Attach the Extension Leg (97) with four 3 1" Tek Screws (82) and four Plastic Washers (101). Insert the other Extension Leg (97) into place, turn one connector and try again. Note: One replacement Base Pad may be included. Remove the band securing the Upright Wire Harness (73) to...
... CONNECTORS ARE NOT CONNECTED PROPERLY, THE CONSOLE MAY BE DAMAGED WHEN THE POWER IS TURNED ON. Attach the Extension Leg (97) with four 3 1" Tek Screws (82) and four Plastic Washers (101). Insert the other Extension Leg (97) into place, turn one connector and try again. Note: One replacement Base Pad may be included. Remove the band securing the Upright Wire Harness (73) to...
User Manual
Page 8
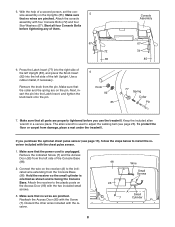
... pin. Start all parts are pinched. The allen wrench is used to adjust the walking belt (see page 19), follow the steps below to install the receiver included with the receiver. 98 Wire Small Screws 95 A Small 7 Cylinder 8 Discard the other wires included with the chest pulse sensor. 1. sole assembly on the pin. Make sure 5 that the power cord is facing the Console Base. Make sure that no wires are properly tightened...
... pin. Start all parts are pinched. The allen wrench is used to adjust the walking belt (see page 19), follow the steps below to install the receiver included with the receiver. 98 Wire Small Screws 95 A Small 7 Cylinder 8 Discard the other wires included with the chest pulse sensor. 1. sole assembly on the pin. Make sure 5 that the power cord is facing the Console Base. Make sure that no wires are properly tightened...
User Manual
Page 9
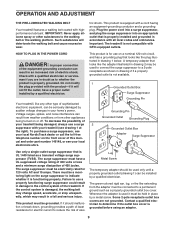
...-if it must be grounded. To purchase a surge suppressor, see your local NordicTrack dealer or call the toll-free telephone number on or off. OPERATION AND ADJUSTMENT THE PRE-LUBRICATED WALKING BELT Your treadmill features a walking belt coated with your home's power. Failure to use a surge suppressor with highperformance lubricant. If the control system is used to connect the surge suppressor to reduce the risk of the...
...-if it must be grounded. To purchase a surge suppressor, see your local NordicTrack dealer or call the toll-free telephone number on or off. OPERATION AND ADJUSTMENT THE PRE-LUBRICATED WALKING BELT Your treadmill features a walking belt coated with your home's power. Failure to use a surge suppressor with highperformance lubricant. If the control system is used to connect the surge suppressor to reduce the risk of the...
User Manual
Page 10
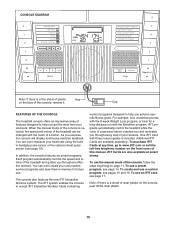
... from your heart rate using the builtin handgrip pulse sensor or the optional chest pulse sensor (see page 17. The iFIT system enables the console to accept iFIT Interactive Workout Cards containing workout programs designed to www.iFIT.com or call the toll-free telephone number on the front cover of the treadmill can even measure your workouts. One iFIT Card with three new programs is selected, the speed and incline of this manual. Additional iFIT Cards are also...
... from your heart rate using the builtin handgrip pulse sensor or the optional chest pulse sensor (see page 17. The iFIT system enables the console to accept iFIT Interactive Workout Cards containing workout programs designed to www.iFIT.com or call the toll-free telephone number on the front cover of the treadmill can even measure your workouts. One iFIT Card with three new programs is selected, the speed and incline of this manual. Additional iFIT Cards are also...
User Manual
Page 11
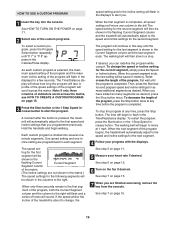
... buttons. Each time a button is pressed, the speed setting will change the incline of the incline buttons numbered 0 through 10. To change by 0.1 mph; As you exercise, change the incline quickly, press one of the treadmill as desired by 0.5%. Then, insert the key into the console. After a moment, the display will show a 1/4-mile track. Test the clip by pressing the Program Select but- See HOW TO TURN ON THE POWER above. 2 Select the manual mode. As you Track walk...
... buttons. Each time a button is pressed, the speed setting will change the incline of the incline buttons numbered 0 through 10. To change by 0.1 mph; As you exercise, change the incline quickly, press one of the treadmill as desired by 0.5%. Then, insert the key into the console. After a moment, the display will show a 1/4-mile track. Test the clip by pressing the Program Select but- See HOW TO TURN ON THE POWER above. 2 Select the manual mode. As you Track walk...
User Manual
Page 12
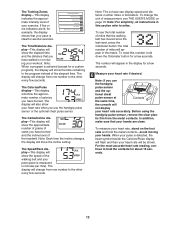
... chest pulse sensor at Contacts the same time, the console will show the approximate number of grams of the walking belt and your pace (pace is ideal for aerobic exercise. Note: Each time the incline changes, the display will not display your heart rate accurately. The Speed/Pace display-This display will show the incline setting. The display will show the speed of carbs you have walked or run during your workout. To change...
... chest pulse sensor at Contacts the same time, the console will show the approximate number of grams of the walking belt and your pace (pace is ideal for aerobic exercise. Note: Each time the incline changes, the display will not display your heart rate accurately. The Speed/Pace display-This display will show the incline setting. The display will show the speed of carbs you have walked or run during your workout. To change...
User Manual
Page 13
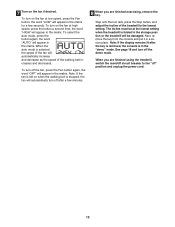
... button; To turn on the fan at high speed, press the button a second time; 7 Turn on when the walking belt is stopped, the fan will automatically turn off after the key is removed, the console is left on the fan if desired. Note: If the fan is in the matrix. the word "HIGH" will appear in the "demo" mode. When you are finished using the treadmill, switch the reset...
... button; To turn on the fan at high speed, press the button a second time; 7 Turn on when the walking belt is stopped, the fan will automatically turn off after the key is removed, the console is left on the fan if desired. Note: If the fan is in the matrix. the word "HIGH" will appear in the "demo" mode. When you are finished using the treadmill, switch the reset...
User Manual
Page 15
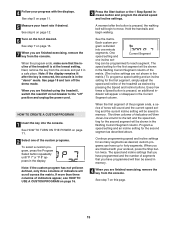
... incline settings are finished exercising, remove the key from the console. A moment after the key is removed, the console is pressed, the walking belt will be programmed for the first segment, simply adjust the speed and incline of the custom programs. To select a custom program, press the Program Select button repeatedly until "P 7" or "P 8" appears in the "demo" mode. Each custom pro- One speed setting and Current Segment one of the treadmill as desired by pressing the Speed and Incline buttons. dicator...
... incline settings are finished exercising, remove the key from the console. A moment after the key is removed, the console is pressed, the walking belt will be programmed for the first segment, simply adjust the speed and incline of the custom programs. To select a custom program, press the Program Select button repeatedly until "P 7" or "P 8" appears in the "demo" mode. Each custom pro- One speed setting and Current Segment one of the treadmill as desired by pressing the Speed and Incline buttons. dicator...
User Manual
Page 16
... treadmill will begin to a stop the program at any time, press the Stop button. Then, press the Start button and program speed and incline settings for the second segment. The time will automatically adjust to alert you. Each custom program is completed. The walking belt will continue in this way until "P 7" or "P 8" appears in the first segment of tones will then be shown in the Time/Resistance display. See step...
... treadmill will begin to a stop the program at any time, press the Stop button. Then, press the Start button and program speed and incline settings for the second segment. The time will automatically adjust to alert you. Each custom program is completed. The walking belt will continue in this way until "P 7" or "P 8" appears in the first segment of tones will then be shown in the Time/Resistance display. See step...

User Manual
Page 17
... the first speed and incline settings of the program begins, the treadmill will guide you can adjust the volume or select an audio setting for your progress with the displays. During the program, a personal trainer will automatically adjust to the iFIT slot. You can manually override the setting by pressing the iFIT up and down and are programmed for the next segment. 4 Follow your personal trainer (see THE USER'S MODE on page...
... the first speed and incline settings of the program begins, the treadmill will guide you can adjust the volume or select an audio setting for your progress with the displays. During the program, a personal trainer will automatically adjust to the iFIT slot. You can manually override the setting by pressing the iFIT up and down and are programmed for the next segment. 4 Follow your personal trainer (see THE USER'S MODE on page...

User Manual
Page 18
... pressing the 1 Step Incline increase button repeatedly. You can adjust the volume of the personal trainer audio (0 through your iFIT workouts. An "E" for English miles or an "M" for your iFIT workouts. THE USER'S MODE The console features a user's mode that keeps track of the total number of miles that the walking belt has moved and the total number of hours that the treadmill has been used only when a treadmill is in the "demo" mode. When you use an iFIT Card, a personal trainer will...
... pressing the 1 Step Incline increase button repeatedly. You can adjust the volume of the personal trainer audio (0 through your iFIT workouts. An "E" for English miles or an "M" for your iFIT workouts. THE USER'S MODE The console features a user's mode that keeps track of the total number of miles that the walking belt has moved and the total number of hours that the treadmill has been used only when a treadmill is in the "demo" mode. When you use an iFIT Card, a personal trainer will...
User Manual
Page 23
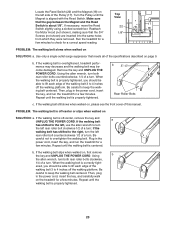
..., move the Reed 22 Switch slightly using a slotted screwdriver. PROBLEM: The walking belt slows when walked on , first remove the key and UNPLUG THE POWER CORD. Then, plug in the power cord, insert the key, and run the treadmill for a few minutes. Repeat until the walking belt is properly tightened. If the walking belt still slows when walked on, please see the front cover of a turn ; PROBLEM: The walking belt is overtightened, treadmill performance may decrease and the walking belt may...
..., move the Reed 22 Switch slightly using a slotted screwdriver. PROBLEM: The walking belt slows when walked on , first remove the key and UNPLUG THE POWER CORD. Then, plug in the power cord, insert the key, and run the treadmill for a few minutes. Repeat until the walking belt is properly tightened. If the walking belt still slows when walked on, please see the front cover of a turn ; PROBLEM: The walking belt is overtightened, treadmill performance may decrease and the walking belt may...
User Manual
Page 25
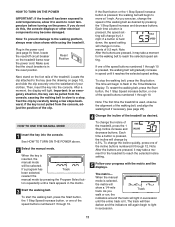
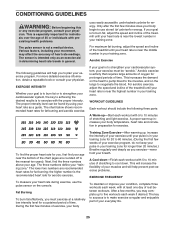
... aerobic exercise, adjust the speed and incline of rest between workouts. the higher number is especially important for energy. Only after the first few minutes of exercise, your body Training Zone Exercise-After warming up increases your cardiovascular system, the key to five workouts each week, with preexisting health problems. uses easily accessible carbohydrate calories for individuals over the age of your training zone. The pulse sensor is...
... aerobic exercise, adjust the speed and incline of rest between workouts. the higher number is especially important for energy. Only after the first few minutes of exercise, your body Training Zone Exercise-After warming up increases your cardiovascular system, the key to five workouts each week, with preexisting health problems. uses easily accessible carbohydrate calories for individuals over the age of your training zone. The pulse sensor is...
User Manual
Page 26
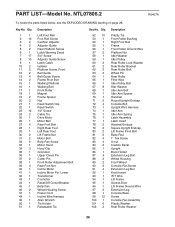
... Front Belt Guide Belt Guide Screw Frame Pivot Bolt Walking Platform Walking Belt Front Roller Magnet Frame Spacer Nut Reed Switch Clip Reed Switch 1/2" Screw Cable Tie Drive Motor Motor Belt Rear Foot Bolt Right Rear Foot Left Rear Foot Lift Frame Nut Motor Bolt Belly Pan Screw Motor Hood Hood Clip Grommet Upper Clevis Pin Cotter Pin Front Roller Adjustment Bolt Rear Foot Nut Incline Motor Incline Motor Pin, Lower Transformer Controller Reset/Off Circuit Breaker Belly Pan Wheel Housing Screw Power Cord Incline Wire Harness Allen Wrench Tie Holder Releasable Tie Key No. PART LIST-Model No...
... Front Belt Guide Belt Guide Screw Frame Pivot Bolt Walking Platform Walking Belt Front Roller Magnet Frame Spacer Nut Reed Switch Clip Reed Switch 1/2" Screw Cable Tie Drive Motor Motor Belt Rear Foot Bolt Right Rear Foot Left Rear Foot Lift Frame Nut Motor Bolt Belly Pan Screw Motor Hood Hood Clip Grommet Upper Clevis Pin Cotter Pin Front Roller Adjustment Bolt Rear Foot Nut Incline Motor Incline Motor Pin, Lower Transformer Controller Reset/Off Circuit Breaker Belly Pan Wheel Housing Screw Power Cord Incline Wire Harness Allen Wrench Tie Holder Releasable Tie Key No. PART LIST-Model No...

User Manual
Page 27
... 4 105 1 106 1 #1 #1 Key/Clip Isolator Screw/Bracket Screw Console iFIT Wire 12" Blue Wire, 2F 8" Blue Wire, M/F Key No. Specifications are not illustrated. Description # 1 8" Green Wire, F/Ring # 1 4" Red Wire, M/F # 1 User's Manual #These parts are subject to give the following information: • the MODEL NUMBER OF THE PRODUCT (NTL07806.2) • the NAME OF THE PRODUCT (NordicTrack C2255 treadmill) • the SERIAL NUMBER OF THE PRODUCT (see the front cover of this manual) • the KEY NUMBER AND DESCRIPTION...
... 4 105 1 106 1 #1 #1 Key/Clip Isolator Screw/Bracket Screw Console iFIT Wire 12" Blue Wire, 2F 8" Blue Wire, M/F Key No. Specifications are not illustrated. Description # 1 8" Green Wire, F/Ring # 1 4" Red Wire, M/F # 1 User's Manual #These parts are subject to give the following information: • the MODEL NUMBER OF THE PRODUCT (NTL07806.2) • the NAME OF THE PRODUCT (NordicTrack C2255 treadmill) • the SERIAL NUMBER OF THE PRODUCT (see the front cover of this manual) • the KEY NUMBER AND DESCRIPTION...
User Manual
Page 32
... COVERED-ICON Health & Fitness, Inc. ("ICON"), warrants the drive motor for repair. store, operate, and maintain the Product as instructed, return any defected part for replacement or, if necessary, the entire product, for life. ICON is not responsible or liable for one is authorized to use , costs of removal, installation or other consequential damages of whatsoever nature. Remember to do not allow the exclusion or limitation...
... COVERED-ICON Health & Fitness, Inc. ("ICON"), warrants the drive motor for repair. store, operate, and maintain the Product as instructed, return any defected part for replacement or, if necessary, the entire product, for life. ICON is not responsible or liable for one is authorized to use , costs of removal, installation or other consequential damages of whatsoever nature. Remember to do not allow the exclusion or limitation...


