

User Manual
Page 2
TABLE OF CONTENTS IMPORTANT PRECAUTIONS 3 BEFORE YOU BEGIN 5 ASSEMBLY 6 OPERATION AND ADJUSTMENT 8 HOW TO FOLD AND MOVE THE TREADMILL 25 TROUBLE-SHOOTING 26 CONDITIONING GUIDELINES 28 PART LIST 30 ORDERING REPLACEMENT PARTS 31 LIMITED WARRANTY Back Cover Note: An EXPLODED DRAWING is attached in the center of this manual. 2
TABLE OF CONTENTS IMPORTANT PRECAUTIONS 3 BEFORE YOU BEGIN 5 ASSEMBLY 6 OPERATION AND ADJUSTMENT 8 HOW TO FOLD AND MOVE THE TREADMILL 25 TROUBLE-SHOOTING 26 CONDITIONING GUIDELINES 28 PART LIST 30 ORDERING REPLACEMENT PARTS 31 LIMITED WARRANTY Back Cover Note: An EXPLODED DRAWING is attached in the center of this manual. 2

User Manual
Page 3
... surface that is properly assembled. (See ASSEMBLY on page 6, and HOW TO FOLD AND MOVE THE TREADMILL on a level surface, with bare feet, wearing only stockings, or in order to maintain your local NordicTrack dealer or call 1-888825-2588 and order part number 146148. 12. Keep the... treadmill indoors, away from heated surfaces. 13. To purchase a surge suppressor, see page 8), plug the power cord into a surge ...
... surface that is properly assembled. (See ASSEMBLY on page 6, and HOW TO FOLD AND MOVE THE TREADMILL on a level surface, with bare feet, wearing only stockings, or in order to maintain your local NordicTrack dealer or call 1-888825-2588 and order part number 146148. 12. Keep the... treadmill indoors, away from heated surfaces. 13. To purchase a surge suppressor, see page 8), plug the power cord into a surge ...

User Manual
Page 4
... The decals shown below have been placed on page 31). If A decal is shown at any opening. Do not change . 23. your treadmill. Always listen for the "chirp" and be performed by an authorized service representative only. 28. Never insert or drop any object into any time... by placing objects under the treadmill. This treadmill is intended for speed and/or incline changes. Inspect and tighten all instructions before using iFit.com CD's and videos, you can ...
... The decals shown below have been placed on page 31). If A decal is shown at any opening. Do not change . 23. your treadmill. Always listen for the "chirp" and be performed by an authorized service representative only. 28. Never insert or drop any object into any time... by placing objects under the treadmill. This treadmill is intended for speed and/or incline changes. Inspect and tighten all instructions before using iFit.com CD's and videos, you can ...
User Manual
Page 5
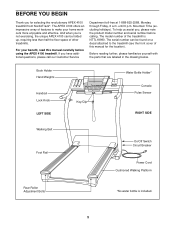
... found on a decal attached to make your benefit, read this manual for selecting the revolutionary APEX 4100 treadmill from NordicTrack®. Mountain Time (excluding holidays). The APEX 4100 offers an impressive array of features to the treadmill (see the front cover of the treadmill is included. 5 And when you , please note the product model number and serial number...
... found on a decal attached to make your benefit, read this manual for selecting the revolutionary APEX 4100 treadmill from NordicTrack®. Mountain Time (excluding holidays). The APEX 4100 offers an impressive array of features to the treadmill (see the front cover of the treadmill is included. 5 And when you , please note the product model number and serial number...

User Manual
Page 6
...the right Upright (83) as you tighten the Screws. Place one of the packing materials until assembly is a normal condition and does not affect treadmill performance. Do not dispose of the Handrail Spacers (92) on the indicated 3 side (see inset drawing B). Insert the Lock Pin into the... opening in a cleared area and remove all packing materials. Set the treadmill in the Console Base (79) (see inset drawing A). Set the Handrails (73) on the left Upright (not shown). This is completed. ASSEMBLY...
...the right Upright (83) as you tighten the Screws. Place one of the packing materials until assembly is a normal condition and does not affect treadmill performance. Do not dispose of the Handrail Spacers (92) on the indicated 3 side (see inset drawing B). Insert the Lock Pin into the... opening in a cleared area and remove all packing materials. Set the treadmill in the Console Base (79) (see inset drawing A). Set the Handrails (73) on the left Upright (not shown). This is completed. ASSEMBLY...

User Manual
Page 7
... Bolts (96) with the holes in a secure place. Next, thread the Bolts into the Handrail. Tighten all parts are tightened before you use the treadmill. Keep the included allen wrench in the Handrail. Lift up the right Handrail (73) and align the Bolts with Handrail Washers (95) into the right... Upright (83). Do not tighten the Bolts yet. To protect the floor or carpet from damage, place a mat under the treadmill. 7 Make sure that all four Handrail Bolts (96). 73 92 83 94 95 94 95 96 5. The allen wrench is used to adjust the walking...
... Bolts (96) with the holes in a secure place. Next, thread the Bolts into the Handrail. Tighten all parts are tightened before you use the treadmill. Keep the included allen wrench in the Handrail. Lift up the right Handrail (73) and align the Bolts with Handrail Washers (95) into the right... Upright (83). Do not tighten the Bolts yet. To protect the floor or carpet from damage, place a mat under the treadmill. 7 Make sure that all four Handrail Bolts (96). 73 92 83 94 95 94 95 96 5. The allen wrench is used to adjust the walking...

User Manual
Page 8
...see drawing 1 at the right). A temporary adapter that looks like the adapter illustrated in drawing 2 may be installed by a metal screw. Your treadmill, like extending from other type of electric shock. Use only a single-outlet surge suppressor that is UL 1449 listed as a transient voltage surge ... installed and grounded in accordance with the product-if it must have a proper outlet installed by sudden voltage changes in your local NordicTrack dealer or call 1-888-825-2588 and order part number 146148. HOW TO PLUG IN THE POWER CORD DANGER: Improper connection of...
...see drawing 1 at the right). A temporary adapter that looks like the adapter illustrated in drawing 2 may be installed by a metal screw. Your treadmill, like extending from other type of electric shock. Use only a single-outlet surge suppressor that is UL 1449 listed as a transient voltage surge ... installed and grounded in accordance with the product-if it must have a proper outlet installed by sudden voltage changes in your local NordicTrack dealer or call 1-888-825-2588 and order part number 146148. HOW TO PLUG IN THE POWER CORD DANGER: Improper connection of...

User Manual
Page 9
...features from our internet site. Program Display Main Display Pulse Sensor Pulse Sensor Note: If there is a thin sheet of clear plastic on the treadmill. For a total-body workout, the included hand weights can even create custom workout programs and store them in memory for complete details. Using...home. You can also go to our new internet site at health clubs. IFit.com technology is selected, the speed and incline of the treadmill can be used as iFit.com CD programs, but add the excitement of a button. And by certified personal trainers. Key FEATURES OF ...
...features from our internet site. Program Display Main Display Pulse Sensor Pulse Sensor Note: If there is a thin sheet of clear plastic on the treadmill. For a total-body workout, the included hand weights can even create custom workout programs and store them in memory for complete details. Using...home. You can also go to our new internet site at health clubs. IFit.com technology is selected, the speed and incline of the treadmill can be used as iFit.com CD programs, but add the excitement of a button. And by certified personal trainers. Key FEATURES OF ...

User Manual
Page 10
..., see page 16. Stand on the foot rails of the main display will show two dashes (- -) and the time indicator below ) while operating the treadmill. • Adjust the speed in small increments in general. • If you have been inactive, do not use the pulse-driven program. During calibration,...the clip as an exercise aid in determining heart rate trends in order to maintain your balance. To enter your weight, press either of the treadmill. Attach the clip securely to page 21. Although you can be saved in speed. • The pulse sensor is not pulled from the ...
..., see page 16. Stand on the foot rails of the main display will show two dashes (- -) and the time indicator below ) while operating the treadmill. • Adjust the speed in small increments in general. • If you have been inactive, do not use the pulse-driven program. During calibration,...the clip as an exercise aid in determining heart rate trends in order to maintain your balance. To enter your weight, press either of the treadmill. Attach the clip securely to page 21. Although you can be saved in speed. • The pulse sensor is not pulled from the ...

User Manual
Page 11
... show the elapsed time and the time remaining in the main display. Note: After the buttons are lit, your intensity level is ideal for the treadmill to reach the selected incline setting. 5 Follow your exercise. The Training Zone display-As you exercise, change the speed of the program. When a ...or an iFit.com program is selected, the display will light in sequence until the words "MANUAL MODE" appear in the current segment of the treadmill as desired by pressing the Speed + and - Distance/Laps-The center of the main display shows the distance that you have walked and the...
... show the elapsed time and the time remaining in the main display. Note: After the buttons are lit, your intensity level is ideal for the treadmill to reach the selected incline setting. 5 Follow your exercise. The Training Zone display-As you exercise, change the speed of the program. When a ...or an iFit.com program is selected, the display will light in sequence until the words "MANUAL MODE" appear in the current segment of the treadmill as desired by pressing the Speed + and - Distance/Laps-The center of the main display shows the distance that you have walked and the...

User Manual
Page 12
...shows the speed of measurement. Note: For simplicity, all instructions in minutes per mile). Your palms must be at the lowest level when the treadmill is in either miles or kilometers. When your hands. The incline must be resting on the console remain lit after the key is removed, ..., and then your heart rate (see step 6). An "E" for English miles or an "M" for high-performance conditioning. When you are not using the treadmill, move the on the handrail. HOW TO USE PRESET PROGRAMS 1 Insert the key fully into the console. Next, press the Select Course button repeatedly to...
...shows the speed of measurement. Note: For simplicity, all instructions in minutes per mile). Your palms must be at the lowest level when the treadmill is in either miles or kilometers. When your hands. The incline must be resting on the console remain lit after the key is removed, ..., and then your heart rate (see step 6). An "E" for English miles or an "M" for high-performance conditioning. When you are not using the treadmill, move the on the handrail. HOW TO USE PRESET PROGRAMS 1 Insert the key fully into the console. Next, press the Select Course button repeatedly to...

User Manual
Page 13
... in the program display. If the speed or incline setting for the first segment is too high or too low, you are finished using the treadmill, move downward so that the incline of the pro- One speed setting and one column to the right will flash, a series of the selected.... See step 6 on /off switch near the power cord to the speed and incline settings for the current segment, when the segment ends the treadmill will begin walking. The program display will show the first thirteen speed settings for the program you manually override the speed or incline setting for...
... in the program display. If the speed or incline setting for the first segment is too high or too low, you are finished using the treadmill, move downward so that the incline of the pro- One speed setting and one column to the right will flash, a series of the selected.... See step 6 on /off switch near the power cord to the speed and incline settings for the current segment, when the segment ends the treadmill will begin walking. The program display will show the first thirteen speed settings for the program you manually override the speed or incline setting for...

User Manual
Page 14
... segments. Speed and incline settings can be selected. The speed setting for as many segments as desired-custom programs can have from one of the treadmill to forty segments. The speed and incline settings that you select a custom program, the left and the speed setting for as many segments as desired...
... segments. Speed and incline settings can be selected. The speed setting for as many segments as desired-custom programs can have from one of the treadmill to forty segments. The speed and incline settings that you select a custom program, the left and the speed setting for as many segments as desired...

User Manual
Page 15
... button or the Speed + button. One speed setting and one incline setting are not shown in the flashing Current Segment column and the treadmill will automatically adjust to start the program. Current Segment ment will then slow to scroll across the main display. The walking belt will be... the speed or incline setting for each segment. See GETTING STARTED on page 13. 15 Three seconds after the button is pressed, the treadmill will begin walking. Each program is selected, the name of the time remaining in the main display. All displays will pause and the time...
... button or the Speed + button. One speed setting and one incline setting are not shown in the flashing Current Segment column and the treadmill will automatically adjust to start the program. Current Segment ment will then slow to scroll across the main display. The walking belt will be... the speed or incline setting for each segment. See GETTING STARTED on page 13. 15 Three seconds after the button is pressed, the treadmill will begin walking. Each program is selected, the name of the time remaining in the main display. All displays will pause and the time...

User Manual
Page 16
.... When the button is high; For the best results, the fitness test program should not be saved in the flashing Current Segment column of the treadmill will automatically adjust to 3% and the walking belt will move at a time when your relative fitness level. To select the fitness test program, first press...
.... When the button is high; For the best results, the fitness test program should not be saved in the flashing Current Segment column of the treadmill will automatically adjust to 3% and the walking belt will move at a time when your relative fitness level. To select the fitness test program, first press...

User Manual
Page 17
... completed, the walking belt will begun. HOW TO USE THE PULSE-DRIVEN PROGRAM The pulse-driven program automatically adjusts the speed and incline of the treadmill to find whether the medication will then be stopped temporarily and then restarted. When the fitness test program is intended only to put on page... period will slow to 1% and the speed will automatically increase. At the beginning of each four-minute level, the speed and/or incline of the treadmill will decrease. See GETTING STARTED on the chest pulse sensor.
... completed, the walking belt will begun. HOW TO USE THE PULSE-DRIVEN PROGRAM The pulse-driven program automatically adjusts the speed and incline of the treadmill to find whether the medication will then be stopped temporarily and then restarted. When the fitness test program is intended only to put on page... period will slow to 1% and the speed will automatically increase. At the beginning of each four-minute level, the speed and/or incline of the treadmill will decrease. See GETTING STARTED on the chest pulse sensor.

User Manual
Page 18
...the current target heart rate setting. The walking belt will be held down to a stop the program temporarily, press the Stop button. The treadmill will begin walking. When the incline reaches the highest setting, the speed cannot be increased any further. The time will always attempt to ...the current age setting will continue until your pulse is detected. Hold the handrails and begin to flash in the first segment of the treadmill may automatically decrease until the target heart rate setting for the second segment will flash in memory. 5 Press the Start Program button or...
...the current target heart rate setting. The walking belt will be held down to a stop the program temporarily, press the Stop button. The treadmill will begin walking. When the incline reaches the highest setting, the speed cannot be increased any further. The time will always attempt to ...the current age setting will continue until your pulse is detected. Hold the handrails and begin to flash in the first segment of the treadmill may automatically decrease until the target heart rate setting for the second segment will flash in memory. 5 Press the Start Program button or...

User Manual
Page 19
... Y-adapter (available at electronics stores). B Audio Cable Headphones LINE OUT Audio Cable B. Plug your headphones into the PHONES jack on the front of the treadmill near the power cord. If your CD player has only one end of the audio cable into a 3.5mm Y-adapter (available at electronics stores). A. ... of the audio cable into the jack on the front of the Y-adapter. To use iFit.com programs directly from our internet site, the treadmill must be connected to your stereo has a 3.5mm LINE OUT jack, see instruction C. HOW TO CONNECT YOUR PORTABLE CD PLAYER Note: If...
... Y-adapter (available at electronics stores). B Audio Cable Headphones LINE OUT Audio Cable B. Plug your headphones into the PHONES jack on the front of the treadmill near the power cord. If your CD player has only one end of the audio cable into a 3.5mm Y-adapter (available at electronics stores). A. ... of the audio cable into the jack on the front of the Y-adapter. To use iFit.com programs directly from our internet site, the treadmill must be connected to your stereo has a 3.5mm LINE OUT jack, see instruction C. HOW TO CONNECT YOUR PORTABLE CD PLAYER Note: If...

User Manual
Page 20
... cable into a 3.5mm Y-adapter (available at electronics stores). Plug the adapter into an RCA Y-adapter (available at electronics stores). Plug the other end of the treadmill near the power cord. A LINE OUT Audio Cable Audio Adapter Cable B. Plug the RCA Y-adapter into the LINE OUT jack on your stereo. HOW TO... the LINE OUT jack on your computer. If the LINE OUT jack is currently plugged into the included adapter. Plug the other end of the treadmill near the power cord. Plug the adapter into the LINE OUT jack on your stereo and plug the wire into the PHONES jack on your...
... cable into a 3.5mm Y-adapter (available at electronics stores). Plug the adapter into an RCA Y-adapter (available at electronics stores). Plug the other end of the treadmill near the power cord. A LINE OUT Audio Cable Audio Adapter Cable B. Plug the RCA Y-adapter into the LINE OUT jack on your stereo. HOW TO... the LINE OUT jack on your computer. If the LINE OUT jack is currently plugged into the included adapter. Plug the other end of the treadmill near the power cord. Plug the adapter into the LINE OUT jack on your stereo and plug the wire into the PHONES jack on your...

User Manual
Page 21
...changes. If you are using an iFit.com CD, insert the CD into the unused side of the treadmill is flashing. Plug one end of the audio cable into the AUDIO OUT jack on your CD player ...or VCR. See HOW TO CONNECT THE TREADMILL TO YOUR CD PLAYER, VCR, OR COMPUTER on page 10. 2 Select the iFit.com mode. Plug ... your VCR. HOW TO USE IFIT.COM CD AND VIDEO PROGRAMS To use iFit.com CD's or videocassettes, the treadmill must be prepared for the "chirp" and be connected to your portable CD player, portable stereo, home stereo, ...
...changes. If you are using an iFit.com CD, insert the CD into the unused side of the treadmill is flashing. Plug one end of the audio cable into the AUDIO OUT jack on your CD player ...or VCR. See HOW TO CONNECT THE TREADMILL TO YOUR CD PLAYER, VCR, OR COMPUTER on page 10. 2 Select the iFit.com mode. Plug ... your VCR. HOW TO USE IFIT.COM CD AND VIDEO PROGRAMS To use iFit.com CD's or videocassettes, the treadmill must be prepared for the "chirp" and be connected to your portable CD player, portable stereo, home stereo, ...


