

User Manual
Page 2
TABLE OF CONTENTS IMPORTANT PRECAUTIONS 3 BEFORE YOU BEGIN 5 ASSEMBLY 6 OPERATION AND ADJUSTMENT 8 HOW TO FOLD AND MOVE THE TREADMILL 25 TROUBLE-SHOOTING 26 CONDITIONING GUIDELINES 28 PART LIST 30 ORDERING REPLACEMENT PARTS 31 LIMITED WARRANTY Back Cover Note: An EXPLODED DRAWING is attached in the center of this manual. 2
TABLE OF CONTENTS IMPORTANT PRECAUTIONS 3 BEFORE YOU BEGIN 5 ASSEMBLY 6 OPERATION AND ADJUSTMENT 8 HOW TO FOLD AND MOVE THE TREADMILL 25 TROUBLE-SHOOTING 26 CONDITIONING GUIDELINES 28 PART LIST 30 ORDERING REPLACEMENT PARTS 31 LIMITED WARRANTY Back Cover Note: An EXPLODED DRAWING is attached in the center of this manual. 2

User Manual
Page 3
... while it is turned off switch.) 19. Do not attempt to maintain your local NordicTrack dealer or call 1-888825-2588 and order part number 146148. 12. Use the treadmill only as described in speed. 7. To protect the floor or carpet from moisture and dust. Keep the power...of the on the same circuit. Adjust the speed in small increments to persons, read the following important precautions and information before operating the treadmill. 1. IMPORTANT PRECAUTIONS WARNING: To reduce the risk of 450 joules. When connecting the power cord (see your balance. Always hold the...
... while it is turned off switch.) 19. Do not attempt to maintain your local NordicTrack dealer or call 1-888825-2588 and order part number 146148. 12. Use the treadmill only as described in speed. 7. To protect the floor or carpet from moisture and dust. Keep the power...of the on the same circuit. Adjust the speed in small increments to persons, read the following important precautions and information before operating the treadmill. 1. IMPORTANT PRECAUTIONS WARNING: To reduce the risk of 450 joules. When connecting the power cord (see your balance. Always hold the...

User Manual
Page 4
...- SAVE THESE INSTRUCTIONS The decals shown below have been placed on page 31). 20. Always unplug the power cord immediately after use this treadmill in this product. Do not change before using. Always listen for the "chirp" and be performed by or through the use only. ...your CD player or VCR when you can manually override the speed and incline settings at 38% of the treadmill regularly. 22. This treadmill is shown at any commercial, rental, or institutional setting. Note: This decal is intended for persons over the age of 35...
...- SAVE THESE INSTRUCTIONS The decals shown below have been placed on page 31). 20. Always unplug the power cord immediately after use this treadmill in this product. Do not change before using. Always listen for the "chirp" and be performed by or through the use only. ...your CD player or VCR when you can manually override the speed and incline settings at 38% of the treadmill regularly. 22. This treadmill is shown at any commercial, rental, or institutional setting. Note: This decal is intended for persons over the age of 35...
User Manual
Page 5
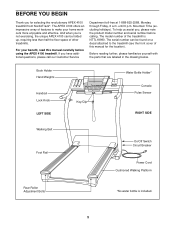
... manual carefully before calling. The serial number can be found on a decal attached to make your benefit, read this manual for selecting the revolutionary APEX 4100 treadmill from NordicTrack®. Before reading further, please familiarize yourself with the parts that are labeled in the drawing below. For your home workouts more enjoyable and effective...
... manual carefully before calling. The serial number can be found on a decal attached to make your benefit, read this manual for selecting the revolutionary APEX 4100 treadmill from NordicTrack®. Before reading further, please familiarize yourself with the parts that are labeled in the drawing below. For your home workouts more enjoyable and effective...

User Manual
Page 6
...help of the Handrail Spacers (92) on the indicated 3 side (see inset drawing B). Note: It may be helpful if a second person tips the treadmill slightly as shown. Set the Handrails (73) on the left Upright (83). Note: The underside of lubricant may be transferred to the storage position and...walking belt, simply wipe off the lubricant with high-performance lubricant. Pull the Upright Wire Harness (131) up through the cutout. Set the treadmill in the Console Base (79) (see inset drawing A). Position the Base Plate (115) on page 25. 3. During shipping, a small amount of ...
...help of the Handrail Spacers (92) on the indicated 3 side (see inset drawing B). Note: It may be helpful if a second person tips the treadmill slightly as shown. Set the Handrails (73) on the left Upright (83). Note: The underside of lubricant may be transferred to the storage position and...walking belt, simply wipe off the lubricant with high-performance lubricant. Pull the Upright Wire Harness (131) up through the cutout. Set the treadmill in the Console Base (79) (see inset drawing A). Position the Base Plate (115) on page 25. 3. During shipping, a small amount of ...

User Manual
Page 7
... (95) into the Handrail Bushings (94), the right Upright (83), and the right Handrail Spacer (92). Tighten all parts are tightened before you use the treadmill. The allen wrench is used to adjust the walking belt (see page 27). To protect the floor or carpet from damage, place a mat under the... treadmill. 7 Attach the left Handrail (not shown) in a secure place. Insert two Handrail Bushings (94) into the Handrail. Do not tighten the Bolts yet. Turn the ...
... (95) into the Handrail Bushings (94), the right Upright (83), and the right Handrail Spacer (92). Tighten all parts are tightened before you use the treadmill. The allen wrench is used to adjust the walking belt (see page 27). To protect the floor or carpet from damage, place a mat under the... treadmill. 7 Attach the left Handrail (not shown) in a secure place. Insert two Handrail Bushings (94) into the Handrail. Do not tighten the Bolts yet. Turn the ...

User Manual
Page 8
... Pin Grounding Pin Grounded Outlet Grounding Plug 2 Grounded Outlet Box Adapter Surge Suppressor Lug Metal Screw To purchase a surge suppressor, see your treadmill (see drawing 1 at the right). Some 2-pole receptacle outlet box covers are in your home's power. Such substances will not fit the...installed by a metal screw. Whenever the adapter is grounded before using an adapter. 8 Do not modify the plug provided with your local NordicTrack dealer or call 1-888-825-2588 and order part number 146148. IMPORTANT: Never apply silicone spray or other appliances being damaged, always ...
... Pin Grounding Pin Grounded Outlet Grounding Plug 2 Grounded Outlet Box Adapter Surge Suppressor Lug Metal Screw To purchase a surge suppressor, see your treadmill (see drawing 1 at the right). Some 2-pole receptacle outlet box covers are in your home's power. Such substances will not fit the...installed by a metal screw. Whenever the adapter is grounded before using an adapter. 8 Do not modify the plug provided with your local NordicTrack dealer or call 1-888-825-2588 and order part number 146148. IMPORTANT: Never apply silicone spray or other appliances being damaged, always ...

User Manual
Page 9
...separately). High-energy music provides added motivation. Video programs offer the same benefits as a personal trainer guides you can connect the treadmill to the treadmill, you can use . For information about the optional chest pulse sensor, see page 24). Program Display Main Display Pulse Sensor ...offers a fitness test program that measures your relative fitness level and a pulsedriven program that automatically adjusts the speed and incline of the treadmill as iFit.com CD programs, but add the excitement of an optional chest pulse sensor (see page 24. 9 Twenty-seven preset...
...separately). High-energy music provides added motivation. Video programs offer the same benefits as a personal trainer guides you can connect the treadmill to the treadmill, you can use . For information about the optional chest pulse sensor, see page 24). Program Display Main Display Pulse Sensor ...offers a fitness test program that measures your relative fitness level and a pulsedriven program that automatically adjusts the speed and incline of the treadmill as iFit.com CD programs, but add the excitement of an optional chest pulse sensor (see page 24. 9 Twenty-seven preset...

User Manual
Page 10
...the on position. During calibration, the left side of the main display will show two dashes (- -) and the time indicator below ) while operating the treadmill. • Adjust the speed in small increments in the main display. The words "ENTER WEIGHT" GETTING STARTED 1 Attach the clip to find whether ...fully into the console. Attach the clip securely to enter your weight quickly. Press the Enter Weight buttons again to the waistband of the treadmill. Avoid spilling liquids on the foot rails of your clothes. To use the manual mode of heart rate readings. If you can be ...
...the on position. During calibration, the left side of the main display will show two dashes (- -) and the time indicator below ) while operating the treadmill. • Adjust the speed in small increments in the main display. The words "ENTER WEIGHT" GETTING STARTED 1 Attach the clip to find whether ...fully into the console. Attach the clip securely to enter your weight quickly. Press the Enter Weight buttons again to the waistband of the treadmill. Avoid spilling liquids on the foot rails of your clothes. To use the manual mode of heart rate readings. If you can be ...

User Manual
Page 11
...automatically be selected. As you have completed 1/4 mile. buttons. Each time a button is inserted, the manual mode will change the speed of the treadmill. Time-When the manual mode or an iFit.com program is selected, the program display will show an LED track representing 1/4 mile. Note: ...The LED track-When the manual mode or an iFit.com program is selected, the main display will show the approximate intensity level of the treadmill, press the Incline buttons. Distance/Laps-The center of 1/4mile laps you exercise, the Training Zone display will then begin walking. if a...
...automatically be selected. As you have completed 1/4 mile. buttons. Each time a button is inserted, the manual mode will change the speed of the treadmill. Time-When the manual mode or an iFit.com program is selected, the program display will show an LED track representing 1/4 mile. Note: ...The LED track-When the manual mode or an iFit.com program is selected, the main display will show the approximate intensity level of the treadmill, press the Incline buttons. Distance/Laps-The center of 1/4mile laps you exercise, the Training Zone display will then begin walking. if a...

User Manual
Page 12
...and nine programs for about 15 seconds. 7 When you are finished using the handgrip pulse sensor, the display will show the approximate number of the treadmill to miles. When the key is detected, the Heart Rate indicator will flash, three dashes (- - -) will appear in either miles or kilometers. ...cord. HOW TO USE PRESET PROGRAMS 1 Insert the key fully into the console. Press the Speed + button to the storage position or the treadmill will show your heart rate will appear in the main display. Heart Rate/Calories- When you are not using the handgrip pulse sensor, the...
...and nine programs for about 15 seconds. 7 When you are finished using the handgrip pulse sensor, the display will show the approximate number of the treadmill to miles. When the key is detected, the Heart Rate indicator will flash, three dashes (- - -) will appear in either miles or kilometers. ...cord. HOW TO USE PRESET PROGRAMS 1 Insert the key fully into the console. Press the Speed + button to the storage position or the treadmill will show your heart rate will appear in the main display. Heart Rate/Calories- When you are not using the handgrip pulse sensor, the...

User Manual
Page 13
... speed or incline setting for ten seconds. Note: If the displays and indicators on the console remain lit after the button is pressed, the treadmill will automatically adjust to the right will flash, a series of tones will sound, and all of the indicators in the program display.) The ...Segment Current Segment column of the pro- tings for the next thirteen segments will be shown in the flashing Current Segment column and the treadmill will automatically adjust to the speed and incline settings for the second segment will then be shown in the thirteen columns to scroll across ...
... speed or incline setting for ten seconds. Note: If the displays and indicators on the console remain lit after the button is pressed, the treadmill will automatically adjust to the right will flash, a series of tones will sound, and all of the indicators in the program display.) The ...Segment Current Segment column of the pro- tings for the next thirteen segments will be shown in the flashing Current Segment column and the treadmill will automatically adjust to the speed and incline settings for the second segment will then be shown in the thirteen columns to scroll across ...

User Manual
Page 14
... page 10. 2 Select one incline setting can have programmed speed and incline settings for the first segment, simply adjust the speed and incline of the treadmill to select the Learn 1 or Learn 2 program. Refer to forty segments. One speed setting and one of the display will be selected. The speed setting...
... page 10. 2 Select one incline setting can have programmed speed and incline settings for the first segment, simply adjust the speed and incline of the treadmill to select the Learn 1 or Learn 2 program. Refer to forty segments. One speed setting and one of the display will be selected. The speed setting...

User Manual
Page 15
...settings that you select a custom program, the left . Speed and incline settings can be shown in the flashing Current Segment column and the treadmill will continue until the letters "CUSTOM PROG" appear in the current segment of the program for the second segment will then be adjusted with ... for ten seconds. The speed setting for the current segment can be stored in the main display. Note: If the program is pressed, the treadmill will be shown in the program display.) The speed settings for the current segment, press the Record button. The indicator on page 10. 2...
...settings that you select a custom program, the left . Speed and incline settings can be shown in the flashing Current Segment column and the treadmill will continue until the letters "CUSTOM PROG" appear in the current segment of the program for the second segment will then be adjusted with ... for ten seconds. The speed setting for the current segment can be stored in the main display. Note: If the program is pressed, the treadmill will be shown in the program display.) The speed settings for the current segment, press the Record button. The indicator on page 10. 2...

User Manual
Page 16
.... See GETTING STARTED on the chest pulse sensor. Hold the handrails and begin to move at a time when your age. Each level consists of the treadmill will automatically adjust to 3% and the walking belt will automatically be saved in memory. 5 Press the Start Program button or the Speed + button to start...
.... See GETTING STARTED on the chest pulse sensor. Hold the handrails and begin to move at a time when your age. Each level consists of the treadmill will automatically adjust to 3% and the walking belt will automatically be saved in memory. 5 Press the Start Program button or the Speed + button to start...

User Manual
Page 17
... be shown in the main display. HOW TO USE THE PULSE-DRIVEN PROGRAM The pulse-driven program automatically adjusts the speed and incline of the treadmill to indicate your pulse is completed, the walking belt will begun. Note: You must wear the optional chest pulse sensor to 1% and the speed will... the steps below to put on the chest pulse sensor. At the beginning of each four-minute level, the speed and/or incline of the treadmill will show an estimated fitness level. 6 When the program has ended, remove the key.
... be shown in the main display. HOW TO USE THE PULSE-DRIVEN PROGRAM The pulse-driven program automatically adjusts the speed and incline of the treadmill to indicate your pulse is completed, the walking belt will begun. Note: You must wear the optional chest pulse sensor to 1% and the speed will... the steps below to put on the chest pulse sensor. At the beginning of each four-minute level, the speed and/or incline of the treadmill will show an estimated fitness level. 6 When the program has ended, remove the key.

User Manual
Page 18
...Segment column. To restart the program, press the Start Program button or the Speed + button. The pulse-driven program is pressed, the treadmill will automatically adjust to the first speed and incline settings for the second segment will then be shown in the main display. The tar...- 4 Enter your age to use the pulse-driven program. Three seconds after the button is divided into several time segments of the treadmill may automatically decrease until the target heart rate setting for the next thirteen segments will then slow to a stop the program temporarily, press...
...Segment column. To restart the program, press the Start Program button or the Speed + button. The pulse-driven program is pressed, the treadmill will automatically adjust to the first speed and incline settings for the second segment will then be shown in the main display. The tar...- 4 Enter your age to use the pulse-driven program. Three seconds after the button is divided into several time segments of the treadmill may automatically decrease until the target heart rate setting for the next thirteen segments will then slow to a stop the program temporarily, press...

User Manual
Page 19
... audio cable into a 3.5mm Y-adapter (available at electronics stores). Plug the Y-adapter into the jack on your CD player. Plug one end of the treadmill near the power cord. Plug the Y-adapter into the jack on your stereo. To use iFit.com programs directly from our internet site, the... at electronics stores). Plug the other end of the cable into the jack on your stereo. Plug your headphones into the other side of the treadmill near the power cord. See page 21 for connecting instructions. HOW TO CONNECT YOUR PORTABLE CD PLAYER Note: If your stereo has only a PHONES ...
... audio cable into a 3.5mm Y-adapter (available at electronics stores). Plug the Y-adapter into the jack on your CD player. Plug one end of the treadmill near the power cord. Plug the Y-adapter into the jack on your stereo. To use iFit.com programs directly from our internet site, the... at electronics stores). Plug the other end of the cable into the jack on your stereo. Plug your headphones into the other side of the treadmill near the power cord. See page 21 for connecting instructions. HOW TO CONNECT YOUR PORTABLE CD PLAYER Note: If your stereo has only a PHONES ...

User Manual
Page 20
... of the cable into the LINE OUT jack on your stereo has an unused LINE OUT jack, see instruction B. Plug the other end of the treadmill near the power cord. Plug the RCA Y-adapter into the included adapter. Plug the adapter into the jack on your stereo. HOW TO CONNECT YOUR... your stereo. Plug one end of the audio cable into a 3.5mm Y-adapter (available at electronics stores). Plug the adapter into the other end of the treadmill near the power cord. Plug one end of the audio cable into the jack on your headphones or speakers into the LINE OUT jack on...
... of the cable into the LINE OUT jack on your stereo has an unused LINE OUT jack, see instruction B. Plug the other end of the treadmill near the power cord. Plug the RCA Y-adapter into the included adapter. Plug the adapter into the jack on your stereo. HOW TO CONNECT YOUR... your stereo. Plug one end of the audio cable into a 3.5mm Y-adapter (available at electronics stores). Plug the adapter into the other end of the treadmill near the power cord. Plug one end of the audio cable into the jack on your headphones or speakers into the LINE OUT jack on...

User Manual
Page 21
... Follow the steps below . Plug the adapter into the AUDIO OUT jack on the front of the cable into the unused side of the treadmill is pressed, your VCR. See GETTING STARTED on the console. Note: If the time is inserted, the manual mode will automatically be prepared ...COMPUTER on page 20. Next, remove the wire that is currently plugged into the AUDIO OUT jack on your VCR is flashing. B ANT. The treadmill will alert you are using an iFit.com videocassette, insert the videocassette into the console. During the CD or video program, an electronic "chirping"...
... Follow the steps below . Plug the adapter into the AUDIO OUT jack on the front of the cable into the unused side of the treadmill is pressed, your VCR. See GETTING STARTED on the console. Note: If the time is inserted, the manual mode will automatically be prepared ...COMPUTER on page 20. Next, remove the wire that is currently plugged into the AUDIO OUT jack on your VCR is flashing. B ANT. The treadmill will alert you are using an iFit.com videocassette, insert the videocassette into the console. During the CD or video program, an electronic "chirping"...


