
Installation Guide
Page 5
... Console and Serial (AUX) Ports 17 System Status LEDs 18 Site Requirements 19 Product Disposal 19 Safety Warnings and Cautions 20 Managing IP150 Security Platform Appliances 20 2 Installing a Nokia IP150 Security Appliance 23 Rack Mounting a Nokia IP150 Appliance 23 3 Connecting to the Ethernet Ports 27 Built-In Four-Port 10/100/1000 Ethernet Interface 27 Ethernet Features 27 Connecting to...
... Console and Serial (AUX) Ports 17 System Status LEDs 18 Site Requirements 19 Product Disposal 19 Safety Warnings and Cautions 20 Managing IP150 Security Platform Appliances 20 2 Installing a Nokia IP150 Security Appliance 23 Rack Mounting a Nokia IP150 Appliance 23 3 Connecting to the Ethernet Ports 27 Built-In Four-Port 10/100/1000 Ethernet Interface 27 Ethernet Features 27 Connecting to...

Installation Guide
Page 6
...50 Before You Start 51 Installing or Replacing the Nokia Encryption Accelerator Card 54 Before You Start 55 Configuring and Activating Nokia Encryption Acceleration 57 Replacing the Battery 58 6 ...Troubleshooting 63 General Troubleshooting Information 63 A Technical Specifications 67 Physical Dimensions 67 Space Requirements 67 Other Specifications 67 Appliance Interfaces 68 B Compliance Information 69 Declaration of Conformity 69 Compliance Statements 70 FCC Notice (US 71 Index 73 6 Nokia IP150 Security...
...50 Before You Start 51 Installing or Replacing the Nokia Encryption Accelerator Card 54 Before You Start 55 Configuring and Activating Nokia Encryption Acceleration 57 Replacing the Battery 58 6 ...Troubleshooting 63 General Troubleshooting Information 63 A Technical Specifications 67 Physical Dimensions 67 Space Requirements 67 Other Specifications 67 Appliance Interfaces 68 B Compliance Information 69 Declaration of Conformity 69 Compliance Statements 70 FCC Notice (US 71 Index 73 6 Nokia IP150 Security...

Installation Guide
Page 7
Tables Table 1 Text Conventions 12 Table 2 Pin Assignments for DB9 and DB25 Interface Cables 18 Table 3 Appliance Status LEDs 19 Nokia IP150 Security Platform Installation Guide 7
Tables Table 1 Text Conventions 12 Table 2 Pin Assignments for DB9 and DB25 Interface Cables 18 Table 3 Appliance Status LEDs 19 Nokia IP150 Security Platform Installation Guide 7

Installation Guide
Page 9
... Front Panel Details 16 Figure 4 Pin Assignments for Console Connections 17 Figure 5 Appliance Status LEDs 18 Figure 6 Installing the Mounting Brackets 24 Figure 7 Rack-mounted IP150 Appliance 25 Figure 8 Output Connector for the Ethernet Cable 28 Figure 9 Ethernet Crossover... Cable Pin Connections 29 Figure 10 Power Switch Location 32 Figure 11 Nokia Network Voyager Reference Access Points 37 Figure 12 Hard-Disk Drive Location 46 Figure 13 DIMM Socket Locations 50 Nokia IP150 Security...
... Front Panel Details 16 Figure 4 Pin Assignments for Console Connections 17 Figure 5 Appliance Status LEDs 18 Figure 6 Installing the Mounting Brackets 24 Figure 7 Rack-mounted IP150 Appliance 25 Figure 8 Output Connector for the Ethernet Cable 28 Figure 9 Ethernet Crossover... Cable Pin Connections 29 Figure 10 Power Switch Location 32 Figure 11 Nokia Network Voyager Reference Access Points 37 Figure 12 Hard-Disk Drive Location 46 Figure 13 DIMM Socket Locations 50 Nokia IP150 Security...
Installation Guide
Page 11
... into the following sections describe the conventions this Guide This guide provides information for the installation and use of the Nokia IP150 Security Platform. „ Chapter 2, "Installing a Nokia IP150 Security Appliance" explains how to rack mount the appliance and how to physically connect it to a network and power. „ Chapter 3, "Connecting to the Ethernet Ports" describes how to...
... into the following sections describe the conventions this Guide This guide provides information for the installation and use of the Nokia IP150 Security Platform. „ Chapter 2, "Installing a Nokia IP150 Security Appliance" explains how to rack mount the appliance and how to physically connect it to a network and power. „ Chapter 3, "Connecting to the Ethernet Ports" describes how to...
Installation Guide
Page 13
...-to date version of the Nokia IP150 Security Platform Installation Guide in PDF on the Nokia support Web site (https:// support.nokia.com/) and on the Nokia support site (https://support.nokia.com). Check Point documentation is available from Nokia Network Voyager. In addition to this guide and other documents shipped with your appliance, documentation for the version of...
...-to date version of the Nokia IP150 Security Platform Installation Guide in PDF on the Nokia support Web site (https:// support.nokia.com/) and on the Nokia support site (https://support.nokia.com). Check Point documentation is available from Nokia Network Voyager. In addition to this guide and other documents shipped with your appliance, documentation for the version of...
Installation Guide
Page 15
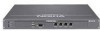
... „ Safety Warnings and Cautions on page 20 „ Product Disposal on page 19 „ Managing IP150 Security Platform Appliances on page 20 About the Nokia IP150 Security Platform The Nokia IP150 appliance is a multi-purpose, one-rack unit (1 RU), disk-based security appliance offering powerful yet cost effective UTM, traditional firewall, and next-generation UTM applications (including firewall, VPN, intrusion...
... „ Safety Warnings and Cautions on page 20 „ Product Disposal on page 19 „ Managing IP150 Security Platform Appliances on page 20 About the Nokia IP150 Security Platform The Nokia IP150 appliance is a multi-purpose, one-rack unit (1 RU), disk-based security appliance offering powerful yet cost effective UTM, traditional firewall, and next-generation UTM applications (including firewall, VPN, intrusion...

Installation Guide
Page 17
...and serial connections. Figure 4 Pin Assignments for RS232-compliant equipment you use the console cable that you are using with your appliance for your console connection. Nokia IP150 Security Platform Appliance Overview Console and Serial (AUX) Ports Use the built-in console port to supply the information that the pin assignments for... or 5 Pin# Assignment output 1 6 9 2 00460 3 not used RXD TXD Input Output 4 DTR Output 5 GND 6 DSR Input 7 RTS Output 8 CTS Input 9 not used Nokia IP150 Security Platform Installation Guide 17 Use the built-in this section.
...and serial connections. Figure 4 Pin Assignments for RS232-compliant equipment you use the console cable that you are using with your appliance for your console connection. Nokia IP150 Security Platform Appliance Overview Console and Serial (AUX) Ports Use the built-in console port to supply the information that the pin assignments for... or 5 Pin# Assignment output 1 6 9 2 00460 3 not used RXD TXD Input Output 4 DTR Output 5 GND 6 DSR Input 7 RTS Output 8 CTS Input 9 not used Nokia IP150 Security Platform Installation Guide 17 Use the built-in this section.

Installation Guide
Page 18
Figure 5 Appliance Status LEDs POWER STATUS FAULT AUX CONSOLE Power Status Fault 1 2 3 4 IP150 00662 18 Nokia IP150 Security Platform Installation Guide Table 2 Pin Assignments for DB9 and DB25 Interface Cables Console or serial DB9 cable output pin and...SG) 5 (SG) 7 (SG) 6 (DSR) 4 (DTR) 20 (DTR) 7 (RTS) 8 (CTS) 5 (CTS) 8 (CTS) 7 (RTS) 4 (RTS) System Status LEDs You can monitor the basic operation of the appliance, as Figure 5 shows. The system status LEDs are using with terminal devices or other appropriate equipment. 1 Table 2 shows how to match pins at the console...
Figure 5 Appliance Status LEDs POWER STATUS FAULT AUX CONSOLE Power Status Fault 1 2 3 4 IP150 00662 18 Nokia IP150 Security Platform Installation Guide Table 2 Pin Assignments for DB9 and DB25 Interface Cables Console or serial DB9 cable output pin and...SG) 5 (SG) 7 (SG) 6 (DSR) 4 (DTR) 20 (DTR) 7 (RTS) 8 (CTS) 5 (CTS) 8 (CTS) 7 (RTS) 4 (RTS) System Status LEDs You can monitor the basic operation of the appliance, as Figure 5 shows. The system status LEDs are using with terminal devices or other appropriate equipment. 1 Table 2 shows how to match pins at the console...
Installation Guide
Page 19
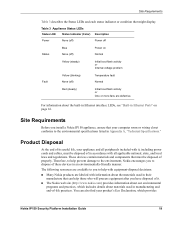
... practices, which includes details about materials used in their manufacture that your product's Eco Declaration, which provides Nokia IP150 Security Platform Installation Guide 19 Table 3 Appliance Status LEDs Status LED Status Indicator (Color) Description Power None (off) Power off Status Blue None ... and end-of-life practices. Therefore, to help those who will process equipment after you to you install a Nokia IP150 appliance, ensure that can also find your computer room or wiring closet conforms to the environmental specifications listed in an environmentally...
... practices, which includes details about materials used in their manufacture that your product's Eco Declaration, which provides Nokia IP150 Security Platform Installation Guide 19 Table 3 Appliance Status LEDs Status LED Status Indicator (Color) Description Power None (off) Power off Status Blue None ... and end-of-life practices. Therefore, to help those who will process equipment after you to you install a Nokia IP150 appliance, ensure that can also find your computer room or wiring closet conforms to the environmental specifications listed in an environmentally...

Installation Guide
Page 20
... Voyager" on the IP150 appliance. Do not dispose of these products as unsorted municipal waste. 050930 Safety Warnings and Cautions Warning To reduce the risk of the product covering material use the product near water. Managing IP150 Security Platform Appliances You can manage, monitor, and configure the IP150 appliance from the command line. 20 Nokia IP150 Security Platform Installation Guide
... Voyager" on the IP150 appliance. Do not dispose of these products as unsorted municipal waste. 050930 Safety Warnings and Cautions Warning To reduce the risk of the product covering material use the product near water. Managing IP150 Security Platform Appliances You can manage, monitor, and configure the IP150 appliance from the command line. 20 Nokia IP150 Security Platform Installation Guide
Installation Guide
Page 21
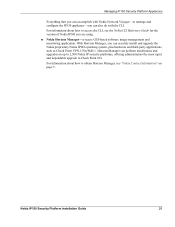
... Reference Guide for the version of Nokia IPSO you can securely install and upgrade the Nokia proprietary Nokia IPSO operating system, plus hardware and third-party applications such as Check Point VPN-1/FireWall-1. For information about how to manage and configure the IP150 appliance-you are using. „ Nokia Horizon Manager-a secure GUI-based software image management and...
... Reference Guide for the version of Nokia IPSO you can securely install and upgrade the Nokia proprietary Nokia IPSO operating system, plus hardware and third-party applications such as Check Point VPN-1/FireWall-1. For information about how to manage and configure the IP150 appliance-you are using. „ Nokia Horizon Manager-a secure GUI-based software image management and...
Installation Guide
Page 23
Nokia IP150 Security Platform Installation Guide 23 Rack Mounting a Nokia IP150 Appliance Before you receive with three screws on each side as shown in a standard-configuration appliance rack. 2 Installing a Nokia IP150 Security Appliance Body (b1_body) follows all headings including the chapter title. The brackets and screws are included with the materials you mount the appliance on the rack, install the two side brackets with the appliance. You can rack mount Nokia IP150 Security appliances in a one-unit space (1U) in Figure 6.
Nokia IP150 Security Platform Installation Guide 23 Rack Mounting a Nokia IP150 Appliance Before you receive with three screws on each side as shown in a standard-configuration appliance rack. 2 Installing a Nokia IP150 Security Appliance Body (b1_body) follows all headings including the chapter title. The brackets and screws are included with the materials you mount the appliance on the rack, install the two side brackets with the appliance. You can rack mount Nokia IP150 Security appliances in a one-unit space (1U) in Figure 6.
Installation Guide
Page 24
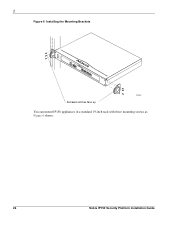
2 Figure 6 Installing the Mounting Brackets POWER STATUS FAULT AUX CONSOLE 1 2 3 4 IP150 Serrated notches face up 00666 You can mount IP150 appliances in a standard 19-inch rack with three mounting screws as Figure 6 shows. 24 Nokia IP150 Security Platform Installation Guide
2 Figure 6 Installing the Mounting Brackets POWER STATUS FAULT AUX CONSOLE 1 2 3 4 IP150 Serrated notches face up 00666 You can mount IP150 appliances in a standard 19-inch rack with three mounting screws as Figure 6 shows. 24 Nokia IP150 Security Platform Installation Guide
Installation Guide
Page 27
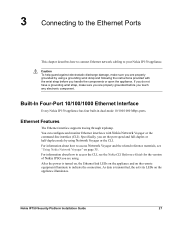
...access the CLI, see "Using Nokia Network Voyager" on page 35. Nokia IP150 Security Platform Installation Guide 27 For information about how to access Network Voyager and the related reference materials, see the Nokia CLI Reference Guide for the version of Nokia IPSO you are properly grounded ..., the activity LEDs on the remote equipment illuminate to your Nokia IP150 appliance. Ethernet Features The Ethernet interface supports tracing through tcpdump. Built-In Four-Port 10/100/1000 Ethernet Interface Every Nokia IP150 appliance has four built-in dual-mode 10/100/1000 Mbps ports...
...access the CLI, see "Using Nokia Network Voyager" on page 35. Nokia IP150 Security Platform Installation Guide 27 For information about how to access Network Voyager and the related reference materials, see the Nokia CLI Reference Guide for the version of Nokia IPSO you are properly grounded ..., the activity LEDs on the remote equipment illuminate to your Nokia IP150 appliance. Ethernet Features The Ethernet interface supports tracing through tcpdump. Built-In Four-Port 10/100/1000 Ethernet Interface Every Nokia IP150 appliance has four built-in dual-mode 10/100/1000 Mbps ports...
Installation Guide
Page 31
It includes the following settings for the console: Nokia IP150 Security Platform Installation Guide 31 You can perform the initial configuration in two ways: „ Configure a DHCP server to perform the initial ...the Initial Configuration „ Connecting Network Interfaces „ Using Nokia Network Voyager „ Using Nokia Horizon Manager „ Using Check Point SmartCenter and Provider-1 Note Nokia recommends that you physically install all hardware components before you turn on power to a Nokia IP150 appliance, the initial configuration process begins. You can use DHCP to...
It includes the following settings for the console: Nokia IP150 Security Platform Installation Guide 31 You can perform the initial configuration in two ways: „ Configure a DHCP server to perform the initial ...the Initial Configuration „ Connecting Network Interfaces „ Using Nokia Network Voyager „ Using Nokia Horizon Manager „ Using Check Point SmartCenter and Provider-1 Note Nokia recommends that you physically install all hardware components before you turn on power to a Nokia IP150 appliance, the initial configuration process begins. You can use DHCP to...
Installation Guide
Page 32
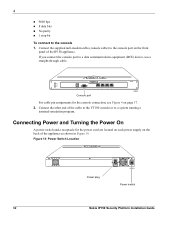
... located on each power supply on page 17. 2. Connect the other end of the IP150 appliance. Connecting Power and Turning the Power On A power switch and a receptacle for the console connection, see Figure 4 on the back of the appliance as shown in Figure 10. 4 „ 9600 bps „ 8 data bits „ No parity... of the cable to the VT100 console or to a system running a terminal-emulation program. Figure 10 Power Switch Location Power plug 00663 Power switch 32 Nokia IP150 Security Platform Installation Guide If you connect the console port to the console 1.
... located on each power supply on page 17. 2. Connect the other end of the IP150 appliance. Connecting Power and Turning the Power On A power switch and a receptacle for the console connection, see Figure 4 on the back of the appliance as shown in Figure 10. 4 „ 9600 bps „ 8 data bits „ No parity... of the cable to the VT100 console or to a system running a terminal-emulation program. Figure 10 Power Switch Location Power plug 00663 Power switch 32 Nokia IP150 Security Platform Installation Guide If you connect the console port to the console 1.
Installation Guide
Page 33
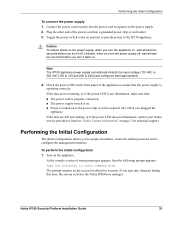
...illuminated, make sure that the power supply is turned on the appliance. Toggle the power switch to ensure that : „ The power cord is properly connected. „ The power supply switch is on . Nokia IP150 Security Platform Installation Guide 33 Caution To reduce stress on the power ...supply, when you turn the appliance on, wait at least ten seconds before you plugged the appliance. At the console a series of the appliance to the on the power supply. ...
...illuminated, make sure that the power supply is turned on the appliance. Toggle the power switch to ensure that : „ The power cord is properly connected. „ The power supply switch is on . Nokia IP150 Security Platform Installation Guide 33 Caution To reduce stress on the power ...supply, when you turn the appliance on, wait at least ten seconds before you plugged the appliance. At the console a series of the appliance to the on the power supply. ...
Installation Guide
Page 34
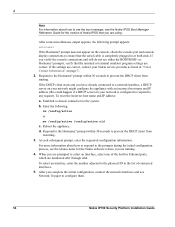
...To reset the incorrect host name and IP address: a. For more information about how to use Network Voyager to configure them. 34 Nokia IP150 Security Platform Installation Guide If you complete the initial configuration, connect the network interfaces and use the boot manager, see either the BOOTMGR> or... client from starting. If the DHCP client starts and you are correct. Establish a console connection to any request). Reboot the appliance. prompt within 30 seconds to the Hostname? When you have already connected to a network interface, a DHCP server on your network might ...
...To reset the incorrect host name and IP address: a. For more information about how to use Network Voyager to configure them. 34 Nokia IP150 Security Platform Installation Guide If you complete the initial configuration, connect the network interfaces and use the boot manager, see either the BOOTMGR> or... client from starting. If the DHCP client starts and you are correct. Establish a console connection to any request). Reboot the appliance. prompt within 30 seconds to the Hostname? When you have already connected to a network interface, a DHCP server on your network might ...

Installation Guide
Page 38
... application installations, and distribute necessary licensing to access and use the CLI, see "Nokia Contact Information" on page 3. 060228 38 Nokia IP150 Security Platform Installation Guide Nokia IPSO command line Enter clish -c "cli-command" Execute a single CLI command. ... as interface configuration and routing configuration) and security configuration tasks (such as user configuration and access configuration), Horizon Manager concentrates on secure software image, inventory, and management of Nokia security appliances that contains commands. While Network Voyager provides ...
... application installations, and distribute necessary licensing to access and use the CLI, see "Nokia Contact Information" on page 3. 060228 38 Nokia IP150 Security Platform Installation Guide Nokia IPSO command line Enter clish -c "cli-command" Execute a single CLI command. ... as interface configuration and routing configuration) and security configuration tasks (such as user configuration and access configuration), Horizon Manager concentrates on secure software image, inventory, and management of Nokia security appliances that contains commands. While Network Voyager provides ...

