Installation Guide
Page 6
4 About IP390 Appliance Network Interface Cards 37 Four-Port 10/100 Mbps Ethernet Network Interface Card 37 Ethernet NIC Features 37 Ethernet NIC Connectors and Cables 38 Two-... You Start 62 Configuring a Hard-Disk Drive for Logging 65 Replacing or Upgrading Memory 66 Before You Start 67 Replacing the Battery 70 7 Troubleshooting 75 General Troubleshooting Information 75 Troubleshooting Routing Problems 82 A Technical Specifications 87 Physical Dimensions 87 Space Requirements 87 Operating Temperature 87 NIC Interfaces 88 6 IP390 Security Platform Installation Guide
4 About IP390 Appliance Network Interface Cards 37 Four-Port 10/100 Mbps Ethernet Network Interface Card 37 Ethernet NIC Features 37 Ethernet NIC Connectors and Cables 38 Two-... You Start 62 Configuring a Hard-Disk Drive for Logging 65 Replacing or Upgrading Memory 66 Before You Start 67 Replacing the Battery 70 7 Troubleshooting 75 General Troubleshooting Information 75 Troubleshooting Routing Problems 82 A Technical Specifications 87 Physical Dimensions 87 Space Requirements 87 Operating Temperature 87 NIC Interfaces 88 6 IP390 Security Platform Installation Guide
Installation Guide
Page 11
... View 18 Figure 3 Built-In Gigabit Ethernet Ports Details 18 Figure 4 Appliance Status LEDs 20 Figure 5 Mounting Screws Location 24 Figure 6 Adjustable Mounting Brackets 24 Figure 7 Back Panel Power Switch and Socket 25 Figure 8 Nokia Network Voyager Reference Access Points 35 Figure 9 Four-Port Ethernet NIC Front ... Network Interface Card Receptacle and Pin Assignments 46 Figure 20 T1 Crossover Cable Pin Connections 46 Figure 21 Compact Flash Memory Card Slot 58 Figure 22 Hard-Disk Drive Location 62 Figure 23 DIMM Socket Locations 67 IP390 Security Platform Installation Guide 11
... View 18 Figure 3 Built-In Gigabit Ethernet Ports Details 18 Figure 4 Appliance Status LEDs 20 Figure 5 Mounting Screws Location 24 Figure 6 Adjustable Mounting Brackets 24 Figure 7 Back Panel Power Switch and Socket 25 Figure 8 Nokia Network Voyager Reference Access Points 35 Figure 9 Four-Port Ethernet NIC Front ... Network Interface Card Receptacle and Pin Assignments 46 Figure 20 T1 Crossover Cable Pin Connections 46 Figure 21 Compact Flash Memory Card Slot 58 Figure 22 Hard-Disk Drive Location 62 Figure 23 DIMM Socket Locations 67 IP390 Security Platform Installation Guide 11
Installation Guide
Page 13
... 6, "Installing and Replacing Components Other than Network Interface Cards" describes how to install or replace compact flash memory cards, flash-memory PC cards, RAM memory, and a hard-disk drive. „ Chapter 7, "Troubleshooting" describes problems you might encounter and proposes solutions to and use Nokia IP390 security appliances. Installation and maintenance should be performed by experienced technicians or...
... 6, "Installing and Replacing Components Other than Network Interface Cards" describes how to install or replace compact flash memory cards, flash-memory PC cards, RAM memory, and a hard-disk drive. „ Chapter 7, "Troubleshooting" describes problems you might encounter and proposes solutions to and use Nokia IP390 security appliances. Installation and maintenance should be performed by experienced technicians or...
Installation Guide
Page 17
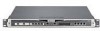
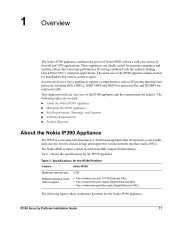
... requirements for multicast traffic. Table 3 shows the specifications for the IP390 appliance Table 3 Specifications for the Nokia IP390 appliance. The following figures show component locations for the IP390 Platform Feature Nokia IP390 Maximum memory size Network interface cards (NICs) support 2 GB • Two... Nokia IPSO system is a one rack-unit disk-based or flash-based appliance that need to conserve space. 1 Overview The Nokia IP390 appliance combines the power of Nokia IPSO software with the industry-leading Check Point VPN-1 enterprise applications. IP390 Security ...
... requirements for multicast traffic. Table 3 shows the specifications for the IP390 appliance Table 3 Specifications for the Nokia IP390 appliance. The following figures show component locations for the IP390 Platform Feature Nokia IP390 Maximum memory size Network interface cards (NICs) support 2 GB • Two... Nokia IPSO system is a one rack-unit disk-based or flash-based appliance that need to conserve space. 1 Overview The Nokia IP390 appliance combines the power of Nokia IPSO software with the industry-leading Check Point VPN-1 enterprise applications. IP390 Security ...
Installation Guide
Page 18
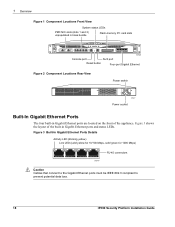
...1 Overview Figure 1 Component Locations Front View System status LEDs PMC NIC slots (slots 1 and 2) unpopulated in base bundle Flash-memory PC card slots IP390 00525 Console port AUX port Reset button Four-port Gigabit Ethernet Figure 2 Component Locations Rear View Power switch 00527 Power socket Built-...-45 connectors Caution Cables that connect to the Gigabit Ethernet ports must be IEEE 802.3 compliant to prevent potential data loss. 18 IP390 Security Platform Installation Guide Figure 3 shows the layout of the built-in Gigabit Ethernet ports are located on the front of the...
...1 Overview Figure 1 Component Locations Front View System status LEDs PMC NIC slots (slots 1 and 2) unpopulated in base bundle Flash-memory PC card slots IP390 00525 Console port AUX port Reset button Four-port Gigabit Ethernet Figure 2 Component Locations Rear View Power switch 00527 Power socket Built-...-45 connectors Caution Cables that connect to the Gigabit Ethernet ports must be IEEE 802.3 compliant to prevent potential data loss. 18 IP390 Security Platform Installation Guide Figure 3 shows the layout of the built-in Gigabit Ethernet ports are located on the front of the...

Installation Guide
Page 57
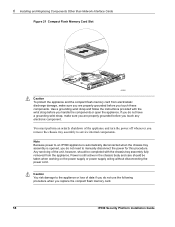
... hard-disk drive. IP390 Security Platform Installation Guide 57 6 Installing and Replacing Components Other than network interface cards (NICs) in a slot behind the hard-disk drive location. Limit service of the compact flash memory card. Caution Protect your IP390 appliance. Use the internal compact flash to boot the system and install the Nokia IPSO operating system...
... hard-disk drive. IP390 Security Platform Installation Guide 57 6 Installing and Replacing Components Other than network interface cards (NICs) in a slot behind the hard-disk drive location. Limit service of the compact flash memory card. Caution Protect your IP390 appliance. Use the internal compact flash to boot the system and install the Nokia IPSO operating system...
Installation Guide
Page 58
... you handle the components or open the appliance. Any servicing of data if you do not have a grounding wrist strap, make sure you are properly grounded before you replace the compact flash memory card. 58 IP390 Security Platform Installation Guide Power is opened, you... touch these components. Note Because power to an IP390 appliance is automatically disconnected when the chassis tray assembly is still active in ...
... you handle the components or open the appliance. Any servicing of data if you do not have a grounding wrist strap, make sure you are properly grounded before you replace the compact flash memory card. 58 IP390 Security Platform Installation Guide Power is opened, you... touch these components. Note Because power to an IP390 appliance is automatically disconnected when the chassis tray assembly is still active in ...
Installation Guide
Page 59
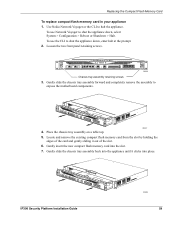
... > Reboot or Shutdown > Halt. To use Network Voyager to halt the appliance. Use Nokia Network Voyager or the CLI to shut the appliance down , enter halt at the prompt. 2. IP390 IP390 Security Platform Installation Guide 00538 59 Locate and remove the existing compact flash memory card from the slot by holding the edges of the slot. 6. Gently...
... > Reboot or Shutdown > Halt. To use Network Voyager to halt the appliance. Use Nokia Network Voyager or the CLI to shut the appliance down , enter halt at the prompt. 2. IP390 IP390 Security Platform Installation Guide 00538 59 Locate and remove the existing compact flash memory card from the slot by holding the edges of the slot. 6. Gently...

Installation Guide
Page 60
... further information, contact the appropriate Nokia customer support site listed in the slot. Caution You risk damage to the left of data if you are notified through your console connection. 60 IP390 Security Platform Installation Guide Insert the flash-memory PC card into place. 8. The eject button to the appliance or loss of the slot...
... further information, contact the appropriate Nokia customer support site listed in the slot. Caution You risk damage to the left of data if you are notified through your console connection. 60 IP390 Security Platform Installation Guide Insert the flash-memory PC card into place. 8. The eject button to the appliance or loss of the slot...
Installation Guide
Page 61
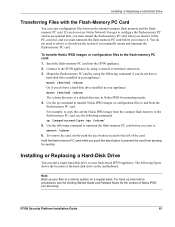
... the flash-memory PC card. Mount the flash-memory PC card by using . Hold the flash-memory PC card while you remove it. IP390 Security Platform Installation Guide 61 For example, to copy the current Nokia IPSO image from the compact flash memory to the flash-memory PC card, use Nokia Network Voyager ...can add a single hard-disk drive to your flash-based IP390 appliance. If you do not need to and from ejecting too quickly. Insert the flash-memory PC card into the IP390 appliance. 2. Use the cp command to transfer Nokia IPSO images or configuration files to reboot or shut down ...
... the flash-memory PC card. Mount the flash-memory PC card by using . Hold the flash-memory PC card while you remove it. IP390 Security Platform Installation Guide 61 For example, to copy the current Nokia IPSO image from the compact flash memory to the flash-memory PC card, use Nokia Network Voyager ...can add a single hard-disk drive to your flash-based IP390 appliance. If you do not need to and from ejecting too quickly. Insert the flash-memory PC card into the IP390 appliance. 2. Use the cp command to transfer Nokia IPSO images or configuration files to reboot or shut down ...
Installation Guide
Page 66
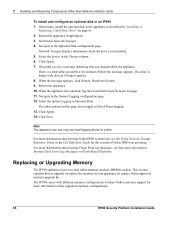
... other options on Flash-Based Platforms. Replacing or Upgrading Memory The IP390 appliances have two dual inline memory-module (DIMM) sockets. For more information on the supported memory configurations. 66 IP390 Security Platform Installation Guide For more information about the device you should reboot the appliance. The IP390 comes with devices of Nokia IPSO you are using a Nokia-approved memory upgrade kit.
... other options on Flash-Based Platforms. Replacing or Upgrading Memory The IP390 appliances have two dual inline memory-module (DIMM) sockets. For more information on the supported memory configurations. 66 IP390 Security Platform Installation Guide For more information about the device you should reboot the appliance. The IP390 comes with devices of Nokia IPSO you are using a Nokia-approved memory upgrade kit.

Installation Guide
Page 67
... to the appliance „ Nokia memory upgrade kit and accompanying documentation „ Network or console access to the appliance Caution To protect the IP390 appliance and the memory modules from Nokia or authorized resellers. Replacing or Upgrading Memory Note Nokia recommends that you obtain memory kits only ...at the appliance from the front, as Figure 23 shows. The DIMM sockets are properly grounded before you touch these components. For further information, contact the appropriate Nokia customer support site listed "Nokia Contact Information" on page 3. IP390 Security Platform ...
... to the appliance „ Nokia memory upgrade kit and accompanying documentation „ Network or console access to the appliance Caution To protect the IP390 appliance and the memory modules from Nokia or authorized resellers. Replacing or Upgrading Memory Note Nokia recommends that you obtain memory kits only ...at the appliance from the front, as Figure 23 shows. The DIMM sockets are properly grounded before you touch these components. For further information, contact the appropriate Nokia customer support site listed "Nokia Contact Information" on page 3. IP390 Security Platform ...

Installation Guide
Page 69
...memory module necessary by pressing the two retaining clips outward and carefully pulling each DIMM upward as the following figure shows. IP390 Security Platform Installation Guide IP390 00544 69 Press the new DIMM into place. The bottom edge has three different length sets of the DIMM is smooth. IP390... 00545 You might need to pull opposite ends of the DIMM alternately to prevent improper insertion. The top of contacts, which mate with the slots on the socket. Replacing or Upgrading Memory 4. The memory DIMMs are properly aligned before you...
...memory module necessary by pressing the two retaining clips outward and carefully pulling each DIMM upward as the following figure shows. IP390 Security Platform Installation Guide IP390 00544 69 Press the new DIMM into place. The bottom edge has three different length sets of the DIMM is smooth. IP390... 00545 You might need to pull opposite ends of the DIMM alternately to prevent improper insertion. The top of contacts, which mate with the slots on the socket. Replacing or Upgrading Memory 4. The memory DIMMs are properly aligned before you...

Installation Guide
Page 70
... „ The appropriate Nokia battery replacement kit for your appliance „ Physical access to the appliance „ A Phillips-head screwdriver „ A grounding wrist strap „ (Optional) Safety glasses 70 IP390 Security Platform Installation Guide Gently slide... the chassis tray assembly back into the appliance until it clicks into place. 7. IP390 00525 Chassis tray assembly retaining screws The appliance automatically recognizes the new memory configuration. IP390 00538 The appliance automatically restarts...
... „ The appropriate Nokia battery replacement kit for your appliance „ Physical access to the appliance „ A Phillips-head screwdriver „ A grounding wrist strap „ (Optional) Safety glasses 70 IP390 Security Platform Installation Guide Gently slide... the chassis tray assembly back into the appliance until it clicks into place. 7. IP390 00525 Chassis tray assembly retaining screws The appliance automatically recognizes the new memory configuration. IP390 00538 The appliance automatically restarts...
Installation Guide
Page 81
...During the upgrade process, some of the environment variables might not have updated correctly. Solution Check power source. Solution Repeat memory installation procedures. Be sure DIMMs click into place. Setting the boot manager to defaults causes the boot manager to determine that... manager prompt, as shown in this example: BOOTMGR> set-defaults IP390 Security Platform Installation Guide 81 Appliance locks up after you upgrade Nokia IPSO with a console connection. No error messages appear, but the appliance stops responding to defaults, issue the set-defaults command at the ...
...During the upgrade process, some of the environment variables might not have updated correctly. Solution Check power source. Solution Repeat memory installation procedures. Be sure DIMMs click into place. Setting the boot manager to defaults causes the boot manager to determine that... manager prompt, as shown in this example: BOOTMGR> set-defaults IP390 Security Platform Installation Guide 81 Appliance locks up after you upgrade Nokia IPSO with a console connection. No error messages appear, but the appliance stops responding to defaults, issue the set-defaults command at the ...
Installation Guide
Page 83
...Routing Problems Note Adding a question mark (?) after any command provides additional command options. addressbgpigmpiphelpermfcripvrrp bootpgwigrpkrtospf route inbound-filterdvmrpinterface memory resource version hostname | IP address> show ? static, I - RIP, B - Under routing options in /var...Nokia Network Voyager" on page 33. You can enable these options under the routing options in /var/tmp/ipsrd.log. These traces are involved in Network Voyager. For information about how to view routing information. Solution Verify that are logged in Network Voyager. IP390 Security...
...Routing Problems Note Adding a question mark (?) after any command provides additional command options. addressbgpigmpiphelpermfcripvrrp bootpgwigrpkrtospf route inbound-filterdvmrpinterface memory resource version hostname | IP address> show ? static, I - RIP, B - Under routing options in /var...Nokia Network Voyager" on page 33. You can enable these options under the routing options in /var/tmp/ipsrd.log. These traces are involved in Network Voyager. For information about how to view routing information. Solution Verify that are logged in Network Voyager. IP390 Security...
Installation Guide
Page 93
Index A appliance 17 auxiliary port connecting to the 26 pin assignments 28 B battery holder... Check Point VPN-1 requirements 22 command-line interface (CLI) overview 21 using the 35 compact flash memory card (internal) Nokia IPSO storage 17 replacing 57 compliance information 89 declaration of conformity 89 FCC notice 92 statements 90 component... server 31 DIMMs see memory (RAM) E end-of-life information 22 Ethernet NICs cable pin assignments 39 connecting to 38 crossover-cable pin connections 39 front panel 38 IEEE 802.3ab compliance 38 LEDs 38 IP390 Security Platform Installation Guide Index...
Index A appliance 17 auxiliary port connecting to the 26 pin assignments 28 B battery holder... Check Point VPN-1 requirements 22 command-line interface (CLI) overview 21 using the 35 compact flash memory card (internal) Nokia IPSO storage 17 replacing 57 compliance information 89 declaration of conformity 89 FCC notice 92 statements 90 component... server 31 DIMMs see memory (RAM) E end-of-life information 22 Ethernet NICs cable pin assignments 39 connecting to 38 crossover-cable pin connections 39 front panel 38 IEEE 802.3ab compliance 38 LEDs 38 IP390 Security Platform Installation Guide Index...

Installation Guide
Page 94
... 44 Gigabit Ethernet NICs, short-range fiber-optic 43 system status 19 M memory (RAM) DIMM socket locations 67 replacing 66 specification upgrading 66 modem, connecting to the 28 monitoring appliances 19 multicast traffic 17 multi-mode, fiber-optic cable 44 N network interface cards... specifications 88 specifications 17, 88 T1 45 Nokia Horizon Manager overview 21 using the 36 Nokia IPSO command-line interface (CLI) 35 reference documentation 34 requirements 22 transferring images 61 Nokia Network Voyager opening 33 overview 20 using 33 Index - 94 IP390 Security Platform Installation Guide
... 44 Gigabit Ethernet NICs, short-range fiber-optic 43 system status 19 M memory (RAM) DIMM socket locations 67 replacing 66 specification upgrading 66 modem, connecting to the 28 monitoring appliances 19 multicast traffic 17 multi-mode, fiber-optic cable 44 N network interface cards... specifications 88 specifications 17, 88 T1 45 Nokia Horizon Manager overview 21 using the 36 Nokia IPSO command-line interface (CLI) 35 reference documentation 34 requirements 22 transferring images 61 Nokia Network Voyager opening 33 overview 20 using 33 Index - 94 IP390 Security Platform Installation Guide
Installation Guide
Page 95
...specification 87 P physical dimensions 87 power connections 24 power supply 25 power switch 25 R rack mounting 23 random access memory (RAM) see memory (RAM) recycling retired equipment 22 S serial port 28 SFP modules 44 single-mode, fiber-optic cable 44 space ...for copper 40 Gigabit Ethernet connections, for fiber-optic 43 technical specifications 87 transferring files with flash-memory PC cards 61 transferring Nokia IPSO images 61 troubleshooting 75 V ventilation requirements 21 W weight specification 87 width specification 87 IP390 Security Platform Installation Guide Index - 95
...specification 87 P physical dimensions 87 power connections 24 power supply 25 power switch 25 R rack mounting 23 random access memory (RAM) see memory (RAM) recycling retired equipment 22 S serial port 28 SFP modules 44 single-mode, fiber-optic cable 44 space ...for copper 40 Gigabit Ethernet connections, for fiber-optic 43 technical specifications 87 transferring files with flash-memory PC cards 61 transferring Nokia IPSO images 61 troubleshooting 75 V ventilation requirements 21 W weight specification 87 width specification 87 IP390 Security Platform Installation Guide Index - 95

