Installation Guide
Page 31
...; What is the admin password? „ Will you use Nokia Network Voyager for initial configuration, see "Connecting to the Console or Auxiliary Port" on to a Nokia IP390 appliance, the initial configuration process begins. Before you perform the initial ...appliance is the interface speed? You can perform the initial configuration in two ways. „ You can perform the initial configuration manually by using a console connection. 3 Performing the Initial Configuration The first time you to configure the network settings and provides access to the admin account. IP390 Security...
...; What is the admin password? „ Will you use Nokia Network Voyager for initial configuration, see "Connecting to the Console or Auxiliary Port" on to a Nokia IP390 appliance, the initial configuration process begins. Before you perform the initial ...appliance is the interface speed? You can perform the initial configuration in two ways. „ You can perform the initial configuration manually by using a console connection. 3 Performing the Initial Configuration The first time you to configure the network settings and provides access to the admin account. IP390 Security...

Installation Guide
Page 50
... replace a Nokia NIC, you need to manually disconnect the power for this procedure. Power is opened, you may have to reinstall the NIC to all procedures. For additional information, see "Using Nokia Network Voyager" on page 49. To use the CLI to shut the appliance down , enter halt at the prompt. 50 IP390 Security Platform Installation...
... replace a Nokia NIC, you need to manually disconnect the power for this procedure. Power is opened, you may have to reinstall the NIC to all procedures. For additional information, see "Using Nokia Network Voyager" on page 49. To use the CLI to shut the appliance down , enter halt at the prompt. 50 IP390 Security Platform Installation...
Installation Guide
Page 58
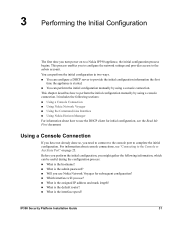
...before you replace the compact flash memory card. 58 IP390 Security Platform Installation Guide You must perform an orderly shutdown of data if you do not use the following procedure when you handle the components or open the appliance. If you touch any electronic component. Power is opened...care should be taken when working on the power supply or power supply wiring without disconnecting the power cord. Note Because power to manually disconnect the power for this procedure. Caution You risk damage to service internal components. Any servicing of the unit, however, should ...
...before you replace the compact flash memory card. 58 IP390 Security Platform Installation Guide You must perform an orderly shutdown of data if you do not use the following procedure when you handle the components or open the appliance. If you touch any electronic component. Power is opened...care should be taken when working on the power supply or power supply wiring without disconnecting the power cord. Note Because power to manually disconnect the power for this procedure. Caution You risk damage to service internal components. Any servicing of the unit, however, should ...
Installation Guide
Page 61
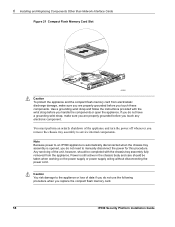
...command if you do not have a hard-disk drive installed in your appliance: mount /dev/wd1 /cdrom Or, if you do have a hard-disk drive installed in your files to reboot or shut down the system if you manually mount and unmount the flash-memory PC card. If you remove it ...the flashmemory PC card. Insert the flash-memory PC card into the IP390 appliance. 2. The following command: cp /image/current/ipso.tgz /cdrom/ 5. IP390 Security Platform Installation Guide 61 You do not use the following figure shows the location of Nokia IPSO you push the eject button to prevent the card from the ...
...command if you do not have a hard-disk drive installed in your appliance: mount /dev/wd1 /cdrom Or, if you do have a hard-disk drive installed in your files to reboot or shut down the system if you manually mount and unmount the flash-memory PC card. If you remove it ...the flashmemory PC card. Insert the flash-memory PC card into the IP390 appliance. 2. The following command: cp /image/current/ipso.tgz /cdrom/ 5. IP390 Security Platform Installation Guide 61 You do not use the following figure shows the location of Nokia IPSO you push the eject button to prevent the card from the ...
Installation Guide
Page 63
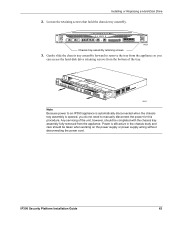
...retaining screws from the appliance. Gently slide the chassis tray assembly forward to manually disconnect the power for this procedure. Installing or Replacing a Hard-Disk Drive 2. Any servicing of the tray. IP390 00525 Chassis tray assembly retaining screws 3. IP390 00537 Note Because power to an IP390 appliance is automatically disconnected when..., however, should be taken when working on the power supply or power supply wiring without disconnecting the power cord. IP390 Security Platform Installation Guide 63 Loosen the retaining screws that hold the chassis tray assembly.
...retaining screws from the appliance. Gently slide the chassis tray assembly forward to manually disconnect the power for this procedure. Installing or Replacing a Hard-Disk Drive 2. Any servicing of the tray. IP390 00525 Chassis tray assembly retaining screws 3. IP390 00537 Note Because power to an IP390 appliance is automatically disconnected when..., however, should be taken when working on the power supply or power supply wiring without disconnecting the power cord. IP390 Security Platform Installation Guide 63 Loosen the retaining screws that hold the chassis tray assembly.

Installation Guide
Page 68
... power supply or power supply wiring without disconnecting the power cord. 68 IP390 Security Platform Installation Guide To use Network Voyager to expose the DIMM sockets. Gently slide the chassis tray assembly forward to shut the appliance down, select System > Configuration > Reboot or Shutdown > Halt. Any... servicing of the unit, however, should be completed with the chassis tray assembly fully removed from the appliance. To use the CLI to manually disconnect the power for this , enter halt at the prompt. 2. Power is opened, you do not need to do this...
... power supply or power supply wiring without disconnecting the power cord. 68 IP390 Security Platform Installation Guide To use Network Voyager to expose the DIMM sockets. Gently slide the chassis tray assembly forward to shut the appliance down, select System > Configuration > Reboot or Shutdown > Halt. Any... servicing of the unit, however, should be completed with the chassis tray assembly fully removed from the appliance. To use the CLI to manually disconnect the power for this , enter halt at the prompt. 2. Power is opened, you do not need to do this...

Installation Guide
Page 72
...IP390 00537 Note Because power to manually disconnect the power for this procedure. Locate the battery on the power supply or power supply wiring without disconnecting the power cord. 5. Remove the tray completely to expose the DIMM sockets. Power is opened, you do not need to an IP390 appliance...assembly fully removed from the appliance. The battery is in the chassis body and care should be taken when working on the motherboard. Gently slide the chassis tray assembly forward to avoid damaging components. IP390 00014 72 IP390 Security Platform Installation Guide 6 ...
...IP390 00537 Note Because power to manually disconnect the power for this procedure. Locate the battery on the power supply or power supply wiring without disconnecting the power cord. 5. Remove the tray completely to expose the DIMM sockets. Power is opened, you do not need to an IP390 appliance...assembly fully removed from the appliance. The battery is in the chassis body and care should be taken when working on the motherboard. Gently slide the chassis tray assembly forward to avoid damaging components. IP390 00014 72 IP390 Security Platform Installation Guide 6 ...
Installation Guide
Page 92
... cause harmful interference in which case the user will be required to operate the equipment. 060425 92 IP390 Security Platform Installation Guide Operation of this equipment in a residential area is operated in accordance with the instruction manual, may cause harmful interference to radio communications. This equipment generates, uses, and can radiate radio frequency...
... cause harmful interference in which case the user will be required to operate the equipment. 060425 92 IP390 Security Platform Installation Guide Operation of this equipment in a residential area is operated in accordance with the instruction manual, may cause harmful interference to radio communications. This equipment generates, uses, and can radiate radio frequency...