Installation Guide
Page 17
... for various network interface cards (NICs). IP390 Security Platform Installation Guide 17 1 Overview The Nokia IP390 appliance combines the power of Nokia IPSO software with the industry-leading Check Point VPN-1 enterprise applications. The following figures show component locations for the Nokia IP390 appliance. The Nokia IPSO system is a one rack-unit disk-based or flash-based appliance that incorporates a serviceable slide-out tray...
... for various network interface cards (NICs). IP390 Security Platform Installation Guide 17 1 Overview The Nokia IP390 appliance combines the power of Nokia IPSO software with the industry-leading Check Point VPN-1 enterprise applications. The following figures show component locations for the Nokia IP390 appliance. The Nokia IPSO system is a one rack-unit disk-based or flash-based appliance that incorporates a serviceable slide-out tray...
Installation Guide
Page 18
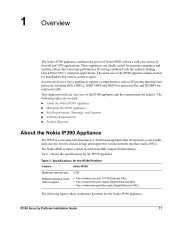
...Figure 1 Component Locations Front View System status LEDs PMC NIC slots (slots 1 and 2) unpopulated in base bundle Flash-memory PC card slots IP390 00525 Console port AUX port Reset button Four-port Gigabit Ethernet Figure 2 Component Locations Rear View Power ...appliance. Figure 3 Built-In Gigabit Ethernet Ports Details Activity LED (blinking yellow) Link LED (solid yellow for 10/100 Mbps, solid green for 1000 Mbps) 00547 RJ-45 connectors Caution Cables that connect to the Gigabit Ethernet ports must be IEEE 802.3 compliant to prevent potential data loss. 18 IP390 Security...
...Figure 1 Component Locations Front View System status LEDs PMC NIC slots (slots 1 and 2) unpopulated in base bundle Flash-memory PC card slots IP390 00525 Console port AUX port Reset button Four-port Gigabit Ethernet Figure 2 Component Locations Rear View Power ...appliance. Figure 3 Built-In Gigabit Ethernet Ports Details Activity LED (blinking yellow) Link LED (solid yellow for 10/100 Mbps, solid green for 1000 Mbps) 00547 RJ-45 connectors Caution Cables that connect to the Gigabit Ethernet ports must be IEEE 802.3 compliant to prevent potential data loss. 18 IP390 Security...

Installation Guide
Page 57
... boot the system and install the Nokia IPSO operating system on the disk. IP390 Security Platform Installation Guide 57 Caution Protect your IP390 appliance. The compact flash memory card is located on the hard-disk drive. Caution You should have a working knowledge of the compact flash memory card. In disk-based IP390 appliances, the compact flash memory card stores only the...
... boot the system and install the Nokia IPSO operating system on the disk. IP390 Security Platform Installation Guide 57 Caution Protect your IP390 appliance. The compact flash memory card is located on the hard-disk drive. Caution You should have a working knowledge of the compact flash memory card. In disk-based IP390 appliances, the compact flash memory card stores only the...
Installation Guide
Page 61
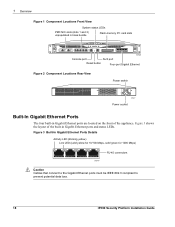
... or configuration files to your flash-based IP390 appliance. Use the following command: cp /image/current/ipso.tgz /cdrom/ 5. Installing or Replacing a Hard-Disk Drive You can copy configuration files between the internal compact flash memory and the flashmemory PC card. IP390 Security Platform Installation Guide 61 Use the cp command to transfer Nokia IPSO images or configuration...
... or configuration files to your flash-based IP390 appliance. Use the following command: cp /image/current/ipso.tgz /cdrom/ 5. Installing or Replacing a Hard-Disk Drive You can copy configuration files between the internal compact flash memory and the flashmemory PC card. IP390 Security Platform Installation Guide 61 Use the cp command to transfer Nokia IPSO images or configuration...

Installation Guide
Page 65
... place. 00535 7. IP390 00538 The appliance automatically restarts when the chassis tray assembly clicks into place. The Nokia Network Voyager Reference Guide and the CLI Reference Guide for Nokia IPSO contain instructions for Logging On the flash-based IP390, you can save ... place. 8. IP390 Security Platform Installation Guide 65 Tighten the retaining screws that hold the chassis tray assembly. Installing or Replacing a Hard-Disk Drive 6. Chassis tray assembly retaining screws IP390 00525 Configuring a Hard-Disk Drive for configuring a Nokia appliance to store Check...
... place. 00535 7. IP390 00538 The appliance automatically restarts when the chassis tray assembly clicks into place. The Nokia Network Voyager Reference Guide and the CLI Reference Guide for Nokia IPSO contain instructions for Logging On the flash-based IP390, you can save ... place. 8. IP390 Security Platform Installation Guide 65 Tighten the retaining screws that hold the chassis tray assembly. Installing or Replacing a Hard-Disk Drive 6. Chassis tray assembly retaining screws IP390 00525 Configuring a Hard-Disk Drive for configuring a Nokia appliance to store Check...
Installation Guide
Page 66
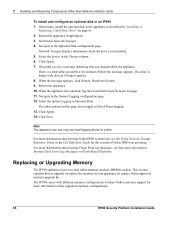
...click Reboot, Shutdown System. 9. The other options on Flash-Based Platforms. Replacing or Upgrading Memory The IP390 appliances have two dual inline memory-module (DIMM) sockets. Restart the appliance if appropriate. 3. The delay is a short delay ...IP390 Security Platform Installation Guide Start Nokia Network Voyager. 4. Network Voyager displays information about storing Check Point log messages, see Important Information: Storing Check Point Log Messages on this page do not apply to the Optional Disk configuration page. Select the device in an IP390 1. Note The appliance...
...click Reboot, Shutdown System. 9. The other options on Flash-Based Platforms. Replacing or Upgrading Memory The IP390 appliances have two dual inline memory-module (DIMM) sockets. Restart the appliance if appropriate. 3. The delay is a short delay ...IP390 Security Platform Installation Guide Start Nokia Network Voyager. 4. Network Voyager displays information about storing Check Point log messages, see Important Information: Storing Check Point Log Messages on this page do not apply to the Optional Disk configuration page. Select the device in an IP390 1. Note The appliance...
