
Installation Guide
Page 6
... 30 Accessing Network Voyager Reference Information 31 Using Network Voyager to Monitor an IP300 Series Appliance . 32 Using Nokia Horizon Manager 33 4 Installing and Replacing Network Interface Cards 35 Deactivating Configured Interfaces 36 Removing, Installing, and Replacing NICs 36 Before You Start 37 Configuring and Activating Interfaces 43 Monitoring Network Interface Cards 43 5 Connecting PMC Network Interface Cards 45 Four-Port and Two-Port 10/100 Mbps Ethernet Interface, PMC . . 46 Ethernet PMC NIC Features 46 Connectors and Cables 47 Two-Port V2 Gigabit Ethernet Card, PMC...
... 30 Accessing Network Voyager Reference Information 31 Using Network Voyager to Monitor an IP300 Series Appliance . 32 Using Nokia Horizon Manager 33 4 Installing and Replacing Network Interface Cards 35 Deactivating Configured Interfaces 36 Removing, Installing, and Replacing NICs 36 Before You Start 37 Configuring and Activating Interfaces 43 Monitoring Network Interface Cards 43 5 Connecting PMC Network Interface Cards 45 Four-Port and Two-Port 10/100 Mbps Ethernet Interface, PMC . . 46 Ethernet PMC NIC Features 46 Connectors and Cables 47 Two-Port V2 Gigabit Ethernet Card, PMC...
Installation Guide
Page 7
... Installing a Flash-Memory PC Card 78 Storing System Logs on the Flash-Memory PC Card 78 Transferring Files with the Flash-Memory PC Card 79 8 Using the Boot Manager 81 Variables 82 Viewing the Variables and Other System Parameters 84 Setting the Variables 86 Other Commands 88 Booting the System 89 Using the Boot Manager to Install IPSO 89 Protecting the Boot Manager with a Password 90 Installing the Boot Manager 91 Upgrading the Boot Manager 92 9 Troubleshooting 95 General Troubleshooting Information 95 Troubleshooting Routing Problems 105 A Technical Specifications...
... Installing a Flash-Memory PC Card 78 Storing System Logs on the Flash-Memory PC Card 78 Transferring Files with the Flash-Memory PC Card 79 8 Using the Boot Manager 81 Variables 82 Viewing the Variables and Other System Parameters 84 Setting the Variables 86 Other Commands 88 Booting the System 89 Using the Boot Manager to Install IPSO 89 Protecting the Boot Manager with a Password 90 Installing the Boot Manager 91 Upgrading the Boot Manager 92 9 Troubleshooting 95 General Troubleshooting Information 95 Troubleshooting Routing Problems 105 A Technical Specifications...
Installation Guide
Page 17
... separate intranet and access routers in the documentation. 1 Overview This guide describes the installation and use these appliances support a comprehensive suite of IProuting functions and protocols, including RIPv1/RIPv2, IGRP, OSPF and BGP4 for unicast traffic, and DVMRP for multicast traffic. The following topics are noted in security applications. As network devices, these appliances is the same. The Nokia IP300 Series appliance combines the power of the...
... separate intranet and access routers in the documentation. 1 Overview This guide describes the installation and use these appliances support a comprehensive suite of IProuting functions and protocols, including RIPv1/RIPv2, IGRP, OSPF and BGP4 for unicast traffic, and DVMRP for multicast traffic. The following topics are noted in security applications. As network devices, these appliances is the same. The Nokia IP300 Series appliance combines the power of the...

Installation Guide
Page 19
...About the Nokia IP300 Series Flash-Based Appliance Table 3 Specifications for logging (PCMCIA slot) 1 GB Optional encryption No Yes accelerator card Nokia IP300 Series Security Platform Installation Guide 11 Table 4 Specifications for IP300 Series Flash-Based Appliances Feature Nokia IP355 Nokia IP385 Maximum memory size 1 GB 1 GB Compact Flash 512 MB 512 MB Optional PC card flash 1 GB for IP300 Series Disk-Based Appliances Feature Nokia IP350 Nokia IP380 Nokia IPSO version 3.9 3.9 Check Point (Enforcement Module support only) Check Point NGX R60 Check Point NGX R60...
...About the Nokia IP300 Series Flash-Based Appliance Table 3 Specifications for logging (PCMCIA slot) 1 GB Optional encryption No Yes accelerator card Nokia IP300 Series Security Platform Installation Guide 11 Table 4 Specifications for IP300 Series Flash-Based Appliances Feature Nokia IP355 Nokia IP385 Maximum memory size 1 GB 1 GB Compact Flash 512 MB 512 MB Optional PC card flash 1 GB for IP300 Series Disk-Based Appliances Feature Nokia IP350 Nokia IP380 Nokia IPSO version 3.9 3.9 Check Point (Enforcement Module support only) Check Point NGX R60 Check Point NGX R60...
Installation Guide
Page 20
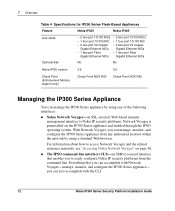
... location within the network by using a standard Web browser. With Network Voyager, you can manage the IP300 Series appliance by using one of the following interfaces: „ Nokia Network Voyager-an SSL-secured, Web-based element management interface to access Network Voyager and the related reference materials, see "Accessing Nokia Network Voyager" on the IP300 Series appliance and enabled through the IPSO operating system. 1 Overview Table 4 Specifications for IP300 Series Flash-Based Appliances Feature Nokia IP355 Nokia IP385 Line cards • 2 two-port 10/100 NICs...
... location within the network by using a standard Web browser. With Network Voyager, you can manage the IP300 Series appliance by using one of the following interfaces: „ Nokia Network Voyager-an SSL-secured, Web-based element management interface to access Network Voyager and the related reference materials, see "Accessing Nokia Network Voyager" on the IP300 Series appliance and enabled through the IPSO operating system. 1 Overview Table 4 Specifications for IP300 Series Flash-Based Appliances Feature Nokia IP355 Nokia IP385 Line cards • 2 two-port 10/100 NICs...
Installation Guide
Page 21
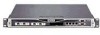
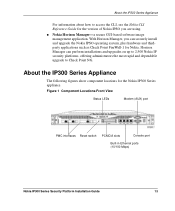
... LEDs Modem (AUX) port PMC interfaces Reset switch PCMCIA slots Console port Built-in Ethernet ports (10/100 Mbps) Nokia IP300 Series Security Platform Installation Guide 13 With Horizon Manager, you can perform installations and upgrades on up to 2,500 Nokia IP security platforms, offering administrators the most rapid and dependable upgrade to access the CLI, see the Nokia CLI Reference Guide for Nokia. About the IP300 Series Appliance For information about how to Check Point NG. About the IP300 Series Appliance...
... LEDs Modem (AUX) port PMC interfaces Reset switch PCMCIA slots Console port Built-in Ethernet ports (10/100 Mbps) Nokia IP300 Series Security Platform Installation Guide 13 With Horizon Manager, you can perform installations and upgrades on up to 2,500 Nokia IP security platforms, offering administrators the most rapid and dependable upgrade to access the CLI, see the Nokia CLI Reference Guide for Nokia. About the IP300 Series Appliance For information about how to Check Point NG. About the IP300 Series Appliance...

Installation Guide
Page 23
... "Nokia Contact Information" on the network. Figure 4 provides pin assignment information for Nokia supported network interface cards. The IP300 Series appliance includes two PMC (PCI mezzanine card) expansion slots for console connections. For sales or reseller information, contact a Nokia service provider listed in Figure 1, to supply the information that use of shielded twisted-pair cables and connectors for best Electromagnetic Interference and Immunity performance. Nokia IP300 Series Security Platform Installation Guide 15...
... "Nokia Contact Information" on the network. Figure 4 provides pin assignment information for Nokia supported network interface cards. The IP300 Series appliance includes two PMC (PCI mezzanine card) expansion slots for console connections. For sales or reseller information, contact a Nokia service provider listed in Figure 1, to supply the information that use of shielded twisted-pair cables and connectors for best Electromagnetic Interference and Immunity performance. Nokia IP300 Series Security Platform Installation Guide 15...
Installation Guide
Page 35
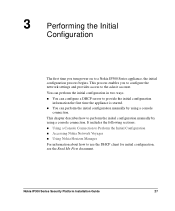
...; You can perform the initial configuration manually by using a console connection. It includes the following sections: „ Using a Console Connection to Perform the Initial Configuration „ Accessing Nokia Network Voyager „ Using Nokia Horizon Manager For information about how to use the DHCP client for initial configuration, see the Read Me First document. 3 Performing the Initial Configuration The first time you to configure the network settings and provides access to the admin account. Nokia IP300 Series Security Platform Installation Guide 27
...; You can perform the initial configuration manually by using a console connection. It includes the following sections: „ Using a Console Connection to Perform the Initial Configuration „ Accessing Nokia Network Voyager „ Using Nokia Horizon Manager For information about how to use the DHCP client for initial configuration, see the Read Me First document. 3 Performing the Initial Configuration The first time you to configure the network settings and provides access to the admin account. Nokia IP300 Series Security Platform Installation Guide 27

Installation Guide
Page 61
...-Port Gigabit Ethernet NIC, Fiber Link LEDs (green or yellow) Activity LEDs (yellow) Ports Connectors and Cables To connect the two-port Gigabit Ethernet NIC to Nokia IP security platforms. Specifically, you use a multimode, fiber-optic cable with an LC connector for the two-port fiber-optic Gigabit Ethernet NIC you set the port speed and full-duplex mode with Network Voyager. Figure 19 shows the front panel details for each NIC Nokia IP300 Series Security Platform Installation Guide 53 Two-Port Gigabit Ethernet Card, PMC, Fiber The two-port Fiber Gigabit Ethernet Card...
...-Port Gigabit Ethernet NIC, Fiber Link LEDs (green or yellow) Activity LEDs (yellow) Ports Connectors and Cables To connect the two-port Gigabit Ethernet NIC to Nokia IP security platforms. Specifically, you use a multimode, fiber-optic cable with an LC connector for the two-port fiber-optic Gigabit Ethernet NIC you set the port speed and full-duplex mode with Network Voyager. Figure 19 shows the front panel details for each NIC Nokia IP300 Series Security Platform Installation Guide 53 Two-Port Gigabit Ethernet Card, PMC, Fiber The two-port Fiber Gigabit Ethernet Card...

Installation Guide
Page 63
...132; Replacing a Hard-Disk Drive „ Replacing or Upgrading Memory „ Installing an Encryption Accelerator Card „ Replacing the Battery For instructions on how to service an IP300 Series appliance. 6 Installing and Replacing Other Components This chapter provides information on adding or replacing interface cards, see Chapter 4, "Installing and Replacing Network Interface Cards" Caution You should have a working knowledge of the appliance to the procedures described in your IP300 Series appliance. Nokia IP300 Series Security Platform Installation Guide 55 Limit service of...
...132; Replacing a Hard-Disk Drive „ Replacing or Upgrading Memory „ Installing an Encryption Accelerator Card „ Replacing the Battery For instructions on how to service an IP300 Series appliance. 6 Installing and Replacing Other Components This chapter provides information on adding or replacing interface cards, see Chapter 4, "Installing and Replacing Network Interface Cards" Caution You should have a working knowledge of the appliance to the procedures described in your IP300 Series appliance. Nokia IP300 Series Security Platform Installation Guide 55 Limit service of...

Installation Guide
Page 65
... the ejector tab on the Network Access and Services link in the Security and Access Configuration section. To configure IPSO to allow logins through the modem, click Config on the Home page in which you can remove and replace. Nokia IP300 Series Security Platform Installation Guide 57 Replacing a Hard-Disk Drive The IP350 and IP380 appliances each include one hard-disk drive, which the device is not already installed, insert the PCMCIA modem into either the top or bottom PCMCIA...
... the ejector tab on the Network Access and Services link in the Security and Access Configuration section. To configure IPSO to allow logins through the modem, click Config on the Home page in which you can remove and replace. Nokia IP300 Series Security Platform Installation Guide 57 Replacing a Hard-Disk Drive The IP350 and IP380 appliances each include one hard-disk drive, which the device is not already installed, insert the PCMCIA modem into either the top or bottom PCMCIA...

Installation Guide
Page 83
Use a small nonconductive device, such as a plastic probe, to slide the battery out of the battery must place the new battery into the battery holder observing the correct polarity. The positive terminal of the battery holder through the cutout in the battery holder. Replacing the Battery Figure 22 Battery Location in the holder. Caution You must be facing up , slide the new battery through the cutout in the Nokia IP300 Series Appliance 00459 2. With the positive side facing up . 3. Nokia IP300 Series Security Platform Installation Guide 75 Remove the old battery.
Use a small nonconductive device, such as a plastic probe, to slide the battery out of the battery must place the new battery into the battery holder observing the correct polarity. The positive terminal of the battery holder through the cutout in the battery holder. Replacing the Battery Figure 22 Battery Location in the holder. Caution You must be facing up , slide the new battery through the cutout in the Nokia IP300 Series Appliance 00459 2. With the positive side facing up . 3. Nokia IP300 Series Security Platform Installation Guide 75 Remove the old battery.

Installation Guide
Page 89
... appliance, the boot manager uses factory-default parameters (kernel, boot device, and so on Nokia IP300 Series Security Platform Installation Guide 81 The factory defaults cause the appliance to use different parameters in this chapter: „ Variables „ Booting the System „ Using the Boot Manager to Install IPSO „ Protecting the Boot Manager with a Password „ Installing the Boot Manager „ Upgrading the Boot Manager The Nokia IP300 Series appliance incorporates a boot manager on disk to control the boot-up process. The boot manager maintains the default...
... appliance, the boot manager uses factory-default parameters (kernel, boot device, and so on Nokia IP300 Series Security Platform Installation Guide 81 The factory defaults cause the appliance to use different parameters in this chapter: „ Variables „ Booting the System „ Using the Boot Manager to Install IPSO „ Protecting the Boot Manager with a Password „ Installing the Boot Manager „ Upgrading the Boot Manager The Nokia IP300 Series appliance incorporates a boot manager on disk to control the boot-up process. The boot manager maintains the default...

Installation Guide
Page 98
... user enter a password to access the boot manager install command. Note The password you enter gives you for your system IP address, the server IP address, and other information). 3. Use the password command to execute the install command. 2. Reboot the IP300 Series appliance. To set the password. At the boot manager command prompt enter: BOOTMGR[0]> passwd The passwd program prompts you access to the install command in boot manager, not access to your current password. 90 Nokia IP300 Series Security Platform Installation Guide At the boot manager command...
... user enter a password to access the boot manager install command. Note The password you enter gives you for your system IP address, the server IP address, and other information). 3. Use the password command to execute the install command. 2. Reboot the IP300 Series appliance. To set the password. At the boot manager command prompt enter: BOOTMGR[0]> passwd The passwd program prompts you access to the install command in boot manager, not access to your current password. 90 Nokia IP300 Series Security Platform Installation Guide At the boot manager command...
Installation Guide
Page 104
... "Using a Console Connection to the instructions included in the instructions for flow control. Problem Wrong terminal settings. Problem Defective IP300 Series appliance or file system. Problem Database is corrupt. The terminal should be set for resetting the default password, or contact the Nokia customer support site listed in "Nokia Contact Information" on page 3. Solution Return to default settings according to Perform the Initial Configuration" on page 3. 9 Troubleshooting Problem Not connected with a null-modem cable. Solution Verify terminal settings: 8 data...
... "Using a Console Connection to the instructions included in the instructions for flow control. Problem Wrong terminal settings. Problem Defective IP300 Series appliance or file system. Problem Database is corrupt. The terminal should be set for resetting the default password, or contact the Nokia customer support site listed in "Nokia Contact Information" on page 3. Solution Return to default settings according to Perform the Initial Configuration" on page 3. 9 Troubleshooting Problem Not connected with a null-modem cable. Solution Verify terminal settings: 8 data...

Installation Guide
Page 107
... defective. Nokia IP300 Series Security Platform Installation Guide 99 Solution Your NIC might be Present Problem Local IP300 Series appliance ports do not appear. Solution Use the CLI over the console connection to Network Voyager Using the Ethernet Port, But Console Access Works Problem Using the wrong Ethernet cable. Solution Use the CLI over the console connection to verify the interface configuration and fix it if necessary. Contact the appropriate Nokia customer support site as active. Problem Host port configuration is not configured as listed in...
... defective. Nokia IP300 Series Security Platform Installation Guide 99 Solution Your NIC might be Present Problem Local IP300 Series appliance ports do not appear. Solution Use the CLI over the console connection to Network Voyager Using the Ethernet Port, But Console Access Works Problem Using the wrong Ethernet cable. Solution Use the CLI over the console connection to verify the interface configuration and fix it if necessary. Contact the appropriate Nokia customer support site as active. Problem Host port configuration is not configured as listed in...

Installation Guide
Page 110
... Reference Guide. Problem Exceeding TTL on each network. Many clients are not configured for the same VC and VP value. Consult your 1483 device documentation. Solution Use ipsctl to the same VC and VP values. These traces are not in Network Voyager, you have IP connectivity; ping various hosts on clients. Problem DVMRP is enabled on the interfaces in use the tcpdump command, see "Accessing Nokia Network Voyager" on the interfaces. Solution Set remote...
... Reference Guide. Problem Exceeding TTL on each network. Many clients are not configured for the same VC and VP value. Consult your 1483 device documentation. Solution Use ipsctl to the same VC and VP values. These traces are not in Network Voyager, you have IP connectivity; ping various hosts on clients. Problem DVMRP is enabled on the interfaces in use the tcpdump command, see "Accessing Nokia Network Voyager" on the interfaces. Solution Set remote...
Installation Guide
Page 115
... use the tcpdump command, see "Accessing Nokia Network Voyager" on each link are logged in Network Voyager. Problem OSPF hello and dead timers are involved in Network Voyager, you can also enable several types of each interface for OSPF. Solution Ensure that the appliance supports and exchange routes with OSPF, or set a default or static route. These traces are identical. Under routing options in OSPF routing. Solution Verify that OSPF is not configured...
... use the tcpdump command, see "Accessing Nokia Network Voyager" on each link are logged in Network Voyager. Problem OSPF hello and dead timers are involved in Network Voyager, you can also enable several types of each interface for OSPF. Solution Ensure that the appliance supports and exchange routes with OSPF, or set a default or static route. These traces are identical. Under routing options in OSPF routing. Solution Verify that OSPF is not configured...

Installation Guide
Page 128
... flash-based appliances 11 flash-memory card disabling 78 transferring files 79 flash-memory PC cards 77 four-port Ethernet network interface card 46 G Gigabit Ethernet network interface cards 50, 53 connectors 53 H halt command 88 hard-disk drive, replacing 57 height 111 help command 88 I ICLID command 105 install command 89 installing network interface cards 36 PCMCIA modem 56 interfaces specifications 112 IP routing 9 IP300Series appliances, monitoring 18 IP355 appliances 11 IP385 appliances 11 IPsec 72 IPSO command-line interface 12 IPSO version 11 IPSO, booting 89 L LC connector 53 LEDs...
... flash-based appliances 11 flash-memory card disabling 78 transferring files 79 flash-memory PC cards 77 four-port Ethernet network interface card 46 G Gigabit Ethernet network interface cards 50, 53 connectors 53 H halt command 88 hard-disk drive, replacing 57 height 111 help command 88 I ICLID command 105 install command 89 installing network interface cards 36 PCMCIA modem 56 interfaces specifications 112 IP routing 9 IP300Series appliances, monitoring 18 IP355 appliances 11 IP385 appliances 11 IPsec 72 IPSO command-line interface 12 IPSO version 11 IPSO, booting 89 L LC connector 53 LEDs...
Installation Guide
Page 129
... 24 mounting screws 24 multicast traffic 9 multimode, fiber-optic cable 53 N network interface cards 10, 12 cable output connector 112 cable type 112 deactivating 36 four-port Ethernet 46 front panel location 13 installing 35, 36 two-port Ethernet 47 two-port Gigabit Ethernet, fiber 53 two-port V2 Gigabit Ethernet, copper 50 types supported 15 network interfaces, connecting 26 Network Voyager 12 accessing 30 configuring VPN tunnels 72 Nokia Horizon Manager 13 Nokia IPSO version 11, 12 null-modem cable 28 O opening Network Voyager 30 operating temperature range...
... 24 mounting screws 24 multicast traffic 9 multimode, fiber-optic cable 53 N network interface cards 10, 12 cable output connector 112 cable type 112 deactivating 36 four-port Ethernet 46 front panel location 13 installing 35, 36 two-port Ethernet 47 two-port Gigabit Ethernet, fiber 53 two-port V2 Gigabit Ethernet, copper 50 types supported 15 network interfaces, connecting 26 Network Voyager 12 accessing 30 configuring VPN tunnels 72 Nokia Horizon Manager 13 Nokia IPSO version 11, 12 null-modem cable 28 O opening Network Voyager 30 operating temperature range...


