
Installation Guide
Page 6
... and Turning the Power On 42 Performing the Initial Configuration 44 Connecting Network Interfaces 46 Using Nokia Network Voyager to Manage Your Security Platform 47 Accessing Nokia Network Voyager Reference Information. . . . . 48 Nokia Network Voyager Reference Guide 49 Nokia Network Voyager Inline Help 49 Using Nokia Network Voyager to Monitor a Nokia IP1200 Series Security Platform 50 Using the Command...
... and Turning the Power On 42 Performing the Initial Configuration 44 Connecting Network Interfaces 46 Using Nokia Network Voyager to Manage Your Security Platform 47 Accessing Nokia Network Voyager Reference Information. . . . . 48 Nokia Network Voyager Reference Guide 49 Nokia Network Voyager Inline Help 49 Using Nokia Network Voyager to Monitor a Nokia IP1200 Series Security Platform 50 Using the Command...

Installation Guide
Page 7
Fiber-Optic Gigabit Ethernet NIC Connectors and Cables . . . . . 80 Dual-Port Copper Gigabit Ethernet NIC 80 Performance Considerations 80 Copper Gigabit Ethernet NIC Features 81 Dual-Port Copper Gigabit Ethernet NIC Connectors and Cables 82 Single-Port ISDN S/T NIC 85 Single-Port ... 101 sysinfo 102 ls 103 Setting the Variables 103 setenv 103 unsetenv 104 set-defaults 104 setalias 105 unsetalias 105 Other commands 106 halt 106 Nokia IP1200 Series Security Platform Installation Guide 7
Fiber-Optic Gigabit Ethernet NIC Connectors and Cables . . . . . 80 Dual-Port Copper Gigabit Ethernet NIC 80 Performance Considerations 80 Copper Gigabit Ethernet NIC Features 81 Dual-Port Copper Gigabit Ethernet NIC Connectors and Cables 82 Single-Port ISDN S/T NIC 85 Single-Port ... 101 sysinfo 102 ls 103 Setting the Variables 103 setenv 103 unsetenv 104 set-defaults 104 setalias 105 unsetalias 105 Other commands 106 halt 106 Nokia IP1200 Series Security Platform Installation Guide 7

Installation Guide
Page 15
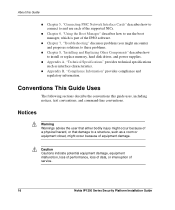
... Guide 15 About this Guide This manual provides information for the installation and use of the Nokia IP1200 Series Security Platform. „ Chapter 3, "Installing the Nokia IP1200 Series Security Platform" describes how to rack mount the security platform. „ Chapter 2, "Performing the Initial Configuration" describes how to physically connect it to a network and to a power source...
... Guide 15 About this Guide This manual provides information for the installation and use of the Nokia IP1200 Series Security Platform. „ Chapter 3, "Installing the Nokia IP1200 Series Security Platform" describes how to rack mount the security platform. „ Chapter 2, "Performing the Initial Configuration" describes how to physically connect it to a network and to a power source...
Installation Guide
Page 16
... 7, "Troubleshooting" discusses problems you might occur because of equipment damage. Caution Cautions indicate potential equipment damage, equipment malfunction, loss of performance, loss of data, or interruption of service. 16 Nokia IP1200 Series Security Platform Installation Guide Conventions This Guide Uses The following sections describe the conventions this Guide „ Chapter 5, "Connecting PMC Network...
... 7, "Troubleshooting" discusses problems you might occur because of equipment damage. Caution Cautions indicate potential equipment damage, equipment malfunction, loss of performance, loss of data, or interruption of service. 16 Nokia IP1200 Series Security Platform Installation Guide Conventions This Guide Uses The following sections describe the conventions this Guide „ Chapter 5, "Connecting PMC Network...

Installation Guide
Page 19
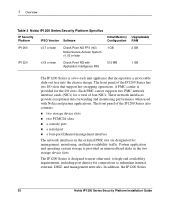
... enterprise data center. The Nokia IP1260 Security Platform is a high-end, multi port security platform that is ideally suited for a smaller data center. Table 2 presents specifics about the Nokia IP1200 Series Security Platforms. Nokia IP1200 Series Security Platform Installation Guide 19 Both IP1200 Series Security Platforms support an encryption accelerator card to further enhance VPN performance. The following topics are...
... enterprise data center. The Nokia IP1260 Security Platform is a high-end, multi port security platform that is ideally suited for a smaller data center. Table 2 presents specifics about the Nokia IP1200 Series Security Platforms. Nokia IP1200 Series Security Platform Installation Guide 19 Both IP1200 Series Security Platforms support an encryption accelerator card to further enhance VPN performance. The following topics are...
Installation Guide
Page 20
... availability requirements, including port density for management, monitoring, and high-availability traffic. These network interfaces provide exceptional data forwarding and monitoring performance when used with Application Intelligence R55 512 MB 1 GB The IP1200 Series is provided for a total of the IP1200 Series also...Upgradeable Configuration RAM IP1260 v3.7 or later Check Point NG FP3 (hf2) Nokia Secure Access System v1.02 or later 1 GB 2 GB IP1220 v3.8 or later Check Point NG with Nokia and partner applications. A PMC carrier is a two-rack unit appliance that support hot...
... availability requirements, including port density for management, monitoring, and high-availability traffic. These network interfaces provide exceptional data forwarding and monitoring performance when used with Application Intelligence R55 512 MB 1 GB The IP1200 Series is provided for a total of the IP1200 Series also...Upgradeable Configuration RAM IP1260 v3.7 or later Check Point NG FP3 (hf2) Nokia Secure Access System v1.02 or later 1 GB 2 GB IP1220 v3.8 or later Check Point NG with Nokia and partner applications. A PMC carrier is a two-rack unit appliance that support hot...

Installation Guide
Page 22
... access the CLI, see the "Nokia Contact Information" on up to 2,500 Nokia IP security platforms, offering administrators the most rapid and dependable upgrade to obtain Horizon Manager, contact your Nokia solution provider or see the Nokia CLI Reference Guide for Nokia. For information about how to Check... Manager can also do with the CLI. 1 Overview Voyager-manage, monitor, and configure the IP1200 Series-you can securely install and upgrade the Nokia proprietary IPSO operating system, plus hardware and third-party applications such as Check Point VPN-1/FireWall-1 for IPSO v3.6 or...
... access the CLI, see the "Nokia Contact Information" on up to 2,500 Nokia IP security platforms, offering administrators the most rapid and dependable upgrade to obtain Horizon Manager, contact your Nokia solution provider or see the Nokia CLI Reference Guide for Nokia. For information about how to Check... Manager can also do with the CLI. 1 Overview Voyager-manage, monitor, and configure the IP1200 Series-you can securely install and upgrade the Nokia proprietary IPSO operating system, plus hardware and third-party applications such as Check Point VPN-1/FireWall-1 for IPSO v3.6 or...

Installation Guide
Page 33
...about the power supply status LEDs, see "Power Supply Status LEDs" on , the Fault LED illuminates. Nokia IP1200 Series Security Platform Installation Guide 33 The power supplies are hot swappable and perform load sharing while two active power supplies are autosensing and can accept input voltages between 85 VAC and 264... VAC. If both power supplies should be turned on for power sharing and redundancy. Note On an appliance with two active power supplies installed, both power supplies are not turned on page 34. The IP1260 comes with power supply;
...about the power supply status LEDs, see "Power Supply Status LEDs" on , the Fault LED illuminates. Nokia IP1200 Series Security Platform Installation Guide 33 The power supplies are hot swappable and perform load sharing while two active power supplies are autosensing and can accept input voltages between 85 VAC and 264... VAC. If both power supplies should be turned on for power sharing and redundancy. Note On an appliance with two active power supplies installed, both power supplies are not turned on page 34. The IP1260 comes with power supply;
Installation Guide
Page 36
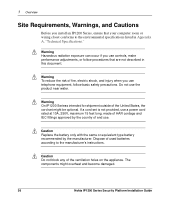
...of end use. If a cord set might overheat and become damaged. 36 Nokia IP1200 Series Security Platform Installation Guide Dispose of the United States, the cord set is not provided, use controls, make performance adjustments, or follow basic safety precautions. The components might be optional. Caution...to the environmental specifications listed in this document. Warning To reduce the risk of the ventilation holes on the appliance. 1 Overview Site Requirements, Warnings, and Cautions Before you install an IP1200 Series, ensure that are not described in Appendix A, ...
...of end use. If a cord set might overheat and become damaged. 36 Nokia IP1200 Series Security Platform Installation Guide Dispose of the United States, the cord set is not provided, use controls, make performance adjustments, or follow basic safety precautions. The components might be optional. Caution...to the environmental specifications listed in this document. Warning To reduce the risk of the ventilation holes on the appliance. 1 Overview Site Requirements, Warnings, and Cautions Before you install an IP1200 Series, ensure that are not described in Appendix A, ...

Installation Guide
Page 39
... the initial configuration information the first time the appliance is started. „ Perform the initial configuration manually by using a console connection. You can perform the initial configuration in two ways: „ Configure a DHCP server to a Nokia IP1200 Series Security Platform, the initial configuration process begins. Nokia IP1200 Series Security Platform Installation Guide 39 It includes the following...
... the initial configuration information the first time the appliance is started. „ Perform the initial configuration manually by using a console connection. You can perform the initial configuration in two ways: „ Configure a DHCP server to a Nokia IP1200 Series Security Platform, the initial configuration process begins. Nokia IP1200 Series Security Platform Installation Guide 39 It includes the following...

Installation Guide
Page 40
... initial configuration procedure this chapter describes. the serial (AUX) port is an auxiliary modem port. 40 Nokia IP1200 Series Security Platform Installation Guide 2 Performing the Initial Configuration Note Nokia recommends that you physically install all NICs and other components, see Chapter 4, "Installing and Replacing Network Interface Cards." Connect the supplied null-modem cable (console...
... initial configuration procedure this chapter describes. the serial (AUX) port is an auxiliary modem port. 40 Nokia IP1200 Series Security Platform Installation Guide 2 Performing the Initial Configuration Note Nokia recommends that you physically install all NICs and other components, see Chapter 4, "Installing and Replacing Network Interface Cards." Connect the supplied null-modem cable (console...

Installation Guide
Page 42
...power interruptions and potential power spikes that might damage your equipment, Nokia strongly recommends that you use an uninterruptible power supply (UPS) with surge protection with your IP1200 Series. 2 Performing the Initial Configuration Connecting Power and Turning the Power On A ...power switch and a receptacle for the power cord are located on each power supply on the power supply. 2. Plug the other end of the appliance as shown in Figure 9. To connect the power supply 1. Connect the power cord securely...
...power interruptions and potential power spikes that might damage your equipment, Nokia strongly recommends that you use an uninterruptible power supply (UPS) with surge protection with your IP1200 Series. 2 Performing the Initial Configuration Connecting Power and Turning the Power On A ...power switch and a receptacle for the power cord are located on each power supply on the power supply. 2. Plug the other end of the appliance as shown in Figure 9. To connect the power supply 1. Connect the power cord securely...

Installation Guide
Page 44
... about five seconds. If the DHCP client starts, it might configure the appliance with an incorrect host name and IP address (this could happen if a DHCP server 44 Nokia IP1200 Series Security Platform Installation Guide prompts, verify that the serial cable is completely plugged in "Nokia Contact Information" on the appliance. To perform the initial configuration 1.
... about five seconds. If the DHCP client starts, it might configure the appliance with an incorrect host name and IP address (this could happen if a DHCP server 44 Nokia IP1200 Series Security Platform Installation Guide prompts, verify that the serial cable is completely plugged in "Nokia Contact Information" on the appliance. To perform the initial configuration 1.

Installation Guide
Page 45
...that you are prompted to the physical ID in the list of the Ethernet management interface ports. d. Nokia IP1200 Series Security Platform Installation Guide 45 Reboot the appliance. prompt within 30 seconds to the system. At each subsequent prompt, enter the requested configuration information. Establish...Hostname? Respond to the prompts during the initial configuration process, see the release notes for the Nokia software release you select one of connected interfaces. Performing the Initial Configuration on your network is configured to respond to any request). To reset the ...
...that you are prompted to the physical ID in the list of the Ethernet management interface ports. d. Nokia IP1200 Series Security Platform Installation Guide 45 Reboot the appliance. prompt within 30 seconds to the system. At each subsequent prompt, enter the requested configuration information. Establish...Hostname? Respond to the prompts during the initial configuration process, see the release notes for the Nokia software release you select one of connected interfaces. Performing the Initial Configuration on your network is configured to respond to any request). To reset the ...

Installation Guide
Page 46
... Voyager system-management interface. Connecting Network Interfaces Connect at this connection. 46 Nokia IP1200 Series Security Platform Installation Guide Note Nokia recommends that you use one network interface to the network to do so. The physical ID syntax is described in... ports for the first port of a dual-port Ethernet NIC in Chapter 2, "Performing the Initial Configuration." After you complete the initial configuration, you are numbered eth-s3p1 through eth-s3p4. 2 Performing the Initial Configuration Note A physical ID identifies the NIC type (nic_type) and provides...
... Voyager system-management interface. Connecting Network Interfaces Connect at this connection. 46 Nokia IP1200 Series Security Platform Installation Guide Note Nokia recommends that you use one network interface to the network to do so. The physical ID syntax is described in... ports for the first port of a dual-port Ethernet NIC in Chapter 2, "Performing the Initial Configuration." After you complete the initial configuration, you are numbered eth-s3p1 through eth-s3p4. 2 Performing the Initial Configuration Note A physical ID identifies the NIC type (nic_type) and provides...
Installation Guide
Page 48
... prompted to use. For more information, see the section in the appropriate installation guide. Accessing Nokia Network Voyager Reference Information As you use Nokia Network Voyager, the Nokia Network Voyager Reference Guide and Voyager inline help are available for you might have a network routing... 48 Nokia IP1200 Series Security Platform Installation Guide Note If the username login screen does not appear, you might not have a physical network connection between the host and your appliance, or you to enter the admin username and the password you entered when you performed the ...
... prompted to use. For more information, see the section in the appropriate installation guide. Accessing Nokia Network Voyager Reference Information As you use Nokia Network Voyager, the Nokia Network Voyager Reference Guide and Voyager inline help are available for you might have a network routing... 48 Nokia IP1200 Series Security Platform Installation Guide Note If the username login screen does not appear, you might not have a physical network connection between the host and your appliance, or you to enter the admin username and the password you entered when you performed the ...

Installation Guide
Page 50
... use Network Voyager to the subject. Connect to access the CLI. Enter clish to the security platform by using . 50 Nokia IP1200 Series Security Platform Installation Guide Click Monitor from the command line. To enter the CLI mode 1. 2 Performing the Initial Configuration To access inline help for the version of the Network Voyager window...
... use Network Voyager to the subject. Connect to access the CLI. Enter clish to the security platform by using . 50 Nokia IP1200 Series Security Platform Installation Guide Click Monitor from the command line. To enter the CLI mode 1. 2 Performing the Initial Configuration To access inline help for the version of the Network Voyager window...

Installation Guide
Page 80
... Series Security Platform supports Nokia-approved, dual-port copper Gigabit Ethernet NICs installed on the type of the two 6U PMC card carrier units to loop back the transmit port of your IP1200 Series, the NIC is installed before the appliance is delivered to -SC cables are ... the fiber-optic Gigabit Ethernet NIC to other network components, use a half-duplex LC-to-LC cable to get 80 Nokia IP1200 Series Security Platform Installation Guide Performance Considerations If you are included with dual-port Gigabit Ethernet NICs. When you . The dual-port Gigabit Ethernet NICs support...
... Series Security Platform supports Nokia-approved, dual-port copper Gigabit Ethernet NICs installed on the type of the two 6U PMC card carrier units to loop back the transmit port of your IP1200 Series, the NIC is installed before the appliance is delivered to -SC cables are ... the fiber-optic Gigabit Ethernet NIC to other network components, use a half-duplex LC-to-LC cable to get 80 Nokia IP1200 Series Security Platform Installation Guide Performance Considerations If you are included with dual-port Gigabit Ethernet NICs. When you . The dual-port Gigabit Ethernet NICs support...

Installation Guide
Page 81
For the IP1200 Series appliance, any two NICs installed on page 48. Each 6U PMC card carrier unit has a separate PCI bus connection to access Network Voyager and the related reference materials, see "Accessing Nokia Network Voyager Reference Information" on a single PMC...PCI bus. For information about how to the main system motherboard. Nokia IP1200 Series Security Platform Installation Guide 81 In the configuration described here, each of the least capable NIC installed. Performance Considerations maximum system throughput. Copper Gigabit Ethernet NIC Features The copper ...
For the IP1200 Series appliance, any two NICs installed on page 48. Each 6U PMC card carrier unit has a separate PCI bus connection to access Network Voyager and the related reference materials, see "Accessing Nokia Network Voyager Reference Information" on a single PMC...PCI bus. For information about how to the main system motherboard. Nokia IP1200 Series Security Platform Installation Guide 81 In the configuration described here, each of the least capable NIC installed. Performance Considerations maximum system throughput. Copper Gigabit Ethernet NIC Features The copper ...

Installation Guide
Page 83
... Gigabit Ethernet NICs support cable autosensing. Nokia IP1200 Series Security Platform Installation Guide 83 Note Certain circumstances might require shielded Category 5 Ethernet cables to a host. You can use a straight-through or crossover cable to connect ... numbered from right to a 1-Gbps hub, switch, or router, use a straight-through RJ-45 cable (Category 5 type cable, or as required by your network configuration). Performance Considerations To connect to left, with the copper pins facing up and toward you.
... Gigabit Ethernet NICs support cable autosensing. Nokia IP1200 Series Security Platform Installation Guide 83 Note Certain circumstances might require shielded Category 5 Ethernet cables to a host. You can use a straight-through or crossover cable to connect ... numbered from right to a 1-Gbps hub, switch, or router, use a straight-through RJ-45 cable (Category 5 type cable, or as required by your network configuration). Performance Considerations To connect to left, with the copper pins facing up and toward you.