S570 User's Manual
Page 9
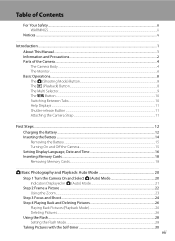
... the Battery ...14 Removing the Battery ...15 Turning On and Off the Camera...15 Setting Display Language, Date and Time 16 Inserting Memory Cards ...18 Removing Memory Cards...18 A Basic Photography and Playback: Auto Mode 20 Step 1 Turn the Camera On and Select A (Auto) Mode 20 Indicators Displayed in A (Auto) Mode 21 Step 2 Frame a Picture ...22 Using the Zoom...23 Step 3 Focus and Shoot ...24 Step 4 Playing Back and Deleting Pictures 26 Playing Back Pictures (Playback Mode 26 Deleting Pictures...26 Using the Flash...28 Setting the Flash Mode...28 Taking Pictures with the Self-timer...
... the Battery ...14 Removing the Battery ...15 Turning On and Off the Camera...15 Setting Display Language, Date and Time 16 Inserting Memory Cards ...18 Removing Memory Cards...18 A Basic Photography and Playback: Auto Mode 20 Step 1 Turn the Camera On and Select A (Auto) Mode 20 Indicators Displayed in A (Auto) Mode 21 Step 2 Frame a Picture ...22 Using the Zoom...23 Step 3 Focus and Shoot ...24 Step 4 Playing Back and Deleting Pictures 26 Playing Back Pictures (Playback Mode 26 Deleting Pictures...26 Using the Flash...28 Setting the Flash Mode...28 Taking Pictures with the Self-timer...

S570 User's Manual
Page 13
... names of a Nikon COOLPIX S570 digital camera. Screen Samples In this manual, images are used to store pictures to, or delete, or view pictures. 1 If a memory card is referred to as the "default setting". • The names of menu items displayed in the camera's internal memory or on the memory card. This icon marks notes, information C that should be helpful when using the camera. Notations • A Secure Digital (SD) memory card is referred to as a "memory card". • The setting at the time of purchase...
... names of a Nikon COOLPIX S570 digital camera. Screen Samples In this manual, images are used to store pictures to, or delete, or view pictures. 1 If a memory card is referred to as the "default setting". • The names of menu items displayed in the camera's internal memory or on the memory card. This icon marks notes, information C that should be helpful when using the camera. Notations • A Secure Digital (SD) memory card is referred to as a "memory card". • The setting at the time of purchase...
S570 User's Manual
Page 31
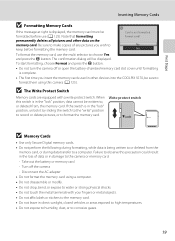
... make copies of data or in damage to or deleted from , the memory card. The confirmation dialog will be formatted before formatting the memory card. When this switch is in other data on the memory card. No Yes To format the memory card, use (A 125). To start formatting, choose Format and press the k button. • Do not turn the camera off the camera - Card is being written to the camera or memory card: - Take out the battery or memory card - Turn off or open the battery...
... make copies of data or in damage to or deleted from , the memory card. The confirmation dialog will be formatted before formatting the memory card. When this switch is in other data on the memory card. No Yes To format the memory card, use (A 125). To start formatting, choose Format and press the k button. • Do not turn the camera off the camera - Card is being written to the camera or memory card: - Take out the battery or memory card - Turn off or open the battery...
S570 User's Manual
Page 32
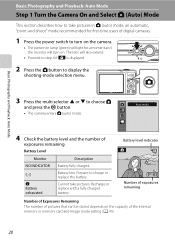
... exposures remaining Number of Exposures Remaining The number of pictures that can be stored depends on . Auto mode 4 Check the battery level and the number of the internal memory or memory card and image mode setting (A 95). 20 The lens will turn on the camera. • The power-on lamp (green) will light for a moment and the monitor will also extend. • Proceed to step 4 if A is displayed. 2 Press the A button to display the shooting-mode selection menu...
... exposures remaining Number of Exposures Remaining The number of pictures that can be stored depends on . Auto mode 4 Check the battery level and the number of the internal memory or memory card and image mode setting (A 95). 20 The lens will turn on the camera. • The power-on lamp (green) will light for a moment and the monitor will also extend. • Proceed to step 4 if A is displayed. 2 Press the A button to display the shooting-mode selection menu...

S570 User's Manual
Page 33
... images will be stored on the camera's internal memory (approximately 47 MB). The default setting is displayed. Basic Photography and Playback: Auto Mode Step 1 Turn the Camera On and Select A (Auto) Mode Indicators Displayed in A (Auto) Mode Shooting mode A displayed in which the effects of camera shake can be taken using the flash mode (A 28) and self-timer (A 30). D Functions Available in pictures before recording them. 21 In these situations, the camera reduces the effects of camera shake in A (Auto) Mode In A (auto) mode, macro mode (A 31) and exposure...
... images will be stored on the camera's internal memory (approximately 47 MB). The default setting is displayed. Basic Photography and Playback: Auto Mode Step 1 Turn the Camera On and Select A (Auto) Mode Indicators Displayed in A (Auto) Mode Shooting mode A displayed in which the effects of camera shake can be taken using the flash mode (A 28) and self-timer (A 30). D Functions Available in pictures before recording them. 21 In these situations, the camera reduces the effects of camera shake in A (Auto) Mode In A (auto) mode, macro mode (A 31) and exposure...
S570 User's Manual
Page 39
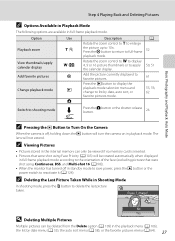
... zoom control to f to display 4, 9 or 16 picture thumbnails or to Turn On the Camera When the camera is off in the internal memory can be viewed if no memory card is inserted. • Pictures that were shot using Face Priority (A 103) will not extend. A 52 50, 51 61 53, 56, 62 Switch to shooting mode Press the A button or the shutter-release button. 26 C Pressing the c Button to apply the calendar display. C Deleting...
... zoom control to f to display 4, 9 or 16 picture thumbnails or to Turn On the Camera When the camera is off in the internal memory can be viewed if no memory card is inserted. • Pictures that were shot using Face Priority (A 103) will not extend. A 52 50, 51 61 53, 56, 62 Switch to shooting mode Press the A button or the shutter-release button. 26 C Pressing the c Button to apply the calendar display. C Deleting...

S570 User's Manual
Page 41
... Playback: Auto Mode Using the Flash B Shooting When Lighting is Poor and the Flash is Disabled (W) • Use of camera shake. • The E indicator is shot. C The Flash Setting The default flash mode setting varies with shooting mode. • A (auto): U (auto) • Scene: varies with the selected scene mode (A 34-40) • F (smart portrait): fixed at low intensity before it is selected for Blink proof, U (auto) when Off is recorded. If the camera detects "red-eye" when a picture is taken, Nikon's own In-Camera Red-Eye Fix...
... Playback: Auto Mode Using the Flash B Shooting When Lighting is Poor and the Flash is Disabled (W) • Use of camera shake. • The E indicator is shot. C The Flash Setting The default flash mode setting varies with shooting mode. • A (auto): U (auto) • Scene: varies with the selected scene mode (A 34-40) • F (smart portrait): fixed at low intensity before it is selected for Blink proof, U (auto) when Off is recorded. If the camera detects "red-eye" when a picture is taken, Nikon's own In-Camera Red-Eye Fix...

S570 User's Manual
Page 42
.... 1 Press n (self-timer). • The self-timer menu is taken, press the shutter-release button again. 30 1/125 F2.7 1/125 F2.7 This feature is counting down . • The self-timer starts, and the number of camera shake that occurs when pressing the shutter-release button. The selftimer lamp blinks while the timer is useful for reducing the effects of seconds remaining before a picture is displayed. Basic Photography and Playback: Auto Mode 2 Use the...
.... 1 Press n (self-timer). • The self-timer menu is taken, press the shutter-release button again. 30 1/125 F2.7 1/125 F2.7 This feature is counting down . • The self-timer starts, and the number of camera shake that occurs when pressing the shutter-release button. The selftimer lamp blinks while the timer is useful for reducing the effects of seconds remaining before a picture is displayed. Basic Photography and Playback: Auto Mode 2 Use the...

S570 User's Manual
Page 43
...; The macro menu is displayed. 2 Use the multi selector H or I to choose ON and press the k button. • The macro mode icon (F) is displayed. • If a setting is not applied by pressing the shutter-release button halfway. Note that the flash may be cancelled. Macro mode 3 Rotate the zoom control to light the entire subject at which the camera can focus on the zoom position. A sound will be unable to frame the picture...
...; The macro menu is displayed. 2 Use the multi selector H or I to choose ON and press the k button. • The macro mode icon (F) is displayed. • If a setting is not applied by pressing the shutter-release button halfway. Note that the flash may be cancelled. Macro mode 3 Rotate the zoom control to light the entire subject at which the camera can focus on the zoom position. A sound will be unable to frame the picture...
S570 User's Manual
Page 56
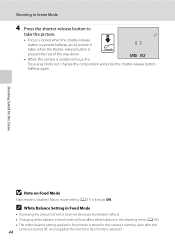
... illumination effects. • Changing white balance in food mode will not affect white balance in the shooting menu (A 96). • The white balance setting applied in food mode is stored in Food Mode • Increasing the amount of the way down. • When the camera is unable to focus, the 1/125 F2.7 focus area blinks red. Macro mode setting (A 31) is disabled. Shooting Suited for the Scene B Note on Food Mode Flash mode is fixed at ON.
... illumination effects. • Changing white balance in food mode will not affect white balance in the shooting menu (A 96). • The white balance setting applied in food mode is stored in Food Mode • Increasing the amount of the way down. • When the camera is unable to focus, the 1/125 F2.7 focus area blinks red. Macro mode setting (A 31) is disabled. Shooting Suited for the Scene B Note on Food Mode Flash mode is fixed at ON.

S570 User's Manual
Page 60
... use the multi selector to set Image mode (A 94). Image mode Allows you to modify and apply settings. When Off is selected, skin softening is turned off in Smart Portrait Mode • Flash cannot be used . • Digital zoom is displayed in the monitor while shooting. To confirm, view the pictures after shooting. 48 C Auto Power Off When Using Smile Timer (Standby Mode) When Smile timer is set to On, the auto off function (A 124) will turn the camera...
... use the multi selector to set Image mode (A 94). Image mode Allows you to modify and apply settings. When Off is selected, skin softening is turned off in Smart Portrait Mode • Flash cannot be used . • Digital zoom is displayed in the monitor while shooting. To confirm, view the pictures after shooting. 48 C Auto Power Off When Using Smile Timer (Standby Mode) When Smile timer is set to On, the auto off function (A 124) will turn the camera...

S570 User's Manual
Page 94
... the USB cable. 82 Source Device Start Transfer button • At the Nikon Transfer default setting, all pictures are transferred to help information contained in the transfer options Source panel and click Start Transfer. Connecting to Televisions, Computers and Printers Connecting to a Computer 5 Confirm that the source device is complete and transferred pictures can be viewed. • For more information on using Nikon Transfer or ViewNX, refer to the computer. • At the Nikon Transfer default settings, ViewNX starts...
... the USB cable. 82 Source Device Start Transfer button • At the Nikon Transfer default setting, all pictures are transferred to help information contained in the transfer options Source panel and click Start Transfer. Connecting to Televisions, Computers and Printers Connecting to a Computer 5 Confirm that the source device is complete and transferred pictures can be viewed. • For more information on using Nikon Transfer or ViewNX, refer to the computer. • At the Nikon Transfer default settings, ViewNX starts...
S570 User's Manual
Page 108
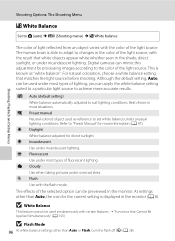
... skies. B White Balance This feature cannot be used simultaneously with the color of lighting, you can be used as "white balance". Digital cameras can mimic this adjustment by processing images according to suit lighting conditions. f Cloudy Use when taking pictures under incandescent lighting. At settings other than Auto, the icon for the current setting is displayed in the monitor (A 6). a Auto (default setting) White balance automatically adjusted to the color of the light source. c Daylight White balance adjusted for more accurate results. e Fluorescent Use under...
... skies. B White Balance This feature cannot be used simultaneously with the color of lighting, you can be used as "white balance". Digital cameras can mimic this adjustment by processing images according to suit lighting conditions. f Cloudy Use when taking pictures under incandescent lighting. At settings other than Auto, the icon for the current setting is displayed in the monitor (A 6). a Auto (default setting) White balance automatically adjusted to the color of the light source. c Daylight White balance adjusted for more accurate results. e Fluorescent Use under...

S570 User's Manual
Page 109
.... Preset manual Shooting, Playback and Setup Menus Cancel Measure Exit Reference object frame 5 Press the k button. • The shutter is released and the new white balance value is set (no picture is used during shooting. 2 Display the shooting menu (A 93), use the multi selector to set White balance to b Preset manual, then press the k button. • The camera zooms in. Preset manual Cancel Measure Exit 4 Frame the reference object. Shooting Options: The Shooting Menu Preset Manual Preset manual is recorded).
.... Preset manual Shooting, Playback and Setup Menus Cancel Measure Exit Reference object frame 5 Press the k button. • The shutter is released and the new white balance value is set (no picture is used during shooting. 2 Display the shooting menu (A 93), use the multi selector to set White balance to b Preset manual, then press the k button. • The camera zooms in. Preset manual Cancel Measure Exit 4 Frame the reference object. Shooting Options: The Shooting Menu Preset Manual Preset manual is recorded).

S570 User's Manual
Page 137
... favorites folder icon settings (A 60) to the default setting (displayed as number). • Do not turn the camera off, or open the battery-chamber/memory card slot cover during formatting. • The first time you insert the memory cards used in other devices into the COOLPIX S570, be sure to format the internal memory or a memory card. Format memory All images will be deleted! The Format memory option appears in the setup menu. OK? Format card All images will be deleted! No Format Exit Shooting, Playback and Setup Menus B Formatting Internal Memory and Memory Cards...
... favorites folder icon settings (A 60) to the default setting (displayed as number). • Do not turn the camera off, or open the battery-chamber/memory card slot cover during formatting. • The first time you insert the memory cards used in other devices into the COOLPIX S570, be sure to format the internal memory or a memory card. Format memory All images will be deleted! The Format memory option appears in the setup menu. OK? Format card All images will be deleted! No Format Exit Shooting, Playback and Setup Menus B Formatting Internal Memory and Memory Cards...
S570 User's Manual
Page 150
...; Insert new memory card. 18 • Remove memory card 18 and use in size. Technical Notes Picture cannot be used . • Pictures taken at an Image mode setting of 16:9. • Pictures created using this camera. cannot be deleted. P Sound file cannot be saved. attached onto movies. P Image cannot be saved. Format internal memory or 125 memory card. Replace the memory card, 132 or format the internal memory/memory card. Format card? Problem Memory card has not been formatted for The following pictures 115 welcome screen. Solution A All data stored on...
...; Insert new memory card. 18 • Remove memory card 18 and use in size. Technical Notes Picture cannot be used . • Pictures taken at an Image mode setting of 16:9. • Pictures created using this camera. cannot be deleted. P Sound file cannot be saved. attached onto movies. P Image cannot be saved. Format internal memory or 125 memory card. Replace the memory card, 132 or format the internal memory/memory card. Format card? Problem Memory card has not been formatted for The following pictures 115 welcome screen. Solution A All data stored on...

S570 User's Manual
Page 151
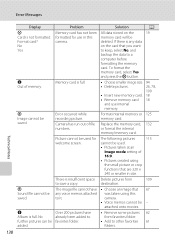
... viewed on - All images are contained Select the folder 56 in the folder selected in containing the sorted auto sort mode. Choose memory card with this camera. N Memory contains no image data. Technical Notes No pictures are hidden. File cannot be - Confirm the conditions 68 that the picture has been added. N Time out error while Cannot record movie. this camera. played back in the picture just picture was detected their eyes closed when the playback mode. Error Messages Display Problem Solution...
... viewed on - All images are contained Select the folder 56 in the folder selected in containing the sorted auto sort mode. Choose memory card with this camera. N Memory contains no image data. Technical Notes No pictures are hidden. File cannot be - Confirm the conditions 68 that the picture has been added. N Time out error while Cannot record movie. this camera. played back in the picture just picture was detected their eyes closed when the playback mode. Error Messages Display Problem Solution...

S570 User's Manual
Page 154
... have time stamp of • Pictures recorded before consulting your retailer or Nikon-authorized service representative. Camera settings reset. Date imprint is exhausted; all settings were restored 117 to save power. 124 • Battery is dirty. Refer to the page numbers in the right-most column for Photo info. 119 in standby mode. Clean monitor. 135 Camera turns off without • Battery is low. 20 warning. • Camera has turned off . • Battery...
... have time stamp of • Pictures recorded before consulting your retailer or Nikon-authorized service representative. Camera settings reset. Date imprint is exhausted; all settings were restored 117 to save power. 124 • Battery is dirty. Refer to the page numbers in the right-most column for Photo info. 119 in standby mode. Clean monitor. 135 Camera turns off without • Battery is low. 20 warning. • Camera has turned off . • Battery...

S570 User's Manual
Page 157
... shooting menu. • d (Sports scene mode) or l (Museum scene mode) is selected. • Blink proof is restricting 105 Image mode. White balance does not match light source. 96 Randomly spaced bright pixels ("noise") appear in some scene modes. 123 34-39 Pictures appear smeared. Lens is dark. Clean lens. 135 Colors are unnatural. Troubleshooting Problem Cause/Solution A Digital zoom cannot be reduced by: • Using flash. • Specifying a lower ISO sensitivity setting. • Using a scene mode...
... shooting menu. • d (Sports scene mode) or l (Museum scene mode) is selected. • Blink proof is restricting 105 Image mode. White balance does not match light source. 96 Randomly spaced bright pixels ("noise") appear in some scene modes. 123 34-39 Pictures appear smeared. Lens is dark. Clean lens. 135 Colors are unnatural. Troubleshooting Problem Cause/Solution A Digital zoom cannot be reduced by: • Using flash. • Specifying a lower ISO sensitivity setting. • Using a scene mode...
S570 User's Manual
Page 167
... Power switch 4, 20 Power-on lamp 4, 20 Preset manual 97 Print 86, 87, 90 Print set 90, 92 Print Set (Date) 91 Printer 84 Protect 109 R Rechargeable battery 131 Rechargeable Li-ion battery 12, 14 Recording movies 75 Red-eye reduction 28, 29 Reset all 128 Rotate image 110 RSCN 132 S Scene auto selector x 34, 41 Scene mode 33, 34 Self-timer 30 Self-timer lamp 4, 30 Sepia 100 Setup menu 112 Shooting 20, 22, 24 Shooting menu 93 Shooting-mode selection menu 8 Shutter sound 124 Shutter...
... Power switch 4, 20 Power-on lamp 4, 20 Preset manual 97 Print 86, 87, 90 Print set 90, 92 Print Set (Date) 91 Printer 84 Protect 109 R Rechargeable battery 131 Rechargeable Li-ion battery 12, 14 Recording movies 75 Red-eye reduction 28, 29 Reset all 128 Rotate image 110 RSCN 132 S Scene auto selector x 34, 41 Scene mode 33, 34 Self-timer 30 Self-timer lamp 4, 30 Sepia 100 Setup menu 112 Shooting 20, 22, 24 Shooting menu 93 Shooting-mode selection menu 8 Shutter sound 124 Shutter...


