S560 User's Manual
Page 4
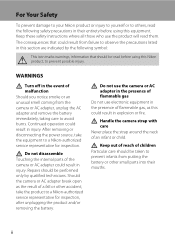
... the internal parts of malfunction Should you notice smoke or an unusual smell coming from the camera or AC adapter, unplug the AC adapter and remove the battery immediately, taking care to a Nikon-authorized service representative for inspection, after unplugging the product and/or removing the battery. Repairs.... Keep out of reach of an infant or child. Should the camera or AC adapter break open as this could result from putting the battery or other small parts into their entirety before using this Nikon product, to others, read before using this section are indicated by ...
... the internal parts of malfunction Should you notice smoke or an unusual smell coming from the camera or AC adapter, unplug the AC adapter and remove the battery immediately, taking care to a Nikon-authorized service representative for inspection, after unplugging the product and/or removing the battery. Repairs.... Keep out of reach of an infant or child. Should the camera or AC adapter break open as this could result from putting the battery or other small parts into their entirety before using this Nikon product, to others, read before using this section are indicated by ...
S560 User's Manual
Page 9
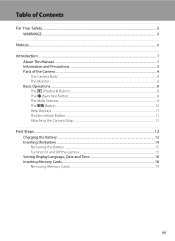
... ...1 Information and Precautions...2 Parts of the Camera...4 The Camera Body ...4 The Monitor...6 Basic Operations...8 The c (Playback) Button...8 The r (favorites) Button...8 The Multi Selector...9 The d Button...10 Help Displays...11 Shutter-release Button ...11 Attaching the Camera Strap ...11 First Steps ...12 Charging the... Battery ...12 Inserting the Battery ...14 Removing the Battery ...15 Turning On and Off the Camera...15 Setting Display Language, Date and Time 16 Inserting ...
... ...1 Information and Precautions...2 Parts of the Camera...4 The Camera Body ...4 The Monitor...6 Basic Operations...8 The c (Playback) Button...8 The r (favorites) Button...8 The Multi Selector...9 The d Button...10 Help Displays...11 Shutter-release Button ...11 Attaching the Camera Strap ...11 First Steps ...12 Charging the... Battery ...12 Inserting the Battery ...14 Removing the Battery ...15 Turning On and Off the Camera...15 Setting Display Language, Date and Time 16 Inserting ...

S560 User's Manual
Page 10
Table of Contents A Basic Photography and Playback: Auto Mode 20 Step 1 Turn the Camera On and Select A (Auto) Mode 20 Indicators Displayed in A (Auto) Mode 21 Step 2 Frame a Picture ...22 Using the Zoom...22 Step 3 Focus and Shoot ...24 ...
Table of Contents A Basic Photography and Playback: Auto Mode 20 Step 1 Turn the Camera On and Select A (Auto) Mode 20 Indicators Displayed in A (Auto) Mode 21 Step 2 Frame a Picture ...22 Using the Zoom...22 Step 3 Focus and Shoot ...24 ...

S560 User's Manual
Page 12
......79 Connecting to Televisions, Computers and Printers 80 Connecting to a TV...80 Connecting to a Computer...81 Before Connecting the Camera...81 Transferring Pictures from a Camera to a Computer 82 Connecting to a Printer...85 Connecting the Camera and Printer...86 Printing Pictures One at a Time ...87 Printing Multiple Pictures ...88 Creating a DPOF Print Order: Print...
......79 Connecting to Televisions, Computers and Printers 80 Connecting to a TV...80 Connecting to a Computer...81 Before Connecting the Camera...81 Transferring Pictures from a Camera to a Computer 82 Connecting to a Printer...85 Connecting the Camera and Printer...86 Printing Pictures One at a Time ...87 Printing Multiple Pictures ...88 Creating a DPOF Print Order: Print...

S560 User's Manual
Page 13
... Menu 108 Displaying the Playback Menu...108 b Slide Show...110 c Delete ...111 d Protect ...111 f Rotate Image...112 h Copy ...113 Basic Camera Setup: The Setup Menu 114 Displaying the Setup Menu...115 a Menus ...115 c Welcome Screen...116 d Date...117 e Monitor Settings ...120 f ...Date Imprint...121 g Vibration reduction ...123 h AF Assist ...124 u Digital Zoom ...124 i Sound Settings ...125 k Auto Off ...125 l Format Memory/m Format Card 126 n Language ...127 o Video Mode ...127 d Blink Warning ...127...
... Menu 108 Displaying the Playback Menu...108 b Slide Show...110 c Delete ...111 d Protect ...111 f Rotate Image...112 h Copy ...113 Basic Camera Setup: The Setup Menu 114 Displaying the Setup Menu...115 a Menus ...115 c Welcome Screen...116 d Date...117 e Monitor Settings ...120 f ...Date Imprint...121 g Vibration reduction ...123 h AF Assist ...124 u Digital Zoom ...124 i Sound Settings ...125 k Auto Off ...125 l Format Memory/m Format Card 126 n Language ...127 o Video Mode ...127 d Blink Warning ...127...

S560 User's Manual
Page 14
Table of Contents Technical Notes...132 Optional Accessories ...132 Approved Memory Cards ...132 Image/Sound File and Folder Names 133 Caring for the Camera ...134 Cleaning ...136 Storage ...137 Error Messages...138 Troubleshooting...142 Specifications ...148 Supported Standards ...151 Index ...152 xii
Table of Contents Technical Notes...132 Optional Accessories ...132 Approved Memory Cards ...132 Image/Sound File and Folder Names 133 Caring for the Camera ...134 Cleaning ...136 Storage ...137 Error Messages...138 Troubleshooting...142 Specifications ...148 Supported Standards ...151 Index ...152 xii
S560 User's Manual
Page 15
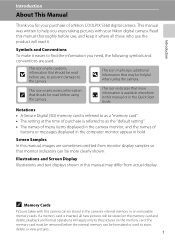
... Display Illustrations and text displays shown in the Quick Start Guide. Introduction Introduction About This Manual Thank you for your Nikon digital camera. This icon indicates that monitor indicators can be read it easier to find the information you enjoy taking pictures with this...display. If a memory card is available elsewhere in the camera's internal memory or on the memory card. Read this manual, images are used to as a "memory card". • The setting at the time of a Nikon COOLPIX S560 digital camera. This icon marks tips, additional D information that may ...
... Display Illustrations and text displays shown in the Quick Start Guide. Introduction Introduction About This Manual Thank you for your Nikon digital camera. This icon indicates that monitor indicators can be read it easier to find the information you enjoy taking pictures with this...display. If a memory card is available elsewhere in the camera's internal memory or on the memory card. Read this manual, images are used to as a "memory card". • The setting at the time of a Nikon COOLPIX S560 digital camera. This icon marks tips, additional D information that may ...
S560 User's Manual
Page 16
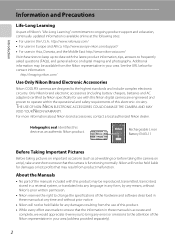
...information: http://imaging.nikon.com/ Use Only Nikon Brand Electronic Accessories Nikon COOLPIX cameras are engineered and proven to the highest standards and include complex electronic circuitry. For more information about Nikon brand accessories, contact a local authorized Nikon dealer. Introduction ...on important occasions (such as an authentic Nikon product. Only Nikon brand electronic accessories (including battery chargers, batteries and AC adapters) certified by Nikon specifically for use of this Nikon digital camera are designed to operate within the operational and...
...information: http://imaging.nikon.com/ Use Only Nikon Brand Electronic Accessories Nikon COOLPIX cameras are engineered and proven to the highest standards and include complex electronic circuitry. For more information about Nikon brand accessories, contact a local authorized Nikon dealer. Introduction ...on important occasions (such as an authentic Nikon product. Only Nikon brand electronic accessories (including battery chargers, batteries and AC adapters) certified by Nikon specifically for use of this Nikon digital camera are designed to operate within the operational and...
S560 User's Manual
Page 17
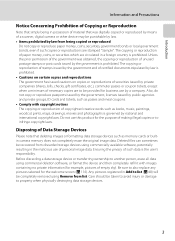
... then completely refill it with copyright notices The copying or reproduction of copyrighted creative works such as memory cards or builtin camera memory does not completely erase the original image data. Ensuring the privacy of such data is prohibited. Before discarding a ...list (A 48) will be completely removed using commercially available software, potentially resulting in possession of material that was digitally copied or reproduced by means of a scanner, digital camera or other device may be punishable by law. • Items prohibited by the government is prohibited. Any pictures ...
... then completely refill it with copyright notices The copying or reproduction of copyrighted creative works such as memory cards or builtin camera memory does not completely erase the original image data. Ensuring the privacy of such data is prohibited. Before discarding a ...list (A 48) will be completely removed using commercially available software, potentially resulting in possession of material that was digitally copied or reproduced by means of a scanner, digital camera or other device may be punishable by law. • Items prohibited by the government is prohibited. Any pictures ...

S560 User's Manual
Page 18
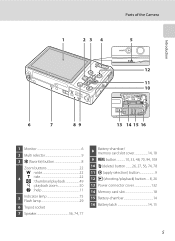
Introduction Parts of the Camera The Camera Body 5 1 23 4 Lens cover closed 6 7 8 9 10 11 1 Shutter-release button 24 2 Power-on lamp 20, 125 3 Power switch 20 4 Self-timer lamp 30 AF-assist illuminator 25, 124 5 Pin cover 80, 82, 86 6 Cable connector 80, 82, 86 7 Eyelet for camera strap 11 8 Built-in flash 28 9 Lens 136, 148 10 Lens cover 134 11 Built-in microphone 55, 69, 75 4
Introduction Parts of the Camera The Camera Body 5 1 23 4 Lens cover closed 6 7 8 9 10 11 1 Shutter-release button 24 2 Power-on lamp 20, 125 3 Power switch 20 4 Self-timer lamp 30 AF-assist illuminator 25, 124 5 Pin cover 80, 82, 86 6 Cable connector 80, 82, 86 7 Eyelet for camera strap 11 8 Built-in flash 28 9 Lens 136, 148 10 Lens cover 134 11 Built-in microphone 55, 69, 75 4
S560 User's Manual
Page 19
Introduction Parts of the Camera 1 23 4 5 12 11 10 6 7 89 13 14 15 16 1 Monitor 6 2 Multi selector 9 3 r (favorite) button 8 Zoom buttons 22 f : wide 22 4 g : tele 22 h : thumbnail playback 49 i : playback ...
Introduction Parts of the Camera 1 23 4 5 12 11 10 6 7 89 13 14 15 16 1 Monitor 6 2 Multi selector 9 3 r (favorite) button 8 Zoom buttons 22 f : wide 22 4 g : tele 22 h : thumbnail playback 49 i : playback ...

S560 User's Manual
Page 20
....5 999 6 8 10 11 12 18 15 14 13 999 a 9999 59m59s b 17 16 9h59m59s 1 Shooting mode* ....20, 33, 42, 44, 46, 69 a Number of the Camera Introduction The Monitor The following indicators may appear in the monitor during shooting and playback (actual display varies with current...
....5 999 6 8 10 11 12 18 15 14 13 999 a 9999 59m59s b 17 16 9h59m59s 1 Shooting mode* ....20, 33, 42, 44, 46, 69 a Number of the Camera Introduction The Monitor The following indicators may appear in the monitor during shooting and playback (actual display varies with current...

S560 User's Manual
Page 21
Parts of the Camera Introduction Playback 4 1 2 35 15/11/2008 12:00 17 9999.JPG 16 15 13 14 12 11 6 999 999 7 8 999 999 a 9999 9999 9 10 59m59s b ...
Parts of the Camera Introduction Playback 4 1 2 35 15/11/2008 12:00 17 9999.JPG 16 15 13 14 12 11 6 999 999 7 8 999 999 a 9999 9999 9 10 59m59s b ...

S560 User's Manual
Page 22
...) Setup mode (A 114) Voice recording mode (A 75) 8 Use the multi selector (A 9) to enter playback mode; Pressing the shutter-release button in playback mode (A 26). The camera mode can be switched to display the Favorites menu. The r (favorites) Button Press r to the following modes using the favorites menu. If the...
...) Setup mode (A 114) Voice recording mode (A 75) 8 Use the multi selector (A 9) to enter playback mode; Pressing the shutter-release button in playback mode (A 26). The camera mode can be switched to display the Favorites menu. The r (favorites) Button Press r to the following modes using the favorites menu. If the...

S560 User's Manual
Page 25
... g (j) again. Press the shutterrelease button the rest of the way down . Continuous Choose single frame, continuous mode, BSS (camera chooses sharpest shot in this may result in camera shake and blurred pictures. Attaching the Camera Strap 11 To release the shutter and take picture. Do not use force when pressing the shutter-release... option. Introduction Basic Operations Help Displays Press g (j) when M is held in series), multi-shot 16, or interval timer shooting. Exit Back Shutter-release Button The camera features a two-stage shutter-release button.
... g (j) again. Press the shutterrelease button the rest of the way down . Continuous Choose single frame, continuous mode, BSS (camera chooses sharpest shot in this may result in camera shake and blurred pictures. Attaching the Camera Strap 11 To release the shutter and take picture. Do not use force when pressing the shutter-release... option. Introduction Basic Operations Help Displays Press g (j) when M is held in series), multi-shot 16, or interval timer shooting. Exit Back Shutter-release Button The camera features a two-stage shutter-release button.

S560 User's Manual
Page 26
First Steps First Steps Charging the Battery The camera uses a Rechargeable Li-ion Battery EN-EL11 (supplied). It is recommended to charge the battery within six months after it to charge a fully depleted battery. ...
First Steps First Steps Charging the Battery The camera uses a Rechargeable Li-ion Battery EN-EL11 (supplied). It is recommended to charge the battery within six months after it to charge a fully depleted battery. ...

S560 User's Manual
Page 27
...AC Adapter allows you to supply power from 45 °C to 60 °C (113 °F to the COOLPIX S560. The supplied battery charger is from 0 °C to 15 °C (32 °F to 59 °... a wall outlet to 140 °F). The rechargeable capacity of the battery may tend to the camera. 13 Connecting another model of each status are as follows. Do not use an AC adapter other...When recharging the battery, the ambient temperature should be 5 to 35 °C (41 to retailer or Nikon-authorized service representative. 3 Unplug the charger. C Note on pages iii and iv before charging. &#...
...AC Adapter allows you to supply power from 45 °C to 60 °C (113 °F to the COOLPIX S560. The supplied battery charger is from 0 °C to 15 °C (32 °F to 59 °... a wall outlet to 140 °F). The rechargeable capacity of the battery may tend to the camera. 13 Connecting another model of each status are as follows. Do not use an AC adapter other...When recharging the battery, the ambient temperature should be 5 to 35 °C (41 to retailer or Nikon-authorized service representative. 3 Unplug the charger. C Note on pages iii and iv before charging. &#...

S560 User's Manual
Page 28
... battery in place. Be sure to check the battery is fully inserted, the battery latch will lock it in the incorrect direction may damage the camera. Turn the orange battery latch on the label at the entrance of the battery chamber, and insert the battery. Battery latch 14 First Steps Inserting... correct orientation. 3 Close the battery-chamber/memory card slot cover. Confirm that has been fully charged, using the Battery Charger MH-64 (supplied), into your camera. 1 Open the battery-chamber/memory card slot cover. 2 Insert the battery.
... battery in place. Be sure to check the battery is fully inserted, the battery latch will lock it in the incorrect direction may damage the camera. Turn the orange battery latch on the label at the entrance of the battery chamber, and insert the battery. Battery latch 14 First Steps Inserting... correct orientation. 3 Close the battery-chamber/memory card slot cover. Confirm that has been fully charged, using the Battery Charger MH-64 (supplied), into your camera. 1 Open the battery-chamber/memory card slot cover. 2 Insert the battery.
S560 User's Manual
Page 29
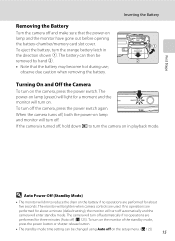
.... To turn off on . The power-on lamp (green) will light for about five seconds. To turn on the setup menu. (A 125) 15 If the camera is turned off . To eject the battery, turn off , hold down c to reduce the drain on the battery if no operations are performed for about... mode time setting can then be changed using Auto off automatically if no operations are used. observe due caution when removing the battery. When the camera turns off ) (A 125). If no operations are performed for three minutes (Auto off , both the power-on in the direction shown 1.
.... To turn off on . The power-on lamp (green) will light for about five seconds. To turn on the setup menu. (A 125) 15 If the camera is turned off . To eject the battery, turn off , hold down c to reduce the drain on the battery if no operations are performed for about... mode time setting can then be changed using Auto off automatically if no operations are used. observe due caution when removing the battery. When the camera turns off ) (A 125). If no operations are performed for three minutes (Auto off , both the power-on in the direction shown 1.

S560 User's Manual
Page 30
... Casablanca Back 16 Date Set time and date? First Steps Setting Display Language, Date and Time A language-selection dialog is displayed the first time the camera is turned on. 1 Press the power switch to turn on. 2 Use the multi selector to choose the desired language and press k. The Date menu is... displayed. For information on the camera. The power-on lamp (green) will light for a moment and the monitor will not be set. 4 Press J or K to display the W mark on the ...
... Casablanca Back 16 Date Set time and date? First Steps Setting Display Language, Date and Time A language-selection dialog is displayed the first time the camera is turned on. 1 Press the power switch to turn on. 2 Use the multi selector to choose the desired language and press k. The Date menu is... displayed. For information on the camera. The power-on lamp (green) will light for a moment and the monitor will not be set. 4 Press J or K to display the W mark on the ...


