
S230 User's Manual
Page 4
...those who use electronic equipment in the presence of the camera or AC adapter could result in injury. After removing or disconnecting the power source, take the product to a Nikon-authorized service representative for inspection. ii Do not use the camera or AC adapter in the presence of flammable gas ... adapter and remove the battery immediately, taking care to avoid burns. Should the camera or AC adapter break open as this could result in explosion or fire. For Your Safety To prevent damage to your Nikon product or injury to yourself or to others, read the following symbol: This...
...those who use electronic equipment in the presence of the camera or AC adapter could result in injury. After removing or disconnecting the power source, take the product to a Nikon-authorized service representative for inspection. ii Do not use the camera or AC adapter in the presence of flammable gas ... adapter and remove the battery immediately, taking care to avoid burns. Should the camera or AC adapter break open as this could result in explosion or fire. For Your Safety To prevent damage to your Nikon product or injury to yourself or to others, read the following symbol: This...
S230 User's Manual
Page 9
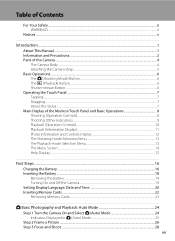
Table of Contents For Your Safety...ii WARNINGS...ii Notices ...v Introduction ...1 About This Manual ...1 Information and Precautions...2 Parts of the Camera...4 The Camera Body ...4 Attaching the Camera Strap ...5 Basic Operations...6 The A (Shooting Mode) Button...6 The c (Playback) Button...6 Shutter-release Button ...6 Operating the ...First Steps ...16 Charging the Battery ...16 Inserting the Battery ...18 Removing the Battery ...19 Turning On and Off the Camera...19 Setting Display Language, Date and Time 20 Inserting Memory Cards ...22 Removing Memory Cards...23 A Basic Photography and ...
Table of Contents For Your Safety...ii WARNINGS...ii Notices ...v Introduction ...1 About This Manual ...1 Information and Precautions...2 Parts of the Camera...4 The Camera Body ...4 Attaching the Camera Strap ...5 Basic Operations...6 The A (Shooting Mode) Button...6 The c (Playback) Button...6 Shutter-release Button ...6 Operating the ...First Steps ...16 Charging the Battery ...16 Inserting the Battery ...18 Removing the Battery ...19 Turning On and Off the Camera...19 Setting Display Language, Date and Time 20 Inserting Memory Cards ...22 Removing Memory Cards...23 A Basic Photography and ...

S230 User's Manual
Page 10
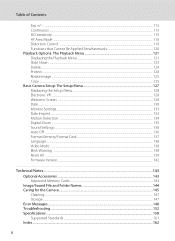
... Suited for the Scene 36 Shooting in Scene Mode ...36 Setting the Scene Mode...36 Features ...37 Shooting in the Scene Mode Selected by the Camera (Scene Auto Selector 43 Shooting in Portrait/Night Portrait Scene Mode 44 Taking Pictures in Food Mode...45 Using the Draw Option...47 Taking Pictures...
... Suited for the Scene 36 Shooting in Scene Mode ...36 Setting the Scene Mode...36 Features ...37 Shooting in the Scene Mode Selected by the Camera (Scene Auto Selector 43 Shooting in Portrait/Night Portrait Scene Mode 44 Taking Pictures in Food Mode...45 Using the Draw Option...47 Taking Pictures...

S230 User's Manual
Page 11
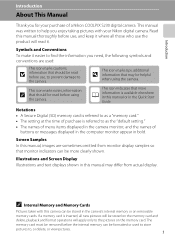
......90 Connecting to Televisions, Computers and Printers 91 Connecting to a TV...91 Connecting to a Computer...93 Before Connecting the Camera...93 Transferring Pictures from a Camera to a Computer 94 Connecting to a Printer...97 Connecting the Camera and Printer...98 Printing Pictures One at a Time ...99 Printing Multiple Pictures ...100 Creating a DPOF Print Order: Print...
......90 Connecting to Televisions, Computers and Printers 91 Connecting to a TV...91 Connecting to a Computer...93 Before Connecting the Camera...93 Transferring Pictures from a Camera to a Computer 94 Connecting to a Printer...97 Connecting the Camera and Printer...98 Printing Pictures One at a Time ...99 Printing Multiple Pictures ...100 Creating a DPOF Print Order: Print...
S230 User's Manual
Page 12
...The Playback Menu 121 Displaying the Playback Menu ...121 Slide Show...123 Delete...124 Protect ...124 Rotate Image ...125 Copy ...125 Basic Camera Setup: The Setup Menu 127 Displaying the Setup Menu...128 Electronic VR ...128 Welcome Screen ...129 Date...130 Monitor Settings...133 Date Imprint... ...133 Motion Detection ...134 Digital Zoom ...135 Sound Settings...136 Auto Off ...136 Format Memory/Format Card...137 Language...138 Video Mode ...138 Blink Warning ...138 Reset ...
...The Playback Menu 121 Displaying the Playback Menu ...121 Slide Show...123 Delete...124 Protect ...124 Rotate Image ...125 Copy ...125 Basic Camera Setup: The Setup Menu 127 Displaying the Setup Menu...128 Electronic VR ...128 Welcome Screen ...129 Date...130 Monitor Settings...133 Date Imprint... ...133 Motion Detection ...134 Digital Zoom ...135 Sound Settings...136 Auto Off ...136 Format Memory/Format Card...137 Language...138 Video Mode ...138 Blink Warning ...138 Reset ...
S230 User's Manual
Page 13
... Cards Pictures taken with your purchase of a Nikon COOLPIX S230 digital camera. The memory card must be removed before the internal memory can be formatted or used : This icon marks cautions, B information that should be read before using the camera. Introduction Introduction About This Manual Thank you for your Nikon digital camera. This icon marks notes, information C that more...
... Cards Pictures taken with your purchase of a Nikon COOLPIX S230 digital camera. The memory card must be removed before the internal memory can be formatted or used : This icon marks cautions, B information that should be read before using the camera. Introduction Introduction About This Manual Thank you for your Nikon digital camera. This icon marks notes, information C that more...
S230 User's Manual
Page 14
... notice. • Nikon will not be held liable for any damages resulting from the Nikon representative in the batteries overheating, igniting, rupturing, or leaking. The use of this Nikon digital camera are designed to -date with normal operation of the camera or result in your...stored in a retrieval system, or translated into any language in any form, by Nikon specifically for contact information: http://imaging.nikon.com/ Use Only Nikon Brand Electronic Accessories Nikon COOLPIX cameras are engineered and proven to frequently asked questions (FAQs), and general advice on ...
... notice. • Nikon will not be held liable for any damages resulting from the Nikon representative in the batteries overheating, igniting, rupturing, or leaking. The use of this Nikon digital camera are designed to -date with normal operation of the camera or result in your...stored in a retrieval system, or translated into any language in any form, by Nikon specifically for contact information: http://imaging.nikon.com/ Use Only Nikon Brand Electronic Accessories Nikon COOLPIX cameras are engineered and proven to frequently asked questions (FAQs), and general advice on ...

S230 User's Manual
Page 15
...copy or reproduce passports issued by the government, licenses issued by law is prohibited. Unless the prior permission of the government was digitally copied or reproduced by law from discarded storage devices using commercial deletion software, or format the device and then completely refill it... when physically destroying data storage devices. 3 Care should be punishable by law. • Items prohibited by means of a scanner, digital camera or other device may be taken to avoid injury or damage to also replace any pictures selected for the purpose of making illegal copies...
...copy or reproduce passports issued by the government, licenses issued by law is prohibited. Unless the prior permission of the government was digitally copied or reproduced by law from discarded storage devices using commercial deletion software, or format the device and then completely refill it... when physically destroying data storage devices. 3 Care should be punishable by law. • Items prohibited by means of a scanner, digital camera or other device may be taken to avoid injury or damage to also replace any pictures selected for the purpose of making illegal copies...

S230 User's Manual
Page 16
Parts of the Camera The Camera Body 1 2 3 45 6 Introduction 9 8 7 Lens cover closed 10 Zoom control 27 f : wide 27 1 g : tele 27 h : thumbnail playback 52 i : playback zoom 54 2 Shutter-release button 28 3 Power switch/Power-on lamp 24, 136 4 Built-in flash 32 5 Self-timer lamp 34 6 Lens 147, 158 7 Eyelet for camera strap 5 8 Built-in microphone 66, 82, 86 9 Speaker 67, 85, 88 10 Lens cover 145 4
Parts of the Camera The Camera Body 1 2 3 45 6 Introduction 9 8 7 Lens cover closed 10 Zoom control 27 f : wide 27 1 g : tele 27 h : thumbnail playback 52 i : playback zoom 54 2 Shutter-release button 28 3 Power switch/Power-on lamp 24, 136 4 Built-in flash 32 5 Self-timer lamp 34 6 Lens 147, 158 7 Eyelet for camera strap 5 8 Built-in microphone 66, 82, 86 9 Speaker 67, 85, 88 10 Lens cover 145 4

S230 User's Manual
Page 17
Parts of the Camera Introduction 1 2 3 4 Opening the pin cover 56 7 8 9 10 11 12 1 A (shooting mode) button 6 2 c (playback) button 6, 30 3 Indicator lamp 86 Flash lamp 33 4 Monitor 8 5 Tripod socket 6 Pin cover 91, 94, 98 7 Cable connector 91, 94, 98 8 Battery-chamber/ memory card slot cover 18, 22 9 Battery latch 18, 19 10 Battery-chamber 18 11 Memory card slot 22 12 Power connector cover 143 Attaching the Camera Strap 5
Parts of the Camera Introduction 1 2 3 4 Opening the pin cover 56 7 8 9 10 11 12 1 A (shooting mode) button 6 2 c (playback) button 6, 30 3 Indicator lamp 86 Flash lamp 33 4 Monitor 8 5 Tripod socket 6 Pin cover 91, 94, 98 7 Cable connector 91, 94, 98 8 Battery-chamber/ memory card slot cover 18, 22 9 Battery latch 18, 19 10 Battery-chamber 18 11 Memory card slot 22 12 Power connector cover 143 Attaching the Camera Strap 5

S230 User's Manual
Page 18
To set focus and exposure Press the shutter-release button the rest of the way down to turn the camera on in camera shake and blurred pictures. Do not use force when pressing the shutter-release button, as this position. Focus and exposure lock ...shooting mode to enter playback mode. • Press the c button in shooting mode to display the shooting-mode selection menu (A 13). Shutter-release Button The camera features a two-stage shutter-release button. To release the shutter and take picture 6 Introduction Basic Operations The A (Shooting Mode) Button • Press the...
To set focus and exposure Press the shutter-release button the rest of the way down to turn the camera on in camera shake and blurred pictures. Do not use force when pressing the shutter-release button, as this position. Focus and exposure lock ...shooting mode to enter playback mode. • Press the c button in shooting mode to display the shooting-mode selection menu (A 13). Shutter-release Button The camera features a two-stage shutter-release button. To release the shutter and take picture 6 Introduction Basic Operations The A (Shooting Mode) Button • Press the...

S230 User's Manual
Page 19
... or the supplied stylus. Introduction Dragging Drag your finger across the touch panel. The strap may slip off the stylus and the camera may fall. 7 Operating the Touch Panel The COOLPIX S230's monitor is difficult, such as shown. B Notes on the Touch Panel and the Stylus • Do not press on the touch... not scratch or press the touch panel too hard. • Do not place the stylus where small children can reach. • Do not carry the camera by the stylus.
... or the supplied stylus. Introduction Dragging Drag your finger across the touch panel. The strap may slip off the stylus and the camera may fall. 7 Operating the Touch Panel The COOLPIX S230's monitor is difficult, such as shown. B Notes on the Touch Panel and the Stylus • Do not press on the touch... not scratch or press the touch panel too hard. • Do not place the stylus where small children can reach. • Do not carry the camera by the stylus.

S230 User's Manual
Page 20
Introduction Main Display of the Monitor/Touch Panel and Basic Operations Shooting (Operation Controls) Tap the following controls to change settings. • The controls available and indicators displayed vary with information display on/off (A 12), shooting mode and the current camera settings. 1 2 3 6 4 7 5 1 Flash mode 32 2 Self-timer 34 Macro mode 35 3 Portrait one-touch zoom (in Portrait or Night portrait scene mode) .... 45 4 A Information display on/off 12 5 White balance (in Food scene mode 45 6 a Touch AF/AE off 26 7 F Menu 14 8
Introduction Main Display of the Monitor/Touch Panel and Basic Operations Shooting (Operation Controls) Tap the following controls to change settings. • The controls available and indicators displayed vary with information display on/off (A 12), shooting mode and the current camera settings. 1 2 3 6 4 7 5 1 Flash mode 32 2 Self-timer 34 Macro mode 35 3 Portrait one-touch zoom (in Portrait or Night portrait scene mode) .... 45 4 A Information display on/off 12 5 White balance (in Food scene mode 45 6 a Touch AF/AE off 26 7 F Menu 14 8

S230 User's Manual
Page 21
... Indicators) The following monitor display shows the current settings applied from the shooting menu (A 107) and focus area. • The indicators displayed vary with current camera settings and shooting mode. 1 23 4 56 7 8 9 10 13 11 12 14 15 999 16 17 18 999 9999 19 1 00 1 00 1 Shooting mode 24, 36...
... Indicators) The following monitor display shows the current settings applied from the shooting menu (A 107) and focus area. • The indicators displayed vary with current camera settings and shooting mode. 1 23 4 56 7 8 9 10 13 11 12 14 15 999 16 17 18 999 9999 19 1 00 1 00 1 Shooting mode 24, 36...

S230 User's Manual
Page 22
Introduction Main Display of the Monitor/Touch Panel and Basic Operations Playback (Operation Controls) Tap the following controls to switch between monitor displays, or delete or edit pictures. • The controls available and indicators displayed vary with information on/off (A 12), the picture played back and the current camera settings. 2 3 4 5 1 6 1 A Information display on/off 12 2 B Display previous picture 30 3 C Display subsequent picture 30 4 D Editing (still pictures 55, 66, 77 5 E Delete 30 6 F Menu 14 10
Introduction Main Display of the Monitor/Touch Panel and Basic Operations Playback (Operation Controls) Tap the following controls to switch between monitor displays, or delete or edit pictures. • The controls available and indicators displayed vary with information on/off (A 12), the picture played back and the current camera settings. 2 3 4 5 1 6 1 A Information display on/off 12 2 B Display previous picture 30 3 C Display subsequent picture 30 4 D Editing (still pictures 55, 66, 77 5 E Delete 30 6 F Menu 14 10

S230 User's Manual
Page 28
First Steps First Steps Charging the Battery The camera uses a Rechargeable Li-ion Battery EN-EL10 (supplied). Connect the power cable to show that the charger is running low. 1 Connect the power cable. Charging ...
First Steps First Steps Charging the Battery The camera uses a Rechargeable Li-ion Battery EN-EL10 (supplied). Connect the power cable to show that the charger is running low. 1 Connect the power cable. Charging ...

S230 User's Manual
Page 29
..., under any circumstances, use an AC Adapter EH-62D (available separately from Nikon) (A 143). First Steps Charging the Battery The following chart explains CHARGE lamp status. Remove the battery and reinsert it to the camera. 17 Battery fully charged. • The battery is for use only with... an ambient temperature of AC adapter. B Notes on the Battery • Be sure to 95 °F) before use only genuine Nikon brand rechargeable batteries. • Be sure...
..., under any circumstances, use an AC Adapter EH-62D (available separately from Nikon) (A 143). First Steps Charging the Battery The following chart explains CHARGE lamp status. Remove the battery and reinsert it to the camera. 17 Battery fully charged. • The battery is for use only with... an ambient temperature of AC adapter. B Notes on the Battery • Be sure to 95 °F) before use only genuine Nikon brand rechargeable batteries. • Be sure...

S230 User's Manual
Page 30
B Inserting the Battery Inserting the battery upside down or backwards could damage the camera. Use the battery to check the battery is in the direction indicated by the arrow 1 and fully insert the battery 2. When the battery is running ... the battery-chamber/memory card slot cover. 2 Insert the battery. First Steps Inserting the Battery Insert a Rechargeable Li-ion Battery EN-EL10 (supplied) into your camera. • Charge the battery before the first use or when the battery is fully inserted, the battery latch will lock it in place. Be sure...
B Inserting the Battery Inserting the battery upside down or backwards could damage the camera. Use the battery to check the battery is in the direction indicated by the arrow 1 and fully insert the battery 2. When the battery is running ... the battery-chamber/memory card slot cover. 2 Insert the battery. First Steps Inserting the Battery Insert a Rechargeable Li-ion Battery EN-EL10 (supplied) into your camera. • Charge the battery before the first use or when the battery is fully inserted, the battery latch will lock it in place. Be sure...

S230 User's Manual
Page 31
... menu (A 127). 19 If no operations are performed for another three minutes, the camera will turn off automatically (the auto off automatically and the camera will reactivate the monitor. Inserting the Battery Turning On and Off the Camera To turn on lamp (green) will light for about a minute (default setting),...Mode) If no operations are performed for a moment and the monitor will turn on lamp and the monitor have gone out before the camera enters standby mode can then be changed from before opening the battery-chamber/memory card slot cover. The time allowed to turn the...
... menu (A 127). 19 If no operations are performed for another three minutes, the camera will turn off automatically (the auto off automatically and the camera will reactivate the monitor. Inserting the Battery Turning On and Off the Camera To turn on lamp (green) will light for about a minute (default setting),...Mode) If no operations are performed for a moment and the monitor will turn on lamp and the monitor have gone out before the camera enters standby mode can then be changed from before opening the battery-chamber/memory card slot cover. The time allowed to turn the...

S230 User's Manual
Page 32
... panel, see "Operating the Touch Panel" (A 7). . 3 Tap Yes. First Steps Setting Display Language, Date and Time A language-selection dialog is displayed the first time the camera is in effect, tap W in the time zone selection screen displayed in step 4 to turn on the daylight saving time option. Yes No London Casablanca... off the daylight saving time option, tap W again. 20 London Casablanca When the daylight saving time option is enabled, W glows yellow. The power-on the camera.
... panel, see "Operating the Touch Panel" (A 7). . 3 Tap Yes. First Steps Setting Display Language, Date and Time A language-selection dialog is displayed the first time the camera is in effect, tap W in the time zone selection screen displayed in step 4 to turn on the daylight saving time option. Yes No London Casablanca... off the daylight saving time option, tap W again. 20 London Casablanca When the daylight saving time option is enabled, W glows yellow. The power-on the camera.


