S200 User's Manual
Page 2
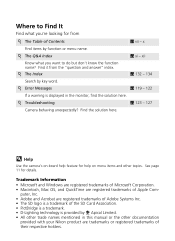
k The Index c 132 - 134 Search by function or menu name. k Troubleshooting c 123 - 127 Camera behaving unexpectedly? puter, Inc. • Adobe and Acrobat are registered trademarks of Adobe Systems Inc. • The SD logo is a trademark of Apple Com...you 're looking for details. x Find items by key word. Find the solution here. l Help Use the camera's on-board help feature for help on menu items and other documentation provided with your Nikon product are registered trademarks of the SD Card Association. • PictBridge is a trademark. • D-Lighting technology ...
k The Index c 132 - 134 Search by function or menu name. k Troubleshooting c 123 - 127 Camera behaving unexpectedly? puter, Inc. • Adobe and Acrobat are registered trademarks of Adobe Systems Inc. • The SD logo is a trademark of Apple Com...you 're looking for details. x Find items by key word. Find the solution here. l Help Use the camera's on-board help feature for help on menu items and other documentation provided with your Nikon product are registered trademarks of the SD Card Association. • PictBridge is a trademark. • D-Lighting technology ...
S200 User's Manual
Page 4
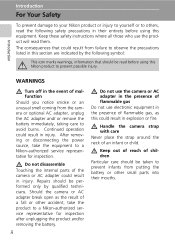
After removing or disconnecting the power source, take the product to a Nikon-authorized service representative for inspection. Should the camera or AC adapter break open as this could result from failure to observe the precautions listed in this section are indicated by qualified .... The consequences that should be performed only by the following safety precautions in their mouths. Repairs should be taken to prevent infants from the camera or optional AC adapter, unplug the AC adapter and/ or remove the battery immediately, taking care to avoid burns. Keep out of reach ...
After removing or disconnecting the power source, take the product to a Nikon-authorized service representative for inspection. Should the camera or AC adapter break open as this could result from failure to observe the precautions listed in this section are indicated by qualified .... The consequences that should be performed only by the following safety precautions in their mouths. Repairs should be taken to prevent infants from the camera or optional AC adapter, unplug the AC adapter and/ or remove the battery immediately, taking care to avoid burns. Keep out of reach ...
S200 User's Manual
Page 9
... ...6 Playback ...7 Basic Operations 8 The i (shooting/playback) Button 8 The C (mode) Button 8 The m Button 9 Turning On and Off the Camera 11 Help Displays 11 First Steps...12 Charging the Battery 12 Inserting the Battery 14 Removing the Battery 15 Setting Display Language, Date, and Time ...16 Inserting Memory Cards 18 Removing Memory Cards 19 L Basic Photography and Playback: Auto Mode 20 Step 1 Turn the Camera On and Select L (Auto) Mode 20 Step 2 Frame a Picture 22 Step 3 Focus and Shoot 24 Step 4 Viewing and Deleting Pictures 26 Using...
... ...6 Playback ...7 Basic Operations 8 The i (shooting/playback) Button 8 The C (mode) Button 8 The m Button 9 Turning On and Off the Camera 11 Help Displays 11 First Steps...12 Charging the Battery 12 Inserting the Battery 14 Removing the Battery 15 Setting Display Language, Date, and Time ...16 Inserting Memory Cards 18 Removing Memory Cards 19 L Basic Photography and Playback: Auto Mode 20 Step 1 Turn the Camera On and Select L (Auto) Mode 20 Step 2 Frame a Picture 22 Step 3 Focus and Shoot 24 Step 4 Viewing and Deleting Pictures 26 Using...
S200 User's Manual
Page 11
... 84 d White Balance 86 q Continuous 88 A Best Shot Selector (BSS 90 W ISO Sensitivity 91 d Color Options 91 c Electronic VR 92 Restrictions on Camera Settings 93 Playback Options: The Playback Menu 94 Displaying the Playback Menu 94 i D-Lighting 48 w Print set 81 z Slide Show 96 A Delete ...97 ...D Protect 98 E Transfer Marking 98 H Small pic 51 O Voice memo 52 L Copy...99 Basic Camera Setup: The Setup Menu 100 Displaying the Setup Menu 101 R Menus 101 H Quick Startup 102 V Welcome Screen 102 W Date...103 Z Monitor Settings 106 ix
... 84 d White Balance 86 q Continuous 88 A Best Shot Selector (BSS 90 W ISO Sensitivity 91 d Color Options 91 c Electronic VR 92 Restrictions on Camera Settings 93 Playback Options: The Playback Menu 94 Displaying the Playback Menu 94 i D-Lighting 48 w Print set 81 z Slide Show 96 A Delete ...97 ...D Protect 98 E Transfer Marking 98 H Small pic 51 O Voice memo 52 L Copy...99 Basic Camera Setup: The Setup Menu 100 Displaying the Setup Menu 101 R Menus 101 H Quick Startup 102 V Welcome Screen 102 W Date...103 Z Monitor Settings 106 ix
S200 User's Manual
Page 12
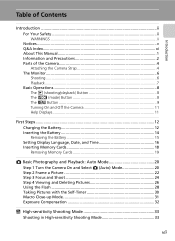
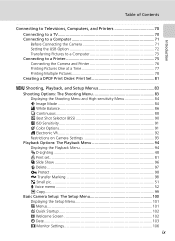
Introduction Table of Contents f Date Imprint 107 h Sound Settings 109 i Auto Off 109 M Format Memory/O Format Card 110 j Language 111 k Interface 111 n Reset All 112 B Firmware Version 113 Technical Notes 114 Optional Accessories 114 Approved Memory Cards 114 Image/Sound File and Folder Names 115 Caring for the Camera 116 Cleaning 118 Storage ...118 Error Messages 119 Troubleshooting 123 Specifications 128 Supported Standards 131 Index...132 x
Introduction Table of Contents f Date Imprint 107 h Sound Settings 109 i Auto Off 109 M Format Memory/O Format Card 110 j Language 111 k Interface 111 n Reset All 112 B Firmware Version 113 Technical Notes 114 Optional Accessories 114 Approved Memory Cards 114 Image/Sound File and Folder Names 115 Caring for the Camera 116 Cleaning 118 Storage ...118 Error Messages 119 Troubleshooting 123 Specifications 128 Supported Standards 131 Index...132 x
S200 User's Manual
Page 13
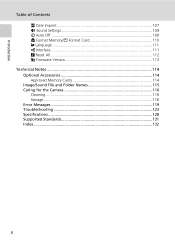
...(High-sensitivity) mode c 20 34 42 33 xi Language 111 Can I keep the monitor from beeping? n (Scene) mode How can I keep the camera from turning off 109 How do I display the menus in ? General Questions Question Key phrase c What do I change time zones when I display the ...What does this "question and answer" index. L (Auto) mode Is there an easy way to take more information on a menu? Cleaning the camera 118 Camera Setup Question Key phrase c How do I set the clock for daylight savings time? World time 16 , 104 How do these indicators mean ?...
...(High-sensitivity) mode c 20 34 42 33 xi Language 111 Can I keep the monitor from beeping? n (Scene) mode How can I keep the camera from turning off 109 How do I display the menus in ? General Questions Question Key phrase c What do I change time zones when I display the ...What does this "question and answer" index. L (Auto) mode Is there an easy way to take more information on a menu? Cleaning the camera 118 Camera Setup Question Key phrase c How do I set the clock for daylight savings time? World time 16 , 104 How do these indicators mean ?...
S200 User's Manual
Page 14
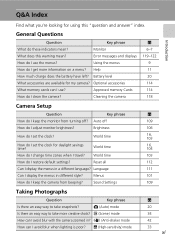
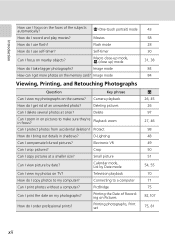
Macro close-up mode, M (close up) mode How do I zoom in on the camera? Image mode Viewing, Printing, and Retouching Photographs Question Key phrase Can I take bigger photographs? Camera playback How do I view my photographs on pictures to make sure they're in shadows? Delete Can I get more photos on Pictures How do...
Macro close-up mode, M (close up) mode How do I zoom in on the camera? Image mode Viewing, Printing, and Retouching Photographs Question Key phrase Can I take bigger photographs? Camera playback How do I view my photographs on pictures to make sure they're in shadows? Delete Can I get more photos on Pictures How do...
S200 User's Manual
Page 15
...icon marks notes, informa- Introduction About This Manual Thank you enjoy taking pictures with this camera can be format- This manual has been written to the camera. Notations • A Secure Digital (SD) memory card is referred to find the information you need, the following symbols and... taken with your purchase of purchase is available elsewhere in this manual or in the camera monitor are used to as a "memory card." • The setting at the time of a Nikon COOLPIX S200 digital camera. If a memory card is inserted, all those who use to prevent damage to ...
...icon marks notes, informa- Introduction About This Manual Thank you enjoy taking pictures with this camera can be format- This manual has been written to the camera. Notations • A Secure Digital (SD) memory card is referred to find the information you need, the following symbols and... taken with your purchase of purchase is available elsewhere in this manual or in the camera monitor are used to as a "memory card." • The setting at the time of a Nikon COOLPIX S200 digital camera. If a memory card is inserted, all those who use to prevent damage to ...
S200 User's Manual
Page 16
...Asia, Oceania, and the Middle East: http://www.nikon-asia.com/ Visit these sites to keep up-to-date with this Nikon digital camera are designed to the highest standards and include complex electronic circuitry. Only Nikon brand electronic accessories (including battery chargers, batteries, ...and safety requirements of this electronic circuitry. Nikon will not be held liable for contact information: http://nikonimaging.com/ Use Only Nikon Brand Electronic Accessories Nikon COOLPIX cameras are engineered and proven to ensure that the camera is accu- Rechargeable Li-ion Battery ...
...Asia, Oceania, and the Middle East: http://www.nikon-asia.com/ Visit these sites to keep up-to-date with this Nikon digital camera are designed to the highest standards and include complex electronic circuitry. Only Nikon brand electronic accessories (including battery chargers, batteries, ...and safety requirements of this electronic circuitry. Nikon will not be held liable for contact information: http://nikonimaging.com/ Use Only Nikon Brand Electronic Accessories Nikon COOLPIX cameras are engineered and proven to ensure that the camera is accu- Rechargeable Li-ion Battery ...
S200 User's Manual
Page 17
...discarding a data storage device or transferring ownership to another person, erase all data using commercially available software, potentially resulting in camera memory does not completely erase the original image data. Unless the prior permission of the government has been obtained, the copying ... property when physically destroying data storage devices. 3 Disposing of Data Storage Devices Please note that has been digitally copied or reproduced by means of a scanner, digital camera or other device may be punishable by law. • Items prohibited by law from discarded storage devices ...
...discarding a data storage device or transferring ownership to another person, erase all data using commercially available software, potentially resulting in camera memory does not completely erase the original image data. Unless the prior permission of the government has been obtained, the copying ... property when physically destroying data storage devices. 3 Disposing of Data Storage Devices Please note that has been digitally copied or reproduced by means of a scanner, digital camera or other device may be punishable by law. • Items prohibited by law from discarded storage devices ...
S200 User's Manual
Page 18
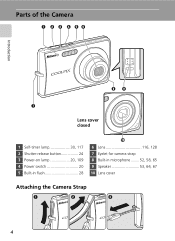
Parts of the Camera q w e r ty Introduction io u Lens cover closed 1 Self-timer lamp 30, 117 2 Shutter-release button 24 3 Power-on lamp 20, 109 4 Power switch 20 5 Built-in flash 28 !0 6 Lens 116, 128 7 Eyelet for camera strap 8 Built-in microphone ........ 52, 58, 65 9 Speaker 53, 64, 67 10 Lens cover Attaching the Camera Strap q w e 4
Parts of the Camera q w e r ty Introduction io u Lens cover closed 1 Self-timer lamp 30, 117 2 Shutter-release button 24 3 Power-on lamp 20, 109 4 Power switch 20 5 Built-in flash 28 !0 6 Lens 116, 128 7 Eyelet for camera strap 8 Built-in microphone ........ 52, 58, 65 9 Speaker 53, 64, 67 10 Lens cover Attaching the Camera Strap q w e 4
S200 User's Manual
Page 19
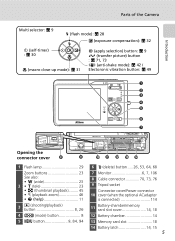
Introduction Parts of the Camera Multi selector: c 9 J (flash mode): c 28 I (exposure compensation): c 32 H (self-timer) : c 30 F (macro close-up mode): c 31 d (apply selection) button: c 9 g (transfer picture) button : c 71, 73 F (anti-...
Introduction Parts of the Camera Multi selector: c 9 J (flash mode): c 28 I (exposure compensation): c 32 H (self-timer) : c 30 F (macro close-up mode): c 31 d (apply selection) button: c 9 g (transfer picture) button : c 71, 73 F (anti-...
S200 User's Manual
Page 20
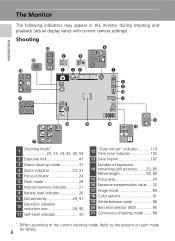
... to the current shooting mode. Introduction The Monitor The following indicators may appear in the monitor during shooting and playback (actual display varies with current camera settings). Shooting @1 y w t @0 !9 q er u i o !0 !8 !1 9999 !6 !5 !4 !2 !3 !7 1 Shooting mode 20, 33, 34, 42, 43, 58 2 Exposure lock 41 3 Macro close-up mode 31 4 Zoom indicator 23, 31 5 Focus...
... to the current shooting mode. Introduction The Monitor The following indicators may appear in the monitor during shooting and playback (actual display varies with current camera settings). Shooting @1 y w t @0 !9 q er u i o !0 !8 !1 9999 !6 !5 !4 !2 !3 !7 1 Shooting mode 20, 33, 34, 42, 43, 58 2 Exposure lock 41 3 Macro close-up mode 31 4 Zoom indicator 23, 31 5 Focus...
S200 User's Manual
Page 22
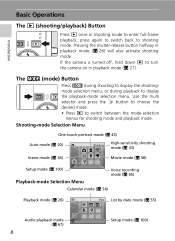
... i to display the playback-mode selection menu. The C (mode) Button Press C during shooting to display the shootingmode selection menu, or during playback to turn the camera on in playback mode (c 27). press again to switch back to switch between the mode-selection menus for shooting mode and playback mode. Use the...
... i to display the playback-mode selection menu. The C (mode) Button Press C during shooting to display the shootingmode selection menu, or during playback to turn the camera on in playback mode (c 27). press again to switch back to switch between the mode-selection menus for shooting mode and playback mode. Use the...

S200 User's Manual
Page 25
If the camera is turned off the camera, press the power switch again. Shooting menu Image mode White balance Continuous BSS ISO sensitivity Exit q Continuous Choose single frame, continous mode, multi-shot 16 (... original menu, press l (v) again. • Press m to return to view a description of the currently selected menu option. Introduction Turning On and Off the Camera To turn the camera on in one picture), or interval timer shooting. To turn on lamp (green) will light and the monitor will turn off , hold down i to...
If the camera is turned off the camera, press the power switch again. Shooting menu Image mode White balance Continuous BSS ISO sensitivity Exit q Continuous Choose single frame, continous mode, multi-shot 16 (... original menu, press l (v) again. • Press m to return to view a description of the currently selected menu option. Introduction Turning On and Off the Camera To turn the camera on in one picture), or interval timer shooting. To turn on lamp (green) will light and the monitor will turn off , hold down i to...
S200 User's Manual
Page 26
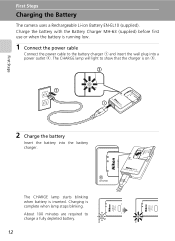
... when the battery is on 3. 2 Charge the battery Insert the battery into a power outlet 2. Charging is inserted. First Steps First Steps Charging the Battery The camera uses a Rechargeable Li-ion Battery EN-EL10 (supplied).
... when the battery is on 3. 2 Charge the battery Insert the battery into a power outlet 2. Charging is inserted. First Steps First Steps Charging the Battery The camera uses a Rechargeable Li-ion Battery EN-EL10 (supplied).

S200 User's Manual
Page 27
... battery immediately and take both devices to read and follow the warnings for the Camera" (c 116), before using the battery charger. k Alternative Power Resources To power the camera continuously for use an AC Adapter EH-62D (available separately from Nikon) (c 114). If ambient temperature is not 5 to 35 °C (41 to 95 °...
... battery immediately and take both devices to read and follow the warnings for the Camera" (c 116), before using the battery charger. k Alternative Power Resources To power the camera continuously for use an AC Adapter EH-62D (available separately from Nikon) (c 114). If ambient temperature is not 5 to 35 °C (41 to 95 °...

S200 User's Manual
Page 28
The battery is fully inserted when the battery latch clicks back into your camera. 1 Open the battery-chamber/memory card slot cover. Be sure to check the battery is in the correct orientation. Battery latch 3 Close the battery-chamber/... been fully charged, using the Battery Charger MH-63 (supplied), into place. j Inserting the Battery Inserting the battery upside down or backwards could damage the camera. First Steps 2 Insert the battery. The orange battery latch is pushed aside as described on the label at the entrance of the battery chamber, and...
The battery is fully inserted when the battery latch clicks back into your camera. 1 Open the battery-chamber/memory card slot cover. Be sure to check the battery is in the correct orientation. Battery latch 3 Close the battery-chamber/... been fully charged, using the Battery Charger MH-63 (supplied), into place. j Inserting the Battery Inserting the battery upside down or backwards could damage the camera. First Steps 2 Insert the battery. The orange battery latch is pushed aside as described on the label at the entrance of the battery chamber, and...
S200 User's Manual
Page 29
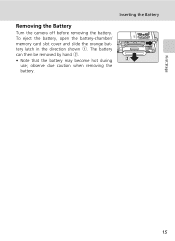
The battery can then be removed by hand 2. • Note that the battery may become hot during use; First Steps Inserting the Battery Removing the Battery Turn the camera off before removing the battery. observe due caution when removing the battery. 15 To eject the battery, open the battery-chamber/ memory card slot cover and slide the orange battery latch in the direction shown 1.
The battery can then be removed by hand 2. • Note that the battery may become hot during use; First Steps Inserting the Battery Removing the Battery Turn the camera off before removing the battery. observe due caution when removing the battery. 15 To eject the battery, open the battery-chamber/ memory card slot cover and slide the orange battery latch in the direction shown 1.
S200 User's Manual
Page 30
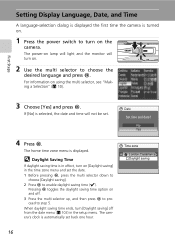
.... 1 Before pressing d, press the multi selector down to choose [Daylight saving]. 2 Press d to turn on. 2 Use the multi selector to step 5. The camera's clock is automatically set . 4 Press d. First Steps 3 Choose [Yes] and press d. The home time zone menu is selected, the date and time will ... in the setup menu. Date Set time and date? Setting Display Language, Date, and Time A language-selection dialog is displayed the first time the camera is turned on. 1 Press the power switch to enable daylight saving time (y). l Daylight Saving Time If daylight saving time is in effect, turn...
.... 1 Before pressing d, press the multi selector down to choose [Daylight saving]. 2 Press d to turn on. 2 Use the multi selector to step 5. The camera's clock is automatically set . 4 Press d. First Steps 3 Choose [Yes] and press d. The home time zone menu is selected, the date and time will ... in the setup menu. Date Set time and date? Setting Display Language, Date, and Time A language-selection dialog is displayed the first time the camera is turned on. 1 Press the power switch to enable daylight saving time (y). l Daylight Saving Time If daylight saving time is in effect, turn...


