S200 User's Manual
Page 4
...camera or optional AC adapter, unplug the AC adapter and/ or remove the battery immediately, taking care to avoid burns. Keep these safety instructions where all those who use electronic equipment in injury. Repairs should be taken to prevent infants from putting the battery or other accident, take the equipment to a Nikon...-authorized service representative for inspection after unplugging the product and/or removing the battery. The consequences that should be performed only...
...camera or optional AC adapter, unplug the AC adapter and/ or remove the battery immediately, taking care to avoid burns. Keep these safety instructions where all those who use electronic equipment in injury. Repairs should be taken to prevent infants from putting the battery or other accident, take the equipment to a Nikon...-authorized service representative for inspection after unplugging the product and/or removing the battery. The consequences that should be performed only...

S200 User's Manual
Page 5
...the following precautions when handling the battery for inspection. Should the insulation be damaged and the wires become exposed, take it to a Nikon-authorized service representative for use immediately should be sure to observe this precaution could result in a Battery Charger MH-63 (supplied). &#...8226; When inserting the battery, do not attempt to water. • Replace the...
...the following precautions when handling the battery for inspection. Should the insulation be damaged and the wires become exposed, take it to a Nikon-authorized service representative for use immediately should be sure to observe this precaution could result in a Battery Charger MH-63 (supplied). &#...8226; When inserting the battery, do not attempt to water. • Replace the...
S200 User's Manual
Page 6
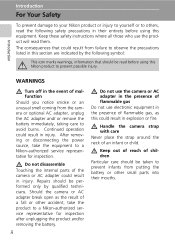
Introduction For Your Safety • Do not handle the plug or battery charger with care Be careful that your subject's eyes could result in .) from the monitor touching the skin or entering the eyes or mouth. Use ... window touching a person or object Failure to maintain compliance with liquid crystal Should the monitor break, care should be taken to avoid injury caused by Nikon for the purpose, to observe this precaution could cause temporary visual impairment. Handle moving parts.
Introduction For Your Safety • Do not handle the plug or battery charger with care Be careful that your subject's eyes could result in .) from the monitor touching the skin or entering the eyes or mouth. Use ... window touching a person or object Failure to maintain compliance with liquid crystal Should the monitor break, care should be taken to avoid injury caused by Nikon for the purpose, to observe this precaution could cause temporary visual impairment. Handle moving parts.
S200 User's Manual
Page 9
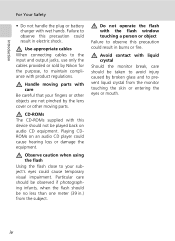
... ...6 Playback ...7 Basic Operations 8 The i (shooting/playback) Button 8 The C (mode) Button 8 The m Button 9 Turning On and Off the Camera 11 Help Displays 11 First Steps...12 Charging the Battery 12 Inserting the Battery 14 Removing the Battery 15 Setting Display Language, Date, and Time 16 Inserting Memory Cards 18 Removing Memory Cards 19 L Basic Photography...
... ...6 Playback ...7 Basic Operations 8 The i (shooting/playback) Button 8 The C (mode) Button 8 The m Button 9 Turning On and Off the Camera 11 Help Displays 11 First Steps...12 Charging the Battery 12 Inserting the Battery 14 Removing the Battery 15 Setting Display Language, Date, and Time 16 Inserting Memory Cards 18 Removing Memory Cards 19 L Basic Photography...
S200 User's Manual
Page 13
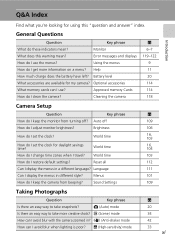
... the menus in a different language? Language 111 Can I display the menus in ? K (High-sensitivity) mode c 20 34 42 33 xi Cleaning the camera 118 Camera Setup Question Key phrase c How do I change time zones when I avoid blur when lighting is poor? World time 16 , 104 How do I get ... Is there an easy way to take snapshots? Error messages and displays 119-122 How do I set the clock for my camera? Help 11 How much charge does the battery have left? Auto off ? Brightness 106 How do I use the menus? Menus 101 How do I adjust monitor brightness...
... the menus in a different language? Language 111 Can I display the menus in ? K (High-sensitivity) mode c 20 34 42 33 xi Cleaning the camera 118 Camera Setup Question Key phrase c How do I change time zones when I avoid blur when lighting is poor? World time 16 , 104 How do I get ... Is there an easy way to take snapshots? Error messages and displays 119-122 How do I set the clock for my camera? Help 11 How much charge does the battery have left? Auto off ? Brightness 106 How do I use the menus? Menus 101 How do I adjust monitor brightness...
S200 User's Manual
Page 16
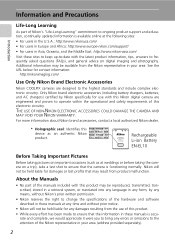
... contact information: http://nikonimaging.com/ Use Only Nikon Brand Electronic Accessories Nikon COOLPIX cameras are engineered and proven to operate within the operational and safety requirements of this electronic circuitry. Only Nikon brand electronic accessories (including battery chargers, batteries, and AC chargers) certified by any means,... effort has been made to ensure that the information in these sites to keep up-to-date with this Nikon digital camera are designed to the highest standards and include complex electronic circuitry. rate and complete, we would appreciate it were...
... contact information: http://nikonimaging.com/ Use Only Nikon Brand Electronic Accessories Nikon COOLPIX cameras are engineered and proven to operate within the operational and safety requirements of this electronic circuitry. Only Nikon brand electronic accessories (including battery chargers, batteries, and AC chargers) certified by any means,... effort has been made to ensure that the information in these sites to keep up-to-date with this Nikon digital camera are designed to the highest standards and include complex electronic circuitry. rate and complete, we would appreciate it were...
S200 User's Manual
Page 19
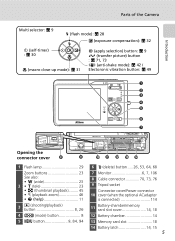
Introduction Parts of the Camera Multi selector: c 9 J (flash mode): c 28 I (exposure compensation): c 32 H (self-timer) : c 30 F (macro close-up mode): c 31 d (apply selection) button: c 9 g (transfer picture) button : c 71, 73 F (anti-..., 64, 68 7 Monitor 6, 7, 106 8 Cable connector 70, 73, 76 9 Tripod socket Connector cover/Power connector 10 cover (when the optional ACadapter is connected 114 11 Battery-chamber/memory card slot cover 14, 18 12 Battery chamber 14 13 Memory card slot 18 14...
Introduction Parts of the Camera Multi selector: c 9 J (flash mode): c 28 I (exposure compensation): c 32 H (self-timer) : c 30 F (macro close-up mode): c 31 d (apply selection) button: c 9 g (transfer picture) button : c 71, 73 F (anti-..., 64, 68 7 Monitor 6, 7, 106 8 Cable connector 70, 73, 76 9 Tripod socket Connector cover/Power connector 10 cover (when the optional ACadapter is connected 114 11 Battery-chamber/memory card slot cover 14, 18 12 Battery chamber 14 13 Memory card slot 18 14...
S200 User's Manual
Page 20
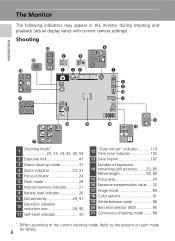
Introduction The Monitor The following indicators may appear in the monitor during shooting and playback (actual display varies with current camera settings). Shooting @1 y w t @0 !9 q er u i o !0 !8 !1 9999 !6 !5 !4 !2 !3 !7 1 Shooting mode 20, 33, 34, 42, 43, 58 2 Exposure lock 41 3...Macro close-up mode 31 4 Zoom indicator 23, 31 5 Focus indicator 24 6 Flash mode 28 7 Internal memory indicator .......... 21 8 Battery level indicator 20 9 ISO sensitivity 29, 91 10 Electronic vibration reduction icon 29, 92 11 Self-timer indicator 30 12 "Date not ...
Introduction The Monitor The following indicators may appear in the monitor during shooting and playback (actual display varies with current camera settings). Shooting @1 y w t @0 !9 q er u i o !0 !8 !1 9999 !6 !5 !4 !2 !3 !7 1 Shooting mode 20, 33, 34, 42, 43, 58 2 Exposure lock 41 3...Macro close-up mode 31 4 Zoom indicator 23, 31 5 Focus indicator 24 6 Flash mode 28 7 Internal memory indicator .......... 21 8 Battery level indicator 20 9 ISO sensitivity 29, 91 10 Electronic vibration reduction icon 29, 92 11 Self-timer indicator 30 12 "Date not ...

S200 User's Manual
Page 21
... Playback The Monitor !7 !6 !5 !4 !2 a !3 !1 b q w 15/05/2007 00:00 e 9999.JPG r t y 9999/9999 !0 i o u 0h00m00s 1 Date of recording 16 2 Time of recording 16 3 Internal memory indicator .......... 26 4 Battery level indicator 20 5 File number and type 115 6 Volume indicator 53, 64 Current frame number/total 7 number of frames 26 Movie length 64 8 D-Lighting icon...
... Playback The Monitor !7 !6 !5 !4 !2 a !3 !1 b q w 15/05/2007 00:00 e 9999.JPG r t y 9999/9999 !0 i o u 0h00m00s 1 Date of recording 16 2 Time of recording 16 3 Internal memory indicator .......... 26 4 Battery level indicator 20 5 File number and type 115 6 Volume indicator 53, 64 Current frame number/total 7 number of frames 26 Movie length 64 8 D-Lighting icon...
S200 User's Manual
Page 26
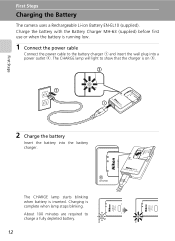
... to charge a fully depleted battery. 12 Charge the battery with the Battery Charger MH-63 (supplied) before first use or when the battery is complete when lamp stops blinking. The CHARGE lamp starts blinking when battery is on 3. 2 Charge the battery Insert the battery into a power outlet 2. First Steps First Steps Charging the Battery The camera uses a Rechargeable Li...
... to charge a fully depleted battery. 12 Charge the battery with the Battery Charger MH-63 (supplied) before first use or when the battery is complete when lamp stops blinking. The CHARGE lamp starts blinking when battery is on 3. 2 Charge the battery Insert the battery into a power outlet 2. First Steps First Steps Charging the Battery The camera uses a Rechargeable Li...

S200 User's Manual
Page 27
... on the Battery Charger Be sure to read and follow the warnings for use an AC Adapter EH-62D (available separately from Nikon) (c 114). Do not use another make or model of AC adapter. ing or in overheat- If ambient temperature is not 5 to 35 °C (41 to the camera. 13 Otherwise... unplug charger and remove battery immediately and take both devices to retailer or ...
... on the Battery Charger Be sure to read and follow the warnings for use an AC Adapter EH-62D (available separately from Nikon) (c 114). Do not use another make or model of AC adapter. ing or in overheat- If ambient temperature is not 5 to 35 °C (41 to the camera. 13 Otherwise... unplug charger and remove battery immediately and take both devices to retailer or ...

S200 User's Manual
Page 28
... described on the label at the entrance of the battery chamber, and insert the battery. Battery latch 3 Close the battery-chamber/memory card slot cover. 14 Be sure to check the battery is inserted. The battery is fully inserted when the battery latch clicks back into your camera. 1 Open the battery-chamber/memory card slot cover. Confirm that has...
... described on the label at the entrance of the battery chamber, and insert the battery. Battery latch 3 Close the battery-chamber/memory card slot cover. 14 Be sure to check the battery is inserted. The battery is fully inserted when the battery latch clicks back into your camera. 1 Open the battery-chamber/memory card slot cover. Confirm that has...
S200 User's Manual
Page 29
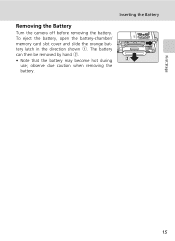
observe due caution when removing the battery. 15 First Steps Inserting the Battery Removing the Battery Turn the camera off before removing the battery. To eject the battery, open the battery-chamber/ memory card slot cover and slide the orange battery latch in the direction shown 1. The battery can then be removed by hand 2. • Note that the battery may become hot during use;
observe due caution when removing the battery. 15 First Steps Inserting the Battery Removing the Battery Turn the camera off before removing the battery. To eject the battery, open the battery-chamber/ memory card slot cover and slide the orange battery latch in the direction shown 1. The battery can then be removed by hand 2. • Note that the battery may become hot during use;
S200 User's Manual
Page 32
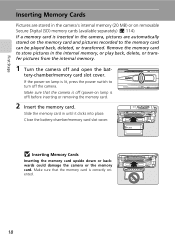
... off (power-on lamp is inserted in the camera, pictures are stored in the camera's internal memory (20 MB) or on removable Secure Digital (SD) memory cards (available separately) (c 114). Make sure that the memory card is off and open the battery-chamber/memory card slot cover. If a memory card is lit..., press the power switch to turn off the camera. Slide the memory card in the ...
... off (power-on lamp is inserted in the camera, pictures are stored in the camera's internal memory (20 MB) or on removable Secure Digital (SD) memory cards (available separately) (c 114). Make sure that the memory card is off and open the battery-chamber/memory card slot cover. If a memory card is lit..., press the power switch to turn off the camera. Slide the memory card in the ...
S200 User's Manual
Page 33
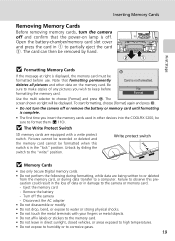
...position. Unlock by hand. Write protect switch j Memory Cards • Use only Secure Digital memory cards. • Do not perform the following during data transfer to a computer. Open the battery-chamber/memory card slot cover and press the card in direct sunlight, closed vehicles, or...that formatting permanently deletes all pictures and other devices into the COOLPIX S200, be sure to format them (c 110). Inserting Memory Cards Removing Memory Cards Before removing memory cards, turn the camera off or remove the battery or memory card until formatting is complete. • The...
...position. Unlock by hand. Write protect switch j Memory Cards • Use only Secure Digital memory cards. • Do not perform the following during data transfer to a computer. Open the battery-chamber/memory card slot cover and press the card in direct sunlight, closed vehicles, or...that formatting permanently deletes all pictures and other devices into the COOLPIX S200, be sure to format them (c 110). Inserting Memory Cards Removing Memory Cards Before removing memory cards, turn the camera off or remove the battery or memory card until formatting is complete. • The...
S200 User's Manual
Page 34
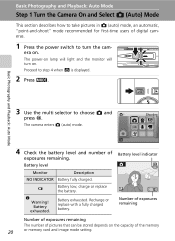
...-and-shoot" mode recommended for first-time users of digital cameras. 1 Press the power switch to step 4 when M is displayed. 2 Press C. Battery level Monitor Description NO INDICATOR Battery fully charged. w Battery low; Battery exhausted. The power-on lamp will light and the monitor will turn the camera on. Battery level indicator 12 Number of exposures remaining Number of...
...-and-shoot" mode recommended for first-time users of digital cameras. 1 Press the power switch to step 4 when M is displayed. 2 Press C. Battery level Monitor Description NO INDICATOR Battery fully charged. w Battery low; Battery exhausted. The power-on lamp will light and the monitor will turn the camera on. Battery level indicator 12 Number of exposures remaining Number of...

S200 User's Manual
Page 35
...indicator Pictures will be restored by pressing the shutter-release button or operating any of the controls next to the monitor. Step 1 Turn the Camera On and Select L (Auto) Mode Indicators Displayed in L (Auto) Mode Shooting mode M displayed in shooting mode, the monitor will gradually ...and self-timer (c 30). Full brightness can be recorded to memory card. 12 Image mode Choose from seven image-mode options depending on the battery (c 109). This menu allows you plan to suit shooting conditions or your own preferences. When memory card is inserted, M is E Normal (3,072...
...indicator Pictures will be restored by pressing the shutter-release button or operating any of the controls next to the monitor. Step 1 Turn the Camera On and Select L (Auto) Mode Indicators Displayed in L (Auto) Mode Shooting mode M displayed in shooting mode, the monitor will gradually ...and self-timer (c 30). Full brightness can be recorded to memory card. 12 Image mode Choose from seven image-mode options depending on the battery (c 109). This menu allows you plan to suit shooting conditions or your own preferences. When memory card is inserted, M is E Normal (3,072...

S200 User's Manual
Page 39
... • Be sure that the focus indicator (p) is moving rapidly In the situations noted above, try pressing the shutter-release button halfway to the camera or card. k Autofocus Autofocus may not perform as described below. 1 Position the subject in the center of the frame. 12 2 Press the ... that the distance between the subject and surroundings (e.g., when the subject is inserted) will blink. l Focus Lock To focus on off , open the battery-chamber/memory card slot cover, or remove or disconnect the power source while these circumstances could result in loss of data or in damage to...
... • Be sure that the focus indicator (p) is moving rapidly In the situations noted above, try pressing the shutter-release button halfway to the camera or card. k Autofocus Autofocus may not perform as described below. 1 Position the subject in the center of the frame. 12 2 Press the ... that the distance between the subject and surroundings (e.g., when the subject is inserted) will blink. l Focus Lock To focus on off , open the battery-chamber/memory card slot cover, or remove or disconnect the power source while these circumstances could result in loss of data or in damage to...
S200 User's Manual
Page 77
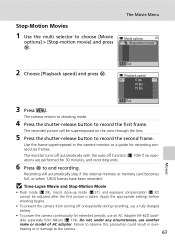
...AC Adapter EH-62D (available separately from Nikon) (c 114). Use the frame superimposed in damage to choose [Movie options] > [Stop-motion movie] and press d. Failure to observe this precaution could result in overheating or in the camera monitor as a guide for recording consecutive...] and press d. Stop-Motion Movies 1 Use the multi selector to the camera. 63 Movies The monitor turns off automatically with the auto off unexpectedly during recording, use a fully charged battery. • To power the camera continuously for 30 minutes, and recording ends. 6 Press d to end recording...
...AC Adapter EH-62D (available separately from Nikon) (c 114). Use the frame superimposed in damage to choose [Movie options] > [Stop-motion movie] and press d. Failure to observe this precaution could result in overheating or in the camera monitor as a guide for recording consecutive...] and press d. Stop-Motion Movies 1 Use the multi selector to the camera. 63 Movies The monitor turns off automatically with the auto off unexpectedly during recording, use a fully charged battery. • To power the camera continuously for 30 minutes, and recording ends. 6 Press d to end recording...
S200 User's Manual
Page 84
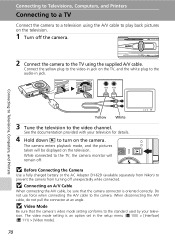
...details. 4 Hold down i to turn on the television. j Connecting an A/V Cable When connecting the A/V cable, be displayed on the camera. When disconnecting the A/V cable, do not pull the connector at an angle. Connecting to Televisions, Computers, and Printers Yellow White 3 Tune...in the setup menu (c 100) > [Interface] (c 111) > [Video mode]. 70 j Before Connecting the Camera Use a fully charged battery or the AC Adapter EH-62D (available separately from Nikon) to prevent the camera from turning off unexpectedly while connected. The video mode setting is oriented correctly.
...details. 4 Hold down i to turn on the television. j Connecting an A/V Cable When connecting the A/V cable, be displayed on the camera. When disconnecting the A/V cable, do not pull the connector at an angle. Connecting to Televisions, Computers, and Printers Yellow White 3 Tune...in the setup menu (c 100) > [Interface] (c 111) > [Video mode]. 70 j Before Connecting the Camera Use a fully charged battery or the AC Adapter EH-62D (available separately from Nikon) to prevent the camera from turning off unexpectedly while connected. The video mode setting is oriented correctly.


