P80 User's Manual
Page 9
Table of Contents For Your Safety...ii WARNINGS ...ii Notices ...v Introduction ...1 About This Manual ...1 Information and Precautions...2 Parts of the Camera...4 The Camera Body ...4 The Monitor...6 Basic Operations...8 The Mode Dial...8 The Command Dial ...9 The Multi Selector...10 The d Button...11 Help Displays ...11 The s Button...12 x ...and Lens Cap...13 First Steps ...14 Charging the Battery ...14 Inserting the Battery ...16 Removing the Battery ...17 Turning On and Off the Camera...17 Setting Display Language, Date and Time 18 Inserting Memory Cards ...20 Removing Memory Cards...21 vii
Table of Contents For Your Safety...ii WARNINGS ...ii Notices ...v Introduction ...1 About This Manual ...1 Information and Precautions...2 Parts of the Camera...4 The Camera Body ...4 The Monitor...6 Basic Operations...8 The Mode Dial...8 The Command Dial ...9 The Multi Selector...10 The d Button...11 Help Displays ...11 The s Button...12 x ...and Lens Cap...13 First Steps ...14 Charging the Battery ...14 Inserting the Battery ...16 Removing the Battery ...17 Turning On and Off the Camera...17 Setting Display Language, Date and Time 18 Inserting Memory Cards ...20 Removing Memory Cards...21 vii
P80 User's Manual
Page 10
Table of Contents A Basic Photography and Playback: Auto Mode 22 Step 1 Turn the Camera On and Select A (Auto) Mode 22 Indicators Displayed in A (Auto) Mode 23 Step 2 Frame a Picture ...24 Using the Electronic Viewfinder ...24 Using the Zoom...24 ... Focus Mode ...35 Using Manual Focus...36 Exposure Compensation ...37 C Shooting Suited for the Scene 38 Shooting in the Scene Mode ...38 Setting the Scene Mode...38 Features ...39 d Sport Continuous Mode ...46 Shooting in Sport Continuous Mode 46 Sport Continuous Menu ...47 PSAM P, S, A and M modes...48 Shooting ...
Table of Contents A Basic Photography and Playback: Auto Mode 22 Step 1 Turn the Camera On and Select A (Auto) Mode 22 Indicators Displayed in A (Auto) Mode 23 Step 2 Frame a Picture ...24 Using the Electronic Viewfinder ...24 Using the Zoom...24 ... Focus Mode ...35 Using Manual Focus...36 Exposure Compensation ...37 C Shooting Suited for the Scene 38 Shooting in the Scene Mode ...38 Setting the Scene Mode...38 Features ...39 d Sport Continuous Mode ...46 Shooting in Sport Continuous Mode 46 Sport Continuous Menu ...47 PSAM P, S, A and M modes...48 Shooting ...

P80 User's Manual
Page 11
... Connecting to Televisions, Computers and Printers 73 Connecting to a TV ...73 Connecting to a Computer...74 Before Connecting the Camera...74 Transferring Pictures from the Camera to a Computer 75 Connecting to a Printer...78 Connecting the Camera and Printer...79 Printing Pictures One at a Time ...80 Printing Multiple Pictures ...81 Creating a DPOF Print Order: Print...
... Connecting to Televisions, Computers and Printers 73 Connecting to a TV ...73 Connecting to a Computer...74 Before Connecting the Camera...74 Transferring Pictures from the Camera to a Computer 75 Connecting to a Printer...78 Connecting the Camera and Printer...79 Printing Pictures One at a Time ...80 Printing Multiple Pictures ...81 Creating a DPOF Print Order: Print...
P80 User's Manual
Page 12
Comp...105 M Noise Reduction...105 Q Distortion Control...106 Restrictions on Camera Settings ...106 Playback Options: The Playback Menu 108 Displaying the Playback Menu...108 b Slide Show...110 c Delete ...111 d Protect ...111 f Rotate image...112 i Hide Image ...112 h ...
Comp...105 M Noise Reduction...105 Q Distortion Control...106 Restrictions on Camera Settings ...106 Playback Options: The Playback Menu 108 Displaying the Playback Menu...108 b Slide Show...110 c Delete ...111 d Protect ...111 f Rotate image...112 i Hide Image ...112 h ...

P80 User's Manual
Page 13
Table of Contents Basic Camera Setup: The Setup Menu 114 Displaying the Setup Menu...115 a Menus...115 c Welcome Screen...116 d Date...117 e Brightness...120 f Date Imprint...120 g Vibration Reduction ...122 h AF Assist ...123 u Digital Zoom ...123 i Sound Settings ...124 k Auto Off ...124 l Format Memory/m Format Card 125 n Language ...126 o Video Mode...126 p Reset All ...127 r Firmware Version ...129 xi
Table of Contents Basic Camera Setup: The Setup Menu 114 Displaying the Setup Menu...115 a Menus...115 c Welcome Screen...116 d Date...117 e Brightness...120 f Date Imprint...120 g Vibration Reduction ...122 h AF Assist ...123 u Digital Zoom ...123 i Sound Settings ...124 k Auto Off ...124 l Format Memory/m Format Card 125 n Language ...126 o Video Mode...126 p Reset All ...127 r Firmware Version ...129 xi

P80 User's Manual
Page 15
... of a Nikon COOLPIX P80 digital camera. This icon indicates that should be read before use, and keep it where all new pictures will be more A information is used to refer to both the LCD monitor and electronic viewfinder. • The names of menu items displayed in the camera monitor, and... icon marks tips, additional D information that should be stored in bold. Notations • A Secure Digital (SD) memory card is referred to as a "memory card." • The setting at the time of buttons or messages displayed in the computer monitor are used to find the information you...
... of a Nikon COOLPIX P80 digital camera. This icon indicates that should be read before use, and keep it where all new pictures will be more A information is used to refer to both the LCD monitor and electronic viewfinder. • The names of menu items displayed in the camera monitor, and... icon marks tips, additional D information that should be stored in bold. Notations • A Secure Digital (SD) memory card is referred to as a "memory card." • The setting at the time of buttons or messages displayed in the computer monitor are used to find the information you...
P80 User's Manual
Page 20
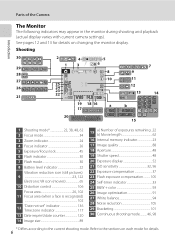
... Focus area 26, 102 11 Focus area (when a face is recognized) 102 12 "Date not set" indicator 136 Time zone indicator 117 13 Date imprint/date counter 120 14 Image size 89 15 a) Number of the Camera Introduction The Monitor The following indicators may appear in the monitor during shooting and playback...
... Focus area 26, 102 11 Focus area (when a face is recognized) 102 12 "Date not set" indicator 136 Time zone indicator 117 13 Date imprint/date counter 120 14 Image size 89 15 a) Number of the Camera Introduction The Monitor The following indicators may appear in the monitor during shooting and playback...

P80 User's Manual
Page 22
... adjusting LCD monitor brightness. A Auto(A 22): Choose this mode for high-speed continuous shooting. P,S,A,M (A 48): Choose these modes for automatic adjustment of digital cameras, in which the camera automatically adjusts settings. Introduction Basic Operations The Mode Dial Align the mode icon with the mark next to shoot movies. 8 d Sport Continuous Mode (A 46): Choose this...
... adjusting LCD monitor brightness. A Auto(A 22): Choose this mode for high-speed continuous shooting. P,S,A,M (A 48): Choose these modes for automatic adjustment of digital cameras, in which the camera automatically adjusts settings. Introduction Basic Operations The Mode Dial Align the mode icon with the mark next to shoot movies. 8 d Sport Continuous Mode (A 46): Choose this...
P80 User's Manual
Page 25
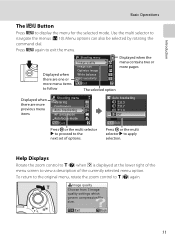
... menu items Shooting menu Metering Continuous Auto bracketing AF area mode Autofocus mode Exit Press k or the multi selector K to proceed to the next set of the currently selected menu option. Menu options can also be selected by rotating the command dial. Press d again to display the menu for ...Rotate the zoom control to g (j) when M is displayed at the lower right of the menu screen to g (j) again. Image quality Choose from 3 image quality settings which govern compression/file size. To return to the original menu, rotate the zoom control to view a description of options.
... menu items Shooting menu Metering Continuous Auto bracketing AF area mode Autofocus mode Exit Press k or the multi selector K to proceed to the next set of the currently selected menu option. Menu options can also be selected by rotating the command dial. Press d again to display the menu for ...Rotate the zoom control to g (j) when M is displayed at the lower right of the menu screen to g (j) again. Image quality Choose from 3 image quality settings which govern compression/file size. To return to the original menu, rotate the zoom control to view a description of options.

P80 User's Manual
Page 26
With Shooting Introduction 1/125 F2.8 20 Current settings With Playback 1/125 F2.8 Framing guides (P, S, A, and M modes only) View through lens only 15/05/2008 15:30 0004.JPG 44 Photo information displayed 100NIKON ..., exposure mode, shutter speed, aperture, exposure compensation, ISO sensitivity, current frame number/total number of the image (highlights) blink. Use highlights as a guide when 12 setting exposure. Shooting data are not displayed if the current picture is also displayed on pictures shot in areas of highlights that are overexposed. P is a movie...
With Shooting Introduction 1/125 F2.8 20 Current settings With Playback 1/125 F2.8 Framing guides (P, S, A, and M modes only) View through lens only 15/05/2008 15:30 0004.JPG 44 Photo information displayed 100NIKON ..., exposure mode, shutter speed, aperture, exposure compensation, ISO sensitivity, current frame number/total number of the image (highlights) blink. Use highlights as a guide when 12 setting exposure. Shooting data are not displayed if the current picture is also displayed on pictures shot in areas of highlights that are overexposed. P is a movie...

P80 User's Manual
Page 31
At default settings, the LCD monitor, or electronic viewfinder, will brighten when camera controls are performed for about five seconds. The LCD monitor will turn the camera on in playback mode (A 28). The camera will dim to reduce the drain on the battery if no operations are performed for ... power-on lamp and monitor are off automatically if no operations are performed for about a minute during use; If the camera is turned off the camera, press the power switch again. Inserting the Battery D Auto Power-Off in the direction shown 1. Turning On and Off the...
At default settings, the LCD monitor, or electronic viewfinder, will brighten when camera controls are performed for about five seconds. The LCD monitor will turn the camera on in playback mode (A 28). The camera will dim to reduce the drain on the battery if no operations are performed for ... power-on lamp and monitor are off automatically if no operations are performed for about a minute during use; If the camera is turned off the camera, press the power switch again. Inserting the Battery D Auto Power-Off in the direction shown 1. Turning On and Off the...

P80 User's Manual
Page 32
... then press k to proceed to turn on Daylight saving in effect, turn on the camera. No Yes Time zone London, Casablanca Daylight saving D Daylight Saving Time If daylight saving time is in the time zone menu and set . 4 Press k. For information on using the multi selector, see "The Multi Selector" (A... turns on. The power-on lamp (green) will light and the LCD monitor (or electronic viewfinder) will turn on. First Steps Setting Display Language, Date and Time A language-selection dialog is displayed the first time the camera is turned on. 1 Press the power switch to step 5.
... then press k to proceed to turn on Daylight saving in effect, turn on the camera. No Yes Time zone London, Casablanca Daylight saving D Daylight Saving Time If daylight saving time is in the time zone menu and set . 4 Press k. For information on using the multi selector, see "The Multi Selector" (A... turns on. The power-on lamp (green) will light and the LCD monitor (or electronic viewfinder) will turn on. First Steps Setting Display Language, Date and Time A language-selection dialog is displayed the first time the camera is turned on. 1 Press the power switch to step 5.
P80 User's Manual
Page 33
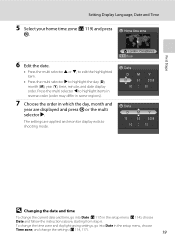
... the current date and time, go into Date in the setup menu (A 114), choose Date and follow the instructions above, starting from step 6. First Steps Setting Display Language, Date and Time 5 Select your home time zone (A 119) and press k. London, Casablanca Back Date D M Y 01 01 2008 00 ...00 Date D M Y 15 05 2008 10 15 D Changing the date and time To change the settings (A 114, 117). 19 Press the multi selector J to highlight items in reverse order (order may differ in some regions). 7 Choose the order in which...
... the current date and time, go into Date in the setup menu (A 114), choose Date and follow the instructions above, starting from step 6. First Steps Setting Display Language, Date and Time 5 Select your home time zone (A 119) and press k. London, Casablanca Back Date D M Y 01 01 2008 00 ...00 Date D M Y 15 05 2008 10 15 D Changing the date and time To change the settings (A 114, 117). 19 Press the multi selector J to highlight items in reverse order (order may differ in some regions). 7 Choose the order in which...
P80 User's Manual
Page 37
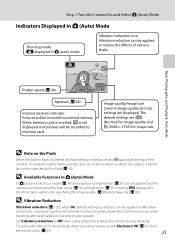
...A (auto) mode, focus mode (A 34) and exposure compensation (A 37) can be recorded to reduce the effects of camera shake. Image quality/Image size Current image quality and size settings are W (Normal) for image quality and J (3648 × 2736) for specifying the image quality (A 88) and... (Auto) Mode Shooting mode A displayed in flash (A 30). D Vibration Reduction Vibration reduction (A 122), when On (default setting) is backlit, be applied and the camera can be recorded to Off when using the flash mode (A 30) and self-timer (A 33). Vibration reduction icon Vibration reduction...
...A (auto) mode, focus mode (A 34) and exposure compensation (A 37) can be recorded to reduce the effects of camera shake. Image quality/Image size Current image quality and size settings are W (Normal) for image quality and J (3648 × 2736) for specifying the image quality (A 88) and... (Auto) Mode Shooting mode A displayed in flash (A 30). D Vibration Reduction Vibration reduction (A 122), when On (default setting) is backlit, be applied and the camera can be recorded to Off when using the flash mode (A 30) and self-timer (A 33). Vibration reduction icon Vibration reduction...

P80 User's Manual
Page 40
...the memory card or internal memory. 1/125 FF24.83 20 Basic Photography and Playback: Auto Mode D Shutter-release Button The camera features a two-stage shutter-release button. To set the rest of the way down. To release the shutter and shoot, press the shutterrelease button the rest of the focus ...and way down . When digital zoom is in focus, the focus area will glow green. Focus and exposure remain locked while the...
...the memory card or internal memory. 1/125 FF24.83 20 Basic Photography and Playback: Auto Mode D Shutter-release Button The camera features a two-stage shutter-release button. To set the rest of the way down. To release the shutter and shoot, press the shutterrelease button the rest of the focus ...and way down . When digital zoom is in focus, the focus area will glow green. Focus and exposure remain locked while the...

P80 User's Manual
Page 41
... F2.8 20 1/125 F2.8 20 Position the subject in damage to the camera or card. The AF-assist illuminator can be displayed and the indicator for the number of exposures or movie length remaining will be set to refocus several times, or focus on an off , open the battery-... situations noted above, try pressing the shutter-release button halfway to Off manually (A 123), although in deep shadow) • No contrast between the camera and the subject with which focus was locked is poor. 27 Basic Photography and Playback: Auto Mode Step 3 Focus and Shoot B During Recording While...
... F2.8 20 1/125 F2.8 20 Position the subject in damage to the camera or card. The AF-assist illuminator can be displayed and the indicator for the number of exposures or movie length remaining will be set to refocus several times, or focus on an off , open the battery-... situations noted above, try pressing the shutter-release button halfway to Off manually (A 123), although in deep shadow) • No contrast between the camera and the subject with which focus was locked is poor. 27 Basic Photography and Playback: Auto Mode Step 3 Focus and Shoot B During Recording While...

P80 User's Manual
Page 44
Fill flash Flash fires when a picture is raised, you can set to your shooting environment. When the built-in " (illuminate) shadows and backlit subjects. slow shutter speeds are used to "fill-in flash is shot. Auto ... Flash will not fire even when lighting is backlit, you can shoot pictures with red-eye reduction Reduces "red-eye" in .-28 ft.) when the camera is set the flash mode according to Auto). With maximum optical zoom applied, the range is about 0.5-8.8 m (1 ft. 8 in portraits (A 32). Use to capture background at...
Fill flash Flash fires when a picture is raised, you can set to your shooting environment. When the built-in " (illuminate) shadows and backlit subjects. slow shutter speeds are used to "fill-in flash is shot. Auto ... Flash will not fire even when lighting is backlit, you can shoot pictures with red-eye reduction Reduces "red-eye" in .-28 ft.) when the camera is set the flash mode according to Auto). With maximum optical zoom applied, the range is about 0.5-8.8 m (1 ft. 8 in portraits (A 32). Use to capture background at...
P80 User's Manual
Page 45
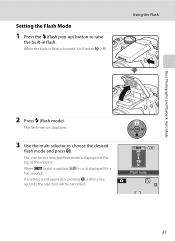
If a setting is displayed. 3 Use the multi selector to choose the desired flash mode and press k. Flash mode 31 Using the Flash Basic Photography and Playback: Auto ... mode). The flash menu is not applied by pressing k within a few seconds, the selection will be cancelled. When U (auto) is applied, D is fixed to W (off). Setting the Flash Mode 1 Press the X (flash pop-up) button to raise the built-in flash is lowered, it is only displayed for the selected flash...
If a setting is displayed. 3 Use the multi selector to choose the desired flash mode and press k. Flash mode 31 Using the Flash Basic Photography and Playback: Auto ... mode). The flash menu is not applied by pressing k within a few seconds, the selection will be cancelled. When U (auto) is applied, D is fixed to W (off). Setting the Flash Mode 1 Press the X (flash pop-up) button to raise the built-in flash is lowered, it is only displayed for the selected flash...

P80 User's Manual
Page 46
...shutter response is taken. In extremely rare instances, areas not subject to red-eye may appear as bright spots in A (auto) mode, the setting is only enabled until it clicks shut. C The Flash Indicator The flash indicator shows flash status when the shutter-release button is pressed halfway. ...processed to U (auto). Advanced red-eye reduction may be shot also increases slightly. When the flash mode is changed in all situations. The camera then analyzes the picture; The time before the main flash, reducing red-eye. Turn vibration reduction (A 122) off returns flash mode to ...
...shutter response is taken. In extremely rare instances, areas not subject to red-eye may appear as bright spots in A (auto) mode, the setting is only enabled until it clicks shut. C The Flash Indicator The flash indicator shows flash status when the shutter-release button is pressed halfway. ...processed to U (auto). Advanced red-eye reduction may be shot also increases slightly. When the flash mode is changed in all situations. The camera then analyzes the picture; The time before the main flash, reducing red-eye. Turn vibration reduction (A 122) off returns flash mode to ...

P80 User's Manual
Page 47
... 10s or 2s and press k. 10s 2s 10s (ten seconds): Suited for important occasions (such as weddings) 2s (two seconds): Suited for preventing camera shake The mode selected for self-portraits. Turn vibration reduction (A 122) off . The self-timer menu is not applied by pressing k within a few...a tripod is recommended. Self-timer If a setting is displayed. When using a tripod. 1 Press n (self-timer). To stop the timer before the shutter is released is released, the lamp remains lit and stops blinking. Shooting with the Self-timer The camera is equipped with a ten-second and two-second...
... 10s or 2s and press k. 10s 2s 10s (ten seconds): Suited for important occasions (such as weddings) 2s (two seconds): Suited for preventing camera shake The mode selected for self-portraits. Turn vibration reduction (A 122) off . The self-timer menu is not applied by pressing k within a few...a tripod is recommended. Self-timer If a setting is displayed. When using a tripod. 1 Press n (self-timer). To stop the timer before the shutter is released is released, the lamp remains lit and stops blinking. Shooting with the Self-timer The camera is equipped with a ten-second and two-second...


