P80 User's Manual
Page 9
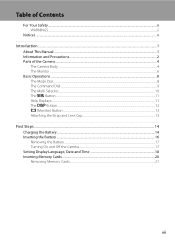
... and Precautions...2 Parts of the Camera...4 The Camera Body ...4 The Monitor...6 Basic Operations...8 The Mode Dial...8 The Command Dial ...9 The Multi Selector...10 The d Button...11 Help Displays ...11 The s Button...12 x (Monitor) Button ...13 Attaching the Strap and Lens Cap...13 First Steps ...14 Charging the... Battery ...14 Inserting the Battery ...16 Removing the Battery ...17 Turning On and Off the Camera...17 Setting Display Language, Date and Time 18 Inserting Memory Cards ...20...
... and Precautions...2 Parts of the Camera...4 The Camera Body ...4 The Monitor...6 Basic Operations...8 The Mode Dial...8 The Command Dial ...9 The Multi Selector...10 The d Button...11 Help Displays ...11 The s Button...12 x (Monitor) Button ...13 Attaching the Strap and Lens Cap...13 First Steps ...14 Charging the... Battery ...14 Inserting the Battery ...16 Removing the Battery ...17 Turning On and Off the Camera...17 Setting Display Language, Date and Time 18 Inserting Memory Cards ...20...

P80 User's Manual
Page 27
... monitor. Diopter adjustment control Attaching the Strap and Lens Cap Attach the lens cap to the strap, and then attach the strap to protect the lens. 13 B Lens Cap • Remove the lens cap before you shoot a picture. • At times when you are carrying the camera, attach the lens cap to the camera to the camera (at two places). Switch to scratch your...
... monitor. Diopter adjustment control Attaching the Strap and Lens Cap Attach the lens cap to the strap, and then attach the strap to protect the lens. 13 B Lens Cap • Remove the lens cap before you shoot a picture. • At times when you are carrying the camera, attach the lens cap to the camera to the camera (at two places). Switch to scratch your...

P80 User's Manual
Page 31
Turning On and Off the Camera Remove the lens cap and press the power switch to turn on the camera. First Steps Removing the Battery Turn the camera off and confirm that the battery may become hot during shooting and playback. The battery can then be removed by hand 2. •...use; At default settings, the LCD monitor, or electronic viewfinder, will dim to reduce the drain on in playback mode (A 28). If the camera is turned off altogether if no operations are performed for another three minutes (A 124). 17 observe due caution when removing the battery. The power-...
Turning On and Off the Camera Remove the lens cap and press the power switch to turn on the camera. First Steps Removing the Battery Turn the camera off and confirm that the battery may become hot during shooting and playback. The battery can then be removed by hand 2. •...use; At default settings, the LCD monitor, or electronic viewfinder, will dim to reduce the drain on in playback mode (A 28). If the camera is turned off altogether if no operations are performed for another three minutes (A 124). 17 observe due caution when removing the battery. The power-...

P80 User's Manual
Page 32
...selected, the date and time will turn on using the multi selector, see "The Multi Selector" (A 10). 3 Choose Yes and press k. Remove the lens cap. 2 Use the multi selector to choose the desired language and press k. No Yes Time zone London, Casablanca Daylight saving D Daylight Saving Time If daylight saving... on . Date Set time and date? First Steps Setting Display Language, Date and Time A language-selection dialog is displayed the first time the camera is turned on. 1 Press the power switch to turn on and off when the LCD monitor turns on Daylight saving in the time zone menu...
...selected, the date and time will turn on using the multi selector, see "The Multi Selector" (A 10). 3 Choose Yes and press k. Remove the lens cap. 2 Use the multi selector to choose the desired language and press k. No Yes Time zone London, Casablanca Daylight saving D Daylight Saving Time If daylight saving... on . Date Set time and date? First Steps Setting Display Language, Date and Time A language-selection dialog is displayed the first time the camera is turned on. 1 Press the power switch to turn on and off when the LCD monitor turns on Daylight saving in the time zone menu...

P80 User's Manual
Page 36
... 1/125 FF24.83 20 Number of exposures remaining Number of Exposures Remaining The number of pictures that can be stored depends on the camera. The power-on . 3 Check the battery level and number of exposures remaining. Cannot shoot pictures. Battery Level Monitor Description NO INDICATOR... Auto Mode Step 1 Turn the Camera On and Select A (Auto) Mode This section describes how to shoot in A (auto) mode, an automatic, "point-andshoot" mode recommended for first-time users of digital cameras. 1 Rotate the mode dial to A. 2 Remove the lens cap and press the power switch to charge...
... 1/125 FF24.83 20 Number of exposures remaining Number of Exposures Remaining The number of pictures that can be stored depends on the camera. The power-on . 3 Check the battery level and number of exposures remaining. Cannot shoot pictures. Battery Level Monitor Description NO INDICATOR... Auto Mode Step 1 Turn the Camera On and Select A (Auto) Mode This section describes how to shoot in A (auto) mode, an automatic, "point-andshoot" mode recommended for first-time users of digital cameras. 1 Rotate the mode dial to A. 2 Remove the lens cap and press the power switch to charge...

P80 User's Manual
Page 144
USB Cable UC-E6 Audio/Video Cable EG-CP14 Lens cap LC-CP18 Technical Notes 130 Failure to observe this precaution could cause damage to the battery-chamber/memory card slot cover. Technical Notes Optional Accessories Rechargeable battery Rechargeable Li-ion Battery EN-EL5 Battery charger Battery Charger MH-61 AC Adapter EH-62A (connects as shown) 1 2 3 AC adapter USB cable A/V cable Lens cap Ensure that the power connector cord passes through the opening before closing the battery-chamber/memory card slot cover.
USB Cable UC-E6 Audio/Video Cable EG-CP14 Lens cap LC-CP18 Technical Notes 130 Failure to observe this precaution could cause damage to the battery-chamber/memory card slot cover. Technical Notes Optional Accessories Rechargeable battery Rechargeable Li-ion Battery EN-EL5 Battery charger Battery Charger MH-61 AC Adapter EH-62A (connects as shown) 1 2 3 AC adapter USB cable A/V cable Lens cap Ensure that the power connector cord passes through the opening before closing the battery-chamber/memory card slot cover.
P80 User's Manual
Page 152
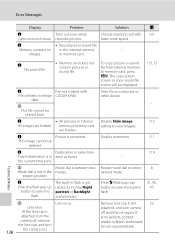
... This image cannot be played back. Lens error. (If the lens cap is attached, turn the camera off, remove the lens cap, and turn camera off and then on again. Rotate ...COOLPIX P80. or memory card. N No sound file. • Memory card does not contain pictures or sound file. memory/memory card are hidden. The built-in flash is not in flash. 31, 40, 43 Remove lens cap if still 22 attached, and turn 138 the camera... on computer or other device. 113, 72 - P Lens error. Press m (flash ...
... This image cannot be played back. Lens error. (If the lens cap is attached, turn the camera off, remove the lens cap, and turn camera off and then on again. Rotate ...COOLPIX P80. or memory card. N No sound file. • Memory card does not contain pictures or sound file. memory/memory card are hidden. The built-in flash is not in flash. 31, 40, 43 Remove lens cap if still 22 attached, and turn 138 the camera... on computer or other device. 113, 72 - P Lens error. Press m (flash ...


