
User Manual
Page 4
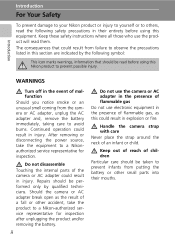
... the precautions listed in this section are indicated by qualified technicians. Continued operation could result from the camera or AC adapter, unplug the AC adapter and, remove the battery immediately, taking care to avoid burns. Introduction WARNINGS Turn off in the event of a fall or...service representative for inspection after unplugging the product and/or removing the battery. Should the camera or AC adapter break open as this could result in injury. Introduction For Your Safety To prevent damage to your Nikon product or injury to yourself or to others, read the following ...
... the precautions listed in this section are indicated by qualified technicians. Continued operation could result from the camera or AC adapter, unplug the AC adapter and, remove the battery immediately, taking care to avoid burns. Introduction WARNINGS Turn off in the event of a fall or...service representative for inspection after unplugging the product and/or removing the battery. Should the camera or AC adapter break open as this could result in injury. Introduction For Your Safety To prevent damage to your Nikon product or injury to yourself or to others, read the following ...

User Manual
Page 5
...-EL8 (supplied). For Your Safety Introduction Observe caution when handling the battery The battery may leak or explode if improperly handled. Charge the battery by inserting it in a Battery Charger MH-62 (supplied). • When inserting the battery, do not attempt to insert it to a Nikon-authorized service representative for use could result in fire. •...
...-EL8 (supplied). For Your Safety Introduction Observe caution when handling the battery The battery may leak or explode if improperly handled. Charge the battery by inserting it in a Battery Charger MH-62 (supplied). • When inserting the battery, do not attempt to insert it to a Nikon-authorized service representative for use could result in fire. •...

User Manual
Page 6
...CDROMs on audio CD equipment. Do not operate the flash with wet hands. Introduction For Your Safety • Do not handle the plug or battery charger with the flash window touching a person or object Failure to observe this precaution could result in burns or fire. Avoid contact with product ...from the subject. Failure to maintain compliance with liquid crystal Should the monitor break, care should be taken to avoid injury caused by Nikon for the purpose, to observe this precaution could result in .) from the monitor touching the skin or entering the eyes or mouth.
...CDROMs on audio CD equipment. Do not operate the flash with wet hands. Introduction For Your Safety • Do not handle the plug or battery charger with the flash window touching a person or object Failure to observe this precaution could result in burns or fire. Avoid contact with product ...from the subject. Failure to maintain compliance with liquid crystal Should the monitor break, care should be taken to avoid injury caused by Nikon for the purpose, to observe this precaution could result in .) from the monitor touching the skin or entering the eyes or mouth.

User Manual
Page 9
... Button 8 The Rotary Multi Selector 9 The m Button 10 Help Displays 11 First Steps...12 Charging the Battery 12 Inserting the Battery 14 Removing the Battery 15 Turning On and Off the Camera 15 Setting Display Language, Date, and Time 16 Inserting Memory Cards 18 Removing Memory Cards 19 L Basic ...Photography and Playback: Auto Mode 20 Step 1 Turn the Camera On and Select L (Auto) Mode 20 Step ...
... Button 8 The Rotary Multi Selector 9 The m Button 10 Help Displays 11 First Steps...12 Charging the Battery 12 Inserting the Battery 14 Removing the Battery 15 Turning On and Off the Camera 15 Setting Display Language, Date, and Time 16 Inserting Memory Cards 18 Removing Memory Cards 19 L Basic ...Photography and Playback: Auto Mode 20 Step 1 Turn the Camera On and Select L (Auto) Mode 20 Step ...

User Manual
Page 14
... in these manuals is functioning normally. See the URL below for contact information: http://nikonimaging.com/ Use Only Nikon Brand Electronic Accessories Nikon COOLPIX cameras are engineered and proven to ongoing product support and education, continually updated information is available online at weddings or ... • For users in Europe and Africa: http://www.europe-nikon.com/support/ • For users in your area. Rechargeable Li-ion Battery EN-EL8 Before Taking Important Pictures Before taking the camera on digital imaging and photography. About the Manuals • No part of the...
... in these manuals is functioning normally. See the URL below for contact information: http://nikonimaging.com/ Use Only Nikon Brand Electronic Accessories Nikon COOLPIX cameras are engineered and proven to ongoing product support and education, continually updated information is available online at weddings or ... • For users in Europe and Africa: http://www.europe-nikon.com/support/ • For users in your area. Rechargeable Li-ion Battery EN-EL8 Before Taking Important Pictures Before taking the camera on digital imaging and photography. About the Manuals • No part of the...

User Manual
Page 17
Introduction Parts of the Camera Rotary multi selector: c 9 H (self-timer): c 30 F (macro close-up mode): c 31 C (mode) button (c 8) Speaker (c 52, 68, 71) J (flash mode): c 28 I (exposure compensation): c 32 d (apply selection) ...): c 47 • l (help): c 11 Indicator lamp (c 69)/ Flash lamp (c 29) i (shooting/playback) button (c 8, 26) T (delete) button (c 26, 27, 52, 68) Monitor (c 6) m button (c 10, 89, 99) Battery-chamber/memory card slot cover (c 14, 18) Battery latch (c 14, 15) Tripod socket Memory card slot (c 18) Multi connector (c 74, 77, 80...
Introduction Parts of the Camera Rotary multi selector: c 9 H (self-timer): c 30 F (macro close-up mode): c 31 C (mode) button (c 8) Speaker (c 52, 68, 71) J (flash mode): c 28 I (exposure compensation): c 32 d (apply selection) ...): c 47 • l (help): c 11 Indicator lamp (c 69)/ Flash lamp (c 29) i (shooting/playback) button (c 8, 26) T (delete) button (c 26, 27, 52, 68) Monitor (c 6) m button (c 10, 89, 99) Battery-chamber/memory card slot cover (c 14, 18) Battery latch (c 14, 15) Tripod socket Memory card slot (c 18) Multi connector (c 74, 77, 80...

User Manual
Page 18
... button is displayed. The focus area can be selected 6 from 99 focus areas in the monitor during shooting and playback (actual display varies with current camera settings). Shooting 2 5 6 20 21 1G 3 4 p zABCD A qwz L F q 19 f g h i j l g 18 17 Edehi I+1.0 E BM7 w8 W9 W 10 10H 11 s ...41 3 Macro close-up mode 31 4 Zoom indicator 22, 31 5 Focus indicator 24 6 Flash mode 28 7 Internal memory indicator .......... 21 8 Battery level indicator 20 9 ISO sensitivity 29, 96 10 Vibration reduction icon 114 11 Self-timer indicator 30 12 "Date not set" indicator 128 Time zone...
... button is displayed. The focus area can be selected 6 from 99 focus areas in the monitor during shooting and playback (actual display varies with current camera settings). Shooting 2 5 6 20 21 1G 3 4 p zABCD A qwz L F q 19 f g h i j l g 18 17 Edehi I+1.0 E BM7 w8 W9 W 10 10H 11 s ...41 3 Macro close-up mode 31 4 Zoom indicator 22, 31 5 Focus indicator 24 6 Flash mode 28 7 Internal memory indicator .......... 21 8 Battery level indicator 20 9 ISO sensitivity 29, 96 10 Vibration reduction icon 114 11 Self-timer indicator 30 12 "Date not set" indicator 128 Time zone...

User Manual
Page 19
.../05/2007 12:00 M 3 9999.JPG w 4 5 h 6 O P 9999 9999 12 11 9 z 10 O7 P8 1 Date of recording 16 2 Time of recording 16 3 Internal memory indicator .......... 26 4 Battery level indicator 20 5 File number and type 123 6 Volume indicator 52, 68 7 Voice memo recording guide...... 52 8 Voice memo playback guide....... 52 Current frame number...
.../05/2007 12:00 M 3 9999.JPG w 4 5 h 6 O P 9999 9999 12 11 9 z 10 O7 P8 1 Date of recording 16 2 Time of recording 16 3 Internal memory indicator .......... 26 4 Battery level indicator 20 5 File number and type 123 6 Volume indicator 52, 68 7 Voice memo recording guide...... 52 8 Voice memo playback guide....... 52 Current frame number...

User Manual
Page 24
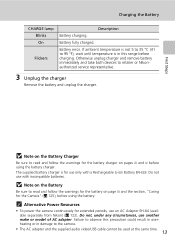
First Steps First Steps Charging the Battery The camera uses a Rechargeable Li-ion Battery EN-EL8 (supplied). About two hours are required to the battery charger 1 and insert the wall plug into the battery charger. Charge the battery with the Battery Charger MH-62 (supplied) before first use or when the battery is inserted. Charging is on 3. 3 2 1 2 Charge the...
First Steps First Steps Charging the Battery The camera uses a Rechargeable Li-ion Battery EN-EL8 (supplied). About two hours are required to the battery charger 1 and insert the wall plug into the battery charger. Charge the battery with the Battery Charger MH-62 (supplied) before first use or when the battery is inserted. Charging is on 3. 3 2 1 2 Charge the...
User Manual
Page 25
...35 °C (41 to observe this range before charging. Do not use only with incompatible batteries. Otherwise unplug charger and remove battery immediately and take both devices to the camera. • The AC adapter and the supplied audio video/USB cable cannot be used at...any circumstances, use an AC Adapter EH-64 (available separately from Nikon) (c 122). k Alternative Power Resources • To power the camera continuously for the Camera" (c 125), before using the battery. Battery fully charged. The supplied battery charger is in this precaution could result in overheating or in ...
...35 °C (41 to observe this range before charging. Do not use only with incompatible batteries. Otherwise unplug charger and remove battery immediately and take both devices to the camera. • The AC adapter and the supplied audio video/USB cable cannot be used at...any circumstances, use an AC Adapter EH-64 (available separately from Nikon) (c 122). k Alternative Power Resources • To power the camera continuously for the Camera" (c 125), before using the battery. Battery fully charged. The supplied battery charger is in this precaution could result in overheating or in ...

User Manual
Page 26
... the positive (+) and negative (-) terminals are oriented correctly as described on the label at the entrance of the battery to check the battery is fully inserted. 1 2 j Inserting the Battery Inserting the battery upside down or backwards could damage the camera. The latch drops back into your camera. 1 Open the battery-chamber/memory card slot cover. 2 Insert the...
... the positive (+) and negative (-) terminals are oriented correctly as described on the label at the entrance of the battery to check the battery is fully inserted. 1 2 j Inserting the Battery Inserting the battery upside down or backwards could damage the camera. The latch drops back into your camera. 1 Open the battery-chamber/memory card slot cover. 2 Insert the...
User Manual
Page 27
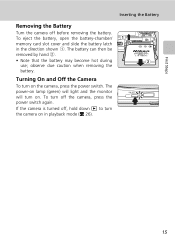
If the camera is turned off the camera, press the power switch again. To eject the battery, open the battery-chamber/ 1 memory card slot cover and slide the battery latch in playback mode (c 26). 15 The battery can then be removed by hand 2. • Note that the battery may become hot during 2 use...lamp (green) will light and the monitor will turn on the camera, press the power switch. To turn off , hold down i to turn the camera on . observe due caution when removing the battery. Turning On and Off the Camera To turn on in the direction shown 1. First Steps Inserting the...
If the camera is turned off the camera, press the power switch again. To eject the battery, open the battery-chamber/ 1 memory card slot cover and slide the battery latch in playback mode (c 26). 15 The battery can then be removed by hand 2. • Note that the battery may become hot during 2 use...lamp (green) will light and the monitor will turn on the camera, press the power switch. To turn off , hold down i to turn the camera on . observe due caution when removing the battery. Turning On and Off the Camera To turn on in the direction shown 1. First Steps Inserting the...
User Manual
Page 30
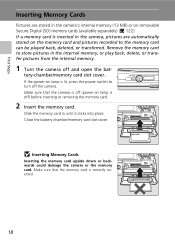
... back, delete, or transfer pictures from the internal memory. 1 Turn the camera off ) before inserting or removing the memory card. 2 Insert the memory card. tery-chamber/memory card slot cover. Close the battery-chamber/memory card slot cover. Remove the memory card to the memory card ... is inserted in the camera, pictures are stored in the camera's internal memory (13 MB) or on the memory card and pictures recorded to store pictures in until it clicks into place. First Steps Inserting Memory Cards Pictures are automatically stored on removable Secure Digital (SD) memory cards ...
... back, delete, or transfer pictures from the internal memory. 1 Turn the camera off ) before inserting or removing the memory card. 2 Insert the memory card. tery-chamber/memory card slot cover. Close the battery-chamber/memory card slot cover. Remove the memory card to the memory card ... is inserted in the camera, pictures are stored in the camera's internal memory (13 MB) or on the memory card and pictures recorded to store pictures in until it clicks into place. First Steps Inserting Memory Cards Pictures are automatically stored on removable Secure Digital (SD) memory cards ...
User Manual
Page 31
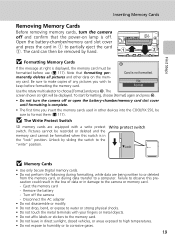
...time you wish to format them (c 117). No Format Use the rotary multi selector to partially eject the card 2. Remove the battery - Open the battery-chamber/memory card slot cover and press the card in direct sunlight, closed vehicles, or areas exposed to high temperatures. •...Format] again and press d. • Do not turn the camera off and confirm that formatting permanently deletes all pictures and other devices into the COOLPIX S50, be displayed. Write protect switch j Memory Cards • Use only Secure Digital memory cards. • Do not perform the following during ...
...time you wish to format them (c 117). No Format Use the rotary multi selector to partially eject the card 2. Remove the battery - Open the battery-chamber/memory card slot cover and press the card in direct sunlight, closed vehicles, or areas exposed to high temperatures. •...Format] again and press d. • Do not turn the camera off and confirm that formatting permanently deletes all pictures and other devices into the COOLPIX S50, be displayed. Write protect switch j Memory Cards • Use only Secure Digital memory cards. • Do not perform the following during ...

User Manual
Page 32
... section describes how to take pictures in L (auto) mode, an automatic, "point-and-shoot" mode recommended for first-time users of digital cameras. 1 Press the power switch to turn on. w K Warning! Battery level indicator L M w W 6 Number of exposures remaining Number of exposures remaining The number of pictures that can be stored depends on the...
... section describes how to take pictures in L (auto) mode, an automatic, "point-and-shoot" mode recommended for first-time users of digital cameras. 1 Press the power switch to turn on. w K Warning! Battery level indicator L M w W 6 Number of exposures remaining Number of exposures remaining The number of pictures that can be stored depends on the...

User Manual
Page 33
...Mode In L (auto) mode, macro close-up mode (c 31) and exposure compensation (c 32) can be applied and pictures can be set - The camera will turn off automatically if no operations are performed for about a minute during shooting and playback. formed for about five seconds. M W Image mode Choose... from seven image-mode options depending on the battery if no operations are performed for another three minutes (c 116). 21 l Auto Power Off in L (Auto) Mode (Standby Mode) The ...
...Mode In L (auto) mode, macro close-up mode (c 31) and exposure compensation (c 32) can be applied and pictures can be set - The camera will turn off automatically if no operations are performed for about a minute during shooting and playback. formed for about five seconds. M W Image mode Choose... from seven image-mode options depending on the battery if no operations are performed for another three minutes (c 116). 21 l Auto Power Off in L (Auto) Mode (Standby Mode) The ...

User Manual
Page 37
...all the way down. 25 Basic Photography and Playback: Auto Mode Step 3 Focus and Shoot j During Recording While pictures are at different distances from the camera (e.g., the subject is inside a cage) • Subject is standing in damage to refocus several times, or use focus lock (c 97). k Autofocus...8226; Several objects are being recorded, the y (wait) icon will be displayed, and the M icon will blink. Do not turn the camera off, open the battery-chamber/memory card slot cover, or remove or disconnect the power source while these circumstances could result in loss of data or in front...
...all the way down. 25 Basic Photography and Playback: Auto Mode Step 3 Focus and Shoot j During Recording While pictures are at different distances from the camera (e.g., the subject is inside a cage) • Subject is standing in damage to refocus several times, or use focus lock (c 97). k Autofocus...8226; Several objects are being recorded, the y (wait) icon will be displayed, and the M icon will blink. Do not turn the camera off, open the battery-chamber/memory card slot cover, or remove or disconnect the power source while these circumstances could result in loss of data or in front...

User Manual
Page 78
... periods, use another make or model of AC adapter. Do not, under any circumstances, use an AC Adapter EH-64 (available separately from Nikon) (c 122). Movies The Movie Menu Stop-Motion Movies 1 Use the rotary multi selector to record the first frame. Exit Playback speed 5 ...fps 10 fps 15 fps Exit 3 Press m. The monitor turns off automatically with the auto off unexpectedly during recording, use a fully charged battery. • To power the camera continuously for 30 minutes, and recording ends. 6 Press d to end recording. j Time-Lapse Movie and Stop-Motion Movie • Flash mode...
... periods, use another make or model of AC adapter. Do not, under any circumstances, use an AC Adapter EH-64 (available separately from Nikon) (c 122). Movies The Movie Menu Stop-Motion Movies 1 Use the rotary multi selector to record the first frame. Exit Playback speed 5 ...fps 10 fps 15 fps Exit 3 Press m. The monitor turns off automatically with the auto off unexpectedly during recording, use a fully charged battery. • To power the camera continuously for 30 minutes, and recording ends. 6 Press d to end recording. j Time-Lapse Movie and Stop-Motion Movie • Flash mode...
User Manual
Page 87
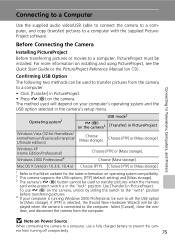
... PictureProject Before transferring pictures or movies to prevent the cam- Choose [PTP] or [Mass storage]. 1 Refer to the Nikon website for the latest information on the camera, unlock by sliding the switch to the "write" position before transferring pictures. 4 If your computer's operating system and ...the [Found New Hardware Wizard] will depend on your computer is in PictureProject. era from the computer. To use a fully charged battery to a computer, PictureProject must be sure to set the USB option to [Mass storage]. Mac OS X (Version 10.3.9, 10.4.x) Choose [PTP].
... PictureProject Before transferring pictures or movies to prevent the cam- Choose [PTP] or [Mass storage]. 1 Refer to the Nikon website for the latest information on the camera, unlock by sliding the switch to the "write" position before transferring pictures. 4 If your computer's operating system and ...the [Found New Hardware Wizard] will depend on your computer is in PictureProject. era from the computer. To use a fully charged battery to a computer, PictureProject must be sure to set the USB option to [Mass storage]. Mac OS X (Version 10.3.9, 10.4.x) Choose [PTP].

User Manual
Page 91
...audio video/USB cable Connecting to Televisions, Computers, and Printers j Note on Power Source When connecting the camera to a computer, use a fully charged battery to the printer and print pictures without using a computer. l ImageLink-compatible Printers Users of ImageLink-compatible printers... printer's card slot • Take a memory card to a digital photo lab For printing using a computer. Connect to printer (c 80) Print pictures one at a time (c 81) Print multiple pictures (c 82) Turn camera off unexpectedly. See "Connecting to the printer and print pictures without...
...audio video/USB cable Connecting to Televisions, Computers, and Printers j Note on Power Source When connecting the camera to a computer, use a fully charged battery to the printer and print pictures without using a computer. l ImageLink-compatible Printers Users of ImageLink-compatible printers... printer's card slot • Take a memory card to a digital photo lab For printing using a computer. Connect to printer (c 80) Print pictures one at a time (c 81) Print multiple pictures (c 82) Turn camera off unexpectedly. See "Connecting to the printer and print pictures without...


