User Manual
Page 13
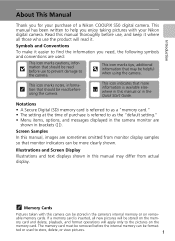
... following symbols and conventions are sometimes omitted from actual display. ted or used : This icon marks cautions, infor- k Memory Cards Pictures taken with your purchase of purchase is inserted, all those who use to prevent damage to as a "memory card." • The setting at the time of a Nikon COOLPIX S50 digital camera. Introduction About This Manual Thank you enjoy taking pictures with this camera can be format- Symbols and Conventions To...
... following symbols and conventions are sometimes omitted from actual display. ted or used : This icon marks cautions, infor- k Memory Cards Pictures taken with your purchase of purchase is inserted, all those who use to prevent damage to as a "memory card." • The setting at the time of a Nikon COOLPIX S50 digital camera. Introduction About This Manual Thank you enjoy taking pictures with this camera can be format- Symbols and Conventions To...

User Manual
Page 14
... the use with this Nikon digital camera are designed to the attention of the Nikon representative in these manuals at weddings or before taking pictures on important occasions (such as an authentic Nikon product. About the Manuals • No part of this device as at any time and without Nikon's prior written permission. • Nikon reserves the right to change the specifications of the hardware and software described...
... the use with this Nikon digital camera are designed to the attention of the Nikon representative in these manuals at weddings or before taking pictures on important occasions (such as an authentic Nikon product. About the Manuals • No part of this device as at any time and without Nikon's prior written permission. • Nikon reserves the right to change the specifications of the hardware and software described...
User Manual
Page 30
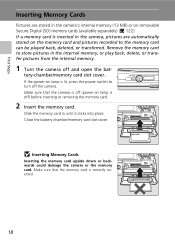
... the power switch to store pictures in the internal memory, or play back, delete, or transfer pictures from the internal memory. 1 Turn the camera off and open the bat- Close the battery-chamber/memory card slot cover. Make sure that the camera is off (power-on removable Secure Digital (SD) memory cards (available separately) (c 122). Slide the memory card in the camera's internal memory (13 MB) or on lamp is off ) before inserting or removing the memory card. 2 Insert the memory card. tery-chamber/memory card...
... the power switch to store pictures in the internal memory, or play back, delete, or transfer pictures from the internal memory. 1 Turn the camera off and open the bat- Close the battery-chamber/memory card slot cover. Make sure that the camera is off (power-on removable Secure Digital (SD) memory cards (available separately) (c 122). Slide the memory card in the camera's internal memory (13 MB) or on lamp is off ) before inserting or removing the memory card. 2 Insert the memory card. tery-chamber/memory card...
User Manual
Page 31
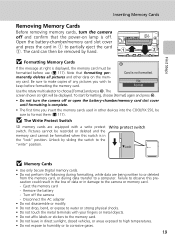
... Inserting Memory Cards Removing Memory Cards Before removing memory cards, turn the camera off or open the battery-chamber/memory card slot cover until formatting is complete. • The first time you wish to corrosive gases. 19 Note that the power-on lamp is displayed, the memory card must be formatted when this precaution could result in the loss of any pictures you insert the memory cards used in other data on the mem- j The Write Protect Switch SD memory cards...
... Inserting Memory Cards Removing Memory Cards Before removing memory cards, turn the camera off or open the battery-chamber/memory card slot cover until formatting is complete. • The first time you wish to corrosive gases. 19 Note that the power-on lamp is displayed, the memory card must be formatted when this precaution could result in the loss of any pictures you insert the memory cards used in other data on the mem- j The Write Protect Switch SD memory cards...
User Manual
Page 41
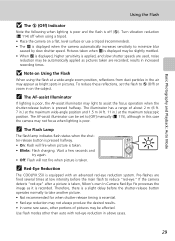
...-flashes are recorded; Turn vibration reduction (c 114) off (B). Pictures taken when W is displayed may be slightly mottled. • When W is displayed, higher sensitivity is applied, and slow shutter speeds are used, noise reduction may be affected. Use flash modes other portions of about 2 m (6 ft. 7 in.) at the maximum wide-angle position and 1.5 m (4 ft. 11 in pictures. k Red-Eye Reduction The COOLPIX S50 is taken, Nikon's own In-Camera Red-Eye Fix processes...
...-flashes are recorded; Turn vibration reduction (c 114) off (B). Pictures taken when W is displayed may be slightly mottled. • When W is displayed, higher sensitivity is applied, and slow shutter speeds are used, noise reduction may be affected. Use flash modes other portions of about 2 m (6 ft. 7 in.) at the maximum wide-angle position and 1.5 m (4 ft. 11 in pictures. k Red-Eye Reduction The COOLPIX S50 is taken, Nikon's own In-Camera Red-Eye Fix processes...

User Manual
Page 42
.... Focus and exposure will blink. To stop the timer before the shutter is released is not applied by pressing d within five seconds, the selection will be set. 10H 6 4 Press the shutter-release button L M the rest of a tripod is displayed. Taking Pictures with the Self-Timer The camera is displayed. Turn vibration reduction (c 114) off when using the self-timer, use of the way down. The self-timer menu is recommended. When using a tripod. 1 Press H (self-timer).
.... Focus and exposure will blink. To stop the timer before the shutter is released is not applied by pressing d within five seconds, the selection will be set. 10H 6 4 Press the shutter-release button L M the rest of a tripod is displayed. Taking Pictures with the Self-Timer The camera is displayed. Turn vibration reduction (c 114) off when using the self-timer, use of the way down. The self-timer menu is recommended. When using a tripod. 1 Press H (self-timer).

User Manual
Page 54
... self-timer is disabled. The camera enters anti-shake mode. In addition, ISO sensitivity is automatically raised to the shooting mode selected in the shooting menu are compared and sharpest picture (picture with L (auto) mode, under natural light. The flash is faster than with highest level of detail) is recommended for dark subjects. • Use of the subject and shutter speed is disabled. This mode is displayed to all shooting modes. l Image Mode in Anti-shake Mode...
... self-timer is disabled. The camera enters anti-shake mode. In addition, ISO sensitivity is automatically raised to the shooting mode selected in the shooting menu are compared and sharpest picture (picture with L (auto) mode, under natural light. The flash is faster than with highest level of detail) is recommended for dark subjects. • Use of the subject and shutter speed is disabled. This mode is displayed to all shooting modes. l Image Mode in Anti-shake Mode...

User Manual
Page 57
...-screen playback. 26 D-Lighting A Press A to enhance brightness and contrast in dark portions of pictures. 49 i Switch to shooting mode Press i or the shutter-release button to return to choose pictures. 9 Change number of pictures displayed When t (j) is pressed, the number of thumbnail images. or 25-picture thumbnail playback modes. Film frames 45 played as film frames. Icons are not displayed with them. Movies are dis- More on Playback k 9-picture Thumbnail Playback Mode Display When protected pictures and pictures selected for transfer...
...-screen playback. 26 D-Lighting A Press A to enhance brightness and contrast in dark portions of pictures. 49 i Switch to shooting mode Press i or the shutter-release button to return to choose pictures. 9 Change number of pictures displayed When t (j) is pressed, the number of thumbnail images. or 25-picture thumbnail playback modes. Film frames 45 played as film frames. Icons are not displayed with them. Movies are dis- More on Playback k 9-picture Thumbnail Playback Mode Display When protected pictures and pictures selected for transfer...
User Manual
Page 60
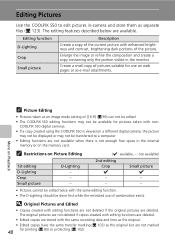
... original pictures are deleted. Create a small copy of the picture. More on the memory card. COOLPIX S50 digital cameras. • If a copy created using the COOLPIX S50 is not enough free space in the internal memory or on Playback k Picture Editing • Pictures taken at an image mode setting of [16:9] (c 89) can not be edited. • The COOLPIX S50 editing functions may not be transferred to edit pictures in-camera and store them as separate files (c 123). Editing Pictures Use the COOLPIX S50...
... original pictures are deleted. Create a small copy of the picture. More on the memory card. COOLPIX S50 digital cameras. • If a copy created using the COOLPIX S50 is not enough free space in the internal memory or on Playback k Picture Editing • Pictures taken at an image mode setting of [16:9] (c 89) can not be edited. • The COOLPIX S50 editing functions may not be transferred to edit pictures in-camera and store them as separate files (c 123). Editing Pictures Use the COOLPIX S50...
User Manual
Page 87
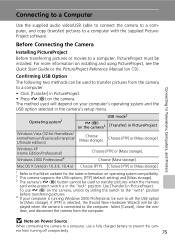
... information on installing and using PictureProject, see the Quick Start Guide or the PictureProject Reference Manual (on Power Source When connecting the camera to a computer, use E (d) on your computer is connected to transfer pictures when the memory card write-protect switch is in the "lock" position. Operating system1 USB mode2 E (d) on the camera3 [Transfer] in PictureProject. • Press E (d) on operating system compatibility. 2 This camera supports the USB options, [PTP] (default setting) and [Mass storage]. 3 The camera's E (d) button cannot be used to the...
... information on installing and using PictureProject, see the Quick Start Guide or the PictureProject Reference Manual (on Power Source When connecting the camera to a computer, use E (d) on your computer is connected to transfer pictures when the memory card write-protect switch is in the "lock" position. Operating system1 USB mode2 E (d) on the camera3 [Transfer] in PictureProject. • Press E (d) on operating system compatibility. 2 This camera supports the USB options, [PTP] (default setting) and [Mass storage]. 3 The camera's E (d) button cannot be used to the...

User Manual
Page 103
... fluorescent lighting. j Cloudy Use when taking pictures under incandescent lighting. The effects of the selected option can be used as "white balance." Shooting, Playback, and Setup Menus j Flash Mode At white-balance settings other than [Auto] or [Flash], turn the flash off (B) (c 28). 91 Although the default setting, [Auto], can mimic this adjustment by processing images according to set white balance under most types of lighting, you can apply the white balance setting suited to a particular light source to suit lighting conditions. This is displayed...
... fluorescent lighting. j Cloudy Use when taking pictures under incandescent lighting. The effects of the selected option can be used as "white balance." Shooting, Playback, and Setup Menus j Flash Mode At white-balance settings other than [Auto] or [Flash], turn the flash off (B) (c 28). 91 Although the default setting, [Auto], can mimic this adjustment by processing images according to set white balance under most types of lighting, you can apply the white balance setting suited to a particular light source to suit lighting conditions. This is displayed...

User Manual
Page 114
... using this function. Delete Erase selected images Erase all images ( excluded) No Yes Exit k Notes on the memory card. • Choose [Yes] and press d in 9-picture thumbnail playback mode. 102 Delete Erasing all images Exit Erase selected images Delete selected pictures (c 100). Transfer important images to a computer before deletion. • Pictures marked with the D icon are recognized by the Q icon (c 45) in the confirmation dialog to delete all pictures stored in the internal memory or on Deletion • Once deleted, pictures cannot be deleted. Shooting...
... using this function. Delete Erase selected images Erase all images ( excluded) No Yes Exit k Notes on the memory card. • Choose [Yes] and press d in 9-picture thumbnail playback mode. 102 Delete Erasing all images Exit Erase selected images Delete selected pictures (c 100). Transfer important images to a computer before deletion. • Pictures marked with the D icon are recognized by the Q icon (c 45) in the confirmation dialog to delete all pictures stored in the internal memory or on Deletion • Once deleted, pictures cannot be deleted. Shooting...

User Manual
Page 116
Camera to card Selected images All images j Notes on the memory card when playback mode is applied, the message, [Memory contains no images.], will be displayed. k File Names of Copied Pictures • When pictures are copied using the [Selected images] option, the newly copied pictures are assigned in the internal memory or memory card. ONM Copy pictures from the largest number existing between the internal memory and a memory card. New folder numbers are numbered consecutively from memory card to receive the copy, an error message will be displayed. ...
Camera to card Selected images All images j Notes on the memory card when playback mode is applied, the message, [Memory contains no images.], will be displayed. k File Names of Copied Pictures • When pictures are copied using the [Selected images] option, the newly copied pictures are assigned in the internal memory or memory card. ONM Copy pictures from the largest number existing between the internal memory and a memory card. New folder numbers are numbered consecutively from memory card to receive the copy, an error message will be displayed. ...

User Manual
Page 117
... is turned on pictures. Record orientation Choose whether or not to default values. Basic Camera Setup: The Setup Menu The setup menu contains the following options. AF assist Enable or disable AF assist illumination. Language Choose language for connection to save power. Interface Adjust settings for camera menus and messages. Date Set camera clock and choose home and destination time zones. Auto off Set time before camera enters standby mode to television or computer. R H V W Z f b u h I i M/O j k n B Menus Choose how menus are displayed. Quick startup...
... is turned on pictures. Record orientation Choose whether or not to default values. Basic Camera Setup: The Setup Menu The setup menu contains the following options. AF assist Enable or disable AF assist illumination. Language Choose language for connection to save power. Interface Adjust settings for camera menus and messages. Date Set camera clock and choose home and destination time zones. Auto off Set time before camera enters standby mode to television or computer. R H V W Z f b u h I i M/O j k n B Menus Choose how menus are displayed. Quick startup...
User Manual
Page 141
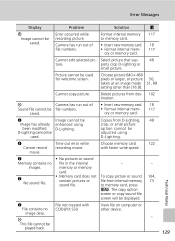
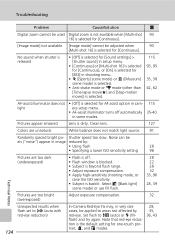
... Problem Error occurred while recording picture. D-Lighting cannot be used . K Memory contains no image data. Time out error while recording movie. • No pictures or sound file in the internal memory or memory card. • Memory card does not contain pictures or sound file. File not created with faster write speed. - - Cannot copy picture. K No sound file. Picture cannot be used for welcome screen. Choose memory card 122 with COOLPIX S50 Solution c Format internal memory 117 or memory card. • Insert new memory card. 18 • Format...
... Problem Error occurred while recording picture. D-Lighting cannot be used . K Memory contains no image data. Time out error while recording movie. • No pictures or sound file in the internal memory or memory card. • Memory card does not contain pictures or sound file. File not created with faster write speed. - - Cannot copy picture. K No sound file. Picture cannot be used for welcome screen. Choose memory card 122 with COOLPIX S50 Solution c Format internal memory 117 or memory card. • Insert new memory card. 18 • Format...

User Manual
Page 144
...; Battery is exhausted; Troubleshooting If the camera fails to function as required. [Hide info] is selected for saving power: press the shutter-release button halfway. • When flash lamp blinks red, wait until flash has charged. • Camera and TV are connected via audio video/USB cable. • Time lapse or interval timer photography in monitor [Date imprint] not available Date not appearing on pic- 62, 40 tures taken using F. movies and voice recordings will have time stamp...
...; Battery is exhausted; Troubleshooting If the camera fails to function as required. [Hide info] is selected for saving power: press the shutter-release button halfway. • When flash lamp blinks red, wait until flash has charged. • Camera and TV are connected via audio video/USB cable. • Time lapse or interval timer photography in monitor [Date imprint] not available Date not appearing on pic- 62, 40 tures taken using F. movies and voice recordings will have time stamp...
User Manual
Page 146
... red-eye. Clean lens. 127 Colors are too bright Adjust exposure compensation. 32 (overexposed) Unexpected results when flash set to A (auto with red-eye reduction) 134 In-Camera Red-Eye Fix may, in camera setup menu. • AF-assist illuminator turns off . • Flash window is blocked. • Subject is beyond flash range. • Adjust exposure compensation. • Apply high-sensitivity shooting mode, or raise the ISO sensitivity. • Subject is selected for [Continuous]. Shutter speed too slow. Select L ([Back light] scene mode...
... red-eye. Clean lens. 127 Colors are too bright Adjust exposure compensation. 32 (overexposed) Unexpected results when flash set to A (auto with red-eye reduction) 134 In-Camera Red-Eye Fix may, in camera setup menu. • AF-assist illuminator turns off . • Flash window is blocked. • Subject is beyond flash range. • Adjust exposure compensation. • Apply high-sensitivity shooting mode, or raise the ISO sensitivity. • Subject is selected for [Continuous]. Shutter speed too slow. Select L ([Back light] scene mode...

User Manual
Page 148
... 136 Use the printer to transfer pictures. Troubleshooting Problem Cause/Solution c Pictures not displayed on PictureProject. PictureProject does not start • Camera is off. 20 when camera is connected • Battery is exhausted. 20 • Audio video/USB cable is not correctly con- 75 nected. • Appropriate [USB] option is not selected. 76 • Camera is selected for transfer using the [Transfer] button in PictureProject. Transfer marking does not Pictures were marked for [USB] or if memory card...
... 136 Use the printer to transfer pictures. Troubleshooting Problem Cause/Solution c Pictures not displayed on PictureProject. PictureProject does not start • Camera is off. 20 when camera is connected • Battery is exhausted. 20 • Audio video/USB cable is not correctly con- 75 nected. • Appropriate [USB] option is not selected. 76 • Camera is selected for transfer using the [Transfer] button in PictureProject. Transfer marking does not Pictures were marked for [USB] or if memory card...
User Manual
Page 149
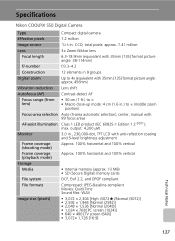
...) Focus-area selection Auto (5-area automatic selection), center, manual with anti-reflection coating and 5-level brightness adjustment Frame coverage (shooting mode) Approx. 100% horizontal and 100% vertical Frame coverage (playback mode) Approx. 100% horizontal and 100% vertical Storage Media • Internal memory (approx. 13 MB) • SD (Secure Digital) memory cards File system DCF, Exif 2.2, and DPOF compliant File formats Compressed: JPEG-Baseline-compliant Movies: QuickTime Sound files: WAV Image size...
...) Focus-area selection Auto (5-area automatic selection), center, manual with anti-reflection coating and 5-level brightness adjustment Frame coverage (shooting mode) Approx. 100% horizontal and 100% vertical Frame coverage (playback mode) Approx. 100% horizontal and 100% vertical Storage Media • Internal memory (approx. 13 MB) • SD (Secure Digital) memory cards File system DCF, Exif 2.2, and DPOF compliant File formats Compressed: JPEG-Baseline-compliant Movies: QuickTime Sound files: WAV Image size...
User Manual
Page 155
... Playback 26, 45-51 menu 99-104 thumbnail 45 zoom 47 Playback menu 99-104 Playback-mode selection menu 8 Power switch 4 Power-on lamp 4, 20 Print set 85, 99 Print size 90 Protect 102 Q Quick startup 107 R Record orientation 116 Red-eye reduction 29 Reset all 119 Rotary multi selector 5, 9 Rotate image 103 RSCN 123 S Self timer 30, 98 Self-timer lamp 4, 30 Setup menu 105-121 Shooting menu 88-96 Shooting-mode selection menu 8 Shutter-release button 4 Slide show 101 Small picture 51 Smear 127 Sound settings...
... Playback 26, 45-51 menu 99-104 thumbnail 45 zoom 47 Playback menu 99-104 Playback-mode selection menu 8 Power switch 4 Power-on lamp 4, 20 Print set 85, 99 Print size 90 Protect 102 Q Quick startup 107 R Record orientation 116 Red-eye reduction 29 Reset all 119 Rotary multi selector 5, 9 Rotate image 103 RSCN 123 S Self timer 30, 98 Self-timer lamp 4, 30 Setup menu 105-121 Shooting menu 88-96 Shooting-mode selection menu 8 Shutter-release button 4 Slide show 101 Small picture 51 Smear 127 Sound settings...


