

User Manual
Page 1
En The Nikon Guide to Digital Photography with the DIGITAL CAMERA
En The Nikon Guide to Digital Photography with the DIGITAL CAMERA

User Manual
Page 2
...malfunction resulting from any direction. Important: Read Before Use The COOLPIX S2 is not waterproof, and should never be immersed in water Use a dry cloth to remove spray or other documentation provided with the camera are registered trademarks of Microsoft Corporation. Do not immerse Do ...not use indoors and outdoors to protect the enclosed equipment against water splashed from failure to IEC 60529 IPX4 ("splash proof"). The accessories provided with your Nikon product are registered...
...malfunction resulting from any direction. Important: Read Before Use The COOLPIX S2 is not waterproof, and should never be immersed in water Use a dry cloth to remove spray or other documentation provided with the camera are registered trademarks of Microsoft Corporation. Do not immerse Do ...not use indoors and outdoors to protect the enclosed equipment against water splashed from failure to IEC 60529 IPX4 ("splash proof"). The accessories provided with your Nikon product are registered...

User Manual
Page 3
...memory cards. This icon marks tips, additional information that may be stored in this camera can be read before using the camera. The memory card must be removed before use to prevent damage to the camera. Symbols and Conventions To make it easier to find the information you need...stored on the memory card and delete, playback, and format operations will be read before the internal memory can be helpful when using the camera. This icon indicates that should be formatted or used to store, delete, or view pictures. This icon marks notes, information that more ...
...memory cards. This icon marks tips, additional information that may be stored in this camera can be read before using the camera. The memory card must be removed before use to prevent damage to the camera. Symbols and Conventions To make it easier to find the information you need...stored on the memory card and delete, playback, and format operations will be read before the internal memory can be helpful when using the camera. This icon indicates that should be formatted or used to store, delete, or view pictures. This icon marks notes, information that more ...
User Manual
Page 4
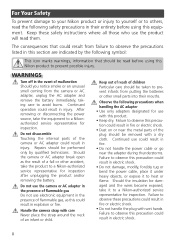
... modify, forcibly tug or bend the power cable, place it under heavy objects, or expose it to a Nikon-authorized service representative for inspection. Failure to observe this precaution could result from the camera or AC adapter, unplug the AC adapter and remove the battery immediately, taking care to avoid burns. For... or injury to yourself or to others, read the following safety precautions in electric shock. Handle the camera strap with this Nikon product to prevent possible injury. Continued use with care Never place the strap around the neck of a fall or other small parts into ...
... modify, forcibly tug or bend the power cable, place it under heavy objects, or expose it to a Nikon-authorized service representative for inspection. Failure to observe this precaution could result from the camera or AC adapter, unplug the AC adapter and remove the battery immediately, taking care to avoid burns. For... or injury to yourself or to others, read the following safety precautions in electric shock. Handle the camera strap with this Nikon product to prevent possible injury. Continued use with care Never place the strap around the neck of a fall or other small parts into ...

User Manual
Page 5
...transport or store with metal objects such as discoloration or deformation. To avoid damage to insert it is unplugged. • Use only rechargeable Nikon EN-EL8 lithium-ion batteries (supplied). CD-ROMs The CD-ROMs supplied with liquid crystal Should the monitor break, care should be sure ... on an audio CD player could cause temporary visual impairment. Charge the battery either by inserting it in the camera and connecting the supplied AC adapter, or by Nikon for use immediately should be taken to avoid injury due to broken glass and to leakage when fully discharged. ...
...transport or store with metal objects such as discoloration or deformation. To avoid damage to insert it is unplugged. • Use only rechargeable Nikon EN-EL8 lithium-ion batteries (supplied). CD-ROMs The CD-ROMs supplied with liquid crystal Should the monitor break, care should be sure ... on an audio CD player could cause temporary visual impairment. Charge the battery either by inserting it in the camera and connecting the supplied AC adapter, or by Nikon for use immediately should be taken to avoid injury due to broken glass and to leakage when fully discharged. ...

User Manual
Page 7
...copyright laws. v Disposing of empty sky). Notice for customers in Canada CAUTION This class B digital apparatus meets all data using commercially available software, potentially resulting in camera memory does not completely erase the original image data. Ensuring the privacy of the Canadian Interference ...toutes les exigences du Règlement sur le matériel brouilleur du Canada. The copying or reproduction of a scanner, digital camera or other device may be taken to avoid injury or damage to property when physically destroying data storage devices. Notice Concerning ...
...copyright laws. v Disposing of empty sky). Notice for customers in Canada CAUTION This class B digital apparatus meets all data using commercially available software, potentially resulting in camera memory does not completely erase the original image data. Ensuring the privacy of the Canadian Interference ...toutes les exigences du Règlement sur le matériel brouilleur du Canada. The copying or reproduction of a scanner, digital camera or other device may be taken to avoid injury or damage to property when physically destroying data storage devices. Notice Concerning ...

User Manual
Page 8
... Monitor 4 The MV-12 COOL-STATION 6 The EH-63 AC Adapter 6 First Steps 7 Inserting the Battery 7 Charging the Battery 8 Inserting Memory Cards 10 Turning the Camera On 12 Basic Setup 12 Basic Photography 14 Step 1-Select Mode 14 Step 2-Frame the Picture 15 Step 3-Focus and Shoot 16 Step 4-View the... Other Scenes 28 Voice Recordings 33 Movies 36 Movie Mode 36 Recording Movies 38 Viewing Movies 40 More on Playback 41 Viewing Pictures on the Camera 41 Viewing Pictures on TV 45 Viewing Pictures on a Computer 46 Printing Pictures 50 vi
... Monitor 4 The MV-12 COOL-STATION 6 The EH-63 AC Adapter 6 First Steps 7 Inserting the Battery 7 Charging the Battery 8 Inserting Memory Cards 10 Turning the Camera On 12 Basic Setup 12 Basic Photography 14 Step 1-Select Mode 14 Step 2-Frame the Picture 15 Step 3-Focus and Shoot 16 Step 4-View the... Other Scenes 28 Voice Recordings 33 Movies 36 Movie Mode 36 Recording Movies 38 Viewing Movies 40 More on Playback 41 Viewing Pictures on the Camera 41 Viewing Pictures on TV 45 Viewing Pictures on a Computer 46 Printing Pictures 50 vi

User Manual
Page 9
... 79 Language...80 Interface ...80 AF Assist ...80 Reset all ...80 Menus ...81 Firmware Version 81 Technical Notes 82 Optional Accessories 82 Caring for the Camera 83 Error Messages 86 Troubleshooting 89 Appendix: Focus Lock, File Storage, and Date Imprint 92 Specifications 95 Index...98 vii
... 79 Language...80 Interface ...80 AF Assist ...80 Reset all ...80 Menus ...81 Firmware Version 81 Technical Notes 82 Optional Accessories 82 Caring for the Camera 83 Error Messages 86 Troubleshooting 89 Appendix: Focus Lock, File Storage, and Date Imprint 92 Specifications 95 Index...98 vii

User Manual
Page 10
... use with normal operation of this Nikon digital camera are designed to operate within the operational and safety requirements of the camera or result in the batteries overheating, igniting, rupturing, or leaking. Attaching the Camera Strap Attach the camera strap as shown below. ቢ ባ Use Only Nikon Brand Electronic Accessories Nikon COOLPIX cameras are engineered and proven to the...
... use with normal operation of this Nikon digital camera are designed to operate within the operational and safety requirements of the camera or result in the batteries overheating, igniting, rupturing, or leaking. Attaching the Camera Strap Attach the camera strap as shown below. ቢ ባ Use Only Nikon Brand Electronic Accessories Nikon COOLPIX cameras are engineered and proven to the...

User Manual
Page 11
.../support • For users in your area. Life-Long Learning As part of a Nikon COOLPIX S2 digital camera. Additional information may result from the Nikon representative in Asia, Oceania, and the Middle East: http://www.nikon-asia.com/ Visit these sites to keep it where all those who use the product will not be available from product...
.../support • For users in your area. Life-Long Learning As part of a Nikon COOLPIX S2 digital camera. Additional information may result from the Nikon representative in Asia, Oceania, and the Middle East: http://www.nikon-asia.com/ Visit these sites to keep it where all those who use the product will not be available from product...

User Manual
Page 12
...from fifteen "scenes" suited to cycle through shooting modes as shown below: seven shooting options. 2 An additional voice recording mode is available for camera strap Lens ( 84, 95) Introduction Memory card slot/ Batterychamber cover ( 7, 10, 11) Sliding lens cover closed Sliding lens cover ( 12)... Built-in which the majority of settings are controlled by the camera. Scene ( 22) Choose from four movie modes. A shooting menu offers control over ( 14, 22, 36) Mode button ( 14, 22, 36)...
...from fifteen "scenes" suited to cycle through shooting modes as shown below: seven shooting options. 2 An additional voice recording mode is available for camera strap Lens ( 84, 95) Introduction Memory card slot/ Batterychamber cover ( 7, 10, 11) Sliding lens cover closed Sliding lens cover ( 12)... Built-in which the majority of settings are controlled by the camera. Scene ( 22) Choose from four movie modes. A shooting menu offers control over ( 14, 22, 36) Mode button ( 14, 22, 36)...

User Manual
Page 14
Introduction The Monitor The following indicators may appear in the monitor during shooting and playback (actual display varies with current camera settings): Shooting 20 21 23 4 1 5 6 19 7 8 10 9 10 +1.0 11 AUTO 999 18 17 16 14 12 AUTO 15 13 Playback 19 01.01.2005 18 00:00 100NIKON 1 9999.JPG 2 3 17 16 15 14 4 5 6 9999/9999 9 13 12 10 7 :START 11 8 4
Introduction The Monitor The following indicators may appear in the monitor during shooting and playback (actual display varies with current camera settings): Shooting 20 21 23 4 1 5 6 19 7 8 10 9 10 +1.0 11 AUTO 999 18 17 16 14 12 AUTO 15 13 Playback 19 01.01.2005 18 00:00 100NIKON 1 9999.JPG 2 3 17 16 15 14 4 5 6 9999/9999 9 13 12 10 7 :START 11 8 4

User Manual
Page 15
... 22, 36 2 Exposure lock 32, 39, 62 3 Zoom indicator1 15 4 Focus indicator2 16 5 Battery level indicator3 14 6 Internal memory/memory card indicator 14, 16 7 Camera shake icon4 .......... 19, 28, 78 8 "Date not set" indicator5 13 9 Time zone indicator 74 10 Self-timer indicator 20 11 Date imprint/date counter 77...-up mode 21 20 White balance 60 21 Color option 64 4 Appears at slow shutter speeds to warn that pictures may be blurred. 5 Appears when camera clock has not been set. 1 Current folder 93-94 2 File number and type 93-94 3 Internal memory/memory card indicator 14, 16, 41 4...
... 22, 36 2 Exposure lock 32, 39, 62 3 Zoom indicator1 15 4 Focus indicator2 16 5 Battery level indicator3 14 6 Internal memory/memory card indicator 14, 16 7 Camera shake icon4 .......... 19, 28, 78 8 "Date not set" indicator5 13 9 Time zone indicator 74 10 Self-timer indicator 20 11 Date imprint/date counter 77...-up mode 21 20 White balance 60 21 Color option 64 4 Appears at slow shutter speeds to warn that pictures may be blurred. 5 Appears when camera clock has not been set. 1 Current folder 93-94 2 File number and type 93-94 3 Internal memory/memory card indicator 14, 16, 41 4...

User Manual
Page 16
...;ts here The EH-63 AC Adapter The supplied EH-63 AC adapter can be connected directly to the camera or via direct USB connection ( 52) DC-IN connector ( 8) USB connector ( 47, 52) Camera connector ( 8) The MV-12 COOL-STATION is fully inserted in the matching connector on a television ( ...AC plug Power cord (connects to charge the battery or power the camera ( 8). The EH-63 AC adapter is tightly closed. Make sure the cover is not waterresistant. Removing the Camera from the COOLSTATION Remove the camera as shown below and close the multi-connector cover. Introduction The MV-...
...;ts here The EH-63 AC Adapter The supplied EH-63 AC adapter can be connected directly to the camera or via direct USB connection ( 52) DC-IN connector ( 8) USB connector ( 47, 52) Camera connector ( 8) The MV-12 COOL-STATION is fully inserted in the matching connector on a television ( ...AC plug Power cord (connects to charge the battery or power the camera ( 8). The EH-63 AC adapter is tightly closed. Make sure the cover is not waterresistant. Removing the Camera from the COOLSTATION Remove the camera as shown below and close the multi-connector cover. Introduction The MV-...

User Manual
Page 17
... (ᕡ) and slide it in the direction shown until it latches (ᕢ). ᕡ ᕢ If the Camera Is Wet Dry the camera with a cloth to the battery chamber. First Steps Inserting the Battery The camera uses a rechargeable Nikon EN-EL8 lithium-ion battery (supplied). 1 Open the memory card slot/battery-chamber cover Slide the... in the label at the entrance to prevent water from getting inside. 7 Inserting the Battery Inserting the battery upside down or backwards could damage the camera.
... (ᕡ) and slide it in the direction shown until it latches (ᕢ). ᕡ ᕢ If the Camera Is Wet Dry the camera with a cloth to the battery chamber. First Steps Inserting the Battery The camera uses a rechargeable Nikon EN-EL8 lithium-ion battery (supplied). 1 Open the memory card slot/battery-chamber cover Slide the... in the label at the entrance to prevent water from getting inside. 7 Inserting the Battery Inserting the battery upside down or backwards could damage the camera.

User Manual
Page 18
... battery before first use or when the battery is off Charging the Battery Check that the camera power-on the COOL-STATION. The power lamp on the AC adapter will not charge when the camera is on. 3 Place the camera in the COOL-STATION Open the multi connector cover and place the... camera in the COOL-STATION with the monitor facing forwards and the connector fully inserted in the matching connector...
... battery before first use or when the battery is off Charging the Battery Check that the camera power-on the COOL-STATION. The power lamp on the AC adapter will not charge when the camera is on. 3 Place the camera in the COOL-STATION Open the multi connector cover and place the... camera in the COOL-STATION with the monitor facing forwards and the connector fully inserted in the matching connector...

User Manual
Page 19
... to charge the battery. On Battery fully charged. Make sure that the battery may become hot during use another make sure that camera is correctly inserted, battery requires replacement. First Steps Removing the Battery from the COOL-STATION When charging is in damage to observe ... the adapter, be removed by hand. Inserting the plug upside down could result in overheating or in the correct orientation. Failure to the camera. To eject the battery, slide the battery latch in COOL-STATION. During charging, battery status is tightly closed . 9 Note that the...
... to charge the battery. On Battery fully charged. Make sure that the battery may become hot during use another make sure that camera is correctly inserted, battery requires replacement. First Steps Removing the Battery from the COOL-STATION When charging is in damage to observe ... the adapter, be removed by hand. Inserting the plug upside down could result in overheating or in the correct orientation. Failure to the camera. To eject the battery, slide the battery latch in COOL-STATION. During charging, battery status is tightly closed . 9 Note that the...

User Manual
Page 20
... inserting or removing memory cards. 2 Open the memory card slot/battery-chamber cover Slide the cover in the camera's internal memory (approximately 12 MB) or on removable Secure Digital (SD) memory cards. To insert a memory card: 1 Confirm that the power-on compatible memory cards, see "...Technical Notes: Optional Accessories" ( 82). If a memory card is inserted, the card is off Inserting Memory Cards Turn the camera off ( 12) before ...
... inserting or removing memory cards. 2 Open the memory card slot/battery-chamber cover Slide the cover in the camera's internal memory (approximately 12 MB) or on removable Secure Digital (SD) memory cards. To insert a memory card: 1 Confirm that the power-on compatible memory cards, see "...Technical Notes: Optional Accessories" ( 82). If a memory card is inserted, the card is off Inserting Memory Cards Turn the camera off ( 12) before ...

User Manual
Page 21
... 3 Insert the memory card Slide the memory card in terminals first until it clicks into place. To remove memory cards, turn the camera off . The card can be used in the COOLPIX S2, memory cards must be sure the card is unlocked. Inserting the card upside down or backwards could damage the... camera or the card. Lock switch 4 Close the memory card slot cover/battery-chamber cover Close the cover (ᕡ) and slide it in the ...
... 3 Insert the memory card Slide the memory card in terminals first until it clicks into place. To remove memory cards, turn the camera off . The card can be used in the COOLPIX S2, memory cards must be sure the card is unlocked. Inserting the card upside down or backwards could damage the... camera or the card. Lock switch 4 Close the memory card slot cover/battery-chamber cover Close the cover (ᕡ) and slide it in the ...
User Manual
Page 22
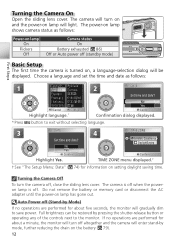
...setting daylight saving time. Cancel Confirm Highlight language. * No Yes Confirm Confirmation dialog displayed. Auto Power off altogether and the camera will enter stand-by mode, further reducing the drain on lamp will turn on and the power-on the battery ( 79). 12 ... If no operations are performed for about a minute, the monitor will light. London, Casablanca DaylightSaving No Yes Confirm Confirm Highlight Yes. The camera is off when the poweron lamp is turned on, a language-selection dialog will be restored by Mode) If no operations are performed for ...
...setting daylight saving time. Cancel Confirm Highlight language. * No Yes Confirm Confirmation dialog displayed. Auto Power off altogether and the camera will enter stand-by mode, further reducing the drain on lamp will turn on and the power-on the battery ( 79). 12 ... If no operations are performed for about a minute, the monitor will light. London, Casablanca DaylightSaving No Yes Confirm Confirm Highlight Yes. The camera is off when the poweron lamp is turned on, a language-selection dialog will be restored by Mode) If no operations are performed for ...


