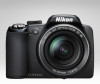
P90 User's Manual
Page 4
...inspection, after unplugging the product and/or removing the battery. Keep out of reach of children Particular care should be performed only by the following safety precautions in injury. For Your Safety To prevent damage to your Nikon product or injury to yourself or to prevent infants from... putting the battery or other accident, take the equipment to avoid burns. WARNINGS Turn off in the event of the...
...inspection, after unplugging the product and/or removing the battery. Keep out of reach of children Particular care should be performed only by the following safety precautions in injury. For Your Safety To prevent damage to your Nikon product or injury to yourself or to prevent infants from... putting the battery or other accident, take the equipment to avoid burns. WARNINGS Turn off in the event of the...

P90 User's Manual
Page 5
... water. Failure to observe this precaution could result in this precaution could result in the battery, such as necklaces or hairpins. • The battery is unplugged. • Use only a Rechargeable Li-ion Battery EN-EL5 (supplied). Failure to observe this precaution could result in contact with clothing or...objects, or expose it upside down or backwards. • Do not short or disassemble the battery or attempt to remove or break the battery insulation or casing. • Do not expose the battery to flame or to excessive heat. • Do not immerse in or expose to a ...
... water. Failure to observe this precaution could result in this precaution could result in the battery, such as necklaces or hairpins. • The battery is unplugged. • Use only a Rechargeable Li-ion Battery EN-EL5 (supplied). Failure to observe this precaution could result in contact with clothing or...objects, or expose it upside down or backwards. • Do not short or disassemble the battery or attempt to remove or break the battery insulation or casing. • Do not expose the battery to flame or to excessive heat. • Do not immerse in or expose to a ...
P90 User's Manual
Page 8
...retailer or the local authorities in charge of waste management. vi The following apply only to users in European countries: • All batteries, whether marked with Canadian ICES-003. The following apply only to users in European countries: • This product is designated for ...separate collection at an appropriate collection point. This symbol on the battery indicates that this symbol or not, are designated for separate collection at an appropriate collection point. Notices Notice for customers in ...
...retailer or the local authorities in charge of waste management. vi The following apply only to users in European countries: • All batteries, whether marked with Canadian ICES-003. The following apply only to users in European countries: • This product is designated for ...separate collection at an appropriate collection point. This symbol on the battery indicates that this symbol or not, are designated for separate collection at an appropriate collection point. Notices Notice for customers in ...

P90 User's Manual
Page 9
... d Button...13 Switching Between Tabs...13 Help Displays ...14 The x (monitor) Button ...14 The s (display) Button ...15 First Steps ...16 Charging the Battery ...16 Inserting the Battery ...18 Removing the Battery...19 Turning On and Off the Camera...19 Setting Display Language, Date and Time 20 Inserting Memory Cards...22 Removing Memory Cards...
... d Button...13 Switching Between Tabs...13 Help Displays ...14 The x (monitor) Button ...14 The s (display) Button ...15 First Steps ...16 Charging the Battery ...16 Inserting the Battery ...18 Removing the Battery...19 Turning On and Off the Camera...19 Setting Display Language, Date and Time 20 Inserting Memory Cards...22 Removing Memory Cards...

P90 User's Manual
Page 14
....nikon.com/ Use Only Nikon Brand Electronic Accessories Nikon COOLPIX cameras are engineered and proven to the highest standards and include complex electronic circuitry. For more information about Nikon brand accessories, contact a local authorized Nikon dealer. THE USE OF NON-NIKON ELECTRONIC...pictures on important occasions (such as an authentic Nikon product. Only Nikon brand electronic accessories (including battery chargers, batteries and AC adapters) certified by any means, without Nikon's prior written permission. • Nikon reserves the right to change the specifications of...
....nikon.com/ Use Only Nikon Brand Electronic Accessories Nikon COOLPIX cameras are engineered and proven to the highest standards and include complex electronic circuitry. For more information about Nikon brand accessories, contact a local authorized Nikon dealer. THE USE OF NON-NIKON ELECTRONIC...pictures on important occasions (such as an authentic Nikon product. Only Nikon brand electronic accessories (including battery chargers, batteries and AC adapters) certified by any means, without Nikon's prior written permission. • Nikon reserves the right to change the specifications of...

P90 User's Manual
Page 17
..., 82, 106, 129, 136 10 Multi selector 12 11 l (delete) button......... 30, 31, 80, 86, 90 12 k (apply selection) button 12 13 Tripod socket 14 Battery-chamber/ memory card slot cover 18, 22 15 Cover latch 18, 22 16 Memory card slot 22 17...
..., 82, 106, 129, 136 10 Multi selector 12 11 l (delete) button......... 30, 31, 80, 86, 90 12 k (apply selection) button 12 13 Tripod socket 14 Battery-chamber/ memory card slot cover 18, 22 15 Cover latch 18, 22 16 Memory card slot 22 17...
P90 User's Manual
Page 20
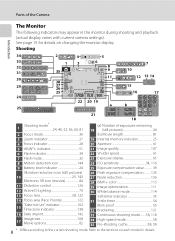
..., 60, 81 2 Focus mode 36 3 Zoom indicator 27 4 Focus indicator 28 5 AE/AF-L indicator 51 6 Flash indicator 34 7 Flash mode 32 8 Motion detection icon 144 9 Battery level indicator 24 Vibration reduction icon (still pictures) 10 25, 143 Electronic VR icon (movies 84 11 Distortion control 126 12 Active D-Lighting 70 13...
..., 60, 81 2 Focus mode 36 3 Zoom indicator 27 4 Focus indicator 28 5 AE/AF-L indicator 51 6 Flash indicator 34 7 Flash mode 32 8 Motion detection icon 144 9 Battery level indicator 24 Vibration reduction icon (still pictures) 10 25, 143 Electronic VR icon (movies 84 11 Distortion control 126 12 Active D-Lighting 70 13...
P90 User's Manual
Page 21
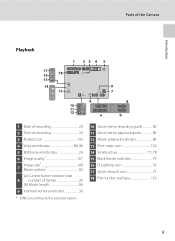
.../ 999 9 8 10 999/ 999 1m00s 11 12 9999/9999 a 1m00s b 1 Date of recording 20 2 Time of recording 20 3 Protect icon 132 4 Volume indicator 80, 86 5 Battery level indicator 24 6 Image quality 107 Image size 108 7 Movie options 82 (a) Current frame number/ total 8 number of frames 30 (b) Movie length 86 9 Internal memory...
.../ 999 9 8 10 999/ 999 1m00s 11 12 9999/9999 a 1m00s b 1 Date of recording 20 2 Time of recording 20 3 Protect icon 132 4 Volume indicator 80, 86 5 Battery level indicator 24 6 Image quality 107 Image size 108 7 Movie options 82 (a) Current frame number/ total 8 number of frames 30 (b) Movie length 86 9 Internal memory...

P90 User's Manual
Page 28
... power cable in a room with a surrounding temperature range of 1-2. • The CHARGE lamp will light. Bring the battery and charger to charge a fully exhausted battery. First Steps 2 Insert the battery into the battery charger by sliding the battery forward 1, and press down until it into place 2. • CHARGE lamp starts blinking when charging starts. •...
... power cable in a room with a surrounding temperature range of 1-2. • The CHARGE lamp will light. Bring the battery and charger to charge a fully exhausted battery. First Steps 2 Insert the battery into the battery charger by sliding the battery forward 1, and press down until it into place 2. • CHARGE lamp starts blinking when charging starts. •...

P90 User's Manual
Page 29
...using the battery. • Be sure to read and follow the warnings for "The Battery" (A159... with a Rechargeable Li-ion Battery EN-EL5. Charging the Battery First Steps B Notes on...before using the battery charger. 3 Remove the battery and unplug the charger....Battery Charger • The supplied battery charger is for the Camera" thoroughly before returning it to the camera. 17 Do not use only with incompatible batteries.... • Be sure to read and follow the warnings and cautions of "For Your Safety" (Aii) thoroughly before using the battery. • If the battery...
...using the battery. • Be sure to read and follow the warnings for "The Battery" (A159... with a Rechargeable Li-ion Battery EN-EL5. Charging the Battery First Steps B Notes on...before using the battery charger. 3 Remove the battery and unplug the charger....Battery Charger • The supplied battery charger is for the Camera" thoroughly before returning it to the camera. 17 Do not use only with incompatible batteries.... • Be sure to read and follow the warnings and cautions of "For Your Safety" (Aii) thoroughly before using the battery. • If the battery...

P90 User's Manual
Page 30
...position 2. 18 First Steps Inserting the Battery Insert a Rechargeable Li-ion Battery EN-EL5 (supplied) into the camera. • Charge the battery before first use or when the battery is running low (A16). 1 Open the battery-chamber/memory card slot cover. 2 Insert the battery. • Confirm that the positive...on the label at the entrance of the battery chamber, and insert the battery. • Use the battery to push the orange battery latch in the correct orientation. 3 Close the battery-chamber/memory card slot cover. • Close the battery-chamber/memory card slot cover 1, and slide...
...position 2. 18 First Steps Inserting the Battery Insert a Rechargeable Li-ion Battery EN-EL5 (supplied) into the camera. • Charge the battery before first use or when the battery is running low (A16). 1 Open the battery-chamber/memory card slot cover. 2 Insert the battery. • Confirm that the positive...on the label at the entrance of the battery chamber, and insert the battery. • Use the battery to push the orange battery latch in the correct orientation. 3 Close the battery-chamber/memory card slot cover. • Close the battery-chamber/memory card slot cover 1, and slide...

P90 User's Manual
Page 31
...switch to elapse before the camera enters standby mode can then be changed from the Auto off option (A146) in the direction shown 1. The battery can be removed by hand 2. • Note that the power-on lamp and the monitor are off before turning on the camera. To eject...removed and turn off automatically and the camera will turn off automatically (auto off function). First Steps Inserting the Battery Removing the Battery Turn the camera off and confirm that the battery may become hot during use; Pressing the power switch when the power-on in Shooting Mode (Standby Mode) ...
...switch to elapse before the camera enters standby mode can then be changed from the Auto off option (A146) in the direction shown 1. The battery can be removed by hand 2. • Note that the power-on lamp and the monitor are off before turning on the camera. To eject...removed and turn off automatically and the camera will turn off automatically (auto off function). First Steps Inserting the Battery Removing the Battery Turn the camera off and confirm that the battery may become hot during use; Pressing the power switch when the power-on in Shooting Mode (Standby Mode) ...
P90 User's Manual
Page 34
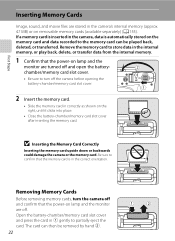
... Slide the memory card in the camera's internal memory (approx. 47 MB) or on the right, until it clicks into place. • Close the battery-chamber/memory card slot cover after inserting the memory card. First Steps Inserting Memory Cards Image, sound, and movie files are off. B Inserting the Memory... Card Correctly Inserting the memory card upside down or backwards could damage the camera or the memory card. Open the battery-chamber/memory card slot cover and press the card in 1 gently to turn the camera off and open the batterychamber/memory card slot cover....
... Slide the memory card in the camera's internal memory (approx. 47 MB) or on the right, until it clicks into place. • Close the battery-chamber/memory card slot cover after inserting the memory card. First Steps Inserting Memory Cards Image, sound, and movie files are off. B Inserting the Memory... Card Correctly Inserting the memory card upside down or backwards could damage the camera or the memory card. Open the battery-chamber/memory card slot cover and press the card in 1 gently to turn the camera off and open the batterychamber/memory card slot cover....

P90 User's Manual
Page 35
...Memory Cards • Use only Secure Digital memory cards. • Do not perform the following operations during data transfer to a computer. Remove the battery - Disconnect the AC adapter • Do not use . Format card? No Use the multi selector to format the memory card. When Yes the ...confirmation dialog is displayed, choose Format and press the k button to corrosive gases. 23 Turn off , or open the battery-chamber/memory card slot cover until formatting is complete. • When you wish to keep before use a computer to format the memory card. ...
...Memory Cards • Use only Secure Digital memory cards. • Do not perform the following operations during data transfer to a computer. Remove the battery - Disconnect the AC adapter • Do not use . Format card? No Use the multi selector to format the memory card. When Yes the ...confirmation dialog is displayed, choose Format and press the k button to corrosive gases. 23 Turn off , or open the battery-chamber/memory card slot cover until formatting is complete. • When you wish to keep before use a computer to format the memory card. ...

P90 User's Manual
Page 36
... turn on the remaining capacity of digital cameras. 1 Rotate the mode dial to charge or replace the battery. The number of pictures that can be stored depends on . 3 Check the battery level and number of exposures remaining in A (auto) mode, an automatic, "pointand-shoot" mode recommended...time users of the internal memory or memory card, the image quality, and the image size (A109). 24 B Battery level low; prepare to A. Recharge or replace with a fully-charged battery. Basic Photography and Playback: Auto Mode Step 1 Turn the Camera On and Select A (Auto) Mode This section...
... turn on the remaining capacity of digital cameras. 1 Rotate the mode dial to charge or replace the battery. The number of pictures that can be stored depends on . 3 Check the battery level and number of exposures remaining in A (auto) mode, an automatic, "pointand-shoot" mode recommended...time users of the internal memory or memory card, the image quality, and the image size (A109). 24 B Battery level low; prepare to A. Recharge or replace with a fully-charged battery. Basic Photography and Playback: Auto Mode Step 1 Turn the Camera On and Select A (Auto) Mode This section...
P90 User's Manual
Page 41
...) • Subject is standing in front of a white wall, wearing a white shirt) • Several objects are included in damage to shoot. Do not open the battery-chamber/memory card slot cover while pictures are being recorded. Cutting power or removing the memory card in these circumstances could result in loss of...
...) • Subject is standing in front of a white wall, wearing a white shirt) • Several objects are included in damage to shoot. Do not open the battery-chamber/memory card slot cover while pictures are being recorded. Cutting power or removing the memory card in these circumstances could result in loss of...

P90 User's Manual
Page 79
...) H Auto bracketing (A121) G AF area mode (A122)4 I Autofocus mode (A125) J Flash exp. Rotating the mode dial to E or F enables you to shoot using A, B, C, D, E and F B Backup battery If the internal backup battery (A139) is recommended. 67
...) H Auto bracketing (A121) G AF area mode (A122)4 I Autofocus mode (A125) J Flash exp. Rotating the mode dial to E or F enables you to shoot using A, B, C, D, E and F B Backup battery If the internal backup battery (A139) is recommended. 67

P90 User's Manual
Page 93
... been fully recorded to the internal memory or memory card, the monitor display will revert to the normal shooting mode display. Do not open the battery-chamber/memory card slot cover while pictures are recorded without sound. 81 Movies
... been fully recorded to the internal memory or memory card, the monitor display will revert to the normal shooting mode display. Do not open the battery-chamber/memory card slot cover while pictures are recorded without sound. 81 Movies

P90 User's Manual
Page 97
...in overheating or in damage to the camera. • Do not rotate the mode dial to a different setting during recording, use a fully charged battery. • To power the camera continuously for the next shot. 6 Press the shutter-release button all the way down a second time to shooting...To prevent the camera from turning off and the power-on lamp blinks between each shot and press the k button. • Choose from Nikon). The Movie Menu 3 Choose the interval taken between shots. • Monitor reactivates automatically for extended periods, use another make or model of 60 ...
...in overheating or in damage to the camera. • Do not rotate the mode dial to a different setting during recording, use a fully charged battery. • To power the camera continuously for the next shot. 6 Press the shutter-release button all the way down a second time to shooting...To prevent the camera from turning off and the power-on lamp blinks between each shot and press the k button. • Choose from Nikon). The Movie Menu 3 Choose the interval taken between shots. • Monitor reactivates automatically for extended periods, use another make or model of 60 ...

P90 User's Manual
Page 105
...pictures to the camera. 93 B Notes on Power Source • When connecting the camera to a computer or printer, use a fully charged battery to prevent the camera from turning off unexpectedly. • To power the camera continuously for extended periods, use another make or model of 32...Software Before connecting the camera to a computer, software, including Nikon Transfer, and Panorama Maker for the latest information on installing the software, refer to the Nikon website for creating panorama photos, must be installed from Nikon). Do not, under any circumstances, use the AC Adapter ...
...pictures to the camera. 93 B Notes on Power Source • When connecting the camera to a computer or printer, use a fully charged battery to prevent the camera from turning off unexpectedly. • To power the camera continuously for extended periods, use another make or model of 32...Software Before connecting the camera to a computer, software, including Nikon Transfer, and Panorama Maker for the latest information on installing the software, refer to the Nikon website for creating panorama photos, must be installed from Nikon). Do not, under any circumstances, use the AC Adapter ...


