
Reference Manual
Page 4
... in this manual handy and refer to it to enhance your enjoyment of your new camera. Introduction COOLPIX L610 Digital Camera Camera Strap LR6/L40 (AA-size) alkaline batteries (×2)* USB Cable UC-E6 Audio Video Cable EG-CP16 ViewNX 2 CD Reference Manual CD • Warranty * The included batteries are missing, please contact the... the camera. Introduction Read This First Thank you purchased the camera. Confirming the Package Contents In the event that any items are for purchasing the Nikon COOLPIX L610 digital camera.
... in this manual handy and refer to it to enhance your enjoyment of your new camera. Introduction COOLPIX L610 Digital Camera Camera Strap LR6/L40 (AA-size) alkaline batteries (×2)* USB Cable UC-E6 Audio Video Cable EG-CP16 ViewNX 2 CD Reference Manual CD • Warranty * The included batteries are missing, please contact the... the camera. Introduction Read This First Thank you purchased the camera. Confirming the Package Contents In the event that any items are for purchasing the Nikon COOLPIX L610 digital camera.

Reference Manual
Page 11
... precautions could result in electric shock. • Do not damage, modify, forcibly tug or bend the power cable, place it under heavy objects, or expose it to a Nikon- ix Introduction Failure to observe this precaution could result in fire or electric shock. • Do not handle... the plug or battery charger with product regulations. Use appropriate cables When connecting cables to the input and output jacks, use only the cables provided or sold ...
... precautions could result in electric shock. • Do not damage, modify, forcibly tug or bend the power cable, place it under heavy objects, or expose it to a Nikon- ix Introduction Failure to observe this precaution could result in fire or electric shock. • Do not handle... the plug or battery charger with product regulations. Use appropriate cables When connecting cables to the input and output jacks, use only the cables provided or sold ...

Reference Manual
Page 14
Introduction Interface Cables Use the interface cables sold or provided by Nikon for customers in the State of California WARNING Handling the cord on the battery indicates that this product will expose you to lead, a chemical known to users in charge of waste management. Nikon Inc., 1300 Walt Whitman Road Melville, New York 11747... this product is designated for Separate Collection in European Countries This symbol indicates that the battery is to cause birth defects or other interface cables may exceed the limits of Class B Part 15 of California to be collected separately.
Introduction Interface Cables Use the interface cables sold or provided by Nikon for customers in the State of California WARNING Handling the cord on the battery indicates that this product will expose you to lead, a chemical known to users in charge of waste management. Nikon Inc., 1300 Walt Whitman Road Melville, New York 11747... this product is designated for Separate Collection in European Countries This symbol indicates that the battery is to cause birth defects or other interface cables may exceed the limits of Class B Part 15 of California to be collected separately.

Reference Manual
Page 63
... played back in 3D. • Refer to the documentation included with your TV or monitor to Auto (default setting) or 1080i. - Use a 3D-compatible HDMI cable to connect the camera and these devices (A 80) for 3D viewing. • When connecting the camera using an HDMI... cable, set TV settings in the setup menu (A 99) as eye strain or nausea. Shooting Features B Playing Back 3D Images • 3D images cannot be played ...
... played back in 3D. • Refer to the documentation included with your TV or monitor to Auto (default setting) or 1080i. - Use a 3D-compatible HDMI cable to connect the camera and these devices (A 80) for 3D viewing. • When connecting the camera using an HDMI... cable, set TV settings in the setup menu (A 99) as eye strain or nausea. Shooting Features B Playing Back 3D Images • 3D images cannot be played ...

Reference Manual
Page 99
...printer, you can perform simple retouching and manage image data in addition to playing back images and movies. Alternatively, connect a commercially available HDMI cable (Type C) to a computer, see page 82. For information about using the ViewNX 2 CD-ROM and transferring images to the TV's ...HDMI input jack. Connection method: Connect the camera directly to the printer's USB input jack with the included USB Cable. • Before connecting to a computer, install ViewNX 2 on the computer using a computer. Printing images without using the included ViewNX 2...
...printer, you can perform simple retouching and manage image data in addition to playing back images and movies. Alternatively, connect a commercially available HDMI cable (Type C) to a computer, see page 82. For information about using the ViewNX 2 CD-ROM and transferring images to the TV's ...HDMI input jack. Connection method: Connect the camera directly to the printer's USB input jack with the included USB Cable. • Before connecting to a computer, install ViewNX 2 on the computer using a computer. Printing images without using the included ViewNX 2...
Reference Manual
Page 103
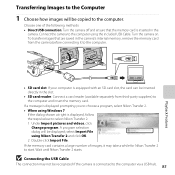
... reader (available separately from the camera before connecting it may not be displayed; B Connecting the USB Cable The connection may take a while for Nikon Transfer 2 to start. Wait until Nikon Transfer 2 starts. Transferring Images to the Computer 1 Choose how images will be recognized if the camera... the card can be copied to the computer. Connect the camera to select Nikon Transfer 2. 1 Under Import pictures and videos, click Change program. select Import File using the included USB Cable. To transfer images that the memory card is inserted in the camera's internal ...
... reader (available separately from the camera before connecting it may not be displayed; B Connecting the USB Cable The connection may take a while for Nikon Transfer 2 to start. Wait until Nikon Transfer 2 starts. Transferring Images to the Computer 1 Choose how images will be recognized if the camera... the card can be copied to the computer. Connect the camera to select Nikon Transfer 2. 1 Under Import pictures and videos, click Change program. select Import File using the included USB Cable. To transfer images that the memory card is inserted in the camera's internal ...

Reference Manual
Page 104
... the computer. • Confirm that the name of the connected camera or removable disk is displayed as the "Source" on the "Options" title bar of Nikon Transfer 2 (1). • Click Start Transfer (2). 1 2 • At default settings, all the images on the memory card will be copied to the computer. 3 Terminate the connection... the appropriate option in the computer operating system to eject the removable disk corresponding to the computer, turn the camera off and disconnect the USB cable.
... the computer. • Confirm that the name of the connected camera or removable disk is displayed as the "Source" on the "Options" title bar of Nikon Transfer 2 (1). • Click Start Transfer (2). 1 2 • At default settings, all the images on the memory card will be copied to the computer. 3 Terminate the connection... the appropriate option in the computer operating system to eject the removable disk corresponding to the computer, turn the camera off and disconnect the USB cable.

Reference Manual
Page 145
... the plug to the audio-in jacks on the TV. Yellow White Red Reference Section When using the included audio/video cable Connect the yellow plug to the video-in jack and the white and red plugs to the HDMI jack on the TV. HDMI mini connector (...Type C) To HDMI jack E27 If your TV is equipped with an HDMI jack, a commercially available HDMI cable can be used to connect the camera to the TV. 1 Turn off the camera. 2 Connect the camera to play back images or movies on the...
... the plug to the audio-in jacks on the TV. Yellow White Red Reference Section When using the included audio/video cable Connect the yellow plug to the video-in jack and the white and red plugs to the HDMI jack on the TV. HDMI mini connector (...Type C) To HDMI jack E27 If your TV is equipped with an HDMI jack, a commercially available HDMI cable can be used to connect the camera to the TV. 1 Turn off the camera. 2 Connect the camera to play back images or movies on the...

Reference Manual
Page 146
.... • Set the HDMI device control setting (E84) of TV settings to On (default setting) and then connect the camera and TV using an HDMI cable. • Aim the remote control at the TV when operating it. • Refer to the TV's operating instructions for details. 4 Hold down the c ... sure that the camera's TV settings (E84) in the setup menu matches the standard used to control playback. B Notes About Connecting the Cable • When connecting the cable, be used by your TV's documentation for information about the TV's HDMI-CEC compatibility. It can be sure that one end of an...
.... • Set the HDMI device control setting (E84) of TV settings to On (default setting) and then connect the camera and TV using an HDMI cable. • Aim the remote control at the TV when operating it. • Refer to the TV's operating instructions for details. 4 Hold down the c ... sure that the camera's TV settings (E84) in the setup menu matches the standard used to control playback. B Notes About Connecting the Cable • When connecting the cable, be used by your TV's documentation for information about the TV's HDMI-CEC compatibility. It can be sure that one end of an...

Reference Manual
Page 147
Follow the procedures below to print images. Take pictures Select images for printing and number of PictBridge-compatible (F22) printers can connect the camera directly to the printer and print images without using Print order option (E51) Connect to the printer (E30) Print images one at a time (E32) Print multiple images (E34) When printing is complete, turn the camera off and disconnect the USB cable Reference Section E29 Connecting the Camera to a Printer (Direct Print) Users of copies using a computer.
Follow the procedures below to print images. Take pictures Select images for printing and number of PictBridge-compatible (F22) printers can connect the camera directly to the printer and print images without using Print order option (E51) Connect to the printer (E30) Print images one at a time (E32) Print multiple images (E34) When printing is complete, turn the camera off and disconnect the USB cable Reference Section E29 Connecting the Camera to a Printer (Direct Print) Users of copies using a computer.

Reference Manual
Page 149
3 Connect the camera to the printer using the included USB cable. • Be sure that connectors are properly oriented, do not use excessive force. When disconnecting the cable, do not remove the cable at an angle, and do not insert the cable at an angle. 4 Turn on the camera. • When properly connected, the PictBridge startup screen is displayed in the camera monitor, followed by the Print selection screen. Print selection 15/11 2012 NO. 32 32 Reference Section E31
3 Connect the camera to the printer using the included USB cable. • Be sure that connectors are properly oriented, do not use excessive force. When disconnecting the cable, do not remove the cable at an angle, and do not insert the cable at an angle. 4 Turn on the camera. • When properly connected, the PictBridge startup screen is displayed in the camera monitor, followed by the Print selection screen. Print selection 15/11 2012 NO. 32 32 Reference Section E31

Reference Manual
Page 171
... date and shooting information is used. • Shooting information cannot be printed when the camera is connected to a DPOF-compatible printer via the included USB cable (E36). • Note that Date and Info settings are reset each time the Print order option is displayed. • The date printed is that saved...
... date and shooting information is used. • Shooting information cannot be printed when the camera is connected to a DPOF-compatible printer via the included USB cable (E36). • Note that Date and Info settings are reset each time the Print order option is displayed. • The date printed is that saved...

Reference Manual
Page 199
... select 30 s, 1 min (default setting), 5 min, or 30 min. When a menu is displayed: Three minutes (when auto off is connected: 30 minutes - When an HDMI cable is connected: 30 minutes • The camera does not enter standby mode while the Eye-Fi card is in the following situations: - This setting determines...
... select 30 s, 1 min (default setting), 5 min, or 30 min. When a menu is displayed: Three minutes (when auto off is connected: 30 minutes - When an HDMI cable is connected: 30 minutes • The camera does not enter standby mode while the Eye-Fi card is in the following situations: - This setting determines...

Reference Manual
Page 202
... this camera in 3D. Reference Section C HDMI and HDMI-CEC "HDMI" is automatically selected from an HDMI-CEC compatible television when connected with an HDMI cable. "HDMI-CEC" is the abbreviation for HDMI-Consumer Electronics Control, which the camera is connected is the abbreviation for connection to play back 3D images...
... this camera in 3D. Reference Section C HDMI and HDMI-CEC "HDMI" is automatically selected from an HDMI-CEC compatible television when connected with an HDMI cable. "HDMI-CEC" is the abbreviation for HDMI-Consumer Electronics Control, which the camera is connected is the abbreviation for connection to play back 3D images...
Reference Manual
Page 219
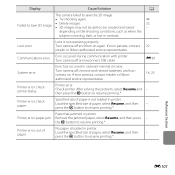
... in contrast. Check printer. the k button to resume printing.* Reference Section E101 If error persists, contact 22 retailer or Nikon-authorized service representative. If error persists, contact retailer or Nikonauthorized service representative. 14, 23 Printer error: check printer status. Turn... camera off and reconnect USB cable. press the k button to resume printing.* Printer error: out of paper is moving, dark, or low in camera's internal ...
... in contrast. Check printer. the k button to resume printing.* Reference Section E101 If error persists, contact 22 retailer or Nikon-authorized service representative. If error persists, contact retailer or Nikonauthorized service representative. 14, 23 Printer error: check printer status. Turn... camera off and reconnect USB cable. press the k button to resume printing.* Printer error: out of paper is moving, dark, or low in camera's internal ...

Reference Manual
Page 228
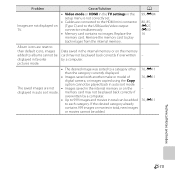
...F4 and cannot operate properly. • Camera is off , remove and reinsert the battery or batteries or, if you are connected via USB cable. • Camera and TV are using an AC adapter, disconnect and reconnect the AC adapter. Cause/Solution A • Wait for the flash... to function as expected, check the list of common problems below before consulting your retailer or Nikon-authorized service representative. If the camera does not turn the camera off without warning. Camera turns off . Power, Display, Settings Issues Problem The...
...F4 and cannot operate properly. • Camera is off , remove and reinsert the battery or batteries or, if you are connected via USB cable. • Camera and TV are using an AC adapter, disconnect and reconnect the AC adapter. Cause/Solution A • Wait for the flash... to function as expected, check the list of common problems below before consulting your retailer or Nikon-authorized service representative. If the camera does not turn the camera off without warning. Camera turns off . Power, Display, Settings Issues Problem The...
Reference Manual
Page 230
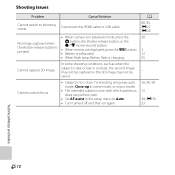
Shooting Issues Problem Cannot switch to Auto. • Turn camera off and then on again. Cause/Solution Disconnect the HDMI cable or USB cable. • When camera is in playback mode, press the A button, the shutter-release button, or the b (e movie-record) button. • When menus are displayed, press ...
Shooting Issues Problem Cannot switch to Auto. • Turn camera off and then on again. Cause/Solution Disconnect the HDMI cable or USB cable. • When camera is in playback mode, press the A button, the shutter-release button, or the b (e movie-record) button. • When menus are displayed, press ...
Reference Manual
Page 235
...; Memory card contains no images. Cause/Solution • Video mode or HDMI in the TV settings in the setup menu is not correctly set. • Cables are not displayed in auto sort mode. A 99, E84 80, 85, E27, E30 16 - 76, E11 76, E11 - 76, E11 Technical Notes and Index F15...
...; Memory card contains no images. Cause/Solution • Video mode or HDMI in the TV settings in the setup menu is not correctly set. • Cables are not displayed in auto sort mode. A 99, E84 80, 85, E27, E30 16 - 76, E11 76, E11 - 76, E11 Technical Notes and Index F15...

Reference Manual
Page 236
Cause/Solution • Camera is off. • Battery is exhausted. • USB cable is not correctly connected. • Camera is not recognized by the camera. • The printer automatically selects the paper size. Use the printer to start ... 2. • Memory card contains no images. Replace the memory card. • Remove the memory card to print images from a PictBridge-compatible printer. Problem Nikon Transfer 2 does not start Nikon Transfer 2 automatically. A 23 22 80, 85 - 82 85 16 16 44 80, E33, E34 - Technical Notes and Index F16 Images to help information...
Cause/Solution • Camera is off. • Battery is exhausted. • USB cable is not correctly connected. • Camera is not recognized by the camera. • The printer automatically selects the paper size. Use the printer to start ... 2. • Memory card contains no images. Replace the memory card. • Remove the memory card to print images from a PictBridge-compatible printer. Problem Nikon Transfer 2 does not start Nikon Transfer 2 automatically. A 23 22 80, 85 - 82 85 16 16 44 80, E33, E34 - Technical Notes and Index F16 Images to help information...

Reference Manual
Page 244
... s 44 A AC adapter 15, E95 AF area mode 64, E48 AF-assist illuminator 2, 98, E78 Album E10 Alkaline batteries 14 Aperture value 29 Audio/video cable 81, E27 Audio/video-in jack 81, E27 Auto flash 54 Auto mode 51 Auto off 23, 98, E81 Auto sort menu 78, E11 Auto...
... s 44 A AC adapter 15, E95 AF area mode 64, E48 AF-assist illuminator 2, 98, E78 Album E10 Alkaline batteries 14 Aperture value 29 Audio/video cable 81, E27 Audio/video-in jack 81, E27 Auto flash 54 Auto mode 51 Auto off 23, 98, E81 Auto sort menu 78, E11 Auto...


