Reference Manual
Page 15
... Playback ... 13 Preparation 1 Insert the Batteries 14 Applicable Batteries 14 Preparation 2 Insert a Memory Card.......... 16 Internal Memory and Memory Cards......... 17 Preparation 3 Set the Display Language, Date, and Time 18 Step 1 Turn the Camera On 22 Turning the Camera On and Off 23 Step 2 Select a Shooting Mode 24 Available Shooting Modes 25 Step 3 Frame a Picture 26 Using the Zoom 27 Step 4 Focus and Shoot 28 The Shutter-release Button 29 Step 5 Play Back Images 30 Step 6 Delete Images 32 Shooting Features 35 G (Easy Auto) Mode 36 Scene Mode (Shooting...
... Playback ... 13 Preparation 1 Insert the Batteries 14 Applicable Batteries 14 Preparation 2 Insert a Memory Card.......... 16 Internal Memory and Memory Cards......... 17 Preparation 3 Set the Display Language, Date, and Time 18 Step 1 Turn the Camera On 22 Turning the Camera On and Off 23 Step 2 Select a Shooting Mode 24 Available Shooting Modes 25 Step 3 Frame a Picture 26 Using the Zoom 27 Step 4 Focus and Shoot 28 The Shutter-release Button 29 Step 5 Play Back Images 30 Step 6 Delete Images 32 Shooting Features 35 G (Easy Auto) Mode 36 Scene Mode (Shooting...

Reference Manual
Page 17
... AF Assist E78 Digital Zoom E79 Sound Settings E80 Auto Off E81 Format Memory/Format Card E82 Language E83 TV Settings E84 Blink Warning E85 Eye-Fi Upload E87 Reset All E88 Battery Type E92 Firmware Version E92 File and Folder Names E93 Optional Accessories E95 Attaching the AN-CP23 Camera Strap ... E96 Error Messages E97 xv Introduction E30 Printing Individual Images E32 Printing Multiple Images E34 Editing Movies E37 The Shooting Menu (for A (Auto) Mode E39 Image Mode (Image Size and Quality)... Connecting the Camera to a TV (Viewing Images on...
... AF Assist E78 Digital Zoom E79 Sound Settings E80 Auto Off E81 Format Memory/Format Card E82 Language E83 TV Settings E84 Blink Warning E85 Eye-Fi Upload E87 Reset All E88 Battery Type E92 Firmware Version E92 File and Folder Names E93 Optional Accessories E95 Attaching the AN-CP23 Camera Strap ... E96 Error Messages E97 xv Introduction E30 Printing Individual Images E32 Printing Multiple Images E34 Editing Movies E37 The Shooting Menu (for A (Auto) Mode E39 Image Mode (Image Size and Quality)... Connecting the Camera to a TV (Viewing Images on...
Reference Manual
Page 41
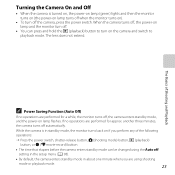
... power switch, shutter-release button, A (shooting mode) button, c (playback) button, or b (e movie-record) button • The time that elapses before the camera enters standby mode can press and hold the c (playback) button to playback mode. Turning the Camera On and Off • When the camera is in about one minute when you are using the Auto off setting in the setup menu (A 98). • By default, the camera enters standby mode in standby mode, the monitor turns back on lamp flashes. When the camera turns...
... power switch, shutter-release button, A (shooting mode) button, c (playback) button, or b (e movie-record) button • The time that elapses before the camera enters standby mode can press and hold the c (playback) button to playback mode. Turning the Camera On and Off • When the camera is in about one minute when you are using the Auto off setting in the setup menu (A 98). • By default, the camera enters standby mode in standby mode, the monitor turns back on lamp flashes. When the camera turns...
Reference Manual
Page 58
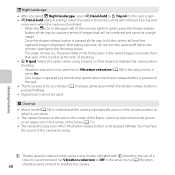
... until the captured image is set to frame the picture on the area in the setup menu is displayed. Shooting Features O: Shutter speed is hand-held (default setting): Select this option when using a tripod or other means to stabilize the camera when shooting. - therefore, the use of the frame (A 71). • The camera focuses even when the shutter-release button is enabled and the camera automatically zooms to produce shots with reduced...
... until the captured image is set to frame the picture on the area in the setup menu is displayed. Shooting Features O: Shutter speed is hand-held (default setting): Select this option when using a tripod or other means to stabilize the camera when shooting. - therefore, the use of the frame (A 71). • The camera focuses even when the shutter-release button is enabled and the camera automatically zooms to produce shots with reduced...

Reference Manual
Page 61
... J (n) to set to shoot manually, the camera captures about 1.9 fps (when Image mode is set again. By default, the camera automatically releases the shutter once it has focused on the detected face. Images are captured continuously at a time. - If the camera detects a person's face and a pet's face in the center of the frame. 29m 0s 860 B Notes About Pet Portrait • Digital zoom cannot be used. • Depending...
... J (n) to set to shoot manually, the camera captures about 1.9 fps (when Image mode is set again. By default, the camera automatically releases the shutter once it has focused on the detected face. Images are captured continuously at a time. - If the camera detects a person's face and a pet's face in the center of the frame. 29m 0s 860 B Notes About Pet Portrait • Digital zoom cannot be used. • Depending...

Reference Manual
Page 69
...) Changing A (Auto) Mode Settings • Features that can be set using the multi selector (A 52) ➝ Flash mode (A 53), self-timer (A 56), macro mode (A 58), and exposure compensation (A 60) • Features that subject. A (Auto) Mode Used for general shooting. Enter shooting mode M A (shooting mode) button M A (auto) mode M k button • You can be used with other functions (A 65). 51 The camera has nine focus areas, and if the camera does not detect the main subject, it focuses on by Pressing the d Button (Shooting Menu) (A 63) Shooting...
...) Changing A (Auto) Mode Settings • Features that can be set using the multi selector (A 52) ➝ Flash mode (A 53), self-timer (A 56), macro mode (A 58), and exposure compensation (A 60) • Features that subject. A (Auto) Mode Used for general shooting. Enter shooting mode M A (shooting mode) button M A (auto) mode M k button • You can be used with other functions (A 65). 51 The camera has nine focus areas, and if the camera does not detect the main subject, it focuses on by Pressing the d Button (Shooting Menu) (A 63) Shooting...

Reference Manual
Page 82
... more open compared to light. E41 Continuous Allows you to control the camera's sensitivity to the other functions (A 65). Available Shooting Menus Option Description A Image mode Allows you see with other shot is saved. The available settings are Standard color (default setting), Vivid color, Black-and-white, E47 Sepia, and Cyanotype. The default setting is detected. E50 Shooting Features B Features That Cannot Be Used Simultaneously 64 Some settings cannot be used when saving images. E49 Smile timer...
... more open compared to light. E41 Continuous Allows you to control the camera's sensitivity to the other functions (A 65). Available Shooting Menus Option Description A Image mode Allows you see with other shot is saved. The available settings are Standard color (default setting), Vivid color, Black-and-white, E47 Sepia, and Cyanotype. The default setting is detected. E50 Shooting Features B Features That Cannot Be Used Simultaneously 64 Some settings cannot be used when saving images. E49 Smile timer...
Reference Manual
Page 103
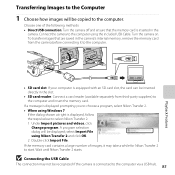
... following methods: • Direct USB connection: Turn the camera off and ensure that are saved in the camera's internal memory, remove the memory card from third-party suppliers) to select Nikon Transfer 2. 1 Under Import pictures and videos, click Change program. A program selection dialog will be copied to the computer via a USB hub. 85 Playback Features select Import File using the included USB Cable. If a message is displayed prompting you to choose a program, select Nikon Transfer 2. • When using Windows 7 If the dialog...
... following methods: • Direct USB connection: Turn the camera off and ensure that are saved in the camera's internal memory, remove the memory card from third-party suppliers) to select Nikon Transfer 2. 1 Under Import pictures and videos, click Change program. A program selection dialog will be copied to the computer via a USB hub. 85 Playback Features select Import File using the included USB Cable. If a message is displayed prompting you to choose a program, select Nikon Transfer 2. • When using Windows 7 If the dialog...
Reference Manual
Page 111
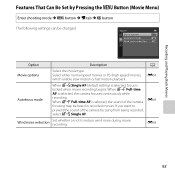
... A Single AF (default setting) is selected, focus is selected, the camera focuses continuously while recording. If you want to reduce wind noise during movie recording. Recording and Playing Back Movies Features That Can Be Set by Pressing the d Button (Movie Menu) Enter shooting mode M d button M D tab M k button The following settings can be heard in recorded movies. Select either normal speed movies or HS (high speed) movies, which enable slow motion or fast motion playback. When B Full-time AF is...
... A Single AF (default setting) is selected, focus is selected, the camera focuses continuously while recording. If you want to reduce wind noise during movie recording. Recording and Playing Back Movies Features That Can Be Set by Pressing the d Button (Movie Menu) Enter shooting mode M d button M D tab M k button The following settings can be heard in recorded movies. Select either normal speed movies or HS (high speed) movies, which enable slow motion or fast motion playback. When B Full-time AF is...

Reference Manual
Page 146
... connector (type C). C Using a TV Remote Control (HDMI Device Control) The remote control of an HDMI-CEC-compatible TV can be sure that the camera's TV settings (E84) in the setup menu matches the standard used instead of the camera's multi selector and zoom control to the TV's operating instructions for details. 4 Hold down the c button to turn on the camera. • The camera enters playback mode and images are displayed on this camera is properly oriented...
... connector (type C). C Using a TV Remote Control (HDMI Device Control) The remote control of an HDMI-CEC-compatible TV can be sure that the camera's TV settings (E84) in the setup menu matches the standard used instead of the camera's multi selector and zoom control to the TV's operating instructions for details. 4 Hold down the c button to turn on the camera. • The camera enters playback mode and images are displayed on this camera is properly oriented...

Reference Manual
Page 162
... Each time the shutter-release button is held down , the camera takes 16 shots at a rate of about 4 images are not moving subjects or when the composition of about 1.9 fps (when Image mode is 2560 × 1920 pixels). • Digital zoom cannot be achieved. Shooting ends when the shutter-release button is best suited to continuous or BSS (best shot selector). The icon for the current setting is displayed...
... Each time the shutter-release button is held down , the camera takes 16 shots at a rate of about 4 images are not moving subjects or when the composition of about 1.9 fps (when Image mode is 2560 × 1920 pixels). • Digital zoom cannot be achieved. Shooting ends when the shutter-release button is best suited to continuous or BSS (best shot selector). The icon for the current setting is displayed...

Reference Manual
Page 169
...images Delete print order Reference Section E51 a Print Order (Creating a DPOF Print Order) Press the c button (playback mode) M d button M a Print order M k button When printing images saved on the right is not displayed. Proceed to a PictBridge-compatible (F22) printer (E29). The Playback Menu • See "Editing Still Images" (E17) for information about image editing features. • See "Favorite Pictures Mode" (E7) for images saved in the playback menu is used to create digital "print orders." • Inserting the memory card into a DPOF-compatible (F21) printer's card...
...images Delete print order Reference Section E51 a Print Order (Creating a DPOF Print Order) Press the c button (playback mode) M d button M a Print order M k button When printing images saved on the right is not displayed. Proceed to a PictBridge-compatible (F22) printer (E29). The Playback Menu • See "Editing Still Images" (E17) for information about image editing features. • See "Favorite Pictures Mode" (E7) for images saved in the playback menu is used to create digital "print orders." • Inserting the memory card into a DPOF-compatible (F21) printer's card...
Reference Manual
Page 181
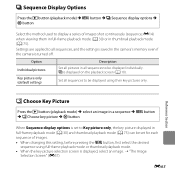
... c button (playback mode) M d button M C Sequence display options M k button Select the method used to be displayed using full-frame playback mode or thumbnail playback mode. • When the key picture selection screen is displayed on the playback screen (A 10). Reference Section N Choose Key Picture Press the c button (playback mode) M select an image in a sequence M d button M N Choose key picture M k button When Sequence display options is set for each sequence of images shot continuously (sequence; Settings are applied to Key picture only, the key picture displayed in the camera...
... c button (playback mode) M d button M C Sequence display options M k button Select the method used to be displayed using full-frame playback mode or thumbnail playback mode. • When the key picture selection screen is displayed on the playback screen (A 10). Reference Section N Choose Key Picture Press the c button (playback mode) M select an image in a sequence M d button M N Choose key picture M k button When Sequence display options is set for each sequence of images shot continuously (sequence; Settings are applied to Key picture only, the key picture displayed in the camera...
Reference Manual
Page 216
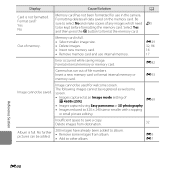
... smaller image size. • Delete images. • Insert new memory card. • Remove memory card and use in the camera. E39 32, 94 16 17 Error occurred while saving image. Format internal memory or memory card. Insert a new memory card or format internal memory or memory card. The following images cannot be registered as welcome screen. • Images captured at an Image mode setting of any images which need F5 to save a copy. No further pictures can be used for use internal memory. Select Yes and then press the k button to other...
... smaller image size. • Delete images. • Insert new memory card. • Remove memory card and use in the camera. E39 32, 94 16 17 Error occurred while saving image. Format internal memory or memory card. Insert a new memory card or format internal memory or memory card. The following images cannot be registered as welcome screen. • Images captured at an Image mode setting of any images which need F5 to save a copy. No further pictures can be used for use internal memory. Select Yes and then press the k button to other...

Reference Manual
Page 217
... the playback menu. No images in the internal memory or memory card. • Remove the memory card from the camera to play back images saved in the camera's internal memory. • To copy the images saved in auto sort mode. Cannot record movie. Cannot edit selected image. • Select images that support editing function. • Movies cannot be saved. View file using a computer or the device used to select Copy in playback mode. Select the category containing the sorted images. Display Sound file cannot be edited. File not created with faster write speed.
... the playback menu. No images in the internal memory or memory card. • Remove the memory card from the camera to play back images saved in the camera's internal memory. • To copy the images saved in auto sort mode. Cannot record movie. Cannot edit selected image. • Select images that support editing function. • Movies cannot be saved. View file using a computer or the device used to select Copy in playback mode. Select the category containing the sorted images. Display Sound file cannot be edited. File not created with faster write speed.

Reference Manual
Page 228
... your retailer or Nikon-authorized service representative. Monitor is charging. Troubleshooting If the camera fails to save power. 98, E81 • The camera and batteries have become too cold F4 and cannot operate properly. • Camera is off. • Battery is exhausted. • Standby mode for saving power: press the power switch, the shutter-release button, A button, c button, or b (e movie-record) button. • The flash lamp flashes while the flash is blank. Power, Display, Settings Issues Problem The camera is on but...
... your retailer or Nikon-authorized service representative. Monitor is charging. Troubleshooting If the camera fails to save power. 98, E81 • The camera and batteries have become too cold F4 and cannot operate properly. • Camera is off. • Battery is exhausted. • Standby mode for saving power: press the power switch, the shutter-release button, A button, c button, or b (e movie-record) button. • The flash lamp flashes while the flash is blank. Power, Display, Settings Issues Problem The camera is on but...

Reference Manual
Page 229
... recording movies or uploading images from an Eye-Fi card for Photo info. this is exhausted; Set the correct time and date using Time zone and date in the setup menu. • Check camera clock regularly against more accurate timepieces and reset as required. 18, 98, E70 No indicators displayed in the setup menu has not been set " indicator flashes when shooting images and recording movies. Camera settings reset. in a hot area; monitor. Select Show info. 98, E73 Print date not available. Clock battery...
... recording movies or uploading images from an Eye-Fi card for Photo info. this is exhausted; Set the correct time and date using Time zone and date in the setup menu. • Check camera clock regularly against more accurate timepieces and reset as required. 18, 98, E70 No indicators displayed in the setup menu has not been set " indicator flashes when shooting images and recording movies. Camera settings reset. in a hot area; monitor. Select Show info. 98, E73 Print date not available. Clock battery...

Reference Manual
Page 234
... make of camera. • This camera cannot play back movies recorded 95 with another make or model of digital camera. • Playback zoom cannot be applied multiple times. • This camera cannot edit images captured with another make or model of g 4608×2592 and images captured using 3D photography. • Edited movies cannot be edited again. • Movies cannot be trimmed so that have been cropped to a size of digital camera, or images 44 captured using Easy panorama...
... make of camera. • This camera cannot play back movies recorded 95 with another make or model of digital camera. • Playback zoom cannot be applied multiple times. • This camera cannot edit images captured with another make or model of g 4608×2592 and images captured using 3D photography. • Edited movies cannot be edited again. • Movies cannot be trimmed so that have been cropped to a size of digital camera, or images 44 captured using Easy panorama...
Reference Manual
Page 235
... set. • Cables are connected to the HDMI mini connector (Type C) and to albums cannot be added to play back images from the internal memory. Data saved in the internal memory or on the memory card may not be played back correctly if overwritten by a computer. • The desired image was sorted to a category other than the category currently displayed. • Images saved with another make or model of digital camera, or images copied using...
... set. • Cables are connected to the HDMI mini connector (Type C) and to albums cannot be added to play back images from the internal memory. Data saved in the internal memory or on the memory card may not be played back correctly if overwritten by a computer. • The desired image was sorted to a category other than the category currently displayed. • Images saved with another make or model of digital camera, or images copied using...

Reference Manual
Page 236
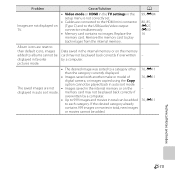
...; Memory card contains no images. Replace the memory card. • Remove the memory card to start when camera is connected. Technical Notes and Index F16 Images to help information contained in the following situations, even when printing from a PictBridge-compatible printer. Problem Nikon Transfer 2 does not start Nikon Transfer 2 automatically. Cause/Solution • Camera is off. • Battery is exhausted. • USB cable is not correctly connected. • Camera is not recognized by the camera. • The printer automatically selects the paper size.
...; Memory card contains no images. Replace the memory card. • Remove the memory card to start when camera is connected. Technical Notes and Index F16 Images to help information contained in the following situations, even when printing from a PictBridge-compatible printer. Problem Nikon Transfer 2 does not start Nikon Transfer 2 automatically. Cause/Solution • Camera is off. • Battery is exhausted. • USB cable is not correctly connected. • Camera is not recognized by the camera. • The printer automatically selects the paper size.


