User Manual
Page 5
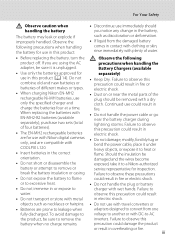
precautions when handling the Battery Chargers (available • Use only the batteries approved for use with Nikon digital cameras only, and are compatible with COOLPIX L120. • Insert batteries in electric shock. When replacing the batteries with EN-MH2-B2 batteries (available separately), purchase two sets (total ... immediately with wet hands. precaution could result in electric shock. • Do not damage, modify, forcibly tug or bend the power cable, place it under heavy objects, or expose it to convert from the damaged battery comes in fire. • Do not handle the power...
precautions when handling the Battery Chargers (available • Use only the batteries approved for use with Nikon digital cameras only, and are compatible with COOLPIX L120. • Insert batteries in electric shock. When replacing the batteries with EN-MH2-B2 batteries (available separately), purchase two sets (total ... immediately with wet hands. precaution could result in electric shock. • Do not damage, modify, forcibly tug or bend the power cable, place it under heavy objects, or expose it to convert from the damaged battery comes in fire. • Do not handle the power...
User Manual
Page 6
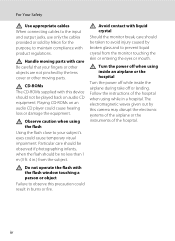
... the flash should be no less than 1 m (3 ft. 4 in burns or fire. For Your Safety Use appropriate cables When connecting cables to the input and output jacks, use only the cables provided or sold by Nikon for the purpose, to your fingers or other objects are not pinched by broken glass and to observe...
... the flash should be no less than 1 m (3 ft. 4 in burns or fire. For Your Safety Use appropriate cables When connecting cables to the input and output jacks, use only the cables provided or sold by Nikon for the purpose, to your fingers or other objects are not pinched by broken glass and to observe...
User Manual
Page 7
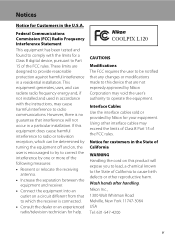
...State of California WARNING Handling the cord on a circuit different from that to the State of the FCC rules. Using other reproductive harm. Nikon Inc., 1300 Walt Whitman Road Melville, New York 11747-3064 USA Tel: 631-547-4200 v Federal Communications Commission (FCC) Radio Frequency ...for a Class B digital device, pursuant to Part 15 of California to correct the interference by Nikon for help. However, there is encouraged to try to cause birth defects or other interface cables may exceed the limits of Class B Part 15 of the following measures: • Reorient or...
...State of California WARNING Handling the cord on a circuit different from that to the State of the FCC rules. Using other reproductive harm. Nikon Inc., 1300 Walt Whitman Road Melville, New York 11747-3064 USA Tel: 631-547-4200 v Federal Communications Commission (FCC) Radio Frequency ...for a Class B digital device, pursuant to Part 15 of California to correct the interference by Nikon for help. However, there is encouraged to try to cause birth defects or other interface cables may exceed the limits of Class B Part 15 of the following measures: • Reorient or...

User Manual
Page 81
... time can be imprinted in images at the time of the print order procedure (A 67) and press the k button to a printer, via the supplied USB cable, for all images. Dates can be printed from printers that do not support date imprinting (A 69). Changing the camera's date using Print date (A 112) in...
... time can be imprinted in images at the time of the print order procedure (A 67) and press the k button to a printer, via the supplied USB cable, for all images. Dates can be printed from printers that do not support date imprinting (A 69). Changing the camera's date using Print date (A 112) in...

User Manual
Page 102
... an HDMI compatible TV, you can enjoy playing back images at high definition image quality by connecting the camera to the television using an HDMI cable (available separately from third-party suppliers). 1 Turn off the camera. 2 Connect the camera to the audio-in jacks on the television. When using the supplied... audio/video cable Connect the yellow plug to the video-in jack and the white and red plugs to the TV. Yellow White Red When using an HDMI...
... an HDMI compatible TV, you can enjoy playing back images at high definition image quality by connecting the camera to the television using an HDMI cable (available separately from third-party suppliers). 1 Turn off the camera. 2 Connect the camera to the audio-in jacks on the television. When using the supplied... audio/video cable Connect the yellow plug to the video-in jack and the white and red plugs to the TV. Yellow White Red When using an HDMI...

User Manual
Page 103
...-pin connector. • To play back images and movies in TV settings to On (default setting), and then connect the camera using an HDMI cable. • Operate the remote control by your television for an HDMI-CEC compatible television can be used by pointing it toward the TV. •... Refer to control the camera during playback. B If the Images Are Not Displayed on HDMI Connection • An HDMI cable is an option set in the Set up menu (A 103) ➝ TV settings (A 119). The video mode setting is not included. C Using a TV ...
...-pin connector. • To play back images and movies in TV settings to On (default setting), and then connect the camera using an HDMI cable. • Operate the remote control by your television for an HDMI-CEC compatible television can be used by pointing it toward the TV. •... Refer to control the camera during playback. B If the Images Are Not Displayed on HDMI Connection • An HDMI cable is an option set in the Set up menu (A 103) ➝ TV settings (A 119). The video mode setting is not included. C Using a TV ...
User Manual
Page 104
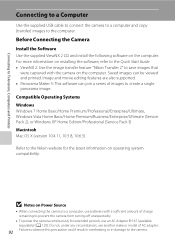
...to a computer, use batteries with the camera on the computer. Connecting to Televisions, Computers and Printers Connecting to a Computer Use the supplied USB cable to connect the camera to a computer and copy (transfer) images to prevent the camera from turning off unexpectedly. • To power the ... Pack 2), or Windows XP Home Edition/Professional (Service Pack 3) Macintosh Mac OS X (version 10.4.11, 10.5.8, 10.6.5) Refer to the Nikon website for extended periods, use another make or model of images to the camera. For more information on installing the software, refer to the Quick...
...to a computer, use batteries with the camera on the computer. Connecting to Televisions, Computers and Printers Connecting to a Computer Use the supplied USB cable to connect the camera to a computer and copy (transfer) images to prevent the camera from turning off unexpectedly. • To power the ... Pack 2), or Windows XP Home Edition/Professional (Service Pack 3) Macintosh Mac OS X (version 10.4.11, 10.5.8, 10.6.5) Refer to the Nikon website for extended periods, use another make or model of images to the camera. For more information on installing the software, refer to the Quick...

User Manual
Page 105
The power-on the camera. The camera monitor will light. B Connecting the USB Cable The connection may not be recognized if the camera is off . Connecting to Televisions, Computers and Printers Connecting to a Computer Transferring Images from a Camera to a .... 93 Be sure that the camera is connected to insert connectors at an angle, and do not use force when connecting or disconnecting the USB cable. 4 Turn on lamp will remain off . 3 Connect the camera to the computer using the supplied USB...
The power-on the camera. The camera monitor will light. B Connecting the USB Cable The connection may not be recognized if the camera is off . Connecting to Televisions, Computers and Printers Connecting to a Computer Transferring Images from a Camera to a .... 93 Be sure that the camera is connected to insert connectors at an angle, and do not use force when connecting or disconnecting the USB cable. 4 Turn on lamp will remain off . 3 Connect the camera to the computer using the supplied USB...

User Manual
Page 107
For more information on using ViewNX 2, refer to a Computer When transfer is complete, the ViewNX 2 screen is complete, turn off the camera and disconnect the USB cable. 95 When transfer is displayed (ViewNX 2 default setting) and transferred images are displayed. Disconnecting the Camera Do not turn off the camera or disconnect the camera from the computer during transfer. Connecting to Televisions, Computers and Printers Connecting to the ViewNX 2 help information (A 96).
For more information on using ViewNX 2, refer to a Computer When transfer is complete, the ViewNX 2 screen is complete, turn off the camera and disconnect the USB cable. 95 When transfer is displayed (ViewNX 2 default setting) and transferred images are displayed. Disconnecting the Camera Do not turn off the camera or disconnect the camera from the computer during transfer. Connecting to Televisions, Computers and Printers Connecting to the ViewNX 2 help information (A 96).
User Manual
Page 109
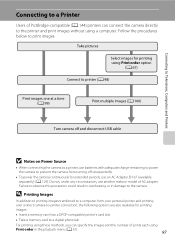
... AC adapter. Follow the procedures below to the camera. D Printing Images In addition to printing images transferred to a computer from turning off and disconnect USB cable B Notes on Power Source • When connecting the camera to the printer and print images without using a computer. Take pictures Select images for printing using...
... AC adapter. Follow the procedures below to the camera. D Printing Images In addition to printing images transferred to a computer from turning off and disconnect USB cable B Notes on Power Source • When connecting the camera to the printer and print images without using a computer. Take pictures Select images for printing using...

User Manual
Page 110
.../05 2011 NO. 32 32 Do not attempt to insert connectors at an angle, and do not use force when connecting or disconnecting the USB cable. 4 Turn on the printer. Then the Print selection screen is displayed in the camera monitor. Be sure that connectors are properly oriented. Check... printer settings. 3 Connect the camera to the printer using the supplied USB cable. Connecting to Televisions, Computers and Printers Connecting to a Printer Connecting the Camera and Printer 1 Turn off the camera. 2 Turn on the camera.
.../05 2011 NO. 32 32 Do not attempt to insert connectors at an angle, and do not use force when connecting or disconnecting the USB cable. 4 Turn on the printer. Then the Print selection screen is displayed in the camera monitor. Be sure that connectors are properly oriented. Check... printer settings. 3 Connect the camera to the printer using the supplied USB cable. Connecting to Televisions, Computers and Printers Connecting to a Printer Connecting the Camera and Printer 1 Turn off the camera. 2 Turn on the camera.

User Manual
Page 131
... interface. Basic Camera Setup Blink Warning d button M z (Setup menu) (A 104) M Blink warning Set whether or not to an HDMI-CEC compatible television via an HDMI cable. HDMI device control Select whether or not the camera can be displayed in the following situations. • G (Easy auto) mode • Portrait (A 36) or Night...
... interface. Basic Camera Setup Blink Warning d button M z (Setup menu) (A 104) M Blink warning Set whether or not to an HDMI-CEC compatible television via an HDMI cable. HDMI device control Select whether or not the camera can be displayed in the following situations. • G (Easy auto) mode • Portrait (A 36) or Night...
User Manual
Page 141
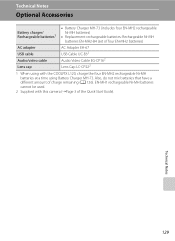
Technical Notes 129 EN-MH1 rechargeable Ni-MH batteries cannot be used. 2 Supplied with the COOLPIX L120, charge the four EN-MH2 rechargeable Ni-MH batteries at a time using Battery Charger MH-73. Technical Notes Optional Accessories Battery charger/ Rechargeable batteries1 &#... Replacement rechargeable batteries: Rechargeable Ni-MH batteries EN-MH2-B4 (set of four EN-MH2 batteries) AC adapter USB cable Audio/video cable Lens cap AC Adapter EH-67 USB Cable UC-E62 Audio Video Cable EG-CP162 Lens Cap LC-CP222 1 When using with this camera (➝Page 3 of charge remaining (A 126)....
Technical Notes 129 EN-MH1 rechargeable Ni-MH batteries cannot be used. 2 Supplied with the COOLPIX L120, charge the four EN-MH2 rechargeable Ni-MH batteries at a time using Battery Charger MH-73. Technical Notes Optional Accessories Battery charger/ Rechargeable batteries1 &#... Replacement rechargeable batteries: Rechargeable Ni-MH batteries EN-MH2-B4 (set of four EN-MH2 batteries) AC adapter USB cable Audio/video cable Lens cap AC Adapter EH-67 USB Cable UC-E62 Audio Video Cable EG-CP162 Lens Cap LC-CP222 1 When using with this camera (➝Page 3 of charge remaining (A 126)....
User Manual
Page 146
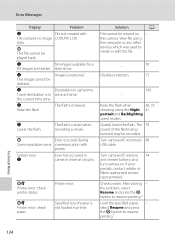
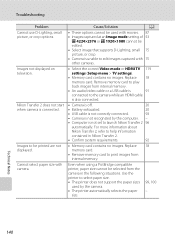
...Nikon-authorized service representative. Raise the flash when 28, 37, shooting using the computer or any other devices which was used to create or edit this camera. data. P This file cannot be recorded. P Error occurred during Communications error communication with File contains no image COOLPIX L120... has occurred in printer. Specified size of the flash being lowered may be played back. Turn camera off , reconnect 98 USB cable. Solution A File cannot be deleted. The flash is raised when recording a movie. View file using the Night 41 portrait and...
...Nikon-authorized service representative. Raise the flash when 28, 37, shooting using the computer or any other devices which was used to create or edit this camera. data. P This file cannot be recorded. P Error occurred during Communications error communication with File contains no image COOLPIX L120... has occurred in printer. Specified size of the flash being lowered may be played back. Turn camera off , reconnect 98 USB cable. Solution A File cannot be deleted. The flash is raised when recording a movie. View file using the Night 41 portrait and...
User Manual
Page 148
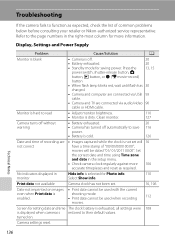
...for setting date and time The clock battery is cold. 126 Date and time of common problems below before consulting your retailer or Nikon-authorized service representative. Print date not available Camera clock has not been set will be used when recording 112 movies. all settings ... 15 button • When flash lamp blinks red, wait until flash has 30 charged. • Camera and computer are connected via USB 93 cable. • Camera and TV are • Images captured while the clock is off automatically to their default values. Troubleshooting If the camera fails...
...for setting date and time The clock battery is cold. 126 Date and time of common problems below before consulting your retailer or Nikon-authorized service representative. Print date not available Camera clock has not been set will be used when recording 112 movies. all settings ... 15 button • When flash lamp blinks red, wait until flash has 30 charged. • Camera and computer are connected via USB 93 cable. • Camera and TV are • Images captured while the clock is off automatically to their default values. Troubleshooting If the camera fails...
User Manual
Page 149
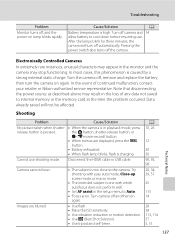
... instances, unusual characters may appear in the monitor and the camera may result in the loss of continued malfunction, contact your retailer or Nikon-authorized service representative. Try shooting with easy auto mode, Close-up scene mode, or macro mode. • The intended subject is ...in playback mode, press release button is too close to the camera. Turn off , and the power-on again. Disconnect the HDMI cable or USB cable. Cause/Solution A Battery temperature is caused by a strong external static charge. Note that disconnecting the power source as described above may stop...
... instances, unusual characters may appear in the monitor and the camera may result in the loss of continued malfunction, contact your retailer or Nikon-authorized service representative. Try shooting with easy auto mode, Close-up scene mode, or macro mode. • The intended subject is ...in playback mode, press release button is too close to the camera. Turn off , and the power-on again. Disconnect the HDMI cable or USB cable. Cause/Solution A Battery temperature is caused by a strong external static charge. Note that disconnecting the power source as described above may stop...
User Manual
Page 152
... also connected. • Camera is off. 20 • Battery exhausted. 20 • USB cable is not correctly connected. 93 • Camera is not recognized by the camera. • The printer automatically selects the paper size. 99, 100 - Nikon Transfer 2 does not start when camera is not set to be selected from internal...
... also connected. • Camera is off. 20 • Battery exhausted. 20 • USB cable is not correctly connected. 93 • Camera is not recognized by the camera. • The printer automatically selects the paper size. 99, 100 - Nikon Transfer 2 does not start when camera is not set to be selected from internal...
User Manual
Page 158
... memory card 19, 117 Formatting internal memory 117 FSCN 131 Full-frame playback mode 26, 61 Full-time AF 85 H Halfway 13 HDMI 119 HDMI cable 90 HDMI input 90 HDMI mini connector 4 Help 35 I Identifier 131 Image mode 21, 35, 53 Image review 110 Image size 53 Incandescent 55 Indicator... playback 87 Movie settings 84 Multi selector 5, 11 Multi-shot 16 57 Museum l 40 N Nickel metal hydride batteries 14 Night landscape j 39 Night Portrait e 37 Nikon Transfer 2 92, 93, 96 Number of Exposures Remaining 20, 54 O Off 28 Optical zoom 23 Optional accessories 129
... memory card 19, 117 Formatting internal memory 117 FSCN 131 Full-frame playback mode 26, 61 Full-time AF 85 H Halfway 13 HDMI 119 HDMI cable 90 HDMI input 90 HDMI mini connector 4 Help 35 I Identifier 131 Image mode 21, 35, 53 Image review 110 Image size 53 Incandescent 55 Indicator... playback 87 Movie settings 84 Multi selector 5, 11 Multi-shot 16 57 Museum l 40 N Nickel metal hydride batteries 14 Night landscape j 39 Night Portrait e 37 Nikon Transfer 2 92, 93, 96 Number of Exposures Remaining 20, 54 O Off 28 Optical zoom 23 Optional accessories 129
User Manual
Page 159
... 6 Sunset h 38 T Tabs 13 Thumbnail playback 62 Time zone 16, 106, 109 Time zone and date 106 Tripod socket 5 TV 90 TV settings 119 U USB cable 93 USB connector and audio/video output 4, 90, 98 USB/audio/video output connector 92, 93 V Vibration reduction 113 Video mode 119 ViewNX 2 92, 96...
... 6 Sunset h 38 T Tabs 13 Thumbnail playback 62 Time zone 16, 106, 109 Time zone and date 106 Tripod socket 5 TV 90 TV settings 119 U USB cable 93 USB connector and audio/video output 4, 90, 98 USB/audio/video output connector 92, 93 V Vibration reduction 113 Video mode 119 ViewNX 2 92, 96...


