User Manual
Page 10
... Mode...35 Choosing a Scene and Shooting (Scene Mode Types and Characteristics 36 Shooting for a Panorama...44 Capturing Smiling Faces Automatically (Smart Portrait Mode 46 Shooting Continuously at High Speed (Sport Continuous 48 Changing the Sport Continuous Shooting Mode Settings 49 Auto Mode...50 Macro Mode...51 Changing A (Auto) Mode Settings (Shooting Menu 52 Displaying the Shooting Menu...52 Image Mode (Image Quality/Image Size 53 White Balance (Adjusting Hue) ...55 Continuous ...57 ISO Sensitivity ...58 Color Options...59 Camera Settings that Cannot Be Set at the Same Time 60...
... Mode...35 Choosing a Scene and Shooting (Scene Mode Types and Characteristics 36 Shooting for a Panorama...44 Capturing Smiling Faces Automatically (Smart Portrait Mode 46 Shooting Continuously at High Speed (Sport Continuous 48 Changing the Sport Continuous Shooting Mode Settings 49 Auto Mode...50 Macro Mode...51 Changing A (Auto) Mode Settings (Shooting Menu 52 Displaying the Shooting Menu...52 Image Mode (Image Quality/Image Size 53 White Balance (Adjusting Hue) ...55 Continuous ...57 ISO Sensitivity ...58 Color Options...59 Camera Settings that Cannot Be Set at the Same Time 60...
User Manual
Page 13
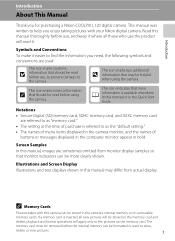
... you enjoy taking pictures with this manual, images are sometimes omitted from actual display. Notations • Secure Digital (SD) memory card, SDHC memory card, and SDXC memory card are used: This icon marks cautions, B information that should be stored on the memory card and delete, playback and format operations will be read it easier to find the information you need, the following symbols and conventions are referred to help you for purchasing a Nikon COOLPIX L120 digital camera.
... you enjoy taking pictures with this manual, images are sometimes omitted from actual display. Notations • Secure Digital (SD) memory card, SDHC memory card, and SDXC memory card are used: This icon marks cautions, B information that should be stored on the memory card and delete, playback and format operations will be read it easier to find the information you need, the following symbols and conventions are referred to help you for purchasing a Nikon COOLPIX L120 digital camera.
User Manual
Page 20
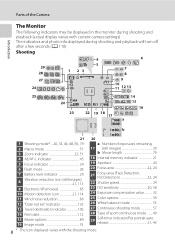
... indicator 106 14 Print date 112 15 Movie options 84 16 Image mode 53 1m00s b 1m00s 20 a Number of exposures remaining 17 (still images 20 b Movie length 79 18 Internal memory indicator 21 19 Aperture 24 20 Focus area 22, 24 21 Focus area (Face Detection, Pet Detection 22, 24 22 Shutter speed 24 23 ISO sensitivity 30, 58 24 Exposure compensation value 32 25 Color options 59 26 White balance mode 55 27 Continuous shooting mode...
... indicator 106 14 Print date 112 15 Movie options 84 16 Image mode 53 1m00s b 1m00s 20 a Number of exposures remaining 17 (still images 20 b Movie length 79 18 Internal memory indicator 21 19 Aperture 24 20 Focus area 22, 24 21 Focus area (Face Detection, Pet Detection 22, 24 22 Shutter speed 24 23 ISO sensitivity 30, 58 24 Exposure compensation value 32 25 Color options 59 26 White balance mode 55 27 Continuous shooting mode...

User Manual
Page 24
... Using Camera Menus Press the d button (A 5) to display the menu for displaying the setup menu (during playback mode) K is displayed when previous menu items are one or more menu items to follow. 1 Press the d button. Shooting menu Image mode White balance Continuous ISO sensitivity Color options 2 Press the multi selector H or I to choose an item and press the k button. Shooting menu Image mode White balance Continuous ISO sensitivity Color options Continuous Single Continuous BSS Multi-shot 16 4 When setting is applied. Shooting menu Image mode White balance Continuous ISO...
... Using Camera Menus Press the d button (A 5) to display the menu for displaying the setup menu (during playback mode) K is displayed when previous menu items are one or more menu items to follow. 1 Press the d button. Shooting menu Image mode White balance Continuous ISO sensitivity Color options 2 Press the multi selector H or I to choose an item and press the k button. Shooting menu Image mode White balance Continuous ISO sensitivity Color options Continuous Single Continuous BSS Multi-shot 16 4 When setting is applied. Shooting menu Image mode White balance Continuous ISO...
User Manual
Page 25
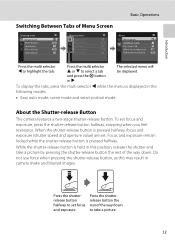
... exposure remain locked while the shutter-release button is displayed in camera shake and blurred images. Do not use force when pressing the shutter-release button, as this position, release the shutter and take a picture by pressing the shutter-release button the rest of the way down to set focus and exposure, press the shutter-release button halfway, stopping when you feel resistance. Introduction Basic Operations Switching Between Tabs of Menu Screen Shooting menu Image mode White balance Continuous ISO sensitivity Color options Shooting menu Image mode White balance Continuous...
... exposure remain locked while the shutter-release button is displayed in camera shake and blurred images. Do not use force when pressing the shutter-release button, as this position, release the shutter and take a picture by pressing the shutter-release button the rest of the way down to set focus and exposure, press the shutter-release button halfway, stopping when you feel resistance. Introduction Basic Operations Switching Between Tabs of Menu Screen Shooting menu Image mode White balance Continuous ISO sensitivity Color options Shooting menu Image mode White balance Continuous...
User Manual
Page 27
... battery performance, set the Battery type setting (A 123) in the setup menu (A 103). 15 C Power Saving Function (Auto Off) If no operations are performed for another make or model of AC adapter. The default setting is displayed Make sure that the lens cap has been removed, and turn the camera off , remove the lens cap, and turn the monitor back on. ➝ Power switch, shutter-release button, A button, c button, or b (e movie-record) button In shooting or playback mode, the camera will blink. Do not, under any circumstances, use an AC Adapter...
... battery performance, set the Battery type setting (A 123) in the setup menu (A 103). 15 C Power Saving Function (Auto Off) If no operations are performed for another make or model of AC adapter. The default setting is displayed Make sure that the lens cap has been removed, and turn the camera off , remove the lens cap, and turn the monitor back on. ➝ Power switch, shutter-release button, A button, c button, or b (e movie-record) button In shooting or playback mode, the camera will blink. Do not, under any circumstances, use an AC Adapter...
User Manual
Page 29
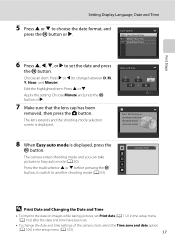
... shooting mode (A 33). Date and time D M Y 01 01 2011 00 00 Edit Press this button in Easy auto mode (A 20). Edit the highlighted item: Press H or I before pressing the k button, to switch to change the date and time settings of the camera clock, select the Time zone and date option (A 106) in the setup menu (A 103). 17 Easy auto mode D Print Date and Changing the Date and Time • To imprint the date on images while taking pictures, set Print date (A 112) in the setup menu...
... shooting mode (A 33). Date and time D M Y 01 01 2011 00 00 Edit Press this button in Easy auto mode (A 20). Edit the highlighted item: Press H or I before pressing the k button, to switch to change the date and time settings of the camera clock, select the Time zone and date option (A 106) in the setup menu (A 103). 17 Easy auto mode D Print Date and Changing the Date and Time • To imprint the date on images while taking pictures, set Print date (A 112) in the setup menu...
User Manual
Page 31
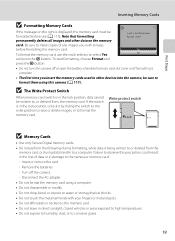
... deletes all images and other devices into the camera, be formatted before formatting the memory card. To format the memory card, use (A 117). Turn off or open the battery-chamber/memory card slot cover until formatting is in the lock position, unlock it by sliding the switch to the write position to save or delete images, or to keep before use the multi selector to a computer. To start formatting, choose Format and press the k button. Write protect switch B Memory Cards • Use only Secure Digital memory cards...
... deletes all images and other devices into the camera, be formatted before formatting the memory card. To format the memory card, use (A 117). Turn off or open the battery-chamber/memory card slot cover until formatting is in the lock position, unlock it by sliding the switch to the write position to save or delete images, or to keep before use the multi selector to a computer. To start formatting, choose Format and press the k button. Write protect switch B Memory Cards • Use only Secure Digital memory cards...
User Manual
Page 42
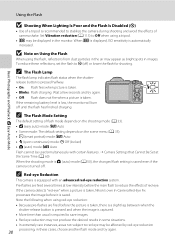
...) mode: U Auto • d (sport continuous) mode: W Off (locked) • A (auto) mode: U Auto Flash cannot be affected by red-eye reduction 30 processing; in images. When E is displayed, ISO sensitivity is saved. If the camera detects "red-eye" when a picture is taken, Nikon's own In-Camera Red-Eye Fix processes the image before the main flash to stabilize the camera during shooting and avoid the effects of camera shake. Basic Photography and Playback: G Easy Auto Mode Using the Flash B Shooting When Lighting Is Poor and the Flash Is Disabled (W) • Use...
...) mode: U Auto • d (sport continuous) mode: W Off (locked) • A (auto) mode: U Auto Flash cannot be affected by red-eye reduction 30 processing; in images. When E is displayed, ISO sensitivity is saved. If the camera detects "red-eye" when a picture is taken, Nikon's own In-Camera Red-Eye Fix processes the image before the main flash to stabilize the camera during shooting and avoid the effects of camera shake. Basic Photography and Playback: G Easy Auto Mode Using the Flash B Shooting When Lighting Is Poor and the Flash Is Disabled (W) • Use...
User Manual
Page 57
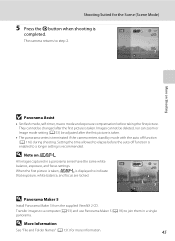
... k button when shooting is terminated if the camera enters standby mode with the auto off function is enabled to a longer setting is recommended. Shooting Suited for more information. 45 Images cannot be deleted, nor can zoom or Image mode setting (A 53) be changed after the first picture is taken. • The panorama series is completed. Setting the time allowed to step 2. D Note on Shooting B Panorama Assist • Set flash mode, self-timer, macro mode and exposure compensation before the auto off function...
... k button when shooting is terminated if the camera enters standby mode with the auto off function is enabled to a longer setting is recommended. Shooting Suited for more information. 45 Images cannot be deleted, nor can zoom or Image mode setting (A 53) be changed after the first picture is taken. • The panorama series is completed. Setting the time allowed to step 2. D Note on Shooting B Panorama Assist • Set flash mode, self-timer, macro mode and exposure compensation before the auto off function...
User Manual
Page 61
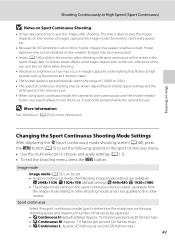
... in the sport continuous menu. • Use the multi selector to lock the focus. Changing the Sport Continuous Shooting Mode Settings After displaying the d (sport continuous) mode shooting screen (A 48), press the d button (A 5) to set the following options in images captured under lighting that flickers at High Speed (Sport Continuous) B Notes on Sport Continuous Shooting • It may take some time to save the images depends on shutter speed settings and the write speed of the memory card. • When using sport continuous mode, the camera focuses continuously until the...
... in the sport continuous menu. • Use the multi selector to lock the focus. Changing the Sport Continuous Shooting Mode Settings After displaying the d (sport continuous) mode shooting screen (A 48), press the d button (A 5) to set the following options in images captured under lighting that flickers at High Speed (Sport Continuous) B Notes on Sport Continuous Shooting • It may take some time to save the images depends on shutter speed settings and the write speed of the memory card. • When using sport continuous mode, the camera focuses continuously until the...
User Manual
Page 64
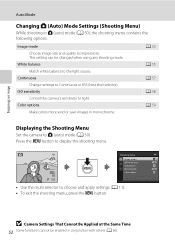
...to Continuous or BSS (best shot selector). ISO sensitivity A 58 Control the camera's sensitivity to A (auto) mode (A 50). Displaying the Shooting Menu Set the camera to light. White balance A 55 Match white balance to choose and apply settings (A 11). • To exit the shooting menu, press the d button. B Camera Settings That Cannot Be Applied at the Same Time 52 Some functions cannot be changed when using any shooting mode. Color options A 59 Make colors more vivid or save images in conjunction with others (A 60). Shooting menu Image mode White balance Continuous ISO...
...to Continuous or BSS (best shot selector). ISO sensitivity A 58 Control the camera's sensitivity to A (auto) mode (A 50). Displaying the Shooting Menu Set the camera to light. White balance A 55 Match white balance to choose and apply settings (A 11). • To exit the shooting menu, press the d button. B Camera Settings That Cannot Be Applied at the Same Time 52 Some functions cannot be changed when using any shooting mode. Color options A 59 Make colors more vivid or save images in conjunction with others (A 60). Shooting menu Image mode White balance Continuous ISO...
User Manual
Page 67
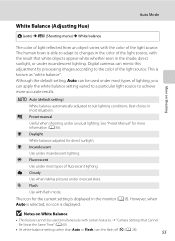
... no icon is known as "white balance". a Auto (default setting) White balance automatically adjusted to the color of fluorescent lighting. b Preset manual Useful when shooting under incandescent lighting. See "Preset Manual" for direct sunlight. e Fluorescent Use under most types of the light source. Auto Mode White Balance (Adjusting Hue) A (auto) M d (Shooting menu) M White balance More on White Balance • This feature cannot be used simultaneously with the result that Cannot Be Set at the Same Time" (A 60) • At white-balance settings other than Auto or Flash, turn...
... no icon is known as "white balance". a Auto (default setting) White balance automatically adjusted to the color of fluorescent lighting. b Preset manual Useful when shooting under incandescent lighting. See "Preset Manual" for direct sunlight. e Fluorescent Use under most types of the light source. Auto Mode White Balance (Adjusting Hue) A (auto) M d (Shooting menu) M White balance More on White Balance • This feature cannot be used simultaneously with the result that Cannot Be Set at the Same Time" (A 60) • At white-balance settings other than Auto or Flash, turn...
User Manual
Page 106
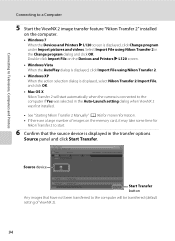
... first installed. • See "Starting Nikon Transfer 2 Manually" (A 96) for more information. • If there are a large number of ViewNX 2). 94 Connecting to Televisions, Computers and Printers Connecting to a Computer 5 Start the ViewNX 2 image transfer feature "Nikon Transfer 2" installed on the computer. • Windows 7 When the Devices and Printers K L120 screen is displayed, select Nikon Transfer 2 Import File, and click OK. • Mac OS X Nikon Transfer 2 will be transferred (default setting of images on the Devices and Printers K L120 screen. • Windows Vista...
... first installed. • See "Starting Nikon Transfer 2 Manually" (A 96) for more information. • If there are a large number of ViewNX 2). 94 Connecting to Televisions, Computers and Printers Connecting to a Computer 5 Start the ViewNX 2 image transfer feature "Nikon Transfer 2" installed on the computer. • Windows 7 When the Devices and Printers K L120 screen is displayed, select Nikon Transfer 2 Import File, and click OK. • Mac OS X Nikon Transfer 2 will be transferred (default setting of images on the Devices and Printers K L120 screen. • Windows Vista...

User Manual
Page 115
... when taking still images. Reset all A 121 Restore camera settings to a television. Language A 118 Choose the language used . Battery type A 123 Select the type of time that passes before the monitor turns off A 116 Set the amount of batteries used for camera monitor display. Print date A 112 Imprint date on . Format memory/Format card A 117 Format internal memory or memory card. Blink warning A 119 Set whether or not to save power. Basic Camera Setup Setup Menu The setup menu contains the following options. AF assist A 115 Basic Camera Setup Enable or disable...
... when taking still images. Reset all A 121 Restore camera settings to a television. Language A 118 Choose the language used . Battery type A 123 Select the type of time that passes before the monitor turns off A 116 Set the amount of batteries used for camera monitor display. Print date A 112 Imprint date on . Format memory/Format card A 117 Format internal memory or memory card. Blink warning A 119 Set whether or not to save power. Basic Camera Setup Setup Menu The setup menu contains the following options. AF assist A 115 Basic Camera Setup Enable or disable...

User Manual
Page 144
... solutions for use in Slide write-protect switch to 19 "lock" position. "write" position. Error Messages The following table lists the error messages and other operations until message clears from display automatically when saving is complete. 24, 25, 50 25 Write-protect switch is write protected. Memory card has not been formatted for dealing with them. All data saved on . To format the memory card, select Yes and press the k button. Format card? Replace the batteries. 14, 123 Camera cannot focus. Q (blinks red) P Please wait for the camera...
... solutions for use in Slide write-protect switch to 19 "lock" position. "write" position. Error Messages The following table lists the error messages and other operations until message clears from display automatically when saving is complete. 24, 25, 50 25 Write-protect switch is write protected. Memory card has not been formatted for dealing with them. All data saved on . To format the memory card, select Yes and press the k button. Format card? Replace the batteries. 14, 123 Camera cannot focus. Q (blinks red) P Please wait for the camera...
User Manual
Page 148
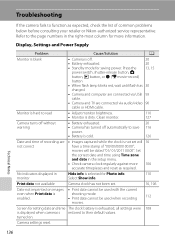
... charged. • Camera and computer are connected via audio/video 90 cable or HDMI cable. Technical Notes 136 movies will 16 not correct have a time stamp of common problems below before consulting your retailer or Nikon-authorized service representative. all settings were 108 is displayed when camera is selected for setting date and time The clock battery is dirty. turned on images • Print date cannot be used when recording 112 movies. Troubleshooting If the camera fails to function...
... charged. • Camera and computer are connected via audio/video 90 cable or HDMI cable. Technical Notes 136 movies will 16 not correct have a time stamp of common problems below before consulting your retailer or Nikon-authorized service representative. all settings were 108 is displayed when camera is selected for setting date and time The clock battery is dirty. turned on images • Print date cannot be used when recording 112 movies. Troubleshooting If the camera fails to function...
User Manual
Page 149
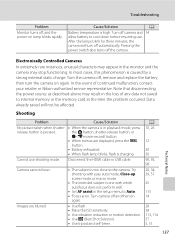
... replace the battery, then turn off automatically. Cannot use . Images are displayed, press the d button. • Battery exhausted. • When flash lamp blinks, flash is pressed. Turn off , and the power-on again. Shooting Technical Notes Problem Cause/Solution No picture taken when shutter- • When the camera is too close to the camera. the A button, shutter-release button, or b (e movie-record) button. • When menus are blurred. • The subject is in the setup menu to Auto. • Focus error...
... replace the battery, then turn off automatically. Cannot use . Images are displayed, press the d button. • Battery exhausted. • When flash lamp blinks, flash is pressed. Turn off , and the power-on again. Shooting Technical Notes Problem Cause/Solution No picture taken when shutter- • When the camera is too close to the camera. the A button, shutter-release button, or b (e movie-record) button. • When menus are blurred. • The subject is in the setup menu to Auto. • Focus error...
User Manual
Page 152
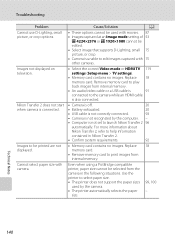
... 140 Troubleshooting Problem Cannot use D-Lighting, small picture, or crop options. For more information about Nikon Transfer 2, refer to play back images from internal memory. Images not displayed on television. Remove memory card to help information contained in the following situations. Images to select paper size. • The printer does not support the paper sizes used with movies. 87 • Images captured at an Image mode setting of 53 P 4224×2376 or m 1920×1080 cannot be printed...
... 140 Troubleshooting Problem Cannot use D-Lighting, small picture, or crop options. For more information about Nikon Transfer 2, refer to play back images from internal memory. Images not displayed on television. Remove memory card to help information contained in the following situations. Images to select paper size. • The printer does not support the paper sizes used with movies. 87 • Images captured at an Image mode setting of 53 P 4224×2376 or m 1920×1080 cannot be printed...
User Manual
Page 159
... Playback zoom 64 Portrait b 36 Power 14, 16, 20 Power switch 4, 14, 20 Power-on lamp 4, 14, 20 Preset manual 56 Print 99, 100 Print date 16, 106, 112 Print order 67 Print order (Date) 68 Printer 97 Protect 71 R Recording movies button 5, 10 Red-eye reduction 28, 30 Reset all 121 Rotate image 73 RSCN 131 S Scene mode 35, 36 Self-timer 31 Self-timer lamp 4, 31 Sepia 59 Setup menu 103 Shooting 20, 22, 24 Shooting mode button 5, 10 Shutter sound 115 Index Shutter speed...
... Playback zoom 64 Portrait b 36 Power 14, 16, 20 Power switch 4, 14, 20 Power-on lamp 4, 14, 20 Preset manual 56 Print 99, 100 Print date 16, 106, 112 Print order 67 Print order (Date) 68 Printer 97 Protect 71 R Recording movies button 5, 10 Red-eye reduction 28, 30 Reset all 121 Rotate image 73 RSCN 131 S Scene mode 35, 36 Self-timer 31 Self-timer lamp 4, 31 Sepia 59 Setup menu 103 Shooting 20, 22, 24 Shooting mode button 5, 10 Shutter sound 115 Index Shutter speed...


