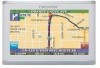
User Guide
Page 1
... equilateral triangle is not used for servicing instructions. CAUTION: To reduce the risk of the unit in the literature accompanying the appliance. NO USE-SERVICEABLE PARTS INSIDE. If the unit is intended to alert the user to the side of electric shock, do not perform any servicing other than that all the connections have difficulty inserting the plug, turn it over and...
... equilateral triangle is not used for servicing instructions. CAUTION: To reduce the risk of the unit in the literature accompanying the appliance. NO USE-SERVICEABLE PARTS INSIDE. If the unit is intended to alert the user to the side of electric shock, do not perform any servicing other than that all the connections have difficulty inserting the plug, turn it over and...
User Guide
Page 2
...manufacturer's instructions. 8) Do not install near water. 6) Clean only with liquids, such as vases, shall be sure to keep the GPS out of direct sunlight or heat. 2 A polarized plug has two blades with the apparatus. Servicing is used, use caution...replacement of the obsolete outlet. 10) Protect the power cord from being damaged, be placed on or pinched particularly at plugs, convenience receptacles, and the point where they exit from the apparatus. 11) Only use this apparatus during lightning storms or when unused for long periods of time. 14) Refer all instructions. 5) Do not use...
...manufacturer's instructions. 8) Do not install near water. 6) Clean only with liquids, such as vases, shall be sure to keep the GPS out of direct sunlight or heat. 2 A polarized plug has two blades with the apparatus. Servicing is used, use caution...replacement of the obsolete outlet. 10) Protect the power cord from being damaged, be placed on or pinched particularly at plugs, convenience receptacles, and the point where they exit from the apparatus. 11) Only use this apparatus during lightning storms or when unused for long periods of time. 14) Refer all instructions. 5) Do not use...
User Guide
Page 3
Replace only with route suggestions. This device complies with part 15 of the GPS hardware and GPS operating software. Operation is subject to the following potentially hazardous situations may result in UL's Standard(s) for any interference received, including interference that may affect safety or timing while driving. Use the unit only as sunshine, fire or the like. Underwriters Laboratories Inc. ("UL") has not tested...
Replace only with route suggestions. This device complies with part 15 of the GPS hardware and GPS operating software. Operation is subject to the following potentially hazardous situations may result in UL's Standard(s) for any interference received, including interference that may affect safety or timing while driving. Use the unit only as sunshine, fire or the like. Underwriters Laboratories Inc. ("UL") has not tested...
User Guide
Page 4
... user is connected. 3. The images in this manual are designed to which can radiate radio frequency energy and, if not installed and used in a residential installation. Consult the dealer or an experienced radio/TV technician for reference only and they may cause harmful interference to radio or television reception, which the receiver is encouraged to try to part...
... user is connected. 3. The images in this manual are designed to which can radiate radio frequency energy and, if not installed and used in a residential installation. Consult the dealer or an experienced radio/TV technician for reference only and they may cause harmful interference to radio or television reception, which the receiver is encouraged to try to part...
User Guide
Page 6
Contents Important Safety Instructions Accessories View of Main Unit System Connections Power Supply Preparation General Setup Playing Music Photo Viewer GPS Unit Installation Reversing Camera Troubleshooting Specifications 1 5 7 8 10 12 16 18 20 21 26 28 6
Contents Important Safety Instructions Accessories View of Main Unit System Connections Power Supply Preparation General Setup Playing Music Photo Viewer GPS Unit Installation Reversing Camera Troubleshooting Specifications 1 5 7 8 10 12 16 18 20 21 26 28 6
User Guide
Page 7
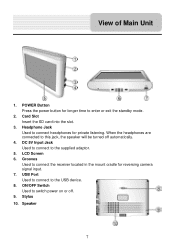
POWER Button Press the power button for longer time to switch power on or off automatically. 4. ON/OFF Switch Used to enter or exit the standby mode. 2. Grooves Used to connect headphones for reversing camera signal input. 7. Headphone Jack Used to connect the receiver located in the mount cradle for private listening. Stylus 10. Speaker 7 When the headphones are connected to the supplied adaptor. 5. Card Slot Insert the SD card into the slot. 3. LCD Screen 6. DC 5V Input Jack...
POWER Button Press the power button for longer time to switch power on or off automatically. 4. ON/OFF Switch Used to enter or exit the standby mode. 2. Grooves Used to connect headphones for reversing camera signal input. 7. Headphone Jack Used to connect the receiver located in the mount cradle for private listening. Stylus 10. Speaker 7 When the headphones are connected to the supplied adaptor. 5. Card Slot Insert the SD card into the slot. 3. LCD Screen 6. DC 5V Input Jack...
User Guide
Page 11
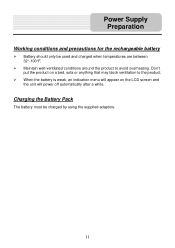
Don't put the product on the LCD screen and the unit will appear on a bed, sofa or anything that may block ventilation to avoid overheating. Maintain well-ventilated conditions around the product to the product. Power Supply Preparation Working conditions and precautions for the rechargeable battery Battery should only be charged by using the supplied adaptors. 11 When the battery is weak, an indication menu will power off automatically after a while. Charging the Battery Pack The battery must be used and charged when temperatures are between 32°-100°F.
Don't put the product on the LCD screen and the unit will appear on a bed, sofa or anything that may block ventilation to avoid overheating. Maintain well-ventilated conditions around the product to the product. Power Supply Preparation Working conditions and precautions for the rechargeable battery Battery should only be charged by using the supplied adaptors. 11 When the battery is weak, an indication menu will power off automatically after a while. Charging the Battery Pack The battery must be used and charged when temperatures are between 32°-100°F.
User Guide
Page 14
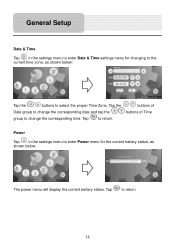
Tap to select the proper Time Zone. General Setup Date & Time Tap in the settings menu to change the corresponding date and tap the group to enter Power menu for changing to the current time zone, as shown below : Tap the buttons to return. 14 buttons of buttons of Time Power Tap in the settings menu to enter Date & Time settings menu for the current battery status, as shown below : The power menu will display the current battery status. Tap the Date group to change the corresponding time. Tap to return.
Tap to select the proper Time Zone. General Setup Date & Time Tap in the settings menu to change the corresponding date and tap the group to enter Power menu for changing to the current time zone, as shown below : Tap the buttons to return. 14 buttons of buttons of Time Power Tap in the settings menu to enter Date & Time settings menu for the current battery status, as shown below : The power menu will display the current battery status. Tap the Date group to change the corresponding time. Tap to return.
User Guide
Page 20
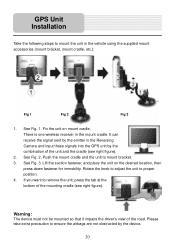
Fix the unit on the desired location, then press down fastener for immobility. See Fig. 2. Rotate the knob to adjust the unit to mount bracket. 3. It can receive the signal sent by the emitter in the Reversing Camera and input these signals into the GPS unit by the device. 20 If you want to remove the unit, press the tab at the bottom of the mounting cradle...
Fix the unit on the desired location, then press down fastener for immobility. See Fig. 2. Rotate the knob to adjust the unit to mount bracket. 3. It can receive the signal sent by the emitter in the Reversing Camera and input these signals into the GPS unit by the device. 20 If you want to remove the unit, press the tab at the bottom of the mounting cradle...
User Guide
Page 22
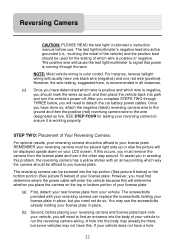
... be used for testing your reversing camera to your license plate. The positive wire will need to you should be affixed to detach the car battery power cables. STEP TWO: Placement of your license plate. (a) First, detach your rear license plate from the license plate and turn the vehicle's power off. Reversing Camera CAUTION: PLEASE READ the test light/ multimeter's instruction manual before...
... be used for testing your reversing camera to your license plate. The positive wire will need to you should be affixed to detach the car battery power cables. STEP TWO: Placement of your license plate. (a) First, detach your rear license plate from the license plate and turn the vehicle's power off. Reversing Camera CAUTION: PLEASE READ the test light/ multimeter's instruction manual before...
User Guide
Page 23
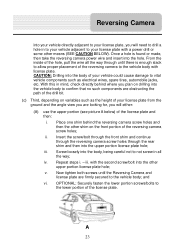
...from the ground and the angle view you are firmly secured to the vehicle body; with a power drill or some other upper portion license plate hole; v. Now tighten both screws until there is found or made, then take the reversing camera power wire and insert into the other ...the upper portion license plate hole; iv. OPTIONAL: Securely fasten the lower portion screws/bolts to the lower portion of the license plate. iii. ii. Reversing Camera into your vehicle directly adjacent to your license plate, you will either: (A) use the upper portion (see picture A below) of ...
...from the ground and the angle view you are firmly secured to the vehicle body; with a power drill or some other upper portion license plate hole; v. Now tighten both screws until there is found or made, then take the reversing camera power wire and insert into the other ...the upper portion license plate hole; iv. OPTIONAL: Securely fasten the lower portion screws/bolts to the lower portion of the license plate. iii. ii. Reversing Camera into your vehicle directly adjacent to your license plate, you will either: (A) use the upper portion (see picture A below) of ...
User Guide
Page 25
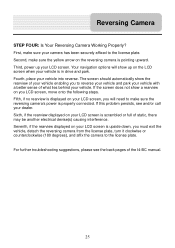
... affix the camera to make sure the yellow arrow on your vehicle enabling you to the license plate. If the screen does not show up your vehicle is properly connected. Sixth, if the rearview displayed on the reversing camera is scrambled or full of the I4-BC manual. 25 Reversing Camera STEP FOUR: Is Your Reversing Camera Working Properly? Your navigation options will need to the license...
... affix the camera to make sure the yellow arrow on your vehicle enabling you to the license plate. If the screen does not show up your vehicle is properly connected. Sixth, if the rearview displayed on the reversing camera is scrambled or full of the I4-BC manual. 25 Reversing Camera STEP FOUR: Is Your Reversing Camera Working Properly? Your navigation options will need to the license...

User Guide
Page 26
.... PROBLEM POSSIBLE CAUSE POSSIBLE SOLUTION User can 't orient. Turn up the volume or turn on . Connect the adaptor correctly. The unit may be obstructed Make sure to supply power or charge the battery. There is not correctly connected. Use the adaptor to use the unit by buildings or metal block. The brightness may be turned down or mute. Adjust the brightness of room. 26 The volume may be turned down . The unit can't receive satellite signals...
.... PROBLEM POSSIBLE CAUSE POSSIBLE SOLUTION User can 't orient. Turn up the volume or turn on . Connect the adaptor correctly. The unit may be obstructed Make sure to supply power or charge the battery. There is not correctly connected. Use the adaptor to use the unit by buildings or metal block. The brightness may be turned down or mute. Adjust the brightness of room. 26 The volume may be turned down . The unit can't receive satellite signals...
Parts List
Page 1
USB port 4. SD Memory Card slot 5. Power switch - mai Next Traveling Direction Zoom Out Distance to Next Turn Name of Arrival Time to Destination Mute Map Scale Indicator QUICK STEPS TO NAVIGATE 1$ Press Menu Select Destination Menu Select Address Set CNNItInatke OeSirldtOil Setting; 11555 ill i 1.107 FW ter et r INIPPWrI7 I alimirro 1. DC Input Jack - Stylus USING THE BACK UP CAMERA FUNCTION r. AVE E 200 m Ns ANN An immomnala ,..11.11•10WASE M14,10.11IMIll i t ea ma...
USB port 4. SD Memory Card slot 5. Power switch - mai Next Traveling Direction Zoom Out Distance to Next Turn Name of Arrival Time to Destination Mute Map Scale Indicator QUICK STEPS TO NAVIGATE 1$ Press Menu Select Destination Menu Select Address Set CNNItInatke OeSirldtOil Setting; 11555 ill i 1.107 FW ter et r INIPPWrI7 I alimirro 1. DC Input Jack - Stylus USING THE BACK UP CAMERA FUNCTION r. AVE E 200 m Ns ANN An immomnala ,..11.11•10WASE M14,10.11IMIll i t ea ma...
Software Manual
Page 2
contents Getting started 2 Starting the system 2 Getting a GPS signal 3 Entering data on the system 4 Moving through the screens 5 Working with the map 6 Map view ...6 Maneuver detail 6 Panning the map 6 Route list ...7 Location and POI information 7 Planning your route 9 Setting a single destination 9 Using an address as a destination 10 Using an intersection as a destination 13 Using a Point of Interest (POI) as a destination 17 Using a Favorite destination as a destination 21 Using a Recent destination as a destination 22 Using a City Center as a destination 23 Adding ...
contents Getting started 2 Starting the system 2 Getting a GPS signal 3 Entering data on the system 4 Moving through the screens 5 Working with the map 6 Map view ...6 Maneuver detail 6 Panning the map 6 Route list ...7 Location and POI information 7 Planning your route 9 Setting a single destination 9 Using an address as a destination 10 Using an intersection as a destination 13 Using a Point of Interest (POI) as a destination 17 Using a Favorite destination as a destination 21 Using a Recent destination as a destination 22 Using a City Center as a destination 23 Adding ...

Software Manual
Page 7
... have set a destination, the map displays additional information. To return to your destination, and your current speed. You can see the time, an estimate of how much time before you arrive at the map. Working with the map The system gives you many ways of looking at your destination, the remaining distance to the regular map view, press the "X" button. - 6 - As you navigate to a destination, the top of the map displays...
... have set a destination, the map displays additional information. To return to your destination, and your current speed. You can see the time, an estimate of how much time before you arrive at the map. Working with the map The system gives you many ways of looking at your destination, the remaining distance to the regular map view, press the "X" button. - 6 - As you navigate to a destination, the top of the map displays...
Software Manual
Page 8
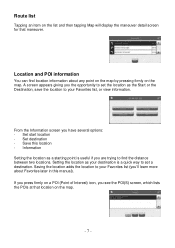
... this manual). If you press firmly on a POI (Point of Interest) icon, you are trying to your Favorites list, or view information. A screen appears giving you the opportunity to set the location as your destination is useful if you see the POI(S) screen, which lists the POIs at that maneuver. Setting the location as the Start or the Destination, save the location to set a destination. Route list Tapping an item on the list and then tapping Map will display the...
... this manual). If you press firmly on a POI (Point of Interest) icon, you are trying to your Favorites list, or view information. A screen appears giving you the opportunity to set the location as your destination is useful if you see the POI(S) screen, which lists the POIs at that maneuver. Setting the location as the Start or the Destination, save the location to set a destination. Route list Tapping an item on the list and then tapping Map will display the...

Software Manual
Page 10
... and delete destinations from your current location (or the location you have found your Favorites list. Enter your street name, followed by your home address: 1. Setting the home address To enter your street number 4. Tap Save as a starting point) to your destination, you have set a destination, you can set your destination the following ways: s Address s Intersection s Point of Interest (POI) s Favorites s Recent s City Center When you set as Home button 6. Map displays the location on the panning map without calculating a route. - 9 - Tap MENU. Tap Set button next...
... and delete destinations from your current location (or the location you have found your Favorites list. Enter your street name, followed by your home address: 1. Setting the home address To enter your street number 4. Tap Save as a starting point) to your destination, you have set a destination, you can set your destination the following ways: s Address s Intersection s Point of Interest (POI) s Favorites s Recent s City Center When you set as Home button 6. Map displays the location on the panning map without calculating a route. - 9 - Tap MENU. Tap Set button next...
Software Manual
Page 11
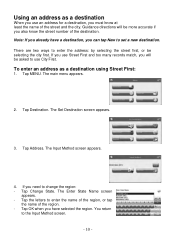
Guidance directions will be more accurate if you can tap New to use City First. Tap Destination. Tap Address. The Input Method screen appears. 4. s Tap the letters to change the region: s Tap Change State. s Tap OK when you have a destination, you also know at least the name of the street and the city. The Set Destination screen appears. 3. If you must know the street number of the region...
Guidance directions will be more accurate if you can tap New to use City First. Tap Destination. Tap Address. The Input Method screen appears. 4. s Tap the letters to change the region: s Tap Change State. s Tap OK when you have a destination, you also know at least the name of the street and the city. The Set Destination screen appears. 3. If you must know the street number of the region...
Software Manual
Page 18
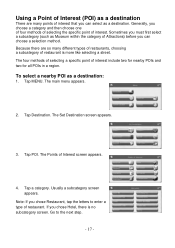
... of selecting a specific point of Interest screen appears. 4. The Set Destination screen appears. 3. Using a Point of Interest (POI) as a destination There are so many points of interest that you choose a category and then choose one of four methods of selecting the specific point of interest. Tap a category. To select a nearby POI as a destination. Tap POI. If you chose Hotel, there is more like selecting a street. Note: If you can select as a destination: 1. Generally...
... of selecting a specific point of Interest screen appears. 4. The Set Destination screen appears. 3. Using a Point of Interest (POI) as a destination There are so many points of interest that you choose a category and then choose one of four methods of selecting the specific point of interest. Tap a category. To select a nearby POI as a destination. Tap POI. If you chose Hotel, there is more like selecting a street. Note: If you can select as a destination: 1. Generally...


