GS748Tv3 User Manual
Page 6
... Saving and Restoring Your Configuration 3-5 Performing a Factory Reset or a Device Reboot 3-6 Chapter 4 Configuring the Switch Configuring Ports ...4-1 Configuring the Link Aggregation Group (LAG 4-3 Setting Up SNMP ...4-5 Configuring and Creating VLANs 4-7...Control 4-20 Configuring the IP Access List 4-22 Controlling Switch Access by MAC Address and VLAN ID 4-22 Setting up Mirroring or "Sniffer Ports 4-23 Viewing Packet Statistics 4-24 Appendix A Specifications and Default Values GS748T Smart Switch Specifications A-1 GS748T Smart Switch Features and Defaults A-2 Appendix B Virtual ...
... Saving and Restoring Your Configuration 3-5 Performing a Factory Reset or a Device Reboot 3-6 Chapter 4 Configuring the Switch Configuring Ports ...4-1 Configuring the Link Aggregation Group (LAG 4-3 Setting Up SNMP ...4-5 Configuring and Creating VLANs 4-7...Control 4-20 Configuring the IP Access List 4-22 Controlling Switch Access by MAC Address and VLAN ID 4-22 Setting up Mirroring or "Sniffer Ports 4-23 Viewing Packet Statistics 4-24 Appendix A Specifications and Default Values GS748T Smart Switch Specifications A-1 GS748T Smart Switch Features and Defaults A-2 Appendix B Virtual ...

GS748Tv3 User Manual
Page 16
... a note of the displayed IP address assigned by clicking on the host PC. • Logging into the web-based switch management utility. 2-2 Using the Smartwizard Discovery Utility v1.0, October 2007 Smart Switch Software User Manual GS748T 6. You will need this value to manage your switch by the DHCP server. Enter the default password which is divided into...
... a note of the displayed IP address assigned by clicking on the host PC. • Logging into the web-based switch management utility. 2-2 Using the Smartwizard Discovery Utility v1.0, October 2007 Smart Switch Software User Manual GS748T 6. You will need this value to manage your switch by the DHCP server. Enter the default password which is divided into...
GS748Tv3 User Manual
Page 17
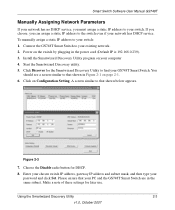
... for DHCP. 8. Connect the GS748T Smart Switch to that your PC and the GS748T Smart Switch are in Figure 2-1 on your switch. Enter your chosen switch IP address, gateway IP address and subnet mask, and then type your switch: 1. Using the Smartwizard Discovery Utility 2-3 v1.0, October 2007 Click on the switch by plugging in the power cord (Default IP is 192.168.0.239). 3. Please...
... for DHCP. 8. Connect the GS748T Smart Switch to that your PC and the GS748T Smart Switch are in Figure 2-1 on your switch. Enter your chosen switch IP address, gateway IP address and subnet mask, and then type your switch: 1. Using the Smartwizard Discovery Utility 2-3 v1.0, October 2007 Click on the switch by plugging in the power cord (Default IP is 192.168.0.239). 3. Please...

GS748Tv3 User Manual
Page 18
Click Web Access. Enter the default password password. For comparison, the settings of the switch are made with entries into the Windows screens shown below. Figure 2-4 To modify your PC, access the MS Windows operating system TCP/IP Properties page as shown. On your NIC settings ...". 2-4 Using the Smartwizard Discovery Utility v1.0, October 2007 Set the appropriate IP address and subnet mask. The Login screen will display. 5. The subnet mask value should be different from that accesses the GS748T Smart Switch, under MS Windows OS, are also shown although they do not appear ...
Click Web Access. Enter the default password password. For comparison, the settings of the switch are made with entries into the Windows screens shown below. Figure 2-4 To modify your PC, access the MS Windows operating system TCP/IP Properties page as shown. On your NIC settings ...". 2-4 Using the Smartwizard Discovery Utility v1.0, October 2007 Set the appropriate IP address and subnet mask. The Login screen will display. 5. The subnet mask value should be different from that accesses the GS748T Smart Switch, under MS Windows OS, are also shown although they do not appear ...

GS748Tv3 User Manual
Page 23
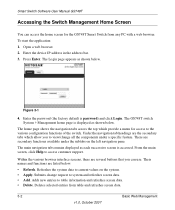
...information for the GS748T Smart Switch. The section includes this information under the following headings: • "Accessing the Switch Management Home Screen" • "Changing Your Password" • "Saving and Restoring Your Configuration" • "Performing a Factory Reset or a Device Reboot" Your NETGEAR Smart Switch series provides a...page for performing basic configuration using the switch IP address. It also describes how to backup your host PC with or without using a standard Web browser such as the default parameters of the switch, which are not using the Smartwizard...
...information for the GS748T Smart Switch. The section includes this information under the following headings: • "Accessing the Switch Management Home Screen" • "Changing Your Password" • "Saving and Restoring Your Configuration" • "Performing a Factory Reset or a Device Reboot" Your NETGEAR Smart Switch series provides a...page for performing basic configuration using the switch IP address. It also describes how to backup your host PC with or without using a standard Web browser such as the default parameters of the switch, which are not using the Smartwizard...
GS748Tv3 User Manual
Page 24
Enter the device IP address in the address bar. 3. Press Enter. Submits change all the components under the subtabs on the system. • Apply. Figure 3-1 4. The home page shows .... • Add. Enter the password (the factory default is accessed. Within the various browser interface screens, there are the secondary tabs which provide a menu for the GS748T Smart Switch from table and refreshes screen data. 3-2 Basic Web Management v1.0, October 2007 Smart Switch Software User Manual GS748T Accessing the Switch Management Home Screen You can use. There are...
Enter the device IP address in the address bar. 3. Press Enter. Submits change all the components under the subtabs on the system. • Apply. Figure 3-1 4. The home page shows .... • Add. Enter the password (the factory default is accessed. Within the various browser interface screens, there are the secondary tabs which provide a menu for the GS748T Smart Switch from table and refreshes screen data. 3-2 Basic Web Management v1.0, October 2007 Smart Switch Software User Manual GS748T Accessing the Switch Management Home Screen You can use. There are...
GS748Tv3 User Manual
Page 25
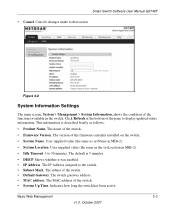
...supplied value (the same as sysName in the switch. Shows whether it was enabled. • IP Address. The subnet of the pane to 30 minutes. Cancels changes made to the switch. • Subnet Mask. The default is described briefly as follows: • ... the switch has been active. This information is 5 minutes. • DHCP. The IP Address assigned to that screen. Figure 3-2 System Information Settings The main screen, System > Management > System Information, shows the condition of the switch. • Firmware Version. Smart Switch Software User Manual GS748T •...
...supplied value (the same as sysName in the switch. Shows whether it was enabled. • IP Address. The subnet of the pane to 30 minutes. Cancels changes made to the switch. • Subnet Mask. The default is described briefly as follows: • ... the switch has been active. This information is 5 minutes. • DHCP. The IP Address assigned to that screen. Figure 3-2 System Information Settings The main screen, System > Management > System Information, shows the condition of the switch. • Firmware Version. Smart Switch Software User Manual GS748T •...

GS748Tv3 User Manual
Page 26
Smart Switch Software User Manual GS748T IP Configuration 1. Changing Your Password It is good practice to secure your IP Configuration. Select the System > Management > IP Configuration screen shown below to the default (see "Performing a Factory Reset or a Device Reboot"). 3-4 Basic Web Management v1.0, October 2007 Enter a static IP address for you switch (make sure that all devices are on the...
Smart Switch Software User Manual GS748T IP Configuration 1. Changing Your Password It is good practice to secure your IP Configuration. Select the System > Management > IP Configuration screen shown below to the default (see "Performing a Factory Reset or a Device Reboot"). 3-4 Basic Web Management v1.0, October 2007 Enter a static IP address for you switch (make sure that all devices are on the...
GS748Tv3 User Manual
Page 57
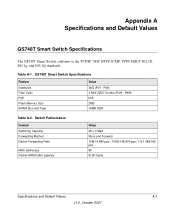
...Combo (P45f - Appendix A Specifications and Default Values GS748T Smart Switch Specifications The GS748T Smart Switch conforms to the TCP/IP, UDP, HTTP, ICMP, TFTP, DHCP, 802.1D, 802.1p, and 802.1Q standards. Table A-1. P48f) N/A 2MB 16MB DDR Table A-2. Switch Performance Feature Switching Capacity Forwarding Method Packet Forwarding Rate MAC ... / 100M:148,809 pps / 1G:1,488,095 pps 8K 512K-bytes Specifications and Default Values A-1 v1.0, October 2007 GS748T Smart Switch Specifications Feature Interfaces Fiber Optic PoE Flash Memory Size SRAM Size and Type Value 48G (P01 -
...Combo (P45f - Appendix A Specifications and Default Values GS748T Smart Switch Specifications The GS748T Smart Switch conforms to the TCP/IP, UDP, HTTP, ICMP, TFTP, DHCP, 802.1D, 802.1p, and 802.1Q standards. Table A-1. P48f) N/A 2MB 16MB DDR Table A-2. Switch Performance Feature Switching Capacity Forwarding Method Packet Forwarding Rate MAC ... / 100M:148,809 pps / 1G:1,488,095 pps 8K 512K-bytes Specifications and Default Values A-1 v1.0, October 2007 GS748T Smart Switch Specifications Feature Interfaces Fiber Optic PoE Flash Memory Size SRAM Size and Type Value 48G (P01 -
GS748Tv3 User Manual
Page 58
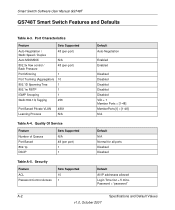
... Feature ACL Password Control Access Sets Supported 10 1 Default Auto-Negotiation Enabled Enabled Disabled Disabled Disabled Disabled Disabled VID = 1 Member Ports = [1-48] MemberPorts[1] = [1-48] N/A Default N/A Normal for all ports Disabled Disabled Default All IP addresses allowed Login Time Out = 5 mins. Password = "password" A-2 Specifications and Default Values v1.0, October 2007 Smart Switch Software User Manual GS748T GS748T Smart Switch Features and Defaults Table A-3.
... Feature ACL Password Control Access Sets Supported 10 1 Default Auto-Negotiation Enabled Enabled Disabled Disabled Disabled Disabled Disabled VID = 1 Member Ports = [1-48] MemberPorts[1] = [1-48] N/A Default N/A Normal for all ports Disabled Disabled Default All IP addresses allowed Login Time Out = 5 mins. Password = "password" A-2 Specifications and Default Values v1.0, October 2007 Smart Switch Software User Manual GS748T GS748T Smart Switch Features and Defaults Table A-3.
GS748Tv3 User Manual
Page 59
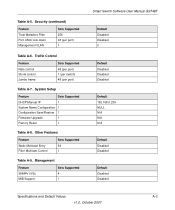
... port) 1 Table A-6. Management Feature SNMPv1/V2c MIB Support Sets Supported 4 1 Smart Switch Software User Manual GS748T Default Disabled Disabled 0 Default Disabled Disabled Disabled Default 192.168.0.239 NULL N/A N/A N/A Default Disabled Disabled Default Disabled Disabled Specifications and Default Values A-3 v1.0, October 2007 Table A-5. System Setup Feature Sets Supported DHCP\Manual IP 1 System Name Configuration 1 Configuration Save/Restore 1 Firmware Upgrade 1 Factory Reset...
... port) 1 Table A-6. Management Feature SNMPv1/V2c MIB Support Sets Supported 4 1 Smart Switch Software User Manual GS748T Default Disabled Disabled 0 Default Disabled Disabled Disabled Default 192.168.0.239 NULL N/A N/A N/A Default Disabled Disabled Default Disabled Disabled Specifications and Default Values A-3 v1.0, October 2007 Table A-5. System Setup Feature Sets Supported DHCP\Manual IP 1 System Name Configuration 1 Configuration Save/Restore 1 Firmware Upgrade 1 Factory Reset...


