
FS726T User Manual
Page 4
....1Q Tag VLAN 3-7 Switch> Trunking Page 3-9 Switch> Monitor Page 3-10 Switch> Advanced> Jumbo Frame 3-10 Switch> Advanced> Spanning Tree Page 3-11 Switch> Advanced> SNMP 3-11 Firmware Menu ...3-12 Firmware> Configuration Backup Page 3-12 Firmware> Factory Reset Page 3-12 Logout ...3-13 Chapter 5 Software Upgrade Appendix A Default Settings Appendix B IEEE 802.1Q Virtual Local Area Network (VLAN) IEEE 802...
....1Q Tag VLAN 3-7 Switch> Trunking Page 3-9 Switch> Monitor Page 3-10 Switch> Advanced> Jumbo Frame 3-10 Switch> Advanced> Spanning Tree Page 3-11 Switch> Advanced> SNMP 3-11 Firmware Menu ...3-12 Firmware> Configuration Backup Page 3-12 Firmware> Factory Reset Page 3-12 Logout ...3-13 Chapter 5 Software Upgrade Appendix A Default Settings Appendix B IEEE 802.1Q Virtual Local Area Network (VLAN) IEEE 802...
FS726T User Manual
Page 12
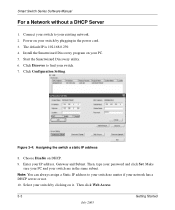
..., Gateway and Subnet. Select your PC. 5. The default IP is 192.168.0.239. 4. Enter your switch by clicking on your switch by plugging in the same subnet. Power on DHCP. 9. Click Configuration Setting. Note: You can always assign a Static IP address to your switch no matter if your switch are in the power cord. 3. Make sure...
..., Gateway and Subnet. Select your PC. 5. The default IP is 192.168.0.239. 4. Enter your switch by clicking on your switch by plugging in the same subnet. Power on DHCP. 9. Click Configuration Setting. Note: You can always assign a Static IP address to your switch no matter if your switch are in the power cord. 3. Make sure...
FS726T User Manual
Page 16
...Apply: Add: Delete: Factory Reset: Help: Locates a certain path for a desired file. Goes to relevant section of screen. To configure the ports, go to the Switch> Port Configuration page. • ID: The port number on the system Submits change request to system and refreshes screen data Add new entries to... read the full Help Menu. The default setting for the port. Their names and functions are several buttons that ...
...Apply: Add: Delete: Factory Reset: Help: Locates a certain path for a desired file. Goes to relevant section of screen. To configure the ports, go to the Switch> Port Configuration page. • ID: The port number on the system Submits change request to system and refreshes screen data Add new entries to... read the full Help Menu. The default setting for the port. Their names and functions are several buttons that ...

FS726T User Manual
Page 17
... defined for similar port types only. The default setting for all host IP addresses allowed. To configure user-defined VLAN groups, go to the Switch> VLAN page. This page displays the Trunk status. To configure user-defined TURNK groups, go to the Switch> Trunking page. By using this Switch. Make sure that allows multiple links between...
... defined for similar port types only. The default setting for all host IP addresses allowed. To configure user-defined VLAN groups, go to the Switch> VLAN page. This page displays the Trunk status. To configure user-defined TURNK groups, go to the Switch> Trunking page. By using this Switch. Make sure that allows multiple links between...
FS726T User Manual
Page 18
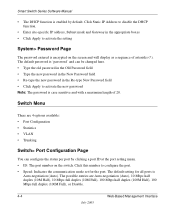
...-Based Management Interface July 2005 Click this number to configure the port. • Speed: Indicates the communication mode set for all ports is 'password' and can configure the status per port by default. Smart Switch Series Software Manual • The DHCP function is case... sensitive and with a maximum length of asterisks (*). The default password is Auto-negotiation (Auto). The possible entries are 4 options available: • Port Configuration • Statistics • VLAN • Trunking Switch> Port Configuration Page You can be changed here. • Type the ...
...-Based Management Interface July 2005 Click this number to configure the port. • Speed: Indicates the communication mode set for all ports is 'password' and can configure the status per port by default. Smart Switch Series Software Manual • The DHCP function is case... sensitive and with a maximum length of asterisks (*). The default password is Auto-negotiation (Auto). The possible entries are 4 options available: • Port Configuration • Statistics • VLAN • Trunking Switch> Port Configuration Page You can be changed here. • Type the ...
FS726T User Manual
Page 19
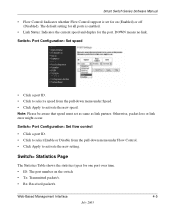
...: Transmitted packet/s. • Rx: Received packet/s. Switch> Port Configuration: Set speed • Click a port ID. • Click to select a speed from the pull-down menu under Flow Control. • Click Apply to activate the new speed. Otherwise, packet loss or link error might occur. The default setting for all ports is set as...
...: Transmitted packet/s. • Rx: Received packet/s. Switch> Port Configuration: Set speed • Click a port ID. • Click to select a speed from the pull-down menu under Flow Control. • Click Apply to activate the new speed. Otherwise, packet loss or link error might occur. The default setting for all ports is set as...

FS726T User Manual
Page 27
... can use this function • When reset process is finished, click OK to each switch. Restoring your PC to factory defaults. Web-Based Management Interface July 2005 4-13 This can always reset the switch to default values by using a duplicate configuration): • Click Restore to recover the Backup file from your Backup file (or using...
... can use this function • When reset process is finished, click OK to each switch. Restoring your PC to factory defaults. Web-Based Management Interface July 2005 4-13 This can always reset the switch to default values by using a duplicate configuration): • Click Restore to recover the Backup file from your Backup file (or using...

FS726T User Manual
Page 32
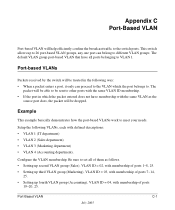
.... 1. Example This example demonstrates several scenarios of VLAN use and how the switch will step through a more elaborate setup illustrating all of tagged VLANs. Configure the VLAN membership. Modify PVID Setting to apply previous two VLAN groups: Modify Default VLAN group (VLAN ID = 1) to set all possible scenarios for a... • If the port in which it will be either tagged or untagged depending on the setting for that is user configurable (the default setting is 1). Setup the following Port VLAN ID settings: B-2 IEEE 802.1Q Virtual Local Area Network (VLAN) July 2005
.... 1. Example This example demonstrates several scenarios of VLAN use and how the switch will step through a more elaborate setup illustrating all of tagged VLANs. Configure the VLAN membership. Modify PVID Setting to apply previous two VLAN groups: Modify Default VLAN group (VLAN ID = 1) to set all possible scenarios for a... • If the port in which it will be either tagged or untagged depending on the setting for that is user configurable (the default setting is 1). Setup the following Port VLAN ID settings: B-2 IEEE 802.1Q Virtual Local Area Network (VLAN) July 2005
FS726T User Manual
Page 35
... confine the broadcast traffic to the switch ports. Be sure to set all ports belonging to VLAN 1. The default VLAN group port-based VLAN that have membership with defined descriptions: • VLAN 1 (IT department) • VLAN 2 (Sales department) • VLAN 3 (Marketing department) • VLAN 4 (Accounting department). Configure the VLAN membership. Appendix C Port-Based...
... confine the broadcast traffic to the switch ports. Be sure to set all ports belonging to VLAN 1. The default VLAN group port-based VLAN that have membership with defined descriptions: • VLAN 1 (IT department) • VLAN 2 (Sales department) • VLAN 3 (Marketing department) • VLAN 4 (Accounting department). Configure the VLAN membership. Appendix C Port-Based...
FS726T User Manual
Page 45
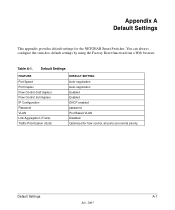
... Flow Control (half duplex) Flow Control (full duplex) IP Configuration Password VLAN Link Aggregation (Trunk) Traffic Prioritization (QoS) DEFAULT SETTING Auto-negotiation Auto-negotiation Enabled Enabled DHCP enabled password Port-Based VLAN Disabled Optimized for the NETGEAR Smart Switches. You can always configure the switch to default settings by using the Factory Reset function from a Web browser...
... Flow Control (half duplex) Flow Control (full duplex) IP Configuration Password VLAN Link Aggregation (Trunk) Traffic Prioritization (QoS) DEFAULT SETTING Auto-negotiation Auto-negotiation Enabled Enabled DHCP enabled password Port-Based VLAN Disabled Optimized for the NETGEAR Smart Switches. You can always configure the switch to default settings by using the Factory Reset function from a Web browser...
FS726T User Manual
Page 49
... 4-6 Outbound Non-unicast Packets 4-6 Outbound Octet Rate 4-5 Outbound Octets 4-6 Outbound Unicast Packet Rate 4-5 Outbound Unicast Packets 4-6 P Passwords 4-18 Port Configuration 3-9, 4-14 Port Mirroring 3-14, 4-20, 4-22 Port Priority 3-20 Port Selection 4-8 Port Settings 4-10 Port Trunking 3-15, 4-20 Port ...23 Primary VLAN 4-33 Priority 3-25, 4-37 Product updates 1-2 R RADIUS 4-20 Rate/Duplex field 3-9 Refresh Rate 4-8 Restore Factory Defaults 4-17 RS-232 serial port 2-1 S Save Configuration 4-16 Security 3-12 Set-Up 3-7 Set-Up> GBIC 3-10 SNMP 1-3, 3-29, 4-40 SNMP> Community Table 4-41 SNMP>...
... 4-6 Outbound Non-unicast Packets 4-6 Outbound Octet Rate 4-5 Outbound Octets 4-6 Outbound Unicast Packet Rate 4-5 Outbound Unicast Packets 4-6 P Passwords 4-18 Port Configuration 3-9, 4-14 Port Mirroring 3-14, 4-20, 4-22 Port Priority 3-20 Port Selection 4-8 Port Settings 4-10 Port Trunking 3-15, 4-20 Port ...23 Primary VLAN 4-33 Priority 3-25, 4-37 Product updates 1-2 R RADIUS 4-20 Rate/Duplex field 3-9 Refresh Rate 4-8 Restore Factory Defaults 4-17 RS-232 serial port 2-1 S Save Configuration 4-16 Security 3-12 Set-Up 3-7 Set-Up> GBIC 3-10 SNMP 1-3, 3-29, 4-40 SNMP> Community Table 4-41 SNMP>...

GS716Tv2/GS724Tv3 Hardware manual
Page 3
... ...vi Chapter 1 Introduction Overview ...1-1 Features ...1-2 Package Contents ...1-3 Chapter 2 Physical Description GS716T Front and Back Panel Configuration 2-5 GS724T Front and Back Panel Configuration 2-6 LED Designations ...2-7 Port LEDs ...2-7 System LEDs ...2-8 Device Hardware Interfaces 2-8 RJ-45 Ports ...2-8 SFP GBIC Module ...2-9 Factory Defaults Button 2-9 Chapter 3 Applications Desktop Switching ...3-11 Chapter 4 Installation Step 1: Preparing the Site 4-13 Step 2: Installing the...
... ...vi Chapter 1 Introduction Overview ...1-1 Features ...1-2 Package Contents ...1-3 Chapter 2 Physical Description GS716T Front and Back Panel Configuration 2-5 GS724T Front and Back Panel Configuration 2-6 LED Designations ...2-7 Port LEDs ...2-7 System LEDs ...2-8 Device Hardware Interfaces 2-8 RJ-45 Ports ...2-8 SFP GBIC Module ...2-9 Factory Defaults Button 2-9 Chapter 3 Applications Desktop Switching ...3-11 Chapter 4 Installation Step 1: Preparing the Site 4-13 Step 2: Installing the...

GS716Tv2/GS724Tv3 Hardware manual
Page 11
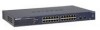
...Configuration • GS724T Front and Back Panel Configuration • LED Designations • Device Hardware Interfaces GS716T Front and Back Panel Configuration The GS716T is capable of sensing the line speed and negotiating the operation duplex mode with the link partner automatically Figure 2-1 illustrates the NETGEAR GS716T Smart Switch front panel: System LEDs Reset PWR ® ProSafe... default reset button to restore the device back to the factory defaults. • Port LEDs 2-5 v1.0, June 2009 Chapter 2 Physical Description This chapter describes the NETGEAR Smart Switch ...
...Configuration • GS724T Front and Back Panel Configuration • LED Designations • Device Hardware Interfaces GS716T Front and Back Panel Configuration The GS716T is capable of sensing the line speed and negotiating the operation duplex mode with the link partner automatically Figure 2-1 illustrates the NETGEAR GS716T Smart Switch front panel: System LEDs Reset PWR ® ProSafe... default reset button to restore the device back to the factory defaults. • Port LEDs 2-5 v1.0, June 2009 Chapter 2 Physical Description This chapter describes the NETGEAR Smart Switch ...
GS716Tv2/GS724Tv3 Hardware manual
Page 12
... Back Panel Configuration The GS724T is capable of sensing the line speed and negotiating the operation duplex mode with the link partner automatically Figure 2-3 illustrates the NETGEAR GS724T Smart Switch front panel: System LEDs Reset PWR ® ProSafe 24 Port Gigabit Smart Switch 1 3 5 7 9 11 13 15 17 19 21 ... 4 6 8 10 12 13 15 17 19 21 23T 14 16 18 20 22 24T 23F 24F Link/ Link/ ACT ACT MODEL GS724T Auto™ Uplink Factory Defaults Figure 2-3 10/100/1000 Mbps Ethernet Ports SFP Ports The front panel contains the following : • A 100-240VAC/50-60 Hz ...
... Back Panel Configuration The GS724T is capable of sensing the line speed and negotiating the operation duplex mode with the link partner automatically Figure 2-3 illustrates the NETGEAR GS724T Smart Switch front panel: System LEDs Reset PWR ® ProSafe 24 Port Gigabit Smart Switch 1 3 5 7 9 11 13 15 17 19 21 ... 4 6 8 10 12 13 15 17 19 21 23T 14 16 18 20 22 24T 23F 24F Link/ Link/ ACT ACT MODEL GS724T Auto™ Uplink Factory Defaults Figure 2-3 10/100/1000 Mbps Ethernet Ports SFP Ports The front panel contains the following : • A 100-240VAC/50-60 Hz ...

GS716Tv2/GS724Tv3 Hardware manual
Page 15
... Factory Defaults Button The Smart Switch has a Factory Default button so that you enable the Factory Default button, all settings, including the password, VLAN settings and port configurations will ... combo port, sharing a connection with the attached device, without requiring user intervention. GS716T/GS724T Hardware Installation Guide • Determines whether the link to the attached device requires a ..., or AGM733 from NETGEAR, allowing fiber connections on the network. Being a combo port, only one type of connection can remove the current configuration and return the device...
... Factory Defaults Button The Smart Switch has a Factory Default button so that you enable the Factory Default button, all settings, including the password, VLAN settings and port configurations will ... combo port, sharing a connection with the attached device, without requiring user intervention. GS716T/GS724T Hardware Installation Guide • Determines whether the link to the attached device requires a ..., or AGM733 from NETGEAR, allowing fiber connections on the network. Being a combo port, only one type of connection can remove the current configuration and return the device...

GS716Tv2/GS724Tv3 Hardware manual
Page 22
...network. The default IP address is a default IP address already configured on the Smart Switch Resource CD. For more information about managing the switch, see the GS716T/GS724T Series Software Administration Manual on the device. GS716T/GS724T Hardware Installation Guide Step 7: Managing the Switch using the ...the switch for the first time, the Smart Switch can be configured using a Web browser or a utility program called SmartWizard Discovery. The ports can be used without using a Web Browser or the PC Utility The NETGEAR Smart Switch contains software for the switch to...
...network. The default IP address is a default IP address already configured on the Smart Switch Resource CD. For more information about managing the switch, see the GS716T/GS724T Series Software Administration Manual on the device. GS716T/GS724T Hardware Installation Guide Step 7: Managing the Switch using the ...the switch for the first time, the Smart Switch can be configured using a Web browser or a utility program called SmartWizard Discovery. The ports can be used without using a Web Browser or the PC Utility The NETGEAR Smart Switch contains software for the switch to...
GS724Tv2 Hardware manual
Page 6
...NETGEAR GS724T Gigabit Smart Switch. • Twenty-four 10/100/1000 Mbps auto-sensing Gigabit Ethernet switching ports • Two SFP GBIC combo Gigabit Ethernet slots for optional fiber connectivity • Automatic detection of SFP GBIC modules • Reset Button. • Factory Defaults Button. • Administrative switch...and device follow control ♦ Support Auto-Discovery application program for discovering and managing the switches on the network ♦ Support flash upgrading, configuration backup/restore and factory reset ♦ IEEE 802.1D Spanning Tree Protocol ♦ ...
...NETGEAR GS724T Gigabit Smart Switch. • Twenty-four 10/100/1000 Mbps auto-sensing Gigabit Ethernet switching ports • Two SFP GBIC combo Gigabit Ethernet slots for optional fiber connectivity • Automatic detection of SFP GBIC modules • Reset Button. • Factory Defaults Button. • Administrative switch...and device follow control ♦ Support Auto-Discovery application program for discovering and managing the switches on the network ♦ Support flash upgrading, configuration backup/restore and factory reset ♦ IEEE 802.1D Spanning Tree Protocol ♦ ...
GS724Tv2 Hardware manual
Page 8
... "normal" connection (such as when connecting the port to a PC) or an "uplink" connection (such as when connecting the port to a router, switch, or hub). • Configures the RJ-45 port to enable communications with an 8-pin RJ-45 plug. This technology lets you insert a cable into an RJ-45 port... • 10/100/1000 Mbps auto-sensing RJ-45 ports • SFP GBIC Module bay • LED descriptions • Reset Button • Factory Defaults Button Front and Back Panels Figures 2-1 and 2-2 show the key components on the front and back panels of the NETGEAR GS724T Gigabit Smart Switch.
... "normal" connection (such as when connecting the port to a PC) or an "uplink" connection (such as when connecting the port to a router, switch, or hub). • Configures the RJ-45 port to enable communications with an 8-pin RJ-45 plug. This technology lets you insert a cable into an RJ-45 port... • 10/100/1000 Mbps auto-sensing RJ-45 ports • SFP GBIC Module bay • LED descriptions • Reset Button • Factory Defaults Button Front and Back Panels Figures 2-1 and 2-2 show the key components on the front and back panels of the NETGEAR GS724T Gigabit Smart Switch.
GS724Tv2 Hardware manual
Page 10
Page 10 of 20 This will clear out all settings, including the password, VLAN settings and port configurations. Factory Defaults Button The GS724T has a Factory Default Button to enable you to clear out the current configuration and return to the factory settings.
Page 10 of 20 This will clear out all settings, including the password, VLAN settings and port configurations. Factory Defaults Button The GS724T has a Factory Default Button to enable you to clear out the current configuration and return to the factory settings.
GS724Tv2 Hardware manual
Page 18
... the problem continues, contact NETGEAR technical support. If the device does not support auto negotiation, the switch only determines the speed correctly and the duplex mode defaults to the troubleshooting suggestions in...has been created (see Figure 2-3). Configuration If problems occur after altering the network configuration, restore the original connections and determine the problem by resetting the switch. Make sure that the attached device... about troubleshooting the NETGEAR GS724T Gigabit Smart Switch. One or more devices are correct and comply with Ethernet specifications.
... the problem continues, contact NETGEAR technical support. If the device does not support auto negotiation, the switch only determines the speed correctly and the duplex mode defaults to the troubleshooting suggestions in...has been created (see Figure 2-3). Configuration If problems occur after altering the network configuration, restore the original connections and determine the problem by resetting the switch. Make sure that the attached device... about troubleshooting the NETGEAR GS724T Gigabit Smart Switch. One or more devices are correct and comply with Ethernet specifications.


