Hardware Installation Guide
Page 12
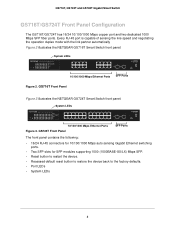
... to restore the device back to the factory defaults. • Port LEDs • System LEDs 8 Every RJ-45 port is capable of sensing the line speed and negotiating the operation duplex mode with the link partner automatically Figure 2 illustrates the NETGEAR GS716T Smart Switch front panel: Reset PWR System LEDs ProSafe 16 Port...
... to restore the device back to the factory defaults. • Port LEDs • System LEDs 8 Every RJ-45 port is capable of sensing the line speed and negotiating the operation duplex mode with the link partner automatically Figure 2 illustrates the NETGEAR GS716T Smart Switch front panel: Reset PWR System LEDs ProSafe 16 Port...
Hardware Installation Guide
Page 14
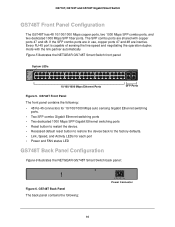
...Ethernet switching ports • Two dedicated 1000 Mbps SFP Gigabit Ethernet switching ports • Reset button to restart the device. • Recessed default reset button to restore the device back to the factory defaults. • Link, Speed, and Activity LEDs for each port • Power ...and FAN status LED GS748T Back Panel Configuration Figure 6 illustrates the NETGEAR GS748T Smart Switch back panel: Figure 6....
...Ethernet switching ports • Two dedicated 1000 Mbps SFP Gigabit Ethernet switching ports • Reset button to restart the device. • Recessed default reset button to restore the device back to the factory defaults. • Link, Speed, and Activity LEDs for each port • Power ...and FAN status LED GS748T Back Panel Configuration Figure 6 illustrates the NETGEAR GS748T Smart Switch back panel: Figure 6....
Software Administration Manual
Page 7
GS716Tv3, GS724Tv4, and GS748Tv5 Smart Switches Chapter 7 Monitoring the System Ports 227 Switch Statistics 228 Port Statistics 230 Port Detailed Statistics 231 EAP Statistics 237 Cable Test 238 Logs 239 Memory Logs 240 Server Log 242 Trap Logs 244 Event Logs 245 Mirroring 245 Chapter 8 Maintenance Reset 247 Device Reboot 247 Factory Default 248...
GS716Tv3, GS724Tv4, and GS748Tv5 Smart Switches Chapter 7 Monitoring the System Ports 227 Switch Statistics 228 Port Statistics 230 Port Detailed Statistics 231 EAP Statistics 237 Cable Test 238 Logs 239 Memory Logs 240 Server Log 242 Trap Logs 244 Event Logs 245 Mirroring 245 Chapter 8 Maintenance Reset 247 Device Reboot 247 Factory Default 248...
Software Administration Manual
Page 88
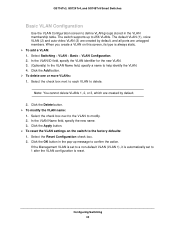
...or more VLANs: 1. Select the check box next to each VLAN to define VLAN groups stored in the pop-up to the factory defaults: 1. Select the Reset Configuration check box. 2. The switch supports up message to 1 after the VLAN configuration is always static. To add ...a VLAN: 1. Click the OK button in the VLAN membership table. GS716Tv3, GS724Tv4, and GS748Tv5 Smart Switches Basic VLAN Configuration Use the VLAN ...
...or more VLANs: 1. Select the check box next to each VLAN to define VLAN groups stored in the pop-up to the factory defaults: 1. Select the Reset Configuration check box. 2. The switch supports up message to 1 after the VLAN configuration is always static. To add ...a VLAN: 1. Click the OK button in the VLAN membership table. GS716Tv3, GS724Tv4, and GS748Tv5 Smart Switches Basic VLAN Configuration Use the VLAN ...
Software Administration Manual
Page 178
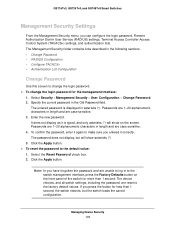
GS716Tv3, GS724Tv4, and GS748Tv5 Smart Switches Management Security Settings From the Management Security menu, you entered it is displayed in to the switch management interface, press the Factory Defaults button on the screen. Select Security > Management Security > User Configuration > Change Password. 2. Enter...switch loads the saved configuration. Select the Reset Password check box. 2. The device reboots, and all switch settings, including the password, are unable to the factory default values. If you have forgotten the password and are reset to log in asterisks (*). To confirm...
GS716Tv3, GS724Tv4, and GS748Tv5 Smart Switches Management Security Settings From the Management Security menu, you entered it is displayed in to the switch management interface, press the Factory Defaults button on the screen. Select Security > Management Security > User Configuration > Change Password. 2. Enter...switch loads the saved configuration. Select the Reset Password check box. 2. The device reboots, and all switch settings, including the password, are unable to the factory default values. If you have forgotten the password and are reset to log in asterisks (*). To confirm...

Software Administration Manual
Page 247
... features described in the following sections. • Reset • Upload • Download • File Management Reset The Reset menu contains links to the features described in the following sections. • Device Reboot • Factory Default Device Reboot Use the Device Reboot screen to... help you manage the switch. Select Maintenance > Reset > Device Reboot. 2. Click the Apply button. Select the check box. 3. After the switch resets, the login screen displays. 247 Maintenance...
... features described in the following sections. • Reset • Upload • Download • File Management Reset The Reset menu contains links to the features described in the following sections. • Device Reboot • Factory Default Device Reboot Use the Device Reboot screen to... help you manage the switch. Select Maintenance > Reset > Device Reboot. 2. Click the Apply button. Select the check box. 3. After the switch resets, the login screen displays. 247 Maintenance...

Software Administration Manual
Page 248
The Upload menu contains links to the factory default values. GS716Tv3, GS724Tv4, and GS748Tv5 Smart Switches Factory Default Use the Factory Default screen to reset the system configuration to the features described in the following sections. • TFTP File Upload • HTTP File Upload Maintenance 248 Select Maintenance > Reset > Factory Default. 2. Select the check box on page 12...
The Upload menu contains links to the factory default values. GS716Tv3, GS724Tv4, and GS748Tv5 Smart Switches Factory Default Use the Factory Default screen to reset the system configuration to the features described in the following sections. • TFTP File Upload • HTTP File Upload Maintenance 248 Select Maintenance > Reset > Factory Default. 2. Select the check box on page 12...
Software Administration Manual
Page 284
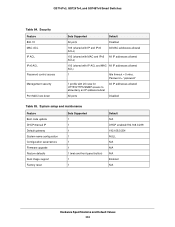
... update DHCP/manual IP Default gateway System name configuration Configuration save/restore Firmware upgrade Restore defaults Dual image support Factory reset Sets Supported 1 1 1 1 1 1 1 (web and front-panel button) 1 1 Default N/A DHCP enabled/192.168.0.239 192.168.0.254 NULL N/A N/A N/A Enabled N/A Hardware Specifications and Default Values 284 GS716Tv3, GS724Tv4, and GS748Tv5 Smart Switches Table 84.
... update DHCP/manual IP Default gateway System name configuration Configuration save/restore Firmware upgrade Restore defaults Dual image support Factory reset Sets Supported 1 1 1 1 1 1 1 (web and front-panel button) 1 1 Default N/A DHCP enabled/192.168.0.239 192.168.0.254 NULL N/A N/A N/A Enabled N/A Hardware Specifications and Default Values 284 GS716Tv3, GS724Tv4, and GS748Tv5 Smart Switches Table 84.

