V Series Specification Brochure
Page 1
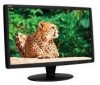
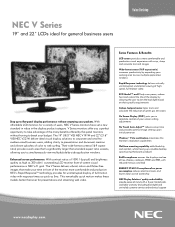
... LCD monitors for a variety of users, NEC V Series monitors have set a new standard in value in complete control of your screen setting adjustments No Touch Auto AdjustTM reduces setup time and provides optimal image settings upon initial power-on Windows® Vista certification maximizes the monitor's resolution capabilities Wall/arm mounting capability adds flexibility and comfort, while freeing up to simultaneously view multiple/side-by flat-panel monitors without emptying your budget. NEC V Series 19" and 22" LCDs ideal for general business users...
... LCD monitors for a variety of users, NEC V Series monitors have set a new standard in value in complete control of your screen setting adjustments No Touch Auto AdjustTM reduces setup time and provides optimal image settings upon initial power-on Windows® Vista certification maximizes the monitor's resolution capabilities Wall/arm mounting capability adds flexibility and comfort, while freeing up to simultaneously view multiple/side-by flat-panel monitors without emptying your budget. NEC V Series 19" and 22" LCDs ideal for general business users...
V Series Specification Brochure
Page 2
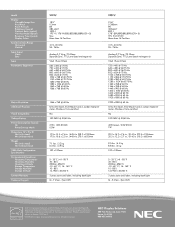
Model Display Viewable Image Size Pixel Pitch Pixels Per Inch Brightness (typical) Contrast Ratio (typical) Viewing Angle (typical) Response Time (typical) Display Colors Synchronization Range Horizontal Vertical Input Signal Video Sync Input Resolutions Supported V191W 18.5" 0.3mm 85 280 cd/m2 1000:1 170°V / 176°H (85U/85D/88L/88R) (CR>5) 5ms More than 16.7million 31.5 - 81 KHz 55 - 76 Hz Analog 0.7 Vp-p / 75 Ohms Separate Sync: TTL Level (positive/negative) VGA 15-pin D-Sub 720...
Model Display Viewable Image Size Pixel Pitch Pixels Per Inch Brightness (typical) Contrast Ratio (typical) Viewing Angle (typical) Response Time (typical) Display Colors Synchronization Range Horizontal Vertical Input Signal Video Sync Input Resolutions Supported V191W 18.5" 0.3mm 85 280 cd/m2 1000:1 170°V / 176°H (85U/85D/88L/88R) (CR>5) 5ms More than 16.7million 31.5 - 81 KHz 55 - 76 Hz Analog 0.7 Vp-p / 75 Ohms Separate Sync: TTL Level (positive/negative) VGA 15-pin D-Sub 720...

Users Manual
Page 2
V221W ...English-12 Features ...English-13 Troubleshooting ...English-14 TCO'03 ...English-15 Manufacturer's Recycling and Energy Information English-16 Index Warning, Caution ...English-1 Registration Information ...English-1 Contents ...English-3 Quick Start ...English-3 Controls ...English-6 Recommended use ...English-9 Specifications - V191W ...English-11 Specifications -
V221W ...English-12 Features ...English-13 Troubleshooting ...English-14 TCO'03 ...English-15 Manufacturer's Recycling and Energy Information English-16 Index Warning, Caution ...English-1 Registration Information ...English-1 Contents ...English-3 Quick Start ...English-3 Controls ...English-6 Recommended use ...English-9 Specifications - V191W ...English-11 Specifications -
Users Manual
Page 3
... SHOCK, MAKE SURE POWER CORD IS UNPLUGGED FROM WALL SOCKET. REFER SERVICING TO QUALIFIED SERVICE PERSONNEL. This symbol alerts the user that matches the power supply voltage of this unit. ALSO, DO NOT USE THIS UNIT'S POLARIZED PLUG WITH AN EXTENSION CORD RECEPTACLE OR OTHER OUTLETS UNLESS THE PRONGS CAN BE FULLY INSERTED. REFER SERVICING TO QUALIFIED SERVICE PERSONNEL. NO USER SERVICEABLE PARTS INSIDE. If a power cord is dangerous...
... SHOCK, MAKE SURE POWER CORD IS UNPLUGGED FROM WALL SOCKET. REFER SERVICING TO QUALIFIED SERVICE PERSONNEL. This symbol alerts the user that matches the power supply voltage of this unit. ALSO, DO NOT USE THIS UNIT'S POLARIZED PLUG WITH AN EXTENSION CORD RECEPTACLE OR OTHER OUTLETS UNLESS THE PRONGS CAN BE FULLY INSERTED. REFER SERVICING TO QUALIFIED SERVICE PERSONNEL. NO USER SERVICEABLE PARTS INSIDE. If a power cord is dangerous...
Users Manual
Page 4
... to interfere with radio and television reception. (1) The power supply cord you use the supplied shielded video signal cable, 15-pin mini D-SUB to D-SUB cable or DVI-D to Identify and Resolve Radio-TV Interference Problems." Canadian Department of Communications Compliance Statement DOC: This Class B digital apparatus meets all requirements of their respective owners. These limits are trademarks or registered trademarks of the...
... to interfere with radio and television reception. (1) The power supply cord you use the supplied shielded video signal cable, 15-pin mini D-SUB to D-SUB cable or DVI-D to Identify and Resolve Radio-TV Interference Problems." Canadian Department of Communications Compliance Statement DOC: This Class B digital apparatus meets all requirements of their respective owners. These limits are trademarks or registered trademarks of the...
Users Manual
Page 5
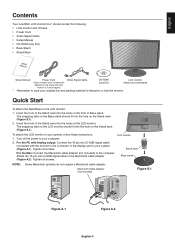
...instructions: LCD monitor 1. For the PC with Analog output: Connect the 15-pin mini D-SUB signal cable connected with tilt base • Power Cord • Video Signal Cable • Setup Manual • CD-ROM (only EU) • Base Stand • Stand Neck Setup Manual Setup Manual Power Cord Video Signal Cable CD-ROM LCD monitor (Type of Base stand. Macintosh Cable Adapter (not included) Figure S.1 Figure A.1 Figure A.2 English-3 Insert the front of the display card in the LCD monitor. Tighten all screws. Tighten all screws. To attach the LCD monitor to the connector...
...instructions: LCD monitor 1. For the PC with Analog output: Connect the 15-pin mini D-SUB signal cable connected with tilt base • Power Cord • Video Signal Cable • Setup Manual • CD-ROM (only EU) • Base Stand • Stand Neck Setup Manual Setup Manual Power Cord Video Signal Cable CD-ROM LCD monitor (Type of Base stand. Macintosh Cable Adapter (not included) Figure S.1 Figure A.1 Figure A.2 English-3 Insert the front of the display card in the LCD monitor. Tighten all screws. Tighten all screws. To attach the LCD monitor to the connector...

Users Manual
Page 6
... care when removing monitor stand. Place monitor face down on the back side of base stand in the direction of LCD monitor and using your hands and adjust the tilt as indicated (Figure R.1) 4. Reverse this User's Manual. NOTE: Use only VESA-compatible alternative mounting method. NOTE: Handle with the front power button and the computer (Figure C.1). 18˚ Tilt Power Cord D-Sub Power Button Figure B.1 Figure C.1 5. For further adjustments, use the following OSD controls: • Image Setup • Image Position Refer to...
... care when removing monitor stand. Place monitor face down on the back side of base stand in the direction of LCD monitor and using your hands and adjust the tilt as indicated (Figure R.1) 4. Reverse this User's Manual. NOTE: Use only VESA-compatible alternative mounting method. NOTE: Handle with the front power button and the computer (Figure C.1). 18˚ Tilt Power Cord D-Sub Power Button Figure B.1 Figure C.1 5. For further adjustments, use the following OSD controls: • Image Setup • Image Position Refer to...

Users Manual
Page 7
... Tighten all screws Specifications 4-SCREWS (M4) (MAX depth: 8.5 mm) 100 mm Weight of the monitor. GS mark). 4 x 12 mm with a flexible arm. English Removing the Base NOTE: Always remove the Base when shipping the LCD. 1. The LCD monitor shall only be mounted to an arm which guaranties the necessary stability under consideration of the weight of LCD assembly: 3.0 kg (MAX) - (V191W) 4.1 kg (MAX) - (V221W) English-5 To meet...
... Tighten all screws Specifications 4-SCREWS (M4) (MAX depth: 8.5 mm) 100 mm Weight of the monitor. GS mark). 4 x 12 mm with a flexible arm. English Removing the Base NOTE: Always remove the Base when shipping the LCD. 1. The LCD monitor shall only be mounted to an arm which guaranties the necessary stability under consideration of the weight of LCD assembly: 3.0 kg (MAX) - (V191W) 4.1 kg (MAX) - (V221W) English-5 To meet...

Users Manual
Page 8
... Icon selection stage. (Adjustment stage) Shortcut to Contrast adjust window. OSD structure Main Menu (Icon Select) Main Menu (Adjust) Press "MENU" key Press "MENU" key Example Tool: Press "MENU" key Adjust by using "-" or "+" Press "MENU" key Press "-" or "+" Press "MENU" key Press "-" or "+" Sub Menu (Icon Select) Press "MENU" key Adjust by using "-" or "+" Sub Menu (Adjust) English-6 Cursor goes to right. Controls OSD (On-Screen Display) control buttons on the front of the monitor function as follows: 1. Basic...
... Icon selection stage. (Adjustment stage) Shortcut to Contrast adjust window. OSD structure Main Menu (Icon Select) Main Menu (Adjust) Press "MENU" key Press "MENU" key Example Tool: Press "MENU" key Adjust by using "-" or "+" Press "MENU" key Press "-" or "+" Press "MENU" key Press "-" or "+" Sub Menu (Icon Select) Press "MENU" key Adjust by using "-" or "+" Sub Menu (Adjust) English-6 Cursor goes to right. Controls OSD (On-Screen Display) control buttons on the front of the monitor function as follows: 1. Basic...

Users Manual
Page 9
... OSD control menu will appear on as long as it is in nine languages. The preset choices are available in use. AUTO CONTRAST Adjusts the image displayed for non-standard video inputs. DOWN/UP Controls Vertical Image Position within the display area of the LCD. H. English-7 AUTO ADJUST Automatically adjusts the Image Position, the H. The change will appear on screen. EXIT Selecting EXIT allows you can be reset and pressing the "+" button. COLOUR BLUE Increase or decreases Blue. LEFT/RIGHT Controls Horizontal Image Position...
... OSD control menu will appear on as long as it is in nine languages. The preset choices are available in use. AUTO CONTRAST Adjusts the image displayed for non-standard video inputs. DOWN/UP Controls Vertical Image Position within the display area of the LCD. H. English-7 AUTO ADJUST Automatically adjusts the Image Position, the H. The change will appear on screen. EXIT Selecting EXIT allows you can be reset and pressing the "+" button. COLOUR BLUE Increase or decreases Blue. LEFT/RIGHT Controls Horizontal Image Position...

Users Manual
Page 10
... Of Range menu will appear on the screen after 30 seconds, notifying you that the resolution is no signal present. FULL: The image is selected, a message will appear. After power is turned on or there is a change of the monitor. V221W Select resolution's priority of input signal to full screen, regardless of the optimized resolution and refresh rate. OSD LOCK OUT This control completely locks out access to activate OSD controls while in the Lock Out mode, a screen...
... Of Range menu will appear on the screen after 30 seconds, notifying you that the resolution is no signal present. FULL: The image is selected, a message will appear. After power is turned on or there is a change of the monitor. V221W Select resolution's priority of input signal to full screen, regardless of the optimized resolution and refresh rate. OSD LOCK OUT This control completely locks out access to activate OSD controls while in the Lock Out mode, a screen...
Users Manual
Page 11
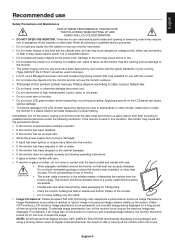
... molded plug having a black (5A) fuse installed for use with care when transporting. Image Persistence occurs when a residual or "ghost" image of time should be installed close to a power outlet which can be avoided. Unlike CRT monitors, LCD monitors' image persistence is idle or turning off the power, unplug your monitor from the power supply. NOTE: As with care. Refer all personal display devices, NEC DISPLAY SOLUTIONS recommends displaying moving images and using a moving screen...
... molded plug having a black (5A) fuse installed for use with care when transporting. Image Persistence occurs when a residual or "ghost" image of time should be installed close to a power outlet which can be avoided. Unlike CRT monitors, LCD monitors' image persistence is idle or turning off the power, unplug your monitor from the power supply. NOTE: As with care. Refer all personal display devices, NEC DISPLAY SOLUTIONS recommends displaying moving images and using a moving screen...

Users Manual
Page 12
... light makes it will cause deterioration or discolor on the LCD surface. English-10 Cleaning the LCD Panel • When the liquid crystal panel is at least 20 feet away. CHECK THE FOLLOWING WHEN YOU POSITION THE MONITOR: • For optimum performance, allow 20 minutes for a long time. The optimal distance is difficult to see your screen, use an anti-glare filter. • Adjust the monitor's brightness...
... light makes it will cause deterioration or discolor on the LCD surface. English-10 Cleaning the LCD Panel • When the liquid crystal panel is at least 20 feet away. CHECK THE FOLLOWING WHEN YOU POSITION THE MONITOR: • For optimum performance, allow 20 minutes for a long time. The optimal distance is difficult to see your screen, use an anti-glare filter. • Adjust the monitor's brightness...
Users Manual
Page 13
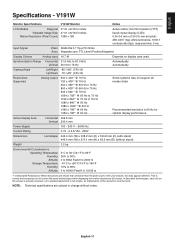
.... English-11 V191W Monitor Specifications V191W Monitor Notes LCD Module Diagonal: 47.01 cm/18.5 inches Viewable Image Size: 47.01 cm/18.5 inches Native Resolution (Pixel Count): 1366 x 768 Active matrix; thin film transistor (TFT) liquid crystal display (LCD); 0.30 (H) mm x 0.30 (V) mm dot pitch; 280 cd/m2 (typ) white luminance, 1000:1 contrast ratio (typ), response time: 5 ms. Input Signal Video: ANALOG 0.7 Vp-p/75 Ohms Sync: Separate sync.TTL Level (Positive/Negative) Display Colours Analog input...
.... English-11 V191W Monitor Specifications V191W Monitor Notes LCD Module Diagonal: 47.01 cm/18.5 inches Viewable Image Size: 47.01 cm/18.5 inches Native Resolution (Pixel Count): 1366 x 768 Active matrix; thin film transistor (TFT) liquid crystal display (LCD); 0.30 (H) mm x 0.30 (V) mm dot pitch; 280 cd/m2 (typ) white luminance, 1000:1 contrast ratio (typ), response time: 5 ms. Input Signal Video: ANALOG 0.7 Vp-p/75 Ohms Sync: Separate sync.TTL Level (Positive/Negative) Display Colours Analog input...
Users Manual
Page 14
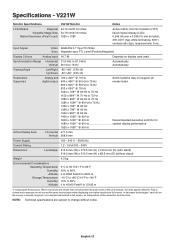
.... V221W Monitor Specifications V221W Monitor Notes LCD Module Diagonal: 54.79 cm/21.6 inches Viewable Image Size: 54.79 cm/21.6 inches Native Resolution (Pixel Count): 1920 x 1080 Active matrix; Synchronization Range Horizontal: 31.5 kHz to 81.0 kHz Vertical: 55 Hz to 12192 m *1 Interpolated Resolutions: When resolutions are shown that are subject to full screen, an interpolation of the LCD module, text may not support all current flat panel technologies when displaying non-native resolutions full screen. English...
.... V221W Monitor Specifications V221W Monitor Notes LCD Module Diagonal: 54.79 cm/21.6 inches Viewable Image Size: 54.79 cm/21.6 inches Native Resolution (Pixel Count): 1920 x 1080 Active matrix; Synchronization Range Horizontal: 31.5 kHz to 81.0 kHz Vertical: 55 Hz to 12192 m *1 Interpolated Resolutions: When resolutions are shown that are subject to full screen, an interpolation of the LCD module, text may not support all current flat panel technologies when displaying non-native resolutions full screen. English...
Users Manual
Page 15
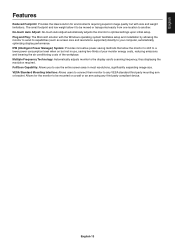
... with the Windows operating system facilitates setup and installation by allowing the monitor to send its capabilities (such as screen size and resolutions supported) directly to use the entire screen area in use, saving two-thirds of your computer, automatically optimizing display performance. Multiple Frequency Technology: Automatically adjusts monitor to any third party compliant device. VESA Standard Mounting Interface: Allows users to connect their monitor to the display card's scanning frequency, thus displaying the resolution required. Plug and...
... with the Windows operating system facilitates setup and installation by allowing the monitor to send its capabilities (such as screen size and resolutions supported) directly to use the entire screen area in use, saving two-thirds of your computer, automatically optimizing display performance. Multiple Frequency Technology: Automatically adjusts monitor to any third party compliant device. VESA Standard Mounting Interface: Allows users to connect their monitor to the display card's scanning frequency, thus displaying the resolution required. Plug and...
Users Manual
Page 16
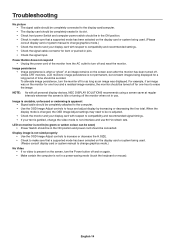
... Hz refresh rate. Troubleshooting No picture • The signal cable should be completely connected to the display card/computer. • The display card should be completely seated in its slot. • Check front power Switch and computer power switch should be in the ON position. • Check to make sure that a supported mode has been selected on the display card or system being used . (Please consult display card or system manual to change graphics mode.) No Video • If no green...
... Hz refresh rate. Troubleshooting No picture • The signal cable should be completely connected to the display card/computer. • The display card should be completely seated in its slot. • Check front power Switch and computer power switch should be in the ON position. • Check to make sure that a supported mode has been selected on the display card or system being used . (Please consult display card or system manual to change graphics mode.) No Video • If no green...
Users Manual
Page 17
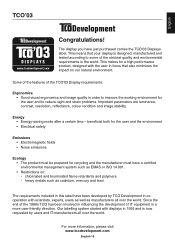
... strain problems. Important parameters are luminance, contrast, resolution, reflectance, colour rendition and image stability. This means that also minimizes the impact on : - For more user-friendly ...user and to improve the working environment for recycling and the manufacturer must have a certified environmental management system such as cadmium, mercury and lead. Energy • Energy-saving mode after a certain time - Our labelling system started with scientists, experts, users as well as manufacturers all over the world. English TCO'03 Congratulations! The display...
... strain problems. Important parameters are luminance, contrast, resolution, reflectance, colour rendition and image stability. This means that also minimizes the impact on : - For more user-friendly ...user and to improve the working environment for recycling and the manufacturer must have a certified environmental management system such as cadmium, mercury and lead. Energy • Energy-saving mode after a certain time - Our labelling system started with scientists, experts, users as well as manufacturers all over the world. English TCO'03 Congratulations! The display...
Users Manual
Page 18
... Saving Mode Off Mode Power consumption Approx. 21 W Less than 1 W Less than 0.5 W LED colour Blue Amber Unlit V221W Mode Normal Operation Energy Saving Mode Off Mode Power consumption Approx. 40 W Less than 1 W Less than 0.5 W LED colour Blue Amber Unlit WEEE Mark (European Directive 2002/96/EC) Within the European Union EU-wide legislation, as signal cables or power cords. Outside the European Union If you wish to dispose of used...
... Saving Mode Off Mode Power consumption Approx. 21 W Less than 1 W Less than 0.5 W LED colour Blue Amber Unlit V221W Mode Normal Operation Energy Saving Mode Off Mode Power consumption Approx. 40 W Less than 1 W Less than 0.5 W LED colour Blue Amber Unlit WEEE Mark (European Directive 2002/96/EC) Within the European Union EU-wide legislation, as signal cables or power cords. Outside the European Union If you wish to dispose of used...
Mechanical Drawing
Page 1
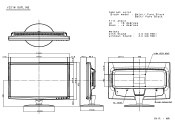
V221W OUTLINE IONI000110000000IIIIIIIIIHHIBIBOONIIIIIIIIIIIIIIIIII1000000M00110110011000011011 Cabinet color Black model : Bezel/ Pure Black Back/ Pure Black Ti l t angle UP : 18 degrees Down : -4 degrees Weight with Stand without Stand 4.3 kg(TBD) 4.0 kg(TBD) 17.5 51#.5 47 .5 17.5 10 56.2 68.5 CO 0 207.3 4-M4 VFSA HOI F 100 0 252.8 o o o o •cro N 193.8 AC Inlet -sub Connector Uni t mm
V221W OUTLINE IONI000110000000IIIIIIIIIHHIBIBOONIIIIIIIIIIIIIIIIII1000000M00110110011000011011 Cabinet color Black model : Bezel/ Pure Black Back/ Pure Black Ti l t angle UP : 18 degrees Down : -4 degrees Weight with Stand without Stand 4.3 kg(TBD) 4.0 kg(TBD) 17.5 51#.5 47 .5 17.5 10 56.2 68.5 CO 0 207.3 4-M4 VFSA HOI F 100 0 252.8 o o o o •cro N 193.8 AC Inlet -sub Connector Uni t mm


