
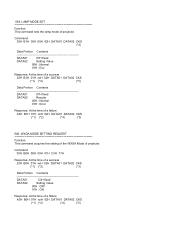
NP115 : RS232 codes- Projectors
Page 10
...006. PICTURE MUTE ON 021. INFORMATION REQUEST 037-1. WXGA MODE SETTING SET 050. MUTE STATUS REQUEST 078-5. AUTO ADJUST EXECUTE2 305-1. PROJECTOR INFORMATION REQUEST 00H 81H 00H 00H 00H 81H 00H C0H 00H 00H 00H C0H 00H 88H 00H 00H 00H 88H 02H 00H 00H 00H...POWER OFF 018. INPUT SW CHANGE 020. SOUND MUTE ON 023. SOUND MUTE OFF 024. GAIN ADJUST 030-2. LAMP INFORMATION REQUEST 037-2. LAMP INFORMATION REQUEST 3 037-7. LAMP INFORMATION REQUEST 4 038. LAMP MODE REQUEST 039. SETTING REQUEST 078-2. MODEL NAME REQUEST 078-6. MIRROR COVER STATUS REQUEST 079. PIP/SIDE BY ...
...006. PICTURE MUTE ON 021. INFORMATION REQUEST 037-1. WXGA MODE SETTING SET 050. MUTE STATUS REQUEST 078-5. AUTO ADJUST EXECUTE2 305-1. PROJECTOR INFORMATION REQUEST 00H 81H 00H 00H 00H 81H 00H C0H 00H 00H 00H C0H 00H 88H 00H 00H 00H 88H 02H 00H 00H 00H...POWER OFF 018. INPUT SW CHANGE 020. SOUND MUTE ON 023. SOUND MUTE OFF 024. GAIN ADJUST 030-2. LAMP INFORMATION REQUEST 037-2. LAMP INFORMATION REQUEST 3 037-7. LAMP INFORMATION REQUEST 4 038. LAMP MODE REQUEST 039. SETTING REQUEST 078-2. MODEL NAME REQUEST 078-6. MIRROR COVER STATUS REQUEST 079. PIP/SIDE BY ...
NP115 : RS232 codes- Projectors
Page 19
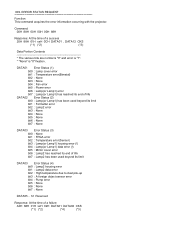
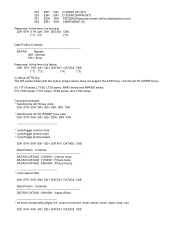
... : None bit4 : None bit5 : None bit6 : None bit7 : None DATA03 Error Status (3) bit0 : None bit1 : FPGA error bit2 : Temperature error(Sensor) bit3 : Lamp(or Lamp1) housing error (!) bit4 : Lamp(or Lamp1) data error (!) bit5 : Mirror cover error bit6 : Lamp2 has reached its end of life bit7 : Lamp2 has been used beyond its... The various bits are normal is "0" and error is "1". * "None" is "0" fixation. ERROR STATUS REQUEST Function: This command acquires the error information occurring with the projector. 009.
... : None bit4 : None bit5 : None bit6 : None bit7 : None DATA03 Error Status (3) bit0 : None bit1 : FPGA error bit2 : Temperature error(Sensor) bit3 : Lamp(or Lamp1) housing error (!) bit4 : Lamp(or Lamp1) data error (!) bit5 : Mirror cover error bit6 : Lamp2 has reached its end of life bit7 : Lamp2 has been used beyond its... The various bits are normal is "0" and error is "1". * "None" is "0" fixation. ERROR STATUS REQUEST Function: This command acquires the error information occurring with the projector. 009.

NP115 : RS232 codes- Projectors
Page 27
...: 03H 8AH 00H 00H 00H 8DH Response: At the time of a success 23H 8CH 01H xxH 10H DATA01 .. DATA98 CKS (*1) (*2) (*3) Data Portion Contents DATA01 .. 49 : Projector name (NULL termination character string) DATA50 .. 82 : Reserved DATA83 .. 86 : Lamp Hour Meter (second) (!) DATA87 .. 90 : Filter Usage (second) DATA91 .. 94 : Panel Usage (second) DATA95 .. 98...
...: 03H 8AH 00H 00H 00H 8DH Response: At the time of a success 23H 8CH 01H xxH 10H DATA01 .. DATA98 CKS (*1) (*2) (*3) Data Portion Contents DATA01 .. 49 : Projector name (NULL termination character string) DATA50 .. 82 : Reserved DATA83 .. 86 : Lamp Hour Meter (second) (!) DATA87 .. 90 : Filter Usage (second) DATA91 .. 94 : Panel Usage (second) DATA95 .. 98...

NP115 : RS232 codes- Projectors
Page 28
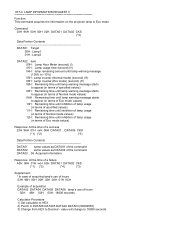
...second) Response: At the time of a failure A3H 8CH 01H xxH 02H DATA01 DATA02 CKS (*1) (*2) (*4) (*3) Supplement: Example for lamp usage warning message (in terms of Normal mode values) DATA09 DATA10 DATA11 DATA12 00H DDH 6DH 00H : 7200000 second Calculator Procedure 1)...DATA03 DATA02 DATA01 (00002A30) 3) Change from HEX to Decimal - DATA05 CKS (*1) (*2) (*3) Data Portion Contents DATA01 .. 04 Reserved DATA05 lamp remaining amount (100% to 7200000 seconds Lamp remaining time (in terms of Normal mode values) = (7200000 - 10800) / 3600 = 1997 hour 037-2. value will change to ...
...second) Response: At the time of a failure A3H 8CH 01H xxH 02H DATA01 DATA02 CKS (*1) (*2) (*4) (*3) Supplement: Example for lamp usage warning message (in terms of Normal mode values) DATA09 DATA10 DATA11 DATA12 00H DDH 6DH 00H : 7200000 second Calculator Procedure 1)...DATA03 DATA02 DATA01 (00002A30) 3) Change from HEX to Decimal - DATA05 CKS (*1) (*2) (*3) Data Portion Contents DATA01 .. 04 Reserved DATA05 lamp remaining amount (100% to 7200000 seconds Lamp remaining time (in terms of Normal mode values) = (7200000 - 10800) / 3600 = 1997 hour 037-2. value will change to ...
NP115 : RS232 codes- Projectors
Page 29
... hours 03H 96H 00H 00H 02H 00H 01H 9CH Example of acquisition DATA03 DATA04 DATA05 DATA06: lamp's use of a success 23H 96H 01H xxH 06H DATA01 .. LAMP INFORMATION REQUEST 3 Function: This command acquires the information on the projector lamp in DATA06 DATA05 DATA04 DATA03 (00004650) 3) Change from HEX to 18000 seconds Command: 03H 96H...
... hours 03H 96H 00H 00H 02H 00H 01H 9CH Example of acquisition DATA03 DATA04 DATA05 DATA06: lamp's use of a success 23H 96H 01H xxH 06H DATA01 .. LAMP INFORMATION REQUEST 3 Function: This command acquires the information on the projector lamp in DATA06 DATA05 DATA04 DATA03 (00004650) 3) Change from HEX to 18000 seconds Command: 03H 96H...
NP115 : RS232 codes- Projectors
Page 30
... 4 Function: This command acquires the information on the projector lamp. Lamp's use of hours = 18000/3600 = 5 hours * In case of acquiring the remaining time until inhibition of lamp usage (in terms of acquisition DATA03 DATA04 DATA05 DATA06: Remaining time 40H 7EH 05H 00H: 360000 seconds ...= 360000/ 3600= 100 hours (!) Lamp Hour Meter This is the timer for normal lamp mode conversion. (!!) Lamp usage time This is the lamp total usage. value will change to 360000 seconds Remaining time until lamp warning message starts to appear (in the projector's menu. (!!!) NP4000/4001, NP4100/4100W...
... 4 Function: This command acquires the information on the projector lamp. Lamp's use of hours = 18000/3600 = 5 hours * In case of acquiring the remaining time until inhibition of lamp usage (in terms of acquisition DATA03 DATA04 DATA05 DATA06: Remaining time 40H 7EH 05H 00H: 360000 seconds ...= 360000/ 3600= 100 hours (!) Lamp Hour Meter This is the timer for normal lamp mode conversion. (!!) Lamp usage time This is the lamp total usage. value will change to 360000 seconds Remaining time until lamp warning message starts to appear (in the projector's menu. (!!!) NP4000/4001, NP4100/4100W...

NP115 : RS232 codes- Projectors
Page 31
... DATA02 CKS (*1) (*2) (*3) Data Portion Contents DATA01 07H fixed DATA02 Setting Value 00H : Normal 01H : Eco Response: At the time of projector. LAMP MODE REQUEST Function: This command acquires the setting of the lamp mode of a failure A3H B0H 01H xxH 02H DATA01 DATA02 CKS (*1) (*2) (*4) (*3) Response: At the time of a success 23H 9BH 01H...
... DATA02 CKS (*1) (*2) (*3) Data Portion Contents DATA01 07H fixed DATA02 Setting Value 00H : Normal 01H : Eco Response: At the time of projector. LAMP MODE REQUEST Function: This command acquires the setting of the lamp mode of a failure A3H B0H 01H xxH 02H DATA01 DATA02 CKS (*1) (*2) (*4) (*3) Response: At the time of a success 23H 9BH 01H...
NP115 : RS232 codes- Projectors
Page 32
...02H DATA01 DATA02 CKS (*1) (*2) (*3) Data Portion Contents DATA01 07H fixed DATA02 Results 00H : Normal 01H : Error Response: At the time of projector. WXGA MODE SETTING REQUEST Function: This command acquires the setting of the WXGA Mode of a failure A3H B1H 01H xxH 02H DATA01 DATA02 CKS (*1)... (*2) (*4) (*3) 046. LAMP MODE SET Function: This command sets the lamp mode of a failure A3H B0H 01H xxH 02H DATA01 DATA02 CKS (*1) (*2) (*4) (*3) Command: 03H B0H 00H 00H 01H ...
...02H DATA01 DATA02 CKS (*1) (*2) (*3) Data Portion Contents DATA01 07H fixed DATA02 Results 00H : Normal 01H : Error Response: At the time of projector. WXGA MODE SETTING REQUEST Function: This command acquires the setting of the WXGA Mode of a failure A3H B1H 01H xxH 02H DATA01 DATA02 CKS (*1)... (*2) (*4) (*3) 046. LAMP MODE SET Function: This command sets the lamp mode of a failure A3H B0H 01H xxH 02H DATA01 DATA02 CKS (*1) (*2) (*4) (*3) Command: 03H B0H 00H 00H 01H ...
NP115 : RS232 codes- Projectors
Page 36
... E8H 00H D ZOOM UP (WT) 233 E9H 00H D ZOOM DOWN (WT) 237 EDH 00H PSCODE(Passcode screen will be displayed at once) 238 EEH 00H LAMP MODE (!!!) Response: At the time of a success 22H 0FH 01H xxH 01H DATA01 CKS (*1) (*2) (*3) Data Portion Contents DATA01 Results 00H : Normal FFH : Error Response: At...
... E8H 00H D ZOOM UP (WT) 233 E9H 00H D ZOOM DOWN (WT) 237 EDH 00H PSCODE(Passcode screen will be displayed at once) 238 EEH 00H LAMP MODE (!!!) Response: At the time of a success 22H 0FH 01H xxH 01H DATA01 CKS (*1) (*2) (*3) Data Portion Contents DATA01 Results 00H : Normal FFH : Error Response: At...
NP115 : RS232 codes- Projectors
Page 39
... 44H 44H 44H 45H 46H 47H 47H 47H 48H 49H 4AH 4BH 4CH 4CH 4CH 4CH 4CH 4CH 4CH 02H Black Correct / Inv Gain 00H Lamp Output 00H Signal Level / Auto Control 00H Signal Level / R/G/B Gain R 01H Signal Level / R/G/B Gain G 02H Signal Level / R/G/B Gain B 00H Signal Level / Y/Cb/Cr Gain Y 01H...
... 44H 44H 44H 45H 46H 47H 47H 47H 48H 49H 4AH 4BH 4CH 4CH 4CH 4CH 4CH 4CH 4CH 02H Black Correct / Inv Gain 00H Lamp Output 00H Signal Level / Auto Control 00H Signal Level / R/G/B Gain R 01H Signal Level / R/G/B Gain G 02H Signal Level / R/G/B Gain B 00H Signal Level / Y/Cb/Cr Gain Y 01H...
NP115 : RS232 codes- Projectors
Page 40
... Cor. Lamp2 / Color Gain 90H 00H Picture Preset 91H 00H SweetVision Mode 92H 00H SweetVision Level 94H 00H Vertical Enhancer 95H 00H I/P Converter 96H 00H Lamp Mode Adjust 97H 00H Wall Color Command example: * In case of acquiring Picture Brightness 03H 04H 00H 00H 03H 00H 00H 00H 0AH Auto White...
... Cor. Lamp2 / Color Gain 90H 00H Picture Preset 91H 00H SweetVision Mode 92H 00H SweetVision Level 94H 00H Vertical Enhancer 95H 00H I/P Converter 96H 00H Lamp Mode Adjust 97H 00H Wall Color Command example: * In case of acquiring Picture Brightness 03H 04H 00H 00H 03H 00H 00H 00H 0AH Auto White...
LT170 user's manual
Page 2
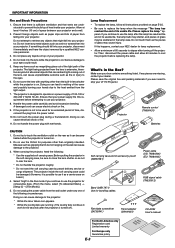
... DO NOT OPEN THE CABINET. NO USER-SERVICEABLE PARTS INSIDE. Failure to operate this equipment. Place the projector on the ceiling: a. To avoid premature lamp failure, do not tilt the front of the projector up or down on , the user is located on top of this unit has been provided. Handle your...product, will not occur in a darkened room. 2. If you wish to direct sunlight, smoke or steam can hit the POWER button before using your NEC LT170 Projector and keep the manual handy for help. In addition, the ceiling must be determined by one or more of California to install the...
... DO NOT OPEN THE CABINET. NO USER-SERVICEABLE PARTS INSIDE. Failure to operate this equipment. Place the projector on the ceiling: a. To avoid premature lamp failure, do not tilt the front of the projector up or down on , the user is located on top of this unit has been provided. Handle your...product, will not occur in a darkened room. 2. If you wish to direct sunlight, smoke or steam can hit the POWER button before using your NEC LT170 Projector and keep the manual handy for help. In addition, the ceiling must be determined by one or more of California to install the...
LT170 user's manual
Page 3
...35. • Be sure to operate on . appears. If this requirement before replacing the lamp. Prevent foreign objects such as it as magnifying glass out of the light path of your LT170 Projector. Do not place any metal objects such as the pieces of paper from the power outlet. ... period of its usable life. The light being projected from the lens is extensive, therefore any pieces are running. (The cooling fans continue to your NEC dealer for consecutive days. (From the menu, select [To Advanced Menu] → [Setup 2] → [Fan Mode].) 5. Please save the original ...
...35. • Be sure to operate on . appears. If this requirement before replacing the lamp. Prevent foreign objects such as it as magnifying glass out of the light path of your LT170 Projector. Do not place any metal objects such as the pieces of paper from the power outlet. ... period of its usable life. The light being projected from the lens is extensive, therefore any pieces are running. (The cooling fans continue to your NEC dealer for consecutive days. (From the menu, select [To Advanced Menu] → [Setup 2] → [Fan Mode].) 5. Please save the original ...

LT170 user's manual
Page 4
... (BASIC OPERATION) ...... E-40 Compatible Input Signal List E-41 TravelCare Guide E-42 E-4 E-18 Turning on the Projector E-18 Selecting a Source E-19 Adjusting the Picture Size and Position E-19 Correcting the Vertical Keystone Distortion E-20 Optimizing...LAMP E-37 Common Problems & Solutions E-38 SPECIFICATIONS E-39 APPENDIX E-40 Cabinet Dimensions E-40 Pin Assignments of the Remote Control E-8 Battery Installation E-9 Remote Control Precautions E-9 Operating Range for Wireless Remote Control E-9 INSTALLATION AND CONNECTIONS E-10 Setting Up the Screen and the Projector...
... (BASIC OPERATION) ...... E-40 Compatible Input Signal List E-41 TravelCare Guide E-42 E-4 E-18 Turning on the Projector E-18 Selecting a Source E-19 Adjusting the Picture Size and Position E-19 Correcting the Vertical Keystone Distortion E-20 Optimizing...LAMP E-37 Common Problems & Solutions E-38 SPECIFICATIONS E-39 APPENDIX E-40 Cabinet Dimensions E-40 Pin Assignments of the Remote Control E-8 Battery Installation E-9 Remote Control Precautions E-9 Operating Range for Wireless Remote Control E-9 INSTALLATION AND CONNECTIONS E-10 Setting Up the Screen and the Projector...
LT170 user's manual
Page 6
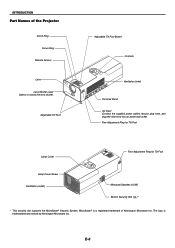
MicroSaver® is trademarked and owned by Kensington Microware Inc. Fine Adjustment Ring for Tilt Foot Lamp Cover Lamp Cover Screw Ventilation (outlet) POWESRTATULSAMP ON/STAND BY MENU ENTSEORURCE SELECT PUSH ZOOM FOCUS Fine Adjustment Ring for Tilt Foot... Monaural Speaker (0.5W) Built-in Security Slot ( )* * This security slot supports the MicroSaver® Security System. The logo is a registered trademark of the Projector ...
MicroSaver® is trademarked and owned by Kensington Microware Inc. Fine Adjustment Ring for Tilt Foot Lamp Cover Lamp Cover Screw Ventilation (outlet) POWESRTATULSAMP ON/STAND BY MENU ENTSEORURCE SELECT PUSH ZOOM FOCUS Fine Adjustment Ring for Tilt Foot... Monaural Speaker (0.5W) Built-in Security Slot ( )* * This security slot supports the MicroSaver® Security System. The logo is a registered trademark of the Projector ...
LT170 user's manual
Page 7
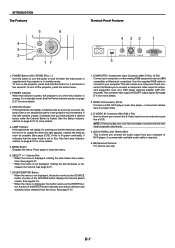
...orange, it indicates that an error has occurred, the lamp cover is displayed, this indicator is orange, it is locked. See the Lamp Indicator section on ; See page E-19. * When the menu is not attached properly or the projector has overheated. Use the supplied RGB cable to connect to... the S-Video input from your computer or other analog RGB equipment such as possible (See page E-35). After this indicator is green, the projector is where you that the lamp mode is required. 5. A press of its usable life. See page E-27. 1. See page E-13 for more details. 4. E-7 See ...
...orange, it indicates that an error has occurred, the lamp cover is displayed, this indicator is orange, it is locked. See the Lamp Indicator section on ; See page E-19. * When the menu is not attached properly or the projector has overheated. Use the supplied RGB cable to connect to... the S-Video input from your computer or other analog RGB equipment such as possible (See page E-35). After this indicator is green, the projector is where you that the lamp mode is required. 5. A press of its usable life. See page E-27. 1. See page E-13 for more details. 4. E-7 See ...
LT170 user's manual
Page 10
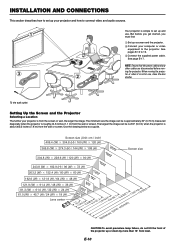
... Location The further your computer or video equipment to 15. ᕅ Connect the supplied power cable. See page E-17. See pages E-12 to the projector. E-10 NOTE: Ensure that the power cable and any other cables are disconnected before you get started, you must first: ᕃ Set up and use... center 60" 30"40" 1.144.51.5/59.8 2.3/90.63.1/121.3 3.9/152.24.6/182.7 Distance (Unit: 5.8/228.7 m/inch) 7.0/274.87.8/305.5 CAUTION:To avoid premature lamp failure, do not tilt the front of the projector up or down by more than 10° from the screen or wall, the larger the image.
... Location The further your computer or video equipment to 15. ᕅ Connect the supplied power cable. See page E-17. See pages E-12 to the projector. E-10 NOTE: Ensure that the power cable and any other cables are disconnected before you get started, you must first: ᕃ Set up and use... center 60" 30"40" 1.144.51.5/59.8 2.3/90.63.1/121.3 3.9/152.24.6/182.7 Distance (Unit: 5.8/228.7 m/inch) 7.0/274.87.8/305.5 CAUTION:To avoid premature lamp failure, do not tilt the front of the projector up or down by more than 10° from the screen or wall, the larger the image.
LT170 user's manual
Page 13
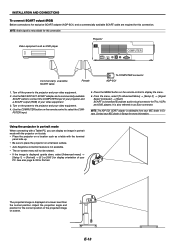
...to the projector and your NEC dealer in Europe for more information. From the menu, select [To Advanced Menu] → [Setup 2] → [Signal Select Computer] → [Scart]. It is not available for TVs, VCRs and DVD players. AUDIO IN S-VIDEO IN VIDEO IN PUSH COMPUTER FOCUS ZOOM LAMP STATUS ... the correct position of the projected image on screen. See also page E-33 for display orientation of your NEC dealer in portrait mode with the projector on its side. • Place the projector on a location such as a table with the terminal panel side up. • Be sure to as...
...to the projector and your NEC dealer in Europe for more information. From the menu, select [To Advanced Menu] → [Setup 2] → [Signal Select Computer] → [Scart]. It is not available for TVs, VCRs and DVD players. AUDIO IN S-VIDEO IN VIDEO IN PUSH COMPUTER FOCUS ZOOM LAMP STATUS ... the correct position of the projected image on screen. See also page E-33 for display orientation of your NEC dealer in portrait mode with the projector on its side. • Place the projector on a location such as a table with the terminal panel side up. • Be sure to as...
LT170 user's manual
Page 17
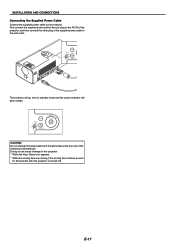
... the Hour Glass icon appears. * While the cooling fans are running. (The cooling fans continue to the projector. MENU LAMP STATUS POWER ON/STAND BY SELECT SOURCE ENTER CAUTION: Do not unplug the power cable from the wall outlet under any one of the ...plug of the following circumstances. SELECT ENTSEORURCE MENU AUDIO IN S-VIDEO IN VIDEO IN COMPUTER POWESRTATLUASMP ON/STAND BY MENU LAMP STATUS POWER ON/STAND BY PUSH ZOOM FOCUS The projector will go into its standby mode and the power indicator will glow orange. INSTALLATION AND CONNECTIONS Connecting the Supplied Power Cable...
... the Hour Glass icon appears. * While the cooling fans are running. (The cooling fans continue to the projector. MENU LAMP STATUS POWER ON/STAND BY SELECT SOURCE ENTER CAUTION: Do not unplug the power cable from the wall outlet under any one of the ...plug of the following circumstances. SELECT ENTSEORURCE MENU AUDIO IN S-VIDEO IN VIDEO IN COMPUTER POWESRTATLUASMP ON/STAND BY MENU LAMP STATUS POWER ON/STAND BY PUSH ZOOM FOCUS The projector will go into its standby mode and the power indicator will glow orange. INSTALLATION AND CONNECTIONS Connecting the Supplied Power Cable...
LT170 user's manual
Page 18
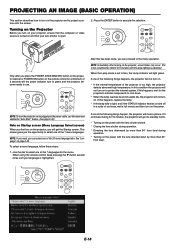
...To select a menu language, follow these steps: 1. Use the dial to select one of the following things happens, the projector will get the Startup screen. MENU LAMP STATUS POWER ON/STAND BY SELECT SOURCE ENTER OFF P0WER ON VIDEO S-VIDEO COMPUTER COMP. If this has been done, you ...turn on and that the computer or video source is open. In this happens, replace the lamp. * If the lamp fails to execute the selection. If this condition the projector will light green. MENU LAMP STATUS POWER ON/STAND BY SELECT SOURCE ENTER OFF P0WER ON VIDEO S-VIDEO COMPUTER COMP. AUTO...
...To select a menu language, follow these steps: 1. Use the dial to select one of the following things happens, the projector will get the Startup screen. MENU LAMP STATUS POWER ON/STAND BY SELECT SOURCE ENTER OFF P0WER ON VIDEO S-VIDEO COMPUTER COMP. If this has been done, you ...turn on and that the computer or video source is open. In this happens, replace the lamp. * If the lamp fails to execute the selection. If this condition the projector will light green. MENU LAMP STATUS POWER ON/STAND BY SELECT SOURCE ENTER OFF P0WER ON VIDEO S-VIDEO COMPUTER COMP. AUTO...


