User Guide
Page 10
... risk of properly and may damage the unit. 9. ITC03-201 8 Because cordless phones operate on or near a TV, microwave oven, or VCR. Battery Safety Instructions • Do not burn, disassemble, mutilate, or puncture the battery. Contact your home goes out. 10. Use only the power supply that came...RF exposure guidelines, place the base unit at least one phone in your battery's label for proper disposal methods. Refer to nearby appliances, do not place the base of the cordless phone on electricity, you replace the battery with this product must be disposed of explosion if you...
... risk of properly and may damage the unit. 9. ITC03-201 8 Because cordless phones operate on or near a TV, microwave oven, or VCR. Battery Safety Instructions • Do not burn, disassemble, mutilate, or puncture the battery. Contact your home goes out. 10. Use only the power supply that came...RF exposure guidelines, place the base unit at least one phone in your battery's label for proper disposal methods. Refer to nearby appliances, do not place the base of the cordless phone on electricity, you replace the battery with this product must be disposed of explosion if you...
User Guide
Page 14
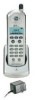
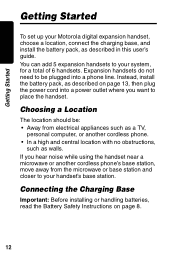
...If you want to place the handset. Connecting the Charging Base Important: Before installing or handling batteries, read the Battery Safety Instructions on page 13, then plug the power cord into a phone line. Getting Started Getting Started To set up your system, for a total of 6 handsets.... such as a TV, personal computer, or another cordless phone's base station, move away from the microwave or base station and closer to your Motorola digital expansion handset, choose a location, connect the charging base, and install the battery pack, as described on page 8. 12 You can add...
...If you want to place the handset. Connecting the Charging Base Important: Before installing or handling batteries, read the Battery Safety Instructions on page 13, then plug the power cord into a phone line. Getting Started Getting Started To set up your system, for a total of 6 handsets.... such as a TV, personal computer, or another cordless phone's base station, move away from the microwave or base station and closer to your Motorola digital expansion handset, choose a location, connect the charging base, and install the battery pack, as described on page 8. 12 You can add...
User Guide
Page 16
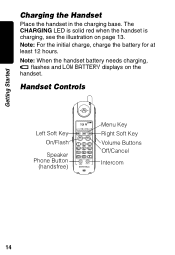
Handset Controls Left Soft Key On/Flash Speaker Phone Button (handsfree) Menu Key Right Soft Key Volume Buttons Off/Cancel Intercom 14 Note: When the handset battery needs charging, l flashes and LOW BATTERY displays on page 13. The CHARGING LED is solid red when the handset is charging, see the illustration on the handset. Note: For the initial charge, charge the battery for at least 12 hours. Getting Started Charging the Handset Place the handset in the charging base.
Handset Controls Left Soft Key On/Flash Speaker Phone Button (handsfree) Menu Key Right Soft Key Volume Buttons Off/Cancel Intercom 14 Note: When the handset battery needs charging, l flashes and LOW BATTERY displays on page 13. The CHARGING LED is solid red when the handset is charging, see the illustration on the handset. Note: For the initial charge, charge the battery for at least 12 hours. Getting Started Charging the Handset Place the handset in the charging base.
User Guide
Page 17
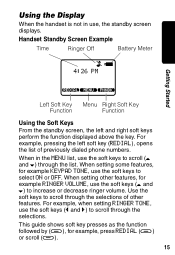
... scroll (t and s) through the selections. When setting other features. Use the soft keys to scroll through the selections of previously dialed phone numbers. Handset Standby Screen Example Time Ringer Off Battery Meter Wm 4:26 PM Getting Started VSU Left Soft Key Menu Right Soft Key Function Function Using the Soft Keys From...
... scroll (t and s) through the selections. When setting other features. Use the soft keys to scroll through the selections of previously dialed phone numbers. Handset Standby Screen Example Time Ringer Off Battery Meter Wm 4:26 PM Getting Started VSU Left Soft Key Menu Right Soft Key Function Function Using the Soft Keys From...
