
User Guide
Page 2
... and number phonebook. • Answering machine with 15 minutes digital recording time.* • Caller ID shows you will need to provide a copy of the last 30 callers in a calls list.** • Register up to 5 handsets or wireless headsets to a single base. • Make internal calls, transfer external calls, hold 3-way conversation between two internal callers and an external caller. *The recording time includes the pre-recorded voice menu and outgoing announcements. **You must subscribe to your network provider's Caller ID or Call Waiting service...
... and number phonebook. • Answering machine with 15 minutes digital recording time.* • Caller ID shows you will need to provide a copy of the last 30 callers in a calls list.** • Register up to 5 handsets or wireless headsets to a single base. • Make internal calls, transfer external calls, hold 3-way conversation between two internal callers and an external caller. *The recording time includes the pre-recorded voice menu and outgoing announcements. **You must subscribe to your network provider's Caller ID or Call Waiting service...
User Guide
Page 4
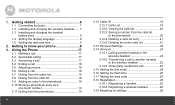
... Intercom 23 3.14.1 Calling another handset or the wireless headset 23 3.14.2 Transferring a call to know your phone 9 3. Getting started 6 1.1 Connecting the base 7 1.2 Installing and charging the wireless headset...... 7 1.3 Installing and charging the handset battery pack 8 1.4 Setting the display language 8 1.5 Setting the date and time 9 2. Getting to another handset or the wireless headset 23 3.14.3 Three-party conference call 24 3.15 Setting the dial mode 24 3.16 Setting the flash time 25 3.17 Setting the area code 25 3.18 Registration 25 3.18.1 Registering a handset...
... Intercom 23 3.14.1 Calling another handset or the wireless headset 23 3.14.2 Transferring a call to know your phone 9 3. Getting started 6 1.1 Connecting the base 7 1.2 Installing and charging the wireless headset...... 7 1.3 Installing and charging the handset battery pack 8 1.4 Setting the display language 8 1.5 Setting the date and time 9 2. Getting to another handset or the wireless headset 23 3.14.3 Three-party conference call 24 3.15 Setting the dial mode 24 3.16 Setting the flash time 25 3.17 Setting the area code 25 3.18 Registration 25 3.18.1 Registering a handset...
User Guide
Page 5
3.20 Paging/Finding a handset and/or a wireless headset 26 3.21 Using your answering machine 27 3.21.1 Playing messages 27 3.21.2 Turning on or off the answering machine 28 3.21.3 Setting the announcement mode ...........28 3.21.4 Setting the number of rings 29 3.21.5 Announcement 29 3.21.6 Recording a memo 30 3.21.7 Call screening on/off 30 3.21.8 Deleting all old messages 31 3.21.9 Remote access 31 3.21.10Setting the security code 32 4. Help 32 5. General information 34 5
3.20 Paging/Finding a handset and/or a wireless headset 26 3.21 Using your answering machine 27 3.21.1 Playing messages 27 3.21.2 Turning on or off the answering machine 28 3.21.3 Setting the announcement mode ...........28 3.21.4 Setting the number of rings 29 3.21.5 Announcement 29 3.21.6 Recording a memo 30 3.21.7 Call screening on/off 30 3.21.8 Deleting all old messages 31 3.21.9 Remote access 31 3.21.10Setting the security code 32 4. Help 32 5. General information 34 5
User Guide
Page 6
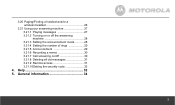
... appliances working within the range area. Do not connect the telephone line cord into an electrical outlet at the network interface. • Use caution when installing or modifying telephone lines. 6 HANDSET RANGE Optimal range is fully charged. Setting up IMPORTANT The base must be plugged into the telephone wall jack until the handset is reached when there are on a call, the line will disconnect. 1. The handset will also reduce the range significantly. WHICH POWER ADAPTER The power adapter...
... appliances working within the range area. Do not connect the telephone line cord into an electrical outlet at the network interface. • Use caution when installing or modifying telephone lines. 6 HANDSET RANGE Optimal range is fully charged. Setting up IMPORTANT The base must be plugged into the telephone wall jack until the handset is reached when there are on a call, the line will disconnect. 1. The handset will also reduce the range significantly. WHICH POWER ADAPTER The power adapter...
User Guide
Page 10
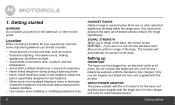
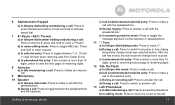
... answering machine mode: Press to decrease the volume. 5 Talk Off / Back a) In menu/editing mode: Press to exit to decrease the volume. c) During ringing: Press to access the calls list. e) In phonebook entry: Press to go to phonebook editing mode. 2 Scroll Up / Volume Up a) In menu mode: Press to access the redial list. e) In answering machine mode: Press to increase the volume. 3 Right / Calls List a) In idle mode/during a call : Press to another handset or the wireless headset. b) In editing mode: Press...
... answering machine mode: Press to decrease the volume. 5 Talk Off / Back a) In menu/editing mode: Press to exit to decrease the volume. c) During ringing: Press to access the calls list. e) In phonebook entry: Press to go to phonebook editing mode. 2 Scroll Up / Volume Up a) In menu mode: Press to access the redial list. e) In answering machine mode: Press to increase the volume. 3 Right / Calls List a) In idle mode/during a call : Press to another handset or the wireless headset. b) In editing mode: Press...
User Guide
Page 11
... digits. 8 Intercom a) In idle mode/during a call: Press to initiate an intercom call. 9 Microphone 10 Speaker a) In idle/pre-dial mode: Press to tone dialing temporarily if pulse mode was selected before. d) During ringing: Press to answer a call : Press to make a call . b) Call List/phonebook/redial list entry: Press to enter characters/numbers. e) In answering machine mode: Press to toggle the message playback via the earpiece or speakerphone. 11 * / Tone a) In idle/pre-dial/editing mode: Press to access the phonebook. c) In phonebook list...
... digits. 8 Intercom a) In idle mode/during a call: Press to initiate an intercom call. 9 Microphone 10 Speaker a) In idle/pre-dial mode: Press to tone dialing temporarily if pulse mode was selected before. d) During ringing: Press to answer a call : Press to make a call . b) Call List/phonebook/redial list entry: Press to enter characters/numbers. e) In answering machine mode: Press to toggle the message playback via the earpiece or speakerphone. 11 * / Tone a) In idle/pre-dial/editing mode: Press to access the phonebook. c) In phonebook list...
User Guide
Page 12
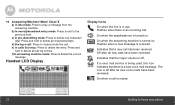
... incoming call is muted. 12 Getting to know your phone Flashes when a new message is in use. If a voice mail service is turned on . Press and hold to delete all characters/digits. Handset LCD Display Display Icons On when the line is received. On when a call . On when the speakerphone is being used, this icon indicates that a new call has been received. Indicates that there is off after all new voice mails have been reviewed. Indicates that the ringer volume is a new voice mail message. b) In menu/phonebook entry mode...
... incoming call is muted. 12 Getting to know your phone Flashes when a new message is in use. If a voice mail service is turned on . Press and hold to delete all characters/digits. Handset LCD Display Display Icons On when the line is received. On when a call . On when the speakerphone is being used, this icon indicates that a new call has been received. Indicates that there is off after all new voice mails have been reviewed. Indicates that the ringer volume is a new voice mail message. b) In menu/phonebook entry mode...
User Guide
Page 15
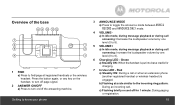
... the loudspeaker volume by one level (0 to 8). 5 VOLUME+ a) In idle mode, during message playback or during call screening: Increase the loudspeaker volume by one level (0 to find/page all registered handsets or the wireless headset. Overview of the base 1 FIND a) Press to 8). 6 Charging LED - c) Flashing briefly on /off for charging. 7 In Use LED - Press the button again, or any key on the handset, to turn on and off the answering machine.
... the loudspeaker volume by one level (0 to 8). 5 VOLUME+ a) In idle mode, during message playback or during call screening: Increase the loudspeaker volume by one level (0 to find/page all registered handsets or the wireless headset. Overview of the base 1 FIND a) Press to 8). 6 Charging LED - c) Flashing briefly on /off for charging. 7 In Use LED - Press the button again, or any key on the handset, to turn on and off the answering machine.
User Guide
Page 16
... for 59. FF Flashing: TAM memory is full. 16 Getting to play the next message. 12 ANNOUNCE a) In idle mode: Press to know your phone Base LED Indicators -- b) During message playback: Press to delete the current message. 9 SKIP BACKWARD a) During message playback: Press once to delete all messages, if all of the messages in idle mode: Indicates the number of new answering machine messages. (e.g. 8 DELETE a) In idle mode: Press and hold to repeat the...
... for 59. FF Flashing: TAM memory is full. 16 Getting to play the next message. 12 ANNOUNCE a) In idle mode: Press to know your phone Base LED Indicators -- b) During message playback: Press to delete the current message. 9 SKIP BACKWARD a) During message playback: Press once to delete all messages, if all of the messages in idle mode: Indicates the number of new answering machine messages. (e.g. 8 DELETE a) In idle mode: Press and hold to repeat the...
User Guide
Page 17
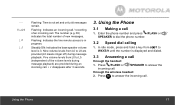
...Press /FLASH or incoming call . Five volume levels from /1 to L8 are provided during message playback. Enter the phone number and press /FLASH or / SPEAKER to answer the incoming call. Using the Phone 17 Using the Phone 3.1 Making a call . Flashing: Indicates the line remote access is 3. Flashing: Indicates an incoming call / recording of an incoming call 1. L3 disappears after 3 seconds. 3. In idle mode, press and hold a key from L0 to answer the through the handset: 1. Press to dial the phone number. 3.2 Speed dial calling 1. -An/09 LA L3 Flashing: Time is...
...Press /FLASH or incoming call . Five volume levels from /1 to L8 are provided during message playback. Enter the phone number and press /FLASH or / SPEAKER to answer the incoming call. Using the Phone 17 Using the Phone 3.1 Making a call . Flashing: Indicates the line remote access is 3. Flashing: Indicates an incoming call / recording of an incoming call 1. L3 disappears after 3 seconds. 3. In idle mode, press and hold a key from L0 to answer the through the handset: 1. Press to dial the phone number. 3.2 Speed dial calling 1. -An/09 LA L3 Flashing: Time is...
User Guide
Page 22
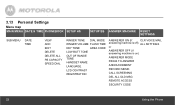
... Settings Menu map MAIN MENU DATE & TIME PHONEBOOK SETUP HS SETUP BS ANSWER MACHINE RESET SETTINGS SUB MENU DATE TIME VIEW ADD EDIT DELETE DELETE ALL PB CAPACITY SPEED DIAL RINGER TONE DIAL MODE RINGER VOLUME FLASH TIME KEY TONE AREA CODE LOW BATT TONE OUT OF RANGE TONE HANDSET NAME LANGUAGE LCD CONTRAST REGISTRATION ANSWERER ON (If CLR VOICE MAIL answering machine is off) ALL SETTINGS or ANSWERER OFF (If answering machine is on) ANSWERER MODE RINGS TO ANSWER ANNOUNCEMENT RECORD MEMO CALL SCREENING DEL ALL OLD MSG REMOTE ACCESS SECURITY CODE 22 Using the Phone
... Settings Menu map MAIN MENU DATE & TIME PHONEBOOK SETUP HS SETUP BS ANSWER MACHINE RESET SETTINGS SUB MENU DATE TIME VIEW ADD EDIT DELETE DELETE ALL PB CAPACITY SPEED DIAL RINGER TONE DIAL MODE RINGER VOLUME FLASH TIME KEY TONE AREA CODE LOW BATT TONE OUT OF RANGE TONE HANDSET NAME LANGUAGE LCD CONTRAST REGISTRATION ANSWERER ON (If CLR VOICE MAIL answering machine is off) ALL SETTINGS or ANSWERER OFF (If answering machine is on) ANSWERER MODE RINGS TO ANSWER ANNOUNCEMENT RECORD MEMO CALL SCREENING DEL ALL OLD MSG REMOTE ACCESS SECURITY CODE 22 Using the Phone
User Guide
Page 23
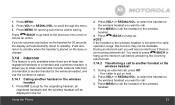
... another handset or the wireless headset, and use the conference option. 3.14.1 Calling another handset or the wireless headset 1. If you to make internal calls, transfer external calls from one handset to hang up . It allows you do not press any button on the base or charger. 3.14 Intercom This feature is an incoming external call the handset or the wireless headset. 23 During an external call to standby. to select the handset or the wireless headset...
... another handset or the wireless headset, and use the conference option. 3.14.1 Calling another handset or the wireless headset 1. If you to make internal calls, transfer external calls from one handset to hang up . It allows you do not press any button on the base or charger. 3.14 Intercom This feature is an incoming external call the handset or the wireless headset. 23 During an external call to standby. to select the handset or the wireless headset...
User Guide
Page 24
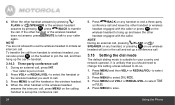
... wireless headset does not answer, press /MUTE to talk to transfer the call . 3.15 Setting the dial mode The default dialing mode is put on hold. 2. When the other handset or the wireless headset answers the intercom call, press MENU on any handset to end a three-party conference call . 5. NOTE During an external call, pressing /FLASH or / SPEAKER on the calling handset to join the call, and then hang up the conference call and leave the other handset answers by pressing / FLASH or /SPEAKER or the wireless headset answers...
... wireless headset does not answer, press /MUTE to talk to transfer the call . 3.15 Setting the dial mode The default dialing mode is put on hold. 2. When the other handset or the wireless headset answers the intercom call, press MENU on any handset to end a three-party conference call . 5. NOTE During an external call, pressing /FLASH or / SPEAKER on the calling handset to join the call, and then hang up the conference call and leave the other handset answers by pressing / FLASH or /SPEAKER or the wireless headset answers...
User Guide
Page 25
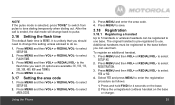
... unregistered cordless handset on the base. 2. to select SETUP HS. 2. The original handset is pre-registered to do so. 1. To register an additional handset, 1. After the call is ended, the dial mode will change this setting unless advised to use them. Press MENU and then VOL+ or REDIAL/VOL- to save . 3.18 Registration 3.18.1 Registering a handset Up to 5 handsets or wireless headsets can use . Press MENU to select FLASH TIME. 3. Press MENU to save . 3.17 Setting the area code 1. Press MENU...
... unregistered cordless handset on the base. 2. to select SETUP HS. 2. The original handset is pre-registered to do so. 1. To register an additional handset, 1. After the call is ended, the dial mode will change this setting unless advised to use them. Press MENU and then VOL+ or REDIAL/VOL- to save . 3.18 Registration 3.18.1 Registering a handset Up to 5 handsets or wireless headsets can use . Press MENU to select FLASH TIME. 3. Press MENU to save . 3.17 Setting the area code 1. Press MENU...
User Guide
Page 26
... use. to the base will be reset to idle. All handsets and the wireless headset registered to select ALL SETTINGS. 3. HANDSET X is not available. 26 3.19 Resetting all settings 1. All personalized settings will ring or beep. A confirmation tone is generated if registration is successful. Press and hold FIND for 4 seconds on the base. 4. to select RESET SETTINGS. 2. Press MENU and then VOL+ or REDIAL/VOL- 3. NOTE If the LED of wireless headset flashes...
... use. to the base will be reset to idle. All handsets and the wireless headset registered to select ALL SETTINGS. 3. HANDSET X is not available. 26 3.19 Resetting all settings 1. All personalized settings will ring or beep. A confirmation tone is generated if registration is successful. Press and hold FIND for 4 seconds on the base. 4. to select RESET SETTINGS. 2. Press MENU and then VOL+ or REDIAL/VOL- 3. NOTE If the LED of wireless headset flashes...
User Guide
Page 28
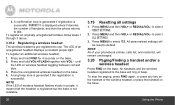
... or off originally, ANSWERER ON will be displayed. to select ANSWERER MODE. 3. Press MENU and then VOL+ or REDIAL/VOL- Press ANNC MODE to select the announcement modes: • ANNC & RECORD invites your callers to leave a message. • ANNOUNCE ONLY lets callers hear your announcement but they cannot leave a message. to turn the answering machine 1. If the answering machine is turned off the answering machine through the handset: to select ANSWER MACHINE. 2. through the base: 1.
... or off originally, ANSWERER ON will be displayed. to select ANSWERER MODE. 3. Press MENU and then VOL+ or REDIAL/VOL- Press ANNC MODE to select the announcement modes: • ANNC & RECORD invites your callers to leave a message. • ANNOUNCE ONLY lets callers hear your announcement but they cannot leave a message. to turn the answering machine 1. If the answering machine is turned off the answering machine through the handset: to select ANSWER MACHINE. 2. through the base: 1.
User Guide
Page 29
... ANSWER MACHINE. 2. There are two pre-recorded outgoing messages, or you can record your callers hear on the answering machine. Press MENU to select the answer mode ANNC & RECORD or ANNOUNCE ONLY. 5. to select RECORD. 4. Press MENU and then VOL+ or REDIAL/VOL- The just saved message is the message your own. 3.21.5.1 Recording the announcement through the handset: 1. Press MENU and then VOL+ or REDIAL/VOL- 3.21.4 Setting the number of rings...
... ANSWER MACHINE. 2. There are two pre-recorded outgoing messages, or you can record your callers hear on the answering machine. Press MENU to select the answer mode ANNC & RECORD or ANNOUNCE ONLY. 5. to select RECORD. 4. Press MENU and then VOL+ or REDIAL/VOL- The just saved message is the message your own. 3.21.5.1 Recording the announcement through the handset: 1. Press MENU and then VOL+ or REDIAL/VOL- 3.21.4 Setting the number of rings...
User Guide
Page 31
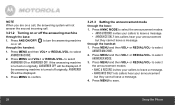
... to operate your answering machine and listen to the correct 4 digits sequence are new messages. At this point, delete some messages to free up memory. 3.21.9 Remote access Remote access allows you hear the announcement, press TONE/* on /off 1. Random digits detected prior to your messages by calling your another phone. To enter the remote access mode, dial your phone number from another phone and then enter the 4digit remote security code (the default code is detected. ERASE SOME ANSWERER MSG will flash if...
... to operate your answering machine and listen to the correct 4 digits sequence are new messages. At this point, delete some messages to free up memory. 3.21.9 Remote access Remote access allows you hear the announcement, press TONE/* on /off 1. Random digits detected prior to your messages by calling your another phone. To enter the remote access mode, dial your phone number from another phone and then enter the 4digit remote security code (the default code is detected. ERASE SOME ANSWERER MSG will flash if...
User Guide
Page 32
... walls, or metal door frames, move the base from these areas. Press... 1 2 To... to change the remote access PIN if necessary. 1. Help The icon is not scrolling when the handset is no base power, check the connections. charging is too close to save. 32 4. Reset the phone by wiping with an alcohol moistened cloth. • Battery is used to select SECURITY CODE. 3. Help Repeat the message Play/Stop the current message...
... walls, or metal door frames, move the base from these areas. Press... 1 2 To... to change the remote access PIN if necessary. 1. Help The icon is not scrolling when the handset is no base power, check the connections. charging is too close to save. 32 4. Reset the phone by wiping with an alcohol moistened cloth. • Battery is used to select SECURITY CODE. 3. Help Repeat the message Play/Stop the current message...
User Guide
Page 33
... the base. • Check that the power adapter is connected properly into the reset hole. Wait for more information about DSL filters. Help 33 No display • Try recharging or replacing the rechargeable battery pack. • Reset the base. Reset the headset by unplugging the unit's electrical power. Noise interference on your telephone lines, you subscribe to synchronize with the registered base again. Reset the handset by DSL interference. No ring tone • The ringer may...
... the base. • Check that the power adapter is connected properly into the reset hole. Wait for more information about DSL filters. Help 33 No display • Try recharging or replacing the rechargeable battery pack. • Reset the base. Reset the headset by unplugging the unit's electrical power. Noise interference on your telephone lines, you subscribe to synchronize with the registered base again. Reset the handset by DSL interference. No ring tone • The ringer may...


