Operating and Installation manual
Page 2
... an extended vacaion 12 Filling water, beans or ground coffee 13 Filling the water tank 13 Filling the bean container 14 Filling ground coffee 14 Preparing drinks 15 Turning on 15 Pre-warming cups 15 Adjusting main dispenser height 16 Coffee and espresso prepared from coffee beans 16 Coffee and espresso prepared from ground coffee 17 Beverages with milk 18 User profile...
... an extended vacaion 12 Filling water, beans or ground coffee 13 Filling the water tank 13 Filling the bean container 14 Filling ground coffee 14 Preparing drinks 15 Turning on 15 Pre-warming cups 15 Adjusting main dispenser height 16 Coffee and espresso prepared from coffee beans 16 Coffee and espresso prepared from ground coffee 17 Beverages with milk 18 User profile...
Operating and Installation manual
Page 6
... parts is void. ~ Defective components should be installed between the coffee system and the appliance. ~ Install or locate this appliance only in accordance with cold, fresh tap water. Do not put anything but coffee beans into the beans container. Contact Miele. ~ Always attach the cord to prevent bacteria or mold growth.... repairs should only be changed daily to the appliance first, then plug it will damage the grinding unit. ~ Do not fill anything but ground coffee or a cleaning tablet (for the brew unit) in any other liquids. ~ Do not let the cord hang over the edge of the...
... parts is void. ~ Defective components should be installed between the coffee system and the appliance. ~ Install or locate this appliance only in accordance with cold, fresh tap water. Do not put anything but coffee beans into the beans container. Contact Miele. ~ Always attach the cord to prevent bacteria or mold growth.... repairs should only be changed daily to the appliance first, then plug it will damage the grinding unit. ~ Do not fill anything but ground coffee or a cleaning tablet (for the brew unit) in any other liquids. ~ Do not let the cord hang over the edge of the...
Operating and Installation manual
Page 9
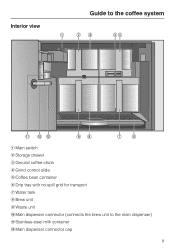
Interior view Guide to the coffee system a Main switch b Storage drawer c Ground coffee chute d Grind control slide e Coffee bean container f Drip tray with no-spill grid for transport g Water tank h Brew unit i Waste unit j Main dispenser connector (connects the brew unit to the main dispenser) k Stainless-steel milk container l Main dispenser connector cap 9
Interior view Guide to the coffee system a Main switch b Storage drawer c Ground coffee chute d Grind control slide e Coffee bean container f Drip tray with no-spill grid for transport g Water tank h Brew unit i Waste unit j Main dispenser connector (connects the brew unit to the main dispenser) k Stainless-steel milk container l Main dispenser connector cap 9

Operating and Installation manual
Page 13
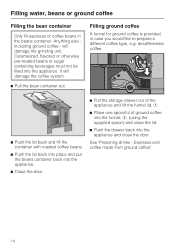
The valve on . Filling water, beans or ground coffee Clean the appliance thoroughly before each day of use deionized or mineral water. mark. The water tank must be washed and filled with fresh, cold ... Do not use . The water tank must be positioned correctly or the valve will leak. Filling the water tank The beans and the water quality is important for a good espresso or coffee. The unit displays a reminder when turned on the water tank ensures that can damage the unit. ^ Pull the water tank...
The valve on . Filling water, beans or ground coffee Clean the appliance thoroughly before each day of use deionized or mineral water. mark. The water tank must be washed and filled with fresh, cold ... Do not use . The water tank must be positioned correctly or the valve will leak. Filling the water tank The beans and the water quality is important for a good espresso or coffee. The unit displays a reminder when turned on the water tank ensures that can damage the unit. ^ Pull the water tank...
Operating and Installation manual
Page 14
... door. Anything else including ground coffee - will damage the coffee system. ^ Pull the bean container out. Filling water, beans or ground coffee Filling the bean container Only fill espresso or coffee beans in case you would like to prepare a different coffee type, e.g. See "Preparing drinks - Filling ground coffee A funnel for ground coffee is provided in the beans container. Espresso and coffee made from ground coffee". 14 Caramelized, flavored or...
... door. Anything else including ground coffee - will damage the coffee system. ^ Pull the bean container out. Filling water, beans or ground coffee Filling the bean container Only fill espresso or coffee beans in case you would like to prepare a different coffee type, e.g. See "Preparing drinks - Filling ground coffee A funnel for ground coffee is provided in the beans container. Espresso and coffee made from ground coffee". 14 Caramelized, flavored or...

Operating and Installation manual
Page 17
... display reverts to the main menu, and you see "Filling water, beans or ground coffee - Otherwise the coffee system assumes that ground coffee is in the machine and dispenses only water the next time coffee is highlighted. Be sure to wait for 2 dispensing cycles to prepare ...place one cup under each spout. Filling ground coffee"), the display shows: Make the coffee? Yes No ^ Tap < or > until "Yes" is made. Preparation will immediately stop. 17 Coffee and espresso prepared from ground coffee After filling the funnel with ground coffee (see "Stop" in the funnel. ...
... display reverts to the main menu, and you see "Filling water, beans or ground coffee - Otherwise the coffee system assumes that ground coffee is in the machine and dispenses only water the next time coffee is highlighted. Be sure to wait for 2 dispensing cycles to prepare ...place one cup under each spout. Filling ground coffee"), the display shows: Make the coffee? Yes No ^ Tap < or > until "Yes" is made. Preparation will immediately stop. 17 Coffee and espresso prepared from ground coffee After filling the funnel with ground coffee (see "Stop" in the funnel. ...
Operating and Installation manual
Page 18
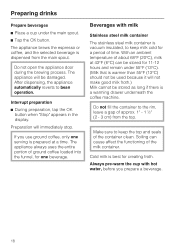
...beverage is dispensed from the top. The appliance will immediately stop. Preparation will be damaged. Make sure to keep the top and seals of ground coffee loaded into the funnel, for 11-12 hours and remain under the main spout. ^ Tap the OK button. After dispensing, the appliance...cold for creating froth. Interrupt preparation ^ During preparation, tap the OK button when "Stop" appears in the display. Do not fill the container to bean operation. Preparing drinks Prepare beverages ^ Place a cup under 55°F (13°C). (Milk that is warmer than 55°F (13°C) should...
...beverage is dispensed from the top. The appliance will immediately stop. Preparation will be damaged. Make sure to keep the top and seals of ground coffee loaded into the funnel, for 11-12 hours and remain under the main spout. ^ Tap the OK button. After dispensing, the appliance...cold for creating froth. Interrupt preparation ^ During preparation, tap the OK button when "Stop" appears in the display. Do not fill the container to bean operation. Preparing drinks Prepare beverages ^ Place a cup under 55°F (13°C). (Milk that is warmer than 55°F (13°C) should...

Operating and Installation manual
Page 21
...be adjusted to a finer setting. - The grinder should be built up because the beans have been ground too fine and the coffee will be bitter. If the crema is very dark brown on the other, the ground coffee is too coarse. - If the slide control will be adjusted: - The grinder ...time and let the beans grind before adjusting another notch. If the espresso only trickles into the cup, the pressure cannot be able to feel the notches when moving the slide control. Adjusting the coffee grinder The finer the coffee beans are ground determines the strength of the coffee and the quality ...
...be adjusted to a finer setting. - The grinder should be built up because the beans have been ground too fine and the coffee will be bitter. If the crema is very dark brown on the other, the ground coffee is too coarse. - If the slide control will be adjusted: - The grinder ...time and let the beans grind before adjusting another notch. If the espresso only trickles into the cup, the pressure cannot be able to feel the notches when moving the slide control. Adjusting the coffee grinder The finer the coffee beans are ground determines the strength of the coffee and the quality ...
Operating and Installation manual
Page 49
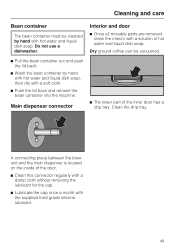
...the lid back. ^ Wash the bean container by hand with the supplied food grade silicone lubricant. 49 Interior and door ^ Once all movable parts are removed clean the interior with a solution of the inner door has a drip tray. Clean the drip tray. Dry ground coffee can be cleaned by hand with ...hot water and liquid dish soap, then dry with a soft cloth. ^ Push the lid back and reinsert the bean container into the machine. Main dispenser connector ^ The lower part of hot water...
...the lid back. ^ Wash the bean container by hand with the supplied food grade silicone lubricant. 49 Interior and door ^ Once all movable parts are removed clean the interior with a solution of the inner door has a drip tray. Clean the drip tray. Dry ground coffee can be cleaned by hand with ...hot water and liquid dish soap, then dry with a soft cloth. ^ Push the lid back and reinsert the bean container into the machine. Main dispenser connector ^ The lower part of hot water...

Operating and Installation manual
Page 59
...The drip tray is empty but no ground coffee was inserted. Clean and dry the contacts. - If the message still appears contact Technical Service. 59 Instead of coffee only water is inserted correctly. - Possible fault Solution - Pull the bean container out and push it is ...displayed. Check if the drip tray is dispensed. The ground coffee funnel cover was selected but a message to continue after...
...The drip tray is empty but no ground coffee was inserted. Clean and dry the contacts. - If the message still appears contact Technical Service. 59 Instead of coffee only water is inserted correctly. - Possible fault Solution - Pull the bean container out and push it is ...displayed. Check if the drip tray is dispensed. The ground coffee funnel cover was selected but a message to continue after...


