Operating and Installation manual
Page 5
Please contact the Miele Technical Service Department with national and local safety regulations. IMPORTANT SAFETY INSTRUCTIONS Technical safety ~ Before installing the appliance, check for installation in mobile installations such ... is designed for an extended period of overheating and open . it is open ground circuit). ~ If the appliance is damaged, the machine repaired or faulty parts replaced. - Do not close the door front when the appliance is in doubt, consult a qualified technician. ~ Be certain your appliance is shut off when not...
Please contact the Miele Technical Service Department with national and local safety regulations. IMPORTANT SAFETY INSTRUCTIONS Technical safety ~ Before installing the appliance, check for installation in mobile installations such ... is designed for an extended period of overheating and open . it is open ground circuit). ~ If the appliance is damaged, the machine repaired or faulty parts replaced. - Do not close the door front when the appliance is in doubt, consult a qualified technician. ~ Be certain your appliance is shut off when not...
Operating and Installation manual
Page 6
... or a cleaning tablet (for the brew unit) in the beans container, it into the lighting - Warm or hot water, or any manner. Contact Miele. ~ Always attach the cord to persons do not submerge the cord or plugs in water or other liquids. ~ Do not let the cord hang over...water. Do not put anything but coffee beans into the beans container. Otherwise the warranty is under warranty repairs should only be performed by Miele original spare parts only. Risk of the appliance. Flavored milk products contain substances that can damage the unit. ~ Do not put ground coffee in the ...
... or a cleaning tablet (for the brew unit) in the beans container, it into the lighting - Warm or hot water, or any manner. Contact Miele. ~ Always attach the cord to persons do not submerge the cord or plugs in water or other liquids. ~ Do not let the cord hang over...water. Do not put anything but coffee beans into the beans container. Otherwise the warranty is under warranty repairs should only be performed by Miele original spare parts only. Risk of the appliance. Flavored milk products contain substances that can damage the unit. ~ Do not put ground coffee in the ...
Operating and Installation manual
Page 7
...are dishwasher-safe except for more often. ~ Only use the descaling tablets provided by the appliance manufacturer may clog. Turn the machine off parts. SAVE THESE INSTRUCTIONS AND REVIEW THEM PERIODICALLY 7 Pressurized steam could get clogged. ~ Do not hang, lean, sit or place heavy items...Depending on and taking off at the main switch when not in a trash can damage the appliance! Never hold any parts of accessory attachments not recommended by Miele. Clean the brew unit every 200 cups with an alcohol-coffee mixture underneath the main dispenser. The machine could cause...
...are dishwasher-safe except for more often. ~ Only use the descaling tablets provided by the appliance manufacturer may clog. Turn the machine off parts. SAVE THESE INSTRUCTIONS AND REVIEW THEM PERIODICALLY 7 Pressurized steam could get clogged. ~ Do not hang, lean, sit or place heavy items...Depending on and taking off at the main switch when not in a trash can damage the appliance! Never hold any parts of accessory attachments not recommended by Miele. Clean the brew unit every 200 cups with an alcohol-coffee mixture underneath the main dispenser. The machine could cause...
Operating and Installation manual
Page 15
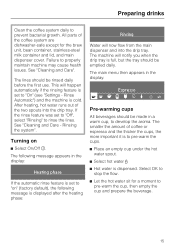
... following message is displayed after the heating phase: Rinsing Water will happen automatically if the rinsing feature is set to "on ^ Select On/Off s. All parts of coffee or espresso and the thicker the cups, the more important it is to rinse the lines. Select OK to stop the flow. ^ Let...
... following message is displayed after the heating phase: Rinsing Water will happen automatically if the rinsing feature is set to "on ^ Select On/Off s. All parts of coffee or espresso and the thicker the cups, the more important it is to rinse the lines. Select OK to stop the flow. ^ Let...
Operating and Installation manual
Page 41
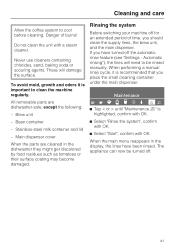
...confirm with OK. ^ Select "Rinse the system", confirm with OK. ^ Select "Start", confirm with a steam cleaner. Main dispenser cover When the parts are dishwasher-safe, except the following: - Automatic rinsing"), the lines will damage the surface. When the main menu reappears in the dishwasher they might ... damaged. Never use cleaners containing chlorides, sand, baking soda or scouring agents. Do not clean the unit with OK. All removable parts are cleaned in the display, the lines have turned off for an extended period of burns! Rinsing the system Before switching your machine...
...confirm with OK. ^ Select "Rinse the system", confirm with OK. ^ Select "Start", confirm with a steam cleaner. Main dispenser cover When the parts are dishwasher-safe, except the following: - Automatic rinsing"), the lines will damage the surface. When the main menu reappears in the dishwasher they might ... damaged. Never use cleaners containing chlorides, sand, baking soda or scouring agents. Do not clean the unit with OK. All removable parts are cleaned in the display, the lines have turned off for an extended period of burns! Rinsing the system Before switching your machine...
Operating and Installation manual
Page 44
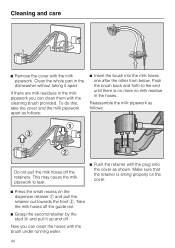
Push the brush back and forth to leak. ^ Push the retainer with the brush under running water. 44 Clean the whole part in the dishwasher without taking it up and off the retainers. This may cause the milk pipework to the end until there is sitting properly ...
Push the brush back and forth to leak. ^ Push the retainer with the brush under running water. 44 Clean the whole part in the dishwasher without taking it up and off the retainers. This may cause the milk pipework to the end until there is sitting properly ...
Operating and Installation manual
Page 46
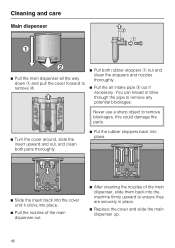
...are securely in place. ^ Replace the cover and slide the main dispenser up. 46 Never use a sharp object to remove blockages, this could damage the parts. ^ Turn the cover around, slide the insert upward and out, and clean both rubber stoppers a out and clean the stoppers and nozzles thoroughly. ^... if necessary. Cleaning and care Main dispenser ^ Pull the main dispenser all the way down a and pull the cover forward to remove b. ^ Pull both parts thoroughly. ^ Put the rubber stoppers back into place. ^ Slide the insert back into the cover until it clicks into place. ^ Pull the nozzles of ...
...are securely in place. ^ Replace the cover and slide the main dispenser up. 46 Never use a sharp object to remove blockages, this could damage the parts. ^ Turn the cover around, slide the insert upward and out, and clean both rubber stoppers a out and clean the stoppers and nozzles thoroughly. ^... if necessary. Cleaning and care Main dispenser ^ Pull the main dispenser all the way down a and pull the cover forward to remove b. ^ Pull both parts thoroughly. ^ Put the rubber stoppers back into place. ^ Slide the insert back into the cover until it clicks into place. ^ Pull the nozzles of ...
Operating and Installation manual
Page 49
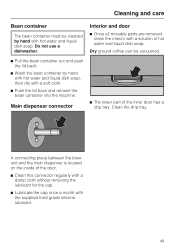
Do not use a dishwasher. Clean the drip tray. Interior and door ^ Once all movable parts are removed clean the interior with hot water and liquid dish soap. Cleaning and care Bean container The bean container must be vacuumed. ^ Pull the ... between the brew unit and the main dispenser is located on the inside of the inner door has a drip tray. Main dispenser connector ^ The lower part of the door. ^ Clean this connector regularly with a damp cloth without removing the lubricant for the cap. ^ Lubricate the cap once a month with a soft cloth...
Do not use a dishwasher. Clean the drip tray. Interior and door ^ Once all movable parts are removed clean the interior with hot water and liquid dish soap. Cleaning and care Bean container The bean container must be vacuumed. ^ Pull the ... between the brew unit and the main dispenser is located on the inside of the inner door has a drip tray. Main dispenser connector ^ The lower part of the door. ^ Clean this connector regularly with a damp cloth without removing the lubricant for the cap. ^ Lubricate the cap once a month with a soft cloth...

Operating and Installation manual
Page 50
... warm water. Dry coffee grounds can be inserted properly. ^ Rub off any coffee residue from sticking. ^ Clean the interior and remove coffee residues. The movable parts are lubricated and the gaskets will cause damage. ^ Take out the water tank, waste unit and the storage drawer. ^ Press the light colored button on...
... warm water. Dry coffee grounds can be inserted properly. ^ Rub off any coffee residue from sticking. ^ Clean the interior and remove coffee residues. The movable parts are lubricated and the gaskets will cause damage. ^ Take out the water tank, waste unit and the storage drawer. ^ Press the light colored button on...
Operating and Installation manual
Page 56
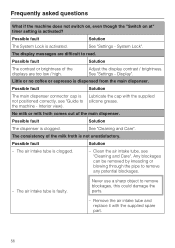
...is clogged. Display". the machine - See "Settings - The consistency of the displays are difficult to remove blockages, this could damage the parts. - The display messages are too low / high. Possible fault Solution The dispenser is activated? Possible fault Solution - The air intake... See "Settings - Possible fault Solution The contrast or brightness of the milk froth is Lubricate the cap with the supplied spare part. 56 Adjust the display contrast / brightness. No milk or milk froth comes out of the main dispenser. The air intake ...
...is clogged. Display". the machine - See "Settings - The consistency of the displays are difficult to remove blockages, this could damage the parts. - The display messages are too low / high. Possible fault Solution The dispenser is activated? Possible fault Solution - The air intake... See "Settings - Possible fault Solution The contrast or brightness of the milk froth is Lubricate the cap with the supplied spare part. 56 Adjust the display contrast / brightness. No milk or milk froth comes out of the main dispenser. The air intake ...
Operating and Installation manual
Page 60
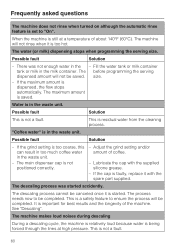
... main dispenser cap is dispensed, the flow stops automatically. Adjust the grind setting and/or amount of the machine. Lubricate the cap with the spare part supplied. If the cap is faulty, replace it is a safety feature to "On". The descaling process was not enough water in the - This is too...
... main dispenser cap is dispensed, the flow stops automatically. Adjust the grind setting and/or amount of the machine. Lubricate the cap with the spare part supplied. If the cap is faulty, replace it is a safety feature to "On". The descaling process was not enough water in the - This is too...
Operating and Installation manual
Page 63
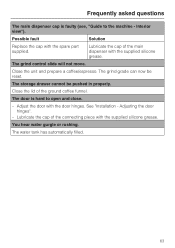
The grind grade can now be pushed in properly. Adjust the door with the spare part supplied. Close the unit and prepare a coffee/espresso. See "Installation - Adjusting the door hinges". - You hear water gurgle or rushing. Interior view"). Close the lid ...
The grind grade can now be pushed in properly. Adjust the door with the spare part supplied. Close the unit and prepare a coffee/espresso. See "Installation - Adjusting the door hinges". - You hear water gurgle or rushing. Interior view"). Close the lid ...
Operating and Installation manual
Page 65
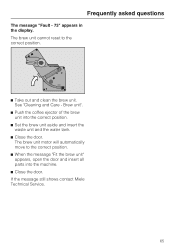
... the display. The brew unit cannot reset to the correct position. ^ When the message "Fit the brew unit" appears, open the door and insert all parts into the correct position. ^ Set the brew unit aside and insert the waste unit and the water tank. ^ Close the door. The brew unit motor... will automatically move to the correct position. ^ Take out and clean the brew unit. If the message still shows contact Miele Technical Service. 65 Brew unit". ^ Push the coffee ejector of the brew unit into the machine. ^ Close the door. See "Cleaning and Care...
... the display. The brew unit cannot reset to the correct position. ^ When the message "Fit the brew unit" appears, open the door and insert all parts into the correct position. ^ Set the brew unit aside and insert the waste unit and the water tank. ^ Close the door. The brew unit motor... will automatically move to the correct position. ^ Take out and clean the brew unit. If the message still shows contact Miele Technical Service. 65 Brew unit". ^ Push the coffee ejector of the brew unit into the machine. ^ Close the door. See "Cleaning and Care...
Operating and Installation manual
Page 66
... is the only Extended Service Contract in writing by Miele's Service department, Extended Service Contracts offered by other providers for Miele products will not be recognized by a Miele Authorized Service Provider using genuine Miele parts. Our goal is covered by factory trained professionals can...MieleCare (USA only) MieleCare, our Extended Service Contract program, gives you the assurance of knowing that guarantees repairs by Miele. Only genuine Miele parts installed by 5 years of worry free ownership. After sales service In the event of a fault which you cannot easily...
... is the only Extended Service Contract in writing by Miele's Service department, Extended Service Contracts offered by other providers for Miele products will not be recognized by a Miele Authorized Service Provider using genuine Miele parts. Our goal is covered by factory trained professionals can...MieleCare (USA only) MieleCare, our Extended Service Contract program, gives you the assurance of knowing that guarantees repairs by Miele. Only genuine Miele parts installed by 5 years of worry free ownership. After sales service In the event of a fault which you cannot easily...


