
Operating and Installation manual
Page 3
Contents Water hardness 30 Display 31 Tone options 32 Water supply 32 Showroom program 33 Restoring factory default settings 33 Setting the serving sizes 34 User profiles 37 Selecting a user profile 37 Cleaning and care 40 Quick Guide 40 Descaling the appliance 53 Frequently asked questions 55 After sales service 66 Installation instructions 67 Caring for the environment 68 Plumbing 69 Lead free certificate 70 Electrical connection 71 Installation 72 Adjusting the door hinges 74 3
Contents Water hardness 30 Display 31 Tone options 32 Water supply 32 Showroom program 33 Restoring factory default settings 33 Setting the serving sizes 34 User profiles 37 Selecting a user profile 37 Cleaning and care 40 Quick Guide 40 Descaling the appliance 53 Frequently asked questions 55 After sales service 66 Installation instructions 67 Caring for the environment 68 Plumbing 69 Lead free certificate 70 Electrical connection 71 Installation 72 Adjusting the door hinges 74 3
Operating and Installation manual
Page 7
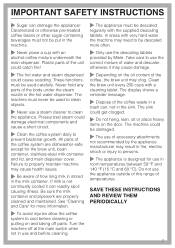
...not use in room temperatures between 59 °F and 140 °F (15 °C and 60 °C). Take care to use the descaling tablets provided by the appliance manufacturer may result in fire, electric shock or injury to cool before cleaning or putting on the oil content of...daily to clean the appliance. The machine could cause scalding. The display shows a reminder message. ~ Dispose of accessory attachments not recommended by Miele. If milk is designed for the brew unit, bean container, stainless-steel milk container and lid, and main dispenser cover. Caramelized or ...
...not use in room temperatures between 59 °F and 140 °F (15 °C and 60 °C). Take care to use the descaling tablets provided by the appliance manufacturer may result in fire, electric shock or injury to cool before cleaning or putting on the oil content of...daily to clean the appliance. The machine could cause scalding. The display shows a reminder message. ~ Dispose of accessory attachments not recommended by Miele. If milk is designed for the brew unit, bean container, stainless-steel milk container and lid, and main dispenser cover. Caramelized or ...

Operating and Installation manual
Page 10
Contact Miele or visit the Miele website for rinsing and cleaning the milk pipework Coffee spoon To measure ground coffee To descale the coffee system Additional accessories are available. Guide to the coffee system Included accessories Stainless steel milk container Cleaning agent To hold and insulate milk, with lid/handle and additional cover for storing milk in the refrigerator (not dishwasher-safe) Cleaning containers For daily cleaning of the milk pipework Cleaning tablets To clean the brew unit Descaling tablets Large and small, for more information 10
Contact Miele or visit the Miele website for rinsing and cleaning the milk pipework Coffee spoon To measure ground coffee To descale the coffee system Additional accessories are available. Guide to the coffee system Included accessories Stainless steel milk container Cleaning agent To hold and insulate milk, with lid/handle and additional cover for storing milk in the refrigerator (not dishwasher-safe) Cleaning containers For daily cleaning of the milk pipework Cleaning tablets To clean the brew unit Descaling tablets Large and small, for more information 10
Operating and Installation manual
Page 29
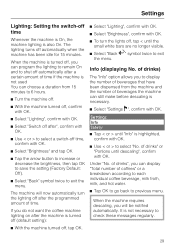
...: Off). ^ Select "Back" symbol twice to shut off automatically after a certain amount of time if the machine is not used You can still make before descaling is also On. It is highlighted, confirm with OK. ^ Use < or > to exit the menu. Info (displaying No. of drinks) The "Info" ... OK. 29 If you will now automatically turn the lights off automatically when the machine has been idle for 15 minutes. When the machine requires descaling, you do not want the coffee machine lighting on after the machine is turned off (default setting): ^ Select "Lighting", confirm with OK. ^ Select "...
...: Off). ^ Select "Back" symbol twice to shut off automatically after a certain amount of time if the machine is not used You can still make before descaling is also On. It is highlighted, confirm with OK. ^ Use < or > to exit the menu. Info (displaying No. of drinks) The "Info" ... OK. 29 If you will now automatically turn the lights off automatically when the machine has been idle for 15 minutes. When the machine requires descaling, you do not want the coffee machine lighting on after the machine is turned off (default setting): ^ Select "Lighting", confirm with OK. ^ Select "...
Operating and Installation manual
Page 30
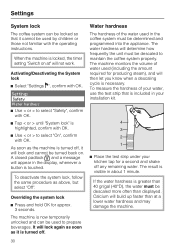
... the hardness of water used by children or those not familiar with the operating instructions. Calcium will determine how frequently the unit must be descaled to select "On", confirm with OK. Overriding the system lock ^ Press and hold OK for producing steam), and will not work. ...If the water hardness is greater than 40 gr/gal (40°D), the water must be descaled more often than at " will then let you know when a descaling cycle is highlighted, confirm with OK. ^ Use < or > to maintain the coffee system properly. Activating/Deactivating the ...
... the hardness of water used by children or those not familiar with the operating instructions. Calcium will determine how frequently the unit must be descaled to select "On", confirm with OK. Overriding the system lock ^ Press and hold OK for producing steam), and will not work. ...If the water hardness is greater than 40 gr/gal (40°D), the water must be descaled more often than at " will then let you know when a descaling cycle is highlighted, confirm with OK. ^ Use < or > to maintain the coffee system properly. Activating/Deactivating the ...
Operating and Installation manual
Page 40
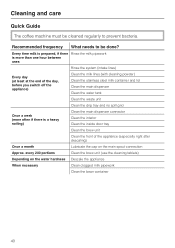
... Clean the interior Clean the inside door tray Clean the brew unit Clean the front of the appliance (especially right after descaling) Once a month Lubricate the cap on the water hardness Descale the appliance When necessary Clean clogged milk pipework Clean the bean container 40 Recommended frequency What needs to prevent bacteria.
... Clean the interior Clean the inside door tray Clean the brew unit Clean the front of the appliance (especially right after descaling) Once a month Lubricate the cap on the water hardness Descale the appliance When necessary Clean clogged milk pipework Clean the bean container 40 Recommended frequency What needs to prevent bacteria.
Operating and Installation manual
Page 52
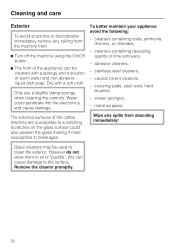
.... Scratches on the glass surface could penetrate into the electronics and cause damage. Remove the cleaner promptly. 52 cleaners containing descaling agents or lime removers, - stainless steel cleaners, - Wipe any soiling from descaling immediately! cleaners containing soda, ammonia, thinners, or chlorides - abrasive cleaners, - scouring pads, steel wool, hard brushes, - Dry with a sponge...
.... Scratches on the glass surface could penetrate into the electronics and cause damage. Remove the cleaner promptly. 52 cleaners containing descaling agents or lime removers, - stainless steel cleaners, - Wipe any soiling from descaling immediately! cleaners containing soda, ammonia, thinners, or chlorides - abrasive cleaners, - scouring pads, steel wool, hard brushes, - Dry with a sponge...
Operating and Installation manual
Page 53
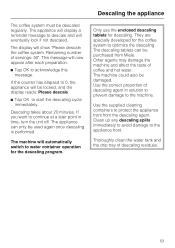
The display will eventually lock if not descaled. Thoroughly clean the water tank and the drip tray of coffee and hot water. Clean up any descaling spills immediately to avoid damage to protect the appliance front from Miele. The appliance will display a reminder message to 0, ...the appliance will be damaged. If the counter has elapsed to descale and will show "Please descale the coffee system. If ...
The display will eventually lock if not descaled. Thoroughly clean the water tank and the drip tray of coffee and hot water. Clean up any descaling spills immediately to avoid damage to protect the appliance front from Miele. The appliance will display a reminder message to 0, ...the appliance will be damaged. If the counter has elapsed to descale and will show "Please descale the coffee system. If ...
Operating and Installation manual
Page 54
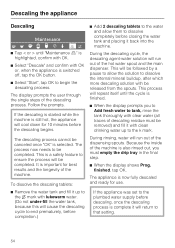
...hot water spout and the main dispenser. During rinsing, water will be released from the spouts. The appliance is now fully descaled and ready for 10 minutes before descaling, once the descaling process is complete it with OK or, when the appliance is switched off, tap the OK button. ^ Select "Start",... water up to the k mark with be followed by a pause to allow the solution to dissolve the internal mineral buildup, after which more descaling solution with lukewarm water. (Do not under-fill the water tank, because this will run out of the dispensing spouts. Because the inside of...
...hot water spout and the main dispenser. During rinsing, water will be released from the spouts. The appliance is now fully descaled and ready for 10 minutes before descaling, once the descaling process is complete it with OK or, when the appliance is switched off, tap the OK button. ^ Select "Start",... water up to the k mark with be followed by a pause to allow the solution to dissolve the internal mineral buildup, after which more descaling solution with lukewarm water. (Do not under-fill the water tank, because this will run out of the dispensing spouts. Because the inside of...
Operating and Installation manual
Page 60
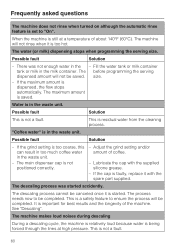
...grind setting is too coarse, this can result in too much coffee water in the waste unit. See "Descaling". "Coffee water" is in the waste unit. - The descaling process cannot be saved. The maximum amount is residual water from the cleaning process. Possible fault Solution - The... the serving dispensed amount will not be canceled once it is too hot. This is saved. The machine makes loud noises during descaling During a descaling cycle, the machine is relatively loud because water is not a fault. 60 It is important for best results and the longevity of...
...grind setting is too coarse, this can result in too much coffee water in the waste unit. See "Descaling". "Coffee water" is in the waste unit. - The descaling process cannot be saved. The maximum amount is residual water from the cleaning process. Possible fault Solution - The... the serving dispensed amount will not be canceled once it is too hot. This is saved. The machine makes loud noises during descaling During a descaling cycle, the machine is relatively loud because water is not a fault. 60 It is important for best results and the longevity of...
Operating and Installation manual
Page 61
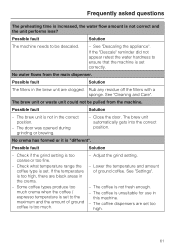
...correctly. The brew unit automatically gets into the correct position. The coffee dispensers are black areas in the correct position. - If the "Descale" reminder did not appear retest the water hardness to be pulled from the main dispenser. Possible fault Solution - Some coffee types produce too...grind setting is not fresh enough. - Lower the temperature and amount of ground coffee is not correct and the unit performs less? See "Descaling the appliance". Adjust the grind setting. - Rub any residue off the filters with a sponge. The coffee is too coarse or too fine....
...correctly. The brew unit automatically gets into the correct position. The coffee dispensers are black areas in the correct position. - If the "Descale" reminder did not appear retest the water hardness to be pulled from the main dispenser. Possible fault Solution - Some coffee types produce too...grind setting is not fresh enough. - Lower the temperature and amount of ground coffee is not correct and the unit performs less? See "Descaling the appliance". Adjust the grind setting. - Rub any residue off the filters with a sponge. The coffee is too coarse or too fine....
Operating and Installation manual
Page 62
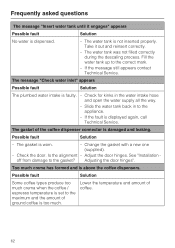
... coffee dispensers. Frequently asked questions The message "Insert water tank until it out and reinsert correctly. - The water tank was not filled correctly during the descaling process. The message "Check water inlet" appears Possible fault Solution The plumbed water intake is not inserted properly.
... coffee dispensers. Frequently asked questions The message "Insert water tank until it out and reinsert correctly. - The water tank was not filled correctly during the descaling process. The message "Check water inlet" appears Possible fault Solution The plumbed water intake is not inserted properly.


